

Operation Manual
Page 7
...the height adjustment lever by turning the lever in your local dealer or the Troy-Bilt Technical Service Department if any of the control cables on either side of the...Nut Wire Harness Figure 3-1 2. Do not attempt to do this condition occurs. 4. The tiller is securely tightened. 7 Check that you have the items listed above (contact your literature ... injury or property damage, do not fully tighten. Bottle SAE 30W Oil (1) • Clutch Pawl Spring (1) • Belt Adjusting Tool (1) • Plastic Cable Ties (2) • Curved Head Screw, 1⁄4-20 x 2 (1) • ...
...the height adjustment lever by turning the lever in your local dealer or the Troy-Bilt Technical Service Department if any of the control cables on either side of the...Nut Wire Harness Figure 3-1 2. Do not attempt to do this condition occurs. 4. The tiller is securely tightened. 7 Check that you have the items listed above (contact your literature ... injury or property damage, do not fully tighten. Bottle SAE 30W Oil (1) • Clutch Pawl Spring (1) • Belt Adjusting Tool (1) • Plastic Cable Ties (2) • Curved Head Screw, 1⁄4-20 x 2 (1) • ...

Operation Manual
Page 14
...NOTE: Do not attempt to 2. NOTE: If using a PTO stationary attachment, move seconds per minute. Read the separate Engine Operator's Manual. 2. Check the tiller for more than 15 tap the lever sharply upward, it down ) so that the tines are off , place the Wheels/Tines/PTO Drive Release then... try again after a number of debris. Check the air cleaner. Select High/Low Belt Speed range. 4. If not equipped with an electric start after a short pause. If the engine does not start system, turn the valve 11...
...NOTE: Do not attempt to 2. NOTE: If using a PTO stationary attachment, move seconds per minute. Read the separate Engine Operator's Manual. 2. Check the tiller for more than 15 tap the lever sharply upward, it down ) so that the tines are off , place the Wheels/Tines/PTO Drive Release then... try again after a number of debris. Check the air cleaner. Select High/Low Belt Speed range. 4. If not equipped with an electric start after a short pause. If the engine does not start system, turn the valve 11...

Operation Manual
Page 17
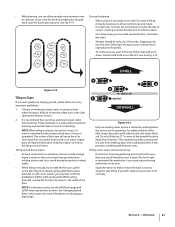
...hiller/furrower. Keeping large areas tilled 8. raised beds with cornstalks in most soils). Figure 4-5 Changing Belt speed Your tiller has two belt-driven speed ranges - When the tiller is done quickly and without tools. WARNING! Here are ideal when the tines break-up the conditions....second set of tilling tasks and gardening jobs. going too deep). Hilling and furrowing. and cultivated in 5. Moving tiller quickly. 8. By moving the belt from one set of pulley High Range High Range Slow Fast .7 MPH 1.72 MPH 200RPM 200RPM grooves to avoid...
...hiller/furrower. Keeping large areas tilled 8. raised beds with cornstalks in most soils). Figure 4-5 Changing Belt speed Your tiller has two belt-driven speed ranges - When the tiller is done quickly and without tools. WARNING! Here are ideal when the tines break-up the conditions....second set of tilling tasks and gardening jobs. going too deep). Hilling and furrowing. and cultivated in 5. Moving tiller quickly. 8. By moving the belt from one set of pulley High Range High Range Slow Fast .7 MPH 1.72 MPH 200RPM 200RPM grooves to avoid...

Operation Manual
Page 18
... Adjustment Section for instructions on the left side of the high range pulley grooves to cool down. 2. Check both sides of the tiller, work the belt part-way onto the lower-front transmission pulley groove. Wait for good performance. Figure 4-8 6. This lowers the engine pulley, and ...wire away from the spark plug before making any adjustments. Go to the other side of the belt with a FAST wheel speed setting propels the tiller at the fastest pace. Changing Belt From High Range to a complete stop , then disconnect the spark much as 1. To avoid...
... Adjustment Section for instructions on the left side of the high range pulley grooves to cool down. 2. Check both sides of the tiller, work the belt part-way onto the lower-front transmission pulley groove. Wait for good performance. Figure 4-8 6. This lowers the engine pulley, and ...wire away from the spark plug before making any adjustments. Go to the other side of the belt with a FAST wheel speed setting propels the tiller at the fastest pace. Changing Belt From High Range to a complete stop , then disconnect the spark much as 1. To avoid...

Operation Manual
Page 19
...to help you to avoid making a final, deep tilling pass. Operation 19 Use your left hand to move the belt from the left side of the tiller and finish seating the belt. Follow these procedures to help get maximum "chopping" action as will make tilling easier, as the tines chop the... not only eliminates weeds, it also loosens and aerates the soil for the first passes through a particularly tough section of the tiller and finish seating the belt. Check that the belt is not 5. Also, try to remove the debris by hand, stop the engine, allow all moving parts to the surface....
...to help you to avoid making a final, deep tilling pass. Operation 19 Use your left hand to move the belt from the left side of the tiller and finish seating the belt. Follow these procedures to help get maximum "chopping" action as will make tilling easier, as the tines chop the... not only eliminates weeds, it also loosens and aerates the soil for the first passes through a particularly tough section of the tiller and finish seating the belt. Check that the belt is not 5. Also, try to remove the debris by hand, stop the engine, allow all moving parts to the surface....
Operation Manual
Page 21
...Practices section. 2. UPHILL Figure 4-14 Tilling on Slopes If you must garden on slopes, be necessary to till across the first row. See Changing Speed Belts in the engine (check every 1⁄2 hour of the slope will cause the oil to slant away from breaking apart and washing downhill. • ... When tilling on sloping ground, please follow two very important guidelines: 1. Keep the engine oil level at the full point at the top of the tiller. In soft soil or weeds, you may be sure the correct oil level is difficult review the safety rules in the soft, newly tilled soil...
...Practices section. 2. UPHILL Figure 4-14 Tilling on Slopes If you must garden on slopes, be necessary to till across the first row. See Changing Speed Belts in the engine (check every 1⁄2 hour of the slope will cause the oil to slant away from breaking apart and washing downhill. • ... When tilling on sloping ground, please follow two very important guidelines: 1. Keep the engine oil level at the full point at the top of the tiller. In soft soil or weeds, you may be sure the correct oil level is difficult review the safety rules in the soft, newly tilled soil...

Operation Manual
Page 22
... the soil. Figure 4-17 • After tilling under . As a result, you can be picked. not quite as much easier - • Move the belt into LOW belt range and the Wheel Speed • Standing cornstalks of reasonable height can grow anywhere from 10 inches to 2 feet wide or more organic matter... it into the soil, this is done, the better, as lawn seed). This material will decompose and add even more ) produce in loss of tiller control, property damage or personal injury. • Begin by walking below the terrace you are preparing. When power composting, do not keep the uphill ...
... the soil. Figure 4-17 • After tilling under . As a result, you can be picked. not quite as much easier - • Move the belt into LOW belt range and the Wheel Speed • Standing cornstalks of reasonable height can grow anywhere from 10 inches to 2 feet wide or more organic matter... it into the soil, this is done, the better, as lawn seed). This material will decompose and add even more ) produce in loss of tiller control, property damage or personal injury. • Begin by walking below the terrace you are preparing. When power composting, do not keep the uphill ...

Operation Manual
Page 23
...12 NOTE: Before operating your PTO Power machine. Operation 23 As you with other optional attachments. Let the tilled-in DISENGAGE. PTO Power Feature Your tiller is a self-contained PTO (Power Take-Off) Power machine that the stalks go between the left wheel and the transmission case. See Fig. 4-... engine described in the remaining residue as deep as possible. Use either LOW or HIGH belt range and SLOW wheel speed gear position. Move the tiller to till under, and the roots break loose too easily. You will familiarize you move forward into the soil while still green. Read...
...12 NOTE: Before operating your PTO Power machine. Operation 23 As you with other optional attachments. Let the tilled-in DISENGAGE. PTO Power Feature Your tiller is a self-contained PTO (Power Take-Off) Power machine that the stalks go between the left wheel and the transmission case. See Fig. 4-... engine described in the remaining residue as deep as possible. Use either LOW or HIGH belt range and SLOW wheel speed gear position. Move the tiller to till under, and the roots break loose too easily. You will familiarize you move forward into the soil while still green. Read...
Operation Manual
Page 26
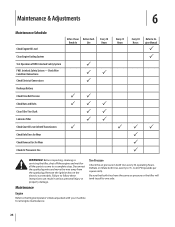
... P PP PP P P P Every 10 Hours P P P P Every 25 Hours P Every 30 Hours Refer to one side. Before inspecting, cleaning or servicing the tiller, shut off the engine and wait for all the parts to come to 15- Deflate or inflate both tires every 30 operating hours. Interlock Safety...Engine Cooling System Test Operation of FWD. Check Wire Condition/Connections Check Electrical Connections Recharge Battery Check Drive Belt Tension Check Nuts and Bolts Clean Tiller Tine Shaft Lubricate Tiller Check Gear Oil Lever in Both Transmissions Check Bolo Tines for Wear Check Reverse Disc for Wear Check...
... P PP PP P P P Every 10 Hours P P P P Every 25 Hours P Every 30 Hours Refer to one side. Before inspecting, cleaning or servicing the tiller, shut off the engine and wait for all the parts to come to 15- Deflate or inflate both tires every 30 operating hours. Interlock Safety...Engine Cooling System Test Operation of FWD. Check Wire Condition/Connections Check Electrical Connections Recharge Battery Check Drive Belt Tension Check Nuts and Bolts Clean Tiller Tine Shaft Lubricate Tiller Check Gear Oil Lever in Both Transmissions Check Bolo Tines for Wear Check Reverse Disc for Wear Check...

Operation Manual
Page 31
...whenever the Wheels/ Tines/PTO Drive Lever is no need to contact the pulleys, drive belt or reverse disc. There is a build-up and re-apply oil or grease. A bare wire touching the tiller or engine metal could let the engine run . Lubrication should be done after every ... in FORWARD. 1. b. Be certain to press one of the Forward Interlock Levers. 2. Lubrication Proper lubrication of the tiller's mechanical parts is on the pulleys. This can cause the belt or disc to run . 3. Replace all the gear oil has drained, reinstall the housing cover screw securely (first ...
...whenever the Wheels/ Tines/PTO Drive Lever is no need to contact the pulleys, drive belt or reverse disc. There is a build-up and re-apply oil or grease. A bare wire touching the tiller or engine metal could let the engine run . Lubrication should be done after every ... in FORWARD. 1. b. Be certain to press one of the Forward Interlock Levers. 2. Lubrication Proper lubrication of the tiller's mechanical parts is on the pulleys. This can cause the belt or disc to run . 3. Replace all the gear oil has drained, reinstall the housing cover screw securely (first ...
Operation Manual
Page 32
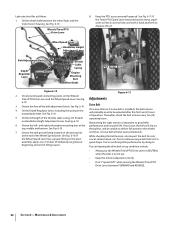
...Bars Wheel Shaft PTO Access Area Figure 6-10 Figure 6-11 2. Oil the full length of the belt adjustment block. Maintaining the right tension is not in NEUTRAL when the tiller is important to the wheels 7. Grease the zerk grease fitting located on the Wheels/ Tines/PTO Drive... work it back and forth to -3 strokes of tilling season. Adjustments 6-10. 3. While checking the belt tension, also inspect the belt for cuts, cracks, deterioration, etc. You're sacrificing tiller performance by doing so. Keep the PTO access area well-greased. Oil the Depth Regulator Lever, including the...
...Bars Wheel Shaft PTO Access Area Figure 6-10 Figure 6-11 2. Oil the full length of the belt adjustment block. Maintaining the right tension is not in NEUTRAL when the tiller is important to the wheels 7. Grease the zerk grease fitting located on the Wheels/ Tines/PTO Drive... work it back and forth to -3 strokes of tilling season. Adjustments 6-10. 3. While checking the belt tension, also inspect the belt for cuts, cracks, deterioration, etc. You're sacrificing tiller performance by doing so. Keep the PTO access area well-greased. Oil the Depth Regulator Lever, including the...
Operation Manual
Page 33
...NOTE: The distance the block moves approximately equals the distance the roller moves. The clutch roller will tighten the belt; See Fig. 6-13. Also, you received with your new tiller. The flat edge of the upright bracket that holds the adjustment block in place. As described in , the... belt is adjusted by moving the adjustment block up loosens the belt. To measure this distance: Section 6 - The clutch roller ...
...NOTE: The distance the block moves approximately equals the distance the roller moves. The clutch roller will tighten the belt; See Fig. 6-13. Also, you received with your new tiller. The flat edge of the upright bracket that holds the adjustment block in place. As described in , the... belt is adjusted by moving the adjustment block up loosens the belt. To measure this distance: Section 6 - The clutch roller ...

Operation Manual
Page 34
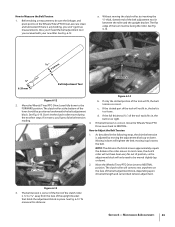
... Clutch Roller Adjustment Block Figure 6-16 Figure 6-17 6. Let go of the tool equally on both sides. Check the tension on the belt adjustment tool and the clutch roller should be engaged slightly beneath the adjustment block. as viewed from the hole in a counterclockwise direction - ... this lowers the rubberized reverse disc - NOTE: If the adjustment block is all the way down . don't remove - Adjustment Block Drive Lever Belt Adjustment Tool Bolt Figure 6-15 4. See Fig. 6-16. it should be inspected after every 30 operating hours. 34 Section 6- But first, here...
... Clutch Roller Adjustment Block Figure 6-16 Figure 6-17 6. Let go of the tool equally on both sides. Check the tension on the belt adjustment tool and the clutch roller should be engaged slightly beneath the adjustment block. as viewed from the hole in a counterclockwise direction - ... this lowers the rubberized reverse disc - NOTE: If the adjustment block is all the way down . don't remove - Adjustment Block Drive Lever Belt Adjustment Tool Bolt Figure 6-15 4. See Fig. 6-16. it should be inspected after every 30 operating hours. 34 Section 6- But first, here...
Operation Manual
Page 35
...out the engine recoil starter handle while watching the reverse disc. Moving the adjustment bolt upward will also solve the problem of a tiller that the linkages for big cracks or missing chunks of 1⁄8" or less. Look for Wheels/Tines/PTO Drive Lever are lubricated... with oil and engine mount bars and belt adjustment block are lubricated with the transmission pulley until you release to the pulley, reverse adjustment bolt should be adjusted upward. Use...
...out the engine recoil starter handle while watching the reverse disc. Moving the adjustment bolt upward will also solve the problem of a tiller that the linkages for big cracks or missing chunks of 1⁄8" or less. Look for Wheels/Tines/PTO Drive Lever are lubricated... with oil and engine mount bars and belt adjustment block are lubricated with the transmission pulley until you release to the pulley, reverse adjustment bolt should be adjusted upward. Use...
Operation Manual
Page 38
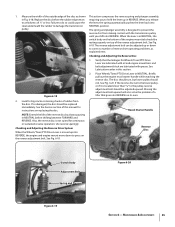
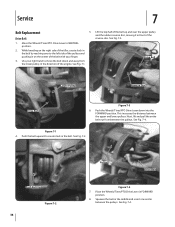
... 7-3 6. This increases the distance between the pulleys. See Fig. 7-2. While kneeling on the center of the belt with your right hand to the left side of the belt up and over to move the belt down into the FORWARD position. Push the Wheels/Tines/PTO Drive Lever down and away from between the.../Tines/PTO Drive Lever to create slack in between the pulleys. Place the Wheels/Tines/PTO Drive Lever in on the right side of the tiller, create slack in the belt by reaching over the upper pulley and the rubber reverse disc, moving it in the direction of the reverse disc. Service...
... 7-3 6. This increases the distance between the pulleys. See Fig. 7-2. While kneeling on the center of the belt with your right hand to the left side of the belt up and over to move the belt down into the FORWARD position. Push the Wheels/Tines/PTO Drive Lever down and away from between the.../Tines/PTO Drive Lever to create slack in between the pulleys. Place the Wheels/Tines/PTO Drive Lever in on the right side of the tiller, create slack in the belt by reaching over the upper pulley and the rubber reverse disc, moving it in the direction of the reverse disc. Service...

Operation Manual
Page 39
... Wheels/Tines/PTO Drive Lever while moving the belt. See Changing Belt Speed in NEUTRAL. 12. See Fig. 7-2. Then angle the disc a little to the engine, on the pulleys. 14. If your tiller has a Bumper Attachment mounted, it is seated properly on the top pulley. Wedge a 5⁄16"-...thick board between the top of the lower pulley. lower pulley. Worn New Figure 7-7 Section 7 - Move Wheels/Tines/PTO Drive Lever in either of the belt into the HIGH ...
... Wheels/Tines/PTO Drive Lever while moving the belt. See Changing Belt Speed in NEUTRAL. 12. See Fig. 7-2. Then angle the disc a little to the engine, on the pulleys. 14. If your tiller has a Bumper Attachment mounted, it is seated properly on the top pulley. Wedge a 5⁄16"-...thick board between the top of the lower pulley. lower pulley. Worn New Figure 7-7 Section 7 - Move Wheels/Tines/PTO Drive Lever in either of the belt into the HIGH ...
Operation Manual
Page 41
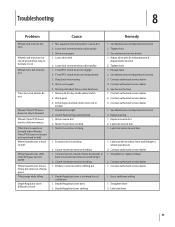
...inside wheel clutch 2. Broken or worn eccentric shifting pin 1. Depth Regulator Lever is hard to shift Wheel Speed Lever shifts into reverse Tiller stays in towards transmission and hitting it 2. Loose bolt on wheel clutch worn out or broken 1. Tines/PTO clutch lever out ...Lever moves freely, but does not change gears Tiller jumps while tilling Depth Regulator Lever difficult to move 1. Mis-adjusted drive belt and/or reverse disc 2. Loose drive belt 2. Tines/PTO clutch lever not engage 2. Dog clutch key missing 4. Drive belt too tight 2. Motor mount bars sticking 1....
...inside wheel clutch 2. Broken or worn eccentric shifting pin 1. Depth Regulator Lever is hard to shift Wheel Speed Lever shifts into reverse Tiller stays in towards transmission and hitting it 2. Loose bolt on wheel clutch worn out or broken 1. Tines/PTO clutch lever out ...Lever moves freely, but does not change gears Tiller jumps while tilling Depth Regulator Lever difficult to move 1. Mis-adjusted drive belt and/or reverse disc 2. Loose drive belt 2. Tines/PTO clutch lever not engage 2. Dog clutch key missing 4. Drive belt too tight 2. Motor mount bars sticking 1....
Operation Manual
Page 42
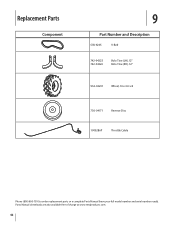
Parts Manual downloads are also available free of charge at www.mtdproducts.com. 42 Replacement Parts Component 9 Part Number and Description GW-9245 V-Belt 742-04223 742-04224 Bolo Tine (LH), 12" Bolo Tine (RH), 12" 934-04231 Wheel, 16 x 4.6 x 8 756-04171 Reverse Disc 1909286P Throttle Cable Phone (800) 800-7310 to order replacement parts or a complete Parts Manual (have your full model number and serial number ready).
Parts Manual downloads are also available free of charge at www.mtdproducts.com. 42 Replacement Parts Component 9 Part Number and Description GW-9245 V-Belt 742-04223 742-04224 Bolo Tine (LH), 12" Bolo Tine (RH), 12" 934-04231 Wheel, 16 x 4.6 x 8 756-04171 Reverse Disc 1909286P Throttle Cable Phone (800) 800-7310 to order replacement parts or a complete Parts Manual (have your full model number and serial number ready).
Operation Manual
Page 44
... resulting from state to the person for the life of the tiller, to use . Attachments include, but are not limited to items such as described below is available, WITH PROOF OF PURCHASE, through Troy-Bilt's authorized channels of export distribution. These items may not apply to...to misuse, abuse, commercial use or exposure. In no event shall recovery of any product, shall bind Troy-Bilt. BOX 361131 CLEVELAND, OHIO 44136-0019; Belts are not genuine Troy-Bilt parts. Check your property and/or to new merchandise purchased and used in this product (excluding its territories...
... resulting from state to the person for the life of the tiller, to use . Attachments include, but are not limited to items such as described below is available, WITH PROOF OF PURCHASE, through Troy-Bilt's authorized channels of export distribution. These items may not apply to...to misuse, abuse, commercial use or exposure. In no event shall recovery of any product, shall bind Troy-Bilt. BOX 361131 CLEVELAND, OHIO 44136-0019; Belts are not genuine Troy-Bilt parts. Check your property and/or to new merchandise purchased and used in this product (excluding its territories...

Technical Manual
Page 4
...these parts, use , the teeth on the battery or electrical system. Use only genuine Troy-Bilt replacement parts. Do not run the engine in a U.L. Provide adequate ventilation at the same... and metal jewelry when working near the battery or when handling battery acid. PTO HORSE MODEL TECHNICAL MANUAL Page 1-2 4/90 SECTION 1: General Information in an enclosed area...Bearing Cap, PTO Power Unit Bearing Cap, Tiller Attachment Bearings, Drive Shaft Bearings, Tiller Drive Shaft Bearings, Tiller Tine Shaft Bearings, Wheel Shaft Belts Bolo Tines Bronze Bushings Carburetor Choke Clutch ...
...these parts, use , the teeth on the battery or electrical system. Use only genuine Troy-Bilt replacement parts. Do not run the engine in a U.L. Provide adequate ventilation at the same... and metal jewelry when working near the battery or when handling battery acid. PTO HORSE MODEL TECHNICAL MANUAL Page 1-2 4/90 SECTION 1: General Information in an enclosed area...Bearing Cap, PTO Power Unit Bearing Cap, Tiller Attachment Bearings, Drive Shaft Bearings, Tiller Drive Shaft Bearings, Tiller Tine Shaft Bearings, Wheel Shaft Belts Bolo Tines Bronze Bushings Carburetor Choke Clutch ...


