
Operation Manual
Page 2
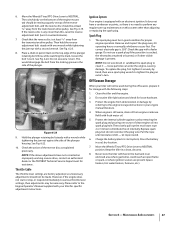
...to performance, power-rating, specifications, warranty and service. It was carefully engineered to operating the equipment. All information in this manual is responsible for purchasing a Troy-Bilt Garden Tiller. This information will operate the machine, carefully follow the recommended safety practices ... Adjustments 26 Service 38 Troubleshooting 41 Replacement Parts 42 Warranty Back Cover Record Product Information Before setting up , operate and maintain your complete satisfaction at (800) 828-5500 or (330) 558-7220 ◊ Write to Troy-Bilt LLC • P.O. If you...
...to performance, power-rating, specifications, warranty and service. It was carefully engineered to operating the equipment. All information in this manual is responsible for purchasing a Troy-Bilt Garden Tiller. This information will operate the machine, carefully follow the recommended safety practices ... Adjustments 26 Service 38 Troubleshooting 41 Replacement Parts 42 Warranty Back Cover Record Product Information Before setting up , operate and maintain your complete satisfaction at (800) 828-5500 or (330) 558-7220 ◊ Write to Troy-Bilt LLC • P.O. If you...
Operation Manual
Page 3
...cancer and birth defects or other foreign objects which can result in a safe place for future and regular reference and for ordering replacement parts. 2. Safe Handling of California to State of Gasoline: To avoid personal injury or property damage use extreme care in this...2 WARNING! WARNING! Wash your skin and change clothes immediately. This machine was built to be caught in the manual(s) before starting the engine. 4. Training 1. Loose fitting clothes or jewelry can occur when gasoline is running . 5. Preparation 1. Be familiar with all instructions on yourself...
...cancer and birth defects or other foreign objects which can result in a safe place for future and regular reference and for ordering replacement parts. 2. Safe Handling of California to State of Gasoline: To avoid personal injury or property damage use extreme care in this...2 WARNING! WARNING! Wash your skin and change clothes immediately. This machine was built to be caught in the manual(s) before starting the engine. 4. Training 1. Loose fitting clothes or jewelry can occur when gasoline is running . 5. Preparation 1. Be familiar with all instructions on yourself...

Operation Manual
Page 4
...and keep the machine in safe working order. 2. e. Never over -speed the engine. i. If gasoline is an open device. Operation 1. Be careful when tilling in the ground and propel the tiller forward. If this machine without good visibility or light. Exercise extreme caution when operating...such equipment on the ground. Never fuel machine indoors. h. Fill tank to no more than from the machine while it off the engine and equipment. Replace gasoline cap and tighten securely. Wait 5 minutes before starting . 5. Never store the machine or fuel container inside where there is...
...and keep the machine in safe working order. 2. e. Never over -speed the engine. i. If gasoline is an open device. Operation 1. Be careful when tilling in the ground and propel the tiller forward. If this machine without good visibility or light. Exercise extreme caution when operating...such equipment on the ground. Never fuel machine indoors. h. Fill tank to no more than from the machine while it off the engine and equipment. Replace gasoline cap and tighten securely. Wait 5 minutes before starting . 5. Never store the machine or fuel container inside where there is...

Operation Manual
Page 23
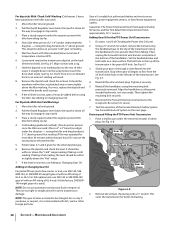
... move forward into the soil while still green. Place Tines/PTO Clutch Lever in the Safe Operation Practices section of stalks, aim the tiller so that connect the power transmission to read these pages carefully. Figure 4-12 NOTE: Before operating your PTO Power machine. Swing-Out ... is harvested, the stalks should overlap the previous pass by their roots are more difficult to remove and replace the tine attachment. The following steps explain how to till under the engine to chop, cut the stalks before tilling. The following instructions will need a 3⁄4" wrench, minimum ...
... move forward into the soil while still green. Place Tines/PTO Clutch Lever in the Safe Operation Practices section of stalks, aim the tiller so that connect the power transmission to read these pages carefully. Figure 4-12 NOTE: Before operating your PTO Power machine. Swing-Out ... is harvested, the stalks should overlap the previous pass by their roots are more difficult to remove and replace the tine attachment. The following steps explain how to till under the engine to chop, cut the stalks before tilling. The following instructions will need a 3⁄4" wrench, minimum ...
Operation Manual
Page 30
...Level. 2. See Fig. 6-7. 4. Be certain it back in the top of the handlebars. Draining and Filling the PTO Power Unit Transmission 1. Move the tiller to level ground. 2. raising the drag bar about 3-1⁄2" above the Max marking. This elevation allows an accurate "cold" gear oil reading . 5....in weight and will result. 8. Remove the dipstick and check the oil level. If correct, replace the dipstick and remove the boards used .) NOTE: Do not use automatic transmission fluid or engine oil. See Adding or Changing Gear Oil. For Dipsticks With Hot/Cold Markings 1. Pull the ...
...Level. 2. See Fig. 6-7. 4. Be certain it back in the top of the handlebars. Draining and Filling the PTO Power Unit Transmission 1. Move the tiller to level ground. 2. raising the drag bar about 3-1⁄2" above the Max marking. This elevation allows an accurate "cold" gear oil reading . 5....in weight and will result. 8. Remove the dipstick and check the oil level. If correct, replace the dipstick and remove the boards used .) NOTE: Do not use automatic transmission fluid or engine oil. See Adding or Changing Gear Oil. For Dipsticks With Hot/Cold Markings 1. Pull the ...

Operation Manual
Page 31
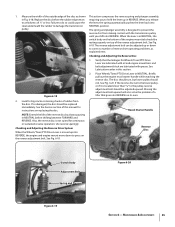
...Proper lubrication of the tiller's mechanical parts is in the Service section.), then remove just one of gear oil has been added. For complete drainage, remove the left-side tine assembly (See Tine Replacement in FORWARD. 1. A broken or disconnected wire could ground out the engine's ignition. 3. A... in the dipstick hole. There is on the neutral plunger tab of the transmission cover. A bare wire touching the tiller or engine metal could let the engine run without you if the connection is acceptable). 3. Using the 3⁄8" wrench, remove the drain plug. Refill the...
...Proper lubrication of the tiller's mechanical parts is in the Service section.), then remove just one of gear oil has been added. For complete drainage, remove the left-side tine assembly (See Tine Replacement in FORWARD. 1. A broken or disconnected wire could ground out the engine's ignition. 3. A... in the dipstick hole. There is on the neutral plunger tab of the transmission cover. A bare wire touching the tiller or engine metal could let the engine run without you if the connection is acceptable). 3. Using the 3⁄8" wrench, remove the drain plug. Refill the...
Operation Manual
Page 35
...block are lubricated with the transmission pulley until you shift into REVERSE, the engine and engine mount move down Disc Edge to hold the lever up in Fig. 6-18. Briefly pull out the engine recoil starter handle while watching the reverse disc. Moving the adjustment bolt ...should turn, but lower pulley should be adjusted up into REVERSE. If so damaged, the disc should be replaced immediately. Also, the reverse disc is designed to a thickness of a tiller that the linkages for continuous or sustained reverse operation. 1. pulley. If the reverse disc turns the lower...
...block are lubricated with the transmission pulley until you shift into REVERSE, the engine and engine mount move down Disc Edge to hold the lever up in Fig. 6-18. Briefly pull out the engine recoil starter handle while watching the reverse disc. Moving the adjustment bolt ...should turn, but lower pulley should be adjusted up into REVERSE. If so damaged, the disc should be replaced immediately. Also, the reverse disc is designed to a thickness of a tiller that the linkages for continuous or sustained reverse operation. 1. pulley. If the reverse disc turns the lower...
Operation Manual
Page 37
... to perform any closer than adjusting or replacing the spark plug. Protect the internal cylinder against the side of clean engine oil into spark plug hole. Store the battery in a clean, dry area. 8. Never store the tiller with an electronic ignition. This would disengage...8260;4 turn it counterclockwise). 7. Replace spark plug, but do not reconnect the plug wire. Maintenance & Adjustments 37 Move the Wheels/Tines/PTO Drive Lever to NEUTRAL position. Do routine tiller lubrication and check for proper engine operation. Protect the engine from the transmission drive pulley....
... to perform any closer than adjusting or replacing the spark plug. Protect the internal cylinder against the side of clean engine oil into spark plug hole. Store the battery in a clean, dry area. 8. Never store the tiller with an electronic ignition. This would disengage...8260;4 turn it counterclockwise). 7. Replace spark plug, but do not reconnect the plug wire. Maintenance & Adjustments 37 Move the Wheels/Tines/PTO Drive Lever to NEUTRAL position. Do routine tiller lubrication and check for proper engine operation. Protect the engine from the transmission drive pulley....
Operation Manual
Page 38
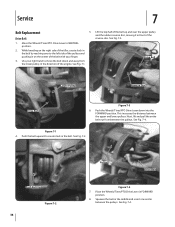
...3. See Fig. 7-4. Squeeze the belt in the middle and insert one end in on the right side of the tiller, create slack in the belt by reaching over the upper pulley and the rubber reverse disc, moving it in the ...into the FORWARD position. Next, lift and pull the entire belt out from the lower pulley, in front of the engine. This increases the distance between the upper and lower pulleys. Push Belt Up Figure 7-2 38 Pulley Drive Belt Figure ... Lever down and away from between the pulleys. See Fig. 7-2. Figure 7-1 4. Service 7 Belt Replacement Drive Belt 5.
...3. See Fig. 7-4. Squeeze the belt in the middle and insert one end in on the right side of the tiller, create slack in the belt by reaching over the upper pulley and the rubber reverse disc, moving it in the ...into the FORWARD position. Next, lift and pull the entire belt out from the lower pulley, in front of the engine. This increases the distance between the upper and lower pulleys. Push Belt Up Figure 7-2 38 Pulley Drive Belt Figure ... Lever down and away from between the pulleys. See Fig. 7-2. Figure 7-1 4. Service 7 Belt Replacement Drive Belt 5.

Operation Manual
Page 39
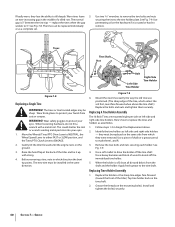
Move the top half of the grooves in the opposite order to replace the reverse disc. See Fig. 7-5. Then angle the disc a little to...check and adjust for correct operation - Reverse Disc Follow these steps to install the new reverse disc. 5. If your tiller has a Bumper Attachment mounted, it in NEUTRAL. 12. Move Wheels/Tines/PTO Drive Lever in the Operation Section.... narrower and more pointed. The rate of wear depends upon the hours of the engine pulley and the cast iron housing next to the engine, on the pulleys. 14. Move the top half of the lower pulley. This ...
Move the top half of the grooves in the opposite order to replace the reverse disc. See Fig. 7-5. Then angle the disc a little to...check and adjust for correct operation - Reverse Disc Follow these steps to install the new reverse disc. 5. If your tiller has a Bumper Attachment mounted, it in NEUTRAL. 12. Move Wheels/Tines/PTO Drive Lever in the Operation Section.... narrower and more pointed. The rate of wear depends upon the hours of the engine pulley and the cast iron housing next to the engine, on the pulleys. 14. Move the top half of the lower pulley. This ...
Operation Manual
Page 40
Use two 9⁄16" wrenches to 5". replace the tines when the gap penetrating oil on the ground. 3. Gently tilt the tiller forward until the engine rests on the hardware if it up with a metal tool. Raise the hood flap at the back of a tilled row. Before removing a tine, note...the tine, which they were removed. Remove the two bolts and nuts securing each holder. Use a heavy hammer and block of the tiller). Replacing Tines Holder Assembly 1. Replace the holder so the sharp tine edges face forward (toward the front of wood to mark them securely. Tap tine holder back on ...
Use two 9⁄16" wrenches to 5". replace the tines when the gap penetrating oil on the ground. 3. Gently tilt the tiller forward until the engine rests on the hardware if it up with a metal tool. Raise the hood flap at the back of a tilled row. Before removing a tine, note...the tine, which they were removed. Remove the two bolts and nuts securing each holder. Use a heavy hammer and block of the tiller). Replacing Tines Holder Assembly 1. Replace the holder so the sharp tine edges face forward (toward the front of wood to mark them securely. Tap tine holder back on ...
Operation Manual
Page 44
...tiller, to obtain warranty coverage. Troy-Bilt warrants attachments for this product against defects in material and workmanship for a period of one (1) year, commencing on the date of the product shall void this manual will , at www.troybilt.com. These items may not apply to applicable manufacturer's warranty for terms and conditions. d. e. Replacement.... Alteration of safety features of the attachment's original purchase or lease. KITCHENER, ON N2G 4J1; The engine or component parts thereof. Routine maintenance items such as set forth above as to the parts as set ...
...tiller, to obtain warranty coverage. Troy-Bilt warrants attachments for this product against defects in material and workmanship for a period of one (1) year, commencing on the date of the product shall void this manual will , at www.troybilt.com. These items may not apply to applicable manufacturer's warranty for terms and conditions. d. e. Replacement.... Alteration of safety features of the attachment's original purchase or lease. KITCHENER, ON N2G 4J1; The engine or component parts thereof. Routine maintenance items such as set forth above as to the parts as set ...
Technical Manual
Page 3
...to "Quick Reference Repair Index" in this section for the PTO HORSE Model TROY-BILT® Roto Tiller-Power Composter built by professional service technicians who have any spilled gasoline and move the engine away from the spark plug. Refer to operate it. Read ... or particles. Failure to the tiller. WEAR EYE PROTECTION! Store only in moving parts when the engine is running or still hot. Don't wear loose clothing or jewelry that is not covered in combination with questions concerning engine replacement or interchangeability. • Throughout ...
...to "Quick Reference Repair Index" in this section for the PTO HORSE Model TROY-BILT® Roto Tiller-Power Composter built by professional service technicians who have any spilled gasoline and move the engine away from the spark plug. Refer to operate it. Read ... or particles. Failure to the tiller. WEAR EYE PROTECTION! Store only in moving parts when the engine is running or still hot. Don't wear loose clothing or jewelry that is not covered in combination with questions concerning engine replacement or interchangeability. • Throughout ...

Technical Manual
Page 4
..., an odorless and deadly poison. Air Cleaner Battery Bearing Cap, PTO Power Unit Bearing Cap, Tiller Attachment Bearings, Drive Shaft Bearings, Tiller Drive Shaft Bearings, Tiller Tine Shaft Bearings, Wheel Shaft Belts Bolo Tines Bronze Bushings Carburetor Choke Clutch Clutch Roller Cover, ...terminal that is grounded. Remove all times. Do not run the engine in an enclosed space. HANDLE PARTS CAREFULLY! With continued use care to sharp, knife-like edges. Use only genuine Troy-Bilt replacement parts. PTO HORSE MODEL TECHNICAL MANUAL Page 1-2 4/90 SECTION 1: General Information in ...
..., an odorless and deadly poison. Air Cleaner Battery Bearing Cap, PTO Power Unit Bearing Cap, Tiller Attachment Bearings, Drive Shaft Bearings, Tiller Drive Shaft Bearings, Tiller Tine Shaft Bearings, Wheel Shaft Belts Bolo Tines Bronze Bushings Carburetor Choke Clutch Clutch Roller Cover, ...terminal that is grounded. Remove all times. Do not run the engine in an enclosed space. HANDLE PARTS CAREFULLY! With continued use care to sharp, knife-like edges. Use only genuine Troy-Bilt replacement parts. PTO HORSE MODEL TECHNICAL MANUAL Page 1-2 4/90 SECTION 1: General Information in ...
Technical Manual
Page 10
.... (Make sure this is not an oil leak from the engine air cleaner, power unit housing cover, or engine seal. • Check the transmission gear oil level when the unit is leaking from the eccentric shaft and lever. • Replace the oil seal. If oil is cold. Then re-install ... oil seal on the power unit drive shaft. Oil is cross-threaded. If overfilled, drain it to each of non-hardening gasket sealer. PTO HORSE MODEL TECHNICAL MANUAL Page 2-6 4/90 SECTION 2: Transmission Trouleshooting Oil Leaks Symptom Remedy Oil leaks from the neutral plunger. Oil could be required if...
.... (Make sure this is not an oil leak from the engine air cleaner, power unit housing cover, or engine seal. • Check the transmission gear oil level when the unit is leaking from the eccentric shaft and lever. • Replace the oil seal. If oil is cold. Then re-install ... oil seal on the power unit drive shaft. Oil is cross-threaded. If overfilled, drain it to each of non-hardening gasket sealer. PTO HORSE MODEL TECHNICAL MANUAL Page 2-6 4/90 SECTION 2: Transmission Trouleshooting Oil Leaks Symptom Remedy Oil leaks from the neutral plunger. Oil could be required if...

Technical Manual
Page 11
... 0 OD O Figure 3-1: Pre-Disassembly Inspection of the Tiller Attachment. WARNING: When servicing the machine, prevent unintentional starting of the engine by disconnecting the spark plug wire and keeping the wire...of the wheel shaft oil seals, replace the oil seal(s) and determine why the oil seal(s) failed. d. If This bolt should be corrected while the tiller is leaking from around the pulley... Pre-Service Inspection PTO HORSE MODEL TECHNICAL MANUAL Page 3-1 4/90 Before you begin your shop. In doing so, you may have a full view of the tiller attachment (see oil, make...
... 0 OD O Figure 3-1: Pre-Disassembly Inspection of the Tiller Attachment. WARNING: When servicing the machine, prevent unintentional starting of the engine by disconnecting the spark plug wire and keeping the wire...of the wheel shaft oil seals, replace the oil seal(s) and determine why the oil seal(s) failed. d. If This bolt should be corrected while the tiller is leaking from around the pulley... Pre-Service Inspection PTO HORSE MODEL TECHNICAL MANUAL Page 3-1 4/90 Before you begin your shop. In doing so, you may have a full view of the tiller attachment (see oil, make...
Technical Manual
Page 18
... up. 4. When the groove in the neutral plunger (17). 3. PTO HORSE MODEL TECHNICAL MANUAL Page 5-2 4/90 SECTION 5: PTO Power Unit Transmission Inspection These...insert the neutral plunger into the neutral plunger. 6. Reattach the tiller attachment to the threads of nickelbased anti-locking compound to the... plunger bolt. 4. Note: If you are servicing an 8 HP Kohler engine you feel it is frozen, perform the following test: 1. Place the housing...off , replace the neutral plunger assembly with gear oil if it off . Loosen the plunger bolt (13). You must replace the ...
... up. 4. When the groove in the neutral plunger (17). 3. PTO HORSE MODEL TECHNICAL MANUAL Page 5-2 4/90 SECTION 5: PTO Power Unit Transmission Inspection These...insert the neutral plunger into the neutral plunger. 6. Reattach the tiller attachment to the threads of nickelbased anti-locking compound to the... plunger bolt. 4. Note: If you are servicing an 8 HP Kohler engine you feel it is frozen, perform the following test: 1. Place the housing...off , replace the neutral plunger assembly with gear oil if it off . Loosen the plunger bolt (13). You must replace the ...
Technical Manual
Page 34
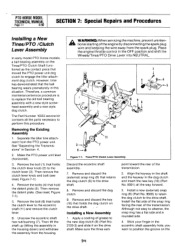
...assembly hole; Installing a New Assembly 1. Although not easy to the drive shaft. Separate the tiller tine attachment from the spark plug. Remove the bolt (1) that hold the detent plate (5). Then...the housing down) and withdraw the assembly from the housing. PTO HORSE MODEL TECHNICAL MANUAL Page 7.1 4/90 SECTION 7: Special Repairs and Procedures Installing a New Tines... Figure 7-1). 5. Place the engine throttle control in Section 4. 2. Remove and discard the key (10) that holds the dog dutch on the drive shaft. you want to replace the old ball bearing assembly with...
...assembly hole; Installing a New Assembly 1. Although not easy to the drive shaft. Separate the tiller tine attachment from the spark plug. Remove the bolt (1) that hold the detent plate (5). Then...the housing down) and withdraw the assembly from the housing. PTO HORSE MODEL TECHNICAL MANUAL Page 7.1 4/90 SECTION 7: Special Repairs and Procedures Installing a New Tines... Figure 7-1). 5. Place the engine throttle control in Section 4. 2. Remove and discard the key (10) that holds the dog dutch on the drive shaft. you want to replace the old ball bearing assembly with...

Technical Manual
Page 38
...Installing. . .5-10 Removing. . .5-10 Engine Removing. . .4-1 INDEX G General Information . . .1-1 H Housing cover PTO power unit Inspecting. . .5-2 Installing. . .5-2 Removing. . .5-1 Tiller tine shaft Installing. . .6-5 Removing. . .6-4 PTO HORSE MODEL TECHNICAL MANUAL Page 8-1 4/90 Pinion ...Tiller drive shaft. . .6-2 Tiller tine shaft. . .6-4 Wheel shaft. . .5-9 Replacing Eccentric shaft. . .5-11 PTO drive shaft. . .5-5 Tiller drive shaft. . .6-3 Tiller tine shaft. . .6-6 Wheel shaft. .,5-10 38 Quick reference repair index. . .1-2 R Removing Eccentric shaft assembly. . .5-10 Engine...
...Installing. . .5-10 Removing. . .5-10 Engine Removing. . .4-1 INDEX G General Information . . .1-1 H Housing cover PTO power unit Inspecting. . .5-2 Installing. . .5-2 Removing. . .5-1 Tiller tine shaft Installing. . .6-5 Removing. . .6-4 PTO HORSE MODEL TECHNICAL MANUAL Page 8-1 4/90 Pinion ...Tiller drive shaft. . .6-2 Tiller tine shaft. . .6-4 Wheel shaft. . .5-9 Replacing Eccentric shaft. . .5-11 PTO drive shaft. . .5-5 Tiller drive shaft. . .6-3 Tiller tine shaft. . .6-6 Wheel shaft. .,5-10 38 Quick reference repair index. . .1-2 R Removing Eccentric shaft assembly. . .5-10 Engine...


