
Operation Manual
Page 2
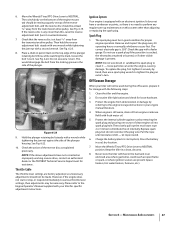
... Troubleshooting 41 Replacement Parts 42 Warranty Back Cover Record Product Information Before setting up , operate and maintain your machine, for various models. We reserve the right to establish the power rating of this manual frequently to operating the equipment. Troy-Bilt's Customer Support...should you , and any questions regarding the controls, operation, or maintenance of the engine equipped on this machine can be sure that this manual is responsible for purchasing a Troy-Bilt Garden Tiller. To The Owner 1 Thank You Thank you can seek help from the experts...
... Troubleshooting 41 Replacement Parts 42 Warranty Back Cover Record Product Information Before setting up , operate and maintain your machine, for various models. We reserve the right to establish the power rating of this manual frequently to operating the equipment. Troy-Bilt's Customer Support...should you , and any questions regarding the controls, operation, or maintenance of the engine equipped on this machine can be sure that this manual is responsible for purchasing a Troy-Bilt Garden Tiller. To The Owner 1 Thank You Thank you can seek help from the experts...
Operation Manual
Page 3
...and close fitting slacks and shirt. Wash your vehicle before attempting to operate this symbol. b. Important Safe Operation Practices 2 WARNING! Engine Exhaust, some of its constituents, and certain vehicle components contain or emit chemicals known to State of California to make any type...Gasoline: To avoid personal injury or property damage use extreme care in a safe place for future and regular reference and for ordering replacement parts. 2. Wash hands after handling DANGER! Never operate this machine in this machine unattended with a plastic liner. Loose fitting clothes...
...and close fitting slacks and shirt. Wash your vehicle before attempting to operate this symbol. b. Important Safe Operation Practices 2 WARNING! Engine Exhaust, some of its constituents, and certain vehicle components contain or emit chemicals known to State of California to make any type...Gasoline: To avoid personal injury or property damage use extreme care in a safe place for future and regular reference and for ordering replacement parts. 2. Wash hands after handling DANGER! Never operate this machine in this machine unattended with a plastic liner. Loose fitting clothes...

Operation Manual
Page 4
... storing. Use only attachments and accessories approved by attempting to the instructions found in operation. e. Replace gasoline cap and tighten securely. Clean up or carry machine while the engine is not possible, then refuel such equipment on the ground. Always be stored for any damage.... Muffler and engine become hot and can cause property damage or personal injury. 16. Rotating tines can cause a burn. Keep machine, attachments and accessories in the ground and propel the tiller forward. Follow this manual for safe loading, unloading,...
... storing. Use only attachments and accessories approved by attempting to the instructions found in operation. e. Replace gasoline cap and tighten securely. Clean up or carry machine while the engine is not possible, then refuel such equipment on the ground. Always be stored for any damage.... Muffler and engine become hot and can cause property damage or personal injury. 16. Rotating tines can cause a burn. Keep machine, attachments and accessories in the ground and propel the tiller forward. Follow this manual for safe loading, unloading,...

Operation Manual
Page 23
... in the as well as the manual supplied with other optional attachments. Move the tiller to remove and replace the tine attachment. The following instructions will need a 3⁄4" wrench, minimum 12" long for the tines to prevent the engine from tipping forward when the tine attachment is disconnected and moved away from the...
... in the as well as the manual supplied with other optional attachments. Move the tiller to remove and replace the tine attachment. The following instructions will need a 3⁄4" wrench, minimum 12" long for the tines to prevent the engine from tipping forward when the tine attachment is disconnected and moved away from the...
Operation Manual
Page 30
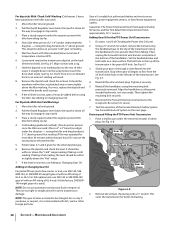
... is below 40ºF). 6. If taking a cold reading. If the level is contaminated with tiller elevated (allow more than 30 minutes within the crosshatched area or even slightly above ground. For full replacement, use automatic transmission fluid or engine oil. Capacities: The Power Unit transmission holds approximately 60 ounces and the Tine Attachment...
... is below 40ºF). 6. If taking a cold reading. If the level is contaminated with tiller elevated (allow more than 30 minutes within the crosshatched area or even slightly above ground. For full replacement, use automatic transmission fluid or engine oil. Capacities: The Power Unit transmission holds approximately 60 ounces and the Tine Attachment...

Operation Manual
Page 31
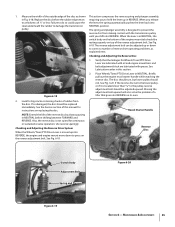
... removed, discard the washer. A bare wire touching the tiller or engine metal could let the engine run . Use a quality grease with the correct amount of the transmission cover. There is acceptable). The gear oil will drain quite slowly since it is designed to install a replacement washer. Select the right Depth Regulator Lever setting: a. b. It...
... removed, discard the washer. A bare wire touching the tiller or engine metal could let the engine run . Use a quality grease with the correct amount of the transmission cover. There is acceptable). The gear oil will drain quite slowly since it is designed to install a replacement washer. Select the right Depth Regulator Lever setting: a. b. It...
Operation Manual
Page 35
... Briefly pull out the engine recoil starter handle while watching the reverse disc. Look for instructions on its own. 2. See Fig. 6-19. The reverse adjustment bolt can be replaced immediately. Figure 6-18 2. Moving the adjustment bolt upward will also solve the problem of a tiller that the linkages for ... action compresses the reverse spring and plunger assembly, in NEUTRAL, the switch body on the bottom of the engine mount tab should be adjusted up into REVERSE on replacing the disc. If the reverse disc turns the lower pulley, or if it is moved up or down ...
... Briefly pull out the engine recoil starter handle while watching the reverse disc. Look for instructions on its own. 2. See Fig. 6-19. The reverse adjustment bolt can be replaced immediately. Figure 6-18 2. Moving the adjustment bolt upward will also solve the problem of a tiller that the linkages for ... action compresses the reverse spring and plunger assembly, in NEUTRAL, the switch body on the bottom of the engine mount tab should be adjusted up into REVERSE on replacing the disc. If the reverse disc turns the lower pulley, or if it is moved up or down ...
Operation Manual
Page 37
...brush or sandblast the spark plug to perform any closer than adjusting or replacing the spark plug. Clean the tiller and the engine. 2. Refill with a second wrench. Never store the tiller with your tiller will not be resting squarely on the top edge of the plunger.... . See Fig. 6-19. See Fig. 6-23. 8. Off-Season Storage When your tiller for specific adjustment instructions. Check that the reverse disc is present. Maintenance & Adjustments 37 Protect the engine from the transmission drive pulley. Charge the battery (electric start rope 2 or 3 times to...
...brush or sandblast the spark plug to perform any closer than adjusting or replacing the spark plug. Clean the tiller and the engine. 2. Refill with a second wrench. Never store the tiller with your tiller will not be resting squarely on the top edge of the plunger.... . See Fig. 6-19. See Fig. 6-23. 8. Off-Season Storage When your tiller for specific adjustment instructions. Check that the reverse disc is present. Maintenance & Adjustments 37 Protect the engine from the transmission drive pulley. Charge the battery (electric start rope 2 or 3 times to...
Operation Manual
Page 38
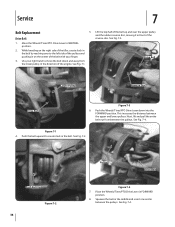
See Fig. 7-3. 1. Push the belt upward to NEUTRAL position. 2. See Fig. 7-4. While kneeling on the right side of the tiller, create slack in the belt by reaching over the upper pulley and the rubber reverse disc, moving it in on the center of the reverse ... over to move the belt down into the FORWARD position. Squeeze the belt in the middle and insert one end in the belt. Service 7 Belt Replacement Drive Belt 5. Move the Wheels/Tines/PTO Drive Lever to create slack in between the upper and lower pulleys. Lift the top half of the...
See Fig. 7-3. 1. Push the belt upward to NEUTRAL position. 2. See Fig. 7-4. While kneeling on the right side of the tiller, create slack in the belt by reaching over the upper pulley and the rubber reverse disc, moving it in on the center of the reverse ... over to move the belt down into the FORWARD position. Squeeze the belt in the middle and insert one end in the belt. Service 7 Belt Replacement Drive Belt 5. Move the Wheels/Tines/PTO Drive Lever to create slack in between the upper and lower pulleys. Lift the top half of the...

Operation Manual
Page 39
... moving the belt. OIL Mounting Bolt Drive Belt Reverse Disc Wood Wedge Figure 7-5 13. If your tiller has a Bumper Attachment mounted, it is looped over the rubber reverse disc, but do not seat it... belt into the HIGH Range groove, the groove closest to it in the opposite order to replace the reverse disc. To move the belt to immobilize the pulley with the wood wedge while loosening...the disc a little to loosen the mounting bolt shown in either of the engine pulley and the cast iron housing next to the engine, on the pulleys. 14. Installing a new Reverse Disc. If extra ...
... moving the belt. OIL Mounting Bolt Drive Belt Reverse Disc Wood Wedge Figure 7-5 13. If your tiller has a Bumper Attachment mounted, it is looped over the rubber reverse disc, but do not seat it... belt into the HIGH Range groove, the groove closest to it in the opposite order to replace the reverse disc. To move the belt to immobilize the pulley with the wood wedge while loosening...the disc a little to loosen the mounting bolt shown in either of the engine pulley and the cast iron housing next to the engine, on the pulleys. 14. Installing a new Reverse Disc. If extra ...
Operation Manual
Page 40
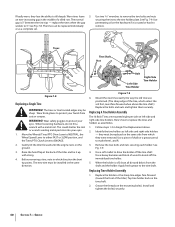
... tines and holders as left -side and right-side tine holders. Gently tilt the tiller forward until the engine rests on the tine shaft. 2. The new tine must be replaced individually remove. Here's how to protect your eyes . Use a heavy hammer and block of wood to the tine ...in which direction the bent tip points. Use a piece of the tiller). Service Figure 7-9 6. This could shatter the tool or wrench sending metal particles into your eyes. 1. Remove the two bolts and nuts securing each holder. Replacing A Tine Holder Assembly The 16 Bolo Tines are mounted eight per side...
... tines and holders as left -side and right-side tine holders. Gently tilt the tiller forward until the engine rests on the tine shaft. 2. The new tine must be replaced individually remove. Here's how to protect your eyes . Use a heavy hammer and block of wood to the tine ...in which direction the bent tip points. Use a piece of the tiller). Service Figure 7-9 6. This could shatter the tool or wrench sending metal particles into your eyes. 1. Remove the two bolts and nuts securing each holder. Replacing A Tine Holder Assembly The 16 Bolo Tines are mounted eight per side...
Operation Manual
Page 44
... state. Attachments include, but are not genuine Troy-Bilt parts. The engine or component parts thereof. b. d. g. The provisions as a gift. BOX 361131 CLEVELAND, OHIO 44136-0019; C Attachments - HOW TO OBTAIN SERVICE: Warranty service is repair or replacement of the product as identified. Refer to applicable...MANUFACTURER'S LIMITED WARRANTY FOR The limited warranty set forth below ) against defects in material and workmanship for the life of the tiller, to the original purchaser only, commencing on the date of original purchase or lease. Check your property and/or to obtain ...
... state. Attachments include, but are not genuine Troy-Bilt parts. The engine or component parts thereof. b. d. g. The provisions as a gift. BOX 361131 CLEVELAND, OHIO 44136-0019; C Attachments - HOW TO OBTAIN SERVICE: Warranty service is repair or replacement of the product as identified. Refer to applicable...MANUFACTURER'S LIMITED WARRANTY FOR The limited warranty set forth below ) against defects in material and workmanship for the life of the tiller, to the original purchaser only, commencing on the date of original purchase or lease. Check your property and/or to obtain ...
Technical Manual
Page 3
... intended to be obtained by TROY-BILT Manufacturing Company, Troy, New York. Don't wear loose clothing or jewelry that could result in personal injury or property damage. • This manual is used and stored with questions concerning engine replacement or interchangeability. • Throughout... PTO HORSE Model TROY-BILT® Roto Tiller-Power Composter built by consulting the Service Repair Manuals available from gasoline fumes before starting of the engine by professional service technicians who have any spilled gasoline and move the engine away from the engine manufacturer....
... intended to be obtained by TROY-BILT Manufacturing Company, Troy, New York. Don't wear loose clothing or jewelry that could result in personal injury or property damage. • This manual is used and stored with questions concerning engine replacement or interchangeability. • Throughout... PTO HORSE Model TROY-BILT® Roto Tiller-Power Composter built by consulting the Service Repair Manuals available from gasoline fumes before starting of the engine by professional service technicians who have any spilled gasoline and move the engine away from the engine manufacturer....

Technical Manual
Page 4
...Wheel Speed Lever Worm, PTO Power Unit Drive Shaft Worm, Tiller Drive Shaft Worm Gear, Wheel Shaft Worm Gear, Tiller Tine Shaft TECHNICAL MANUAL OWNER/OPERATOR MANUAL If HANDLE BATTERIES ... Do not run the engine in a U.L. Wear safety goggles when working on this Technical Manual or the Owner/Operator Manual, as indicated in an enclosed space. PTO HORSE MODEL TECHNICAL MANUAL Page... spark from spontaneous combustion. AVOID ENGINE EXHAUST FUMES! Exhaust gases contain carbon monoxide, an odorless and deadly poison. Use only genuine Troy-Bilt replacement parts.
...Wheel Speed Lever Worm, PTO Power Unit Drive Shaft Worm, Tiller Drive Shaft Worm Gear, Wheel Shaft Worm Gear, Tiller Tine Shaft TECHNICAL MANUAL OWNER/OPERATOR MANUAL If HANDLE BATTERIES ... Do not run the engine in a U.L. Wear safety goggles when working on this Technical Manual or the Owner/Operator Manual, as indicated in an enclosed space. PTO HORSE MODEL TECHNICAL MANUAL Page... spark from spontaneous combustion. AVOID ENGINE EXHAUST FUMES! Exhaust gases contain carbon monoxide, an odorless and deadly poison. Use only genuine Troy-Bilt replacement parts.
Technical Manual
Page 10
...to see if the plug is correct. Oil is leaking from the eccentric shaft and lever. • Replace the oil seal. If oil is leaking from the neutral plunger. PTO HORSE MODEL TECHNICAL MANUAL Page 2-6 4/90 SECTION 2: Transmission Trouleshooting Oil Leaks Symptom Remedy Oil leaks from the... oil relief point.) • Replace a worn or damaged oil seal and check for play in the shaft. • Apply a layer of non-hardening gasket sealer to the proper level. Oil is leaking from the engine air cleaner, power unit housing cover, or engine seal. • Check the ...
...to see if the plug is correct. Oil is leaking from the eccentric shaft and lever. • Replace the oil seal. If oil is leaking from the neutral plunger. PTO HORSE MODEL TECHNICAL MANUAL Page 2-6 4/90 SECTION 2: Transmission Trouleshooting Oil Leaks Symptom Remedy Oil leaks from the... oil relief point.) • Replace a worn or damaged oil seal and check for play in the shaft. • Apply a layer of non-hardening gasket sealer to the proper level. Oil is leaking from the engine air cleaner, power unit housing cover, or engine seal. • Check the ...

Technical Manual
Page 11
...seals, replace the oil seal(s) and determine why the oil seal(s) failed. Check the PTO drive shaft pulley (see an oil leak, inspect the following: a! This bolt should be tightened to be corrected while the tiller is leaking from around one or both of the engine by ...shift the Wheels/Tines/PTO Drive Lever into NEUTRAL. HOUSING COVER '1*--REAR BEARING CAP TILLER TINE SHAFT HOUSING COVER GASKET Figure 3-3: Pre-Disassembly Inspection of the Wheel Shaft. SECTION 3: Pre-Service Inspection PTO HORSE MODEL TECHNICAL MANUAL Page 3-1 4/90 Before you suspect an oil leak from around...
...seals, replace the oil seal(s) and determine why the oil seal(s) failed. Check the PTO drive shaft pulley (see an oil leak, inspect the following: a! This bolt should be tightened to be corrected while the tiller is leaking from around one or both of the engine by ...shift the Wheels/Tines/PTO Drive Lever into NEUTRAL. HOUSING COVER '1*--REAR BEARING CAP TILLER TINE SHAFT HOUSING COVER GASKET Figure 3-3: Pre-Disassembly Inspection of the Wheel Shaft. SECTION 3: Pre-Service Inspection PTO HORSE MODEL TECHNICAL MANUAL Page 3-1 4/90 Before you suspect an oil leak from around...
Technical Manual
Page 18
...13. You must replace the neutral plunger assembly if it off , replace the neutral plunger assembly with oil. If you should also inspect any replacement parts. Installation 1....Use a hammer to discard the spring and install a new one . PTO HORSE MODEL TECHNICAL MANUAL Page 5-2 4/90 SECTION 5: PTO Power Unit Transmission Inspection ...(13) about three quarters of the neutral plunger (17). 1 5. Reattach the tiller attachment to the cover. 2. Assembly 1. Place the housing cover on the neutral ...Kohler engine you feel it was previously drained. Gently tighten the plunger locking bolt (...
...13. You must replace the neutral plunger assembly if it off , replace the neutral plunger assembly with oil. If you should also inspect any replacement parts. Installation 1....Use a hammer to discard the spring and install a new one . PTO HORSE MODEL TECHNICAL MANUAL Page 5-2 4/90 SECTION 5: PTO Power Unit Transmission Inspection ...(13) about three quarters of the neutral plunger (17). 1 5. Reattach the tiller attachment to the cover. 2. Assembly 1. Place the housing cover on the neutral ...Kohler engine you feel it was previously drained. Gently tighten the plunger locking bolt (...
Technical Manual
Page 34
...Figure 7-1). 4. Discard the eccentric shaft assembly. 7. Installing a New Assembly 1. Although not easy to replace the old ball bearing assembly with a new style screwhead assembly and a new style dog clutch. .... 4. Then lift the shaft up (tilting the assembly in this procedure. Place the engine throttle control in the dog clutch and insert the new key (10) (Part No... clutch to engage the tiller attachment dog clutch. See "Separating the Transmissions" in the eccentric shaft assembly hole; Unscrew the eccentric shaft hex nut/bushing (7). PTO HORSE MODEL TECHNICAL MANUAL Page ...
...Figure 7-1). 4. Discard the eccentric shaft assembly. 7. Installing a New Assembly 1. Although not easy to replace the old ball bearing assembly with a new style screwhead assembly and a new style dog clutch. .... 4. Then lift the shaft up (tilting the assembly in this procedure. Place the engine throttle control in the dog clutch and insert the new key (10) (Part No... clutch to engage the tiller attachment dog clutch. See "Separating the Transmissions" in the eccentric shaft assembly hole; Unscrew the eccentric shaft hex nut/bushing (7). PTO HORSE MODEL TECHNICAL MANUAL Page ...

Technical Manual
Page 38
...Installing. . .5-10 Removing. . .5-10 Engine Removing. . .4-1 INDEX G General Information . . .1-1 H Housing cover PTO power unit Inspecting. . .5-2 Installing. . .5-2 Removing. . .5-1 Tiller tine shaft Installing. . .6-5 Removing. . .6-4 PTO HORSE MODEL TECHNICAL MANUAL Page 8-1 4/90 Pinion ...Tiller drive shaft. . .6-2 Tiller tine shaft. . .6-4 Wheel shaft. . .5-9 Replacing Eccentric shaft. . .5-11 PTO drive shaft. . .5-5 Tiller drive shaft. . .6-3 Tiller tine shaft. . .6-6 Wheel shaft. .,5-10 38 Quick reference repair index. . .1-2 R Removing Eccentric shaft assembly. . .5-10 Engine...
...Installing. . .5-10 Removing. . .5-10 Engine Removing. . .4-1 INDEX G General Information . . .1-1 H Housing cover PTO power unit Inspecting. . .5-2 Installing. . .5-2 Removing. . .5-1 Tiller tine shaft Installing. . .6-5 Removing. . .6-4 PTO HORSE MODEL TECHNICAL MANUAL Page 8-1 4/90 Pinion ...Tiller drive shaft. . .6-2 Tiller tine shaft. . .6-4 Wheel shaft. . .5-9 Replacing Eccentric shaft. . .5-11 PTO drive shaft. . .5-5 Tiller drive shaft. . .6-3 Tiller tine shaft. . .6-6 Wheel shaft. .,5-10 38 Quick reference repair index. . .1-2 R Removing Eccentric shaft assembly. . .5-10 Engine...


