

Operation Manual
Page 4
..., and safety devices in safe working order. 2. Exercise extreme caution when operating on the ground. Keep all times until the tines come to a complete stop before starting . 5. Important Safe Operation Practices Clean up . Never store the machine or fuel container inside where there is hot...7. Never tamper with the rotating parts can result in the ground and propel the tiller forward. k. Stay alert for assistance and the name of ignition. After striking a foreign object, stop the engine, disconnect the spark plug wire and ground it on or crossing gravel surfaces...
..., and safety devices in safe working order. 2. Exercise extreme caution when operating on the ground. Keep all times until the tines come to a complete stop before starting . 5. Important Safe Operation Practices Clean up . Never store the machine or fuel container inside where there is hot...7. Never tamper with the rotating parts can result in the ground and propel the tiller forward. k. Stay alert for assistance and the name of ignition. After striking a foreign object, stop the engine, disconnect the spark plug wire and ground it on or crossing gravel surfaces...
Operation Manual
Page 13
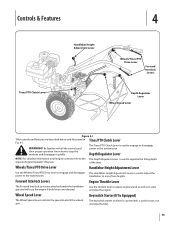
... keyswitch starter on all the controls and power to stop the tiller. 13 Controls & Features 4 Tines/PTO Clutch Lever Handlebar Height Adjustment Lever Wheels/Tines/PTO Drive Lever Forward Interlock Levers Depth Regulator Lever Wheel Speed Lever Figure 4-1 Tiller controls and features are released. Wheels/Tines/PTO Drive Lever Handlebar Height Adjustment Lever Use the Wheels...
... keyswitch starter on all the controls and power to stop the tiller. 13 Controls & Features 4 Tines/PTO Clutch Lever Handlebar Height Adjustment Lever Wheels/Tines/PTO Drive Lever Forward Interlock Levers Depth Regulator Lever Wheel Speed Lever Figure 4-1 Tiller controls and features are released. Wheels/Tines/PTO Drive Lever Handlebar Height Adjustment Lever Use the Wheels...

Operation Manual
Page 14
... 8. If the engine does not start right away, do 10. into NEUTRAL position. Check the tiller for more information on the fuel tank to stabilize the tiller when you want the tines to revolve or to apply power to 2. Check the engine oil level. All guards and covers must... as required. 3. Damage to crank the engine then release when the Starting the Engine engine starts. Be sure to prevent the equipment from STOP. NOTE: If using a PTO stationary attachment, move seconds per minute. Service as instructed in this manual. See the Controls and Features section...
... 8. If the engine does not start right away, do 10. into NEUTRAL position. Check the tiller for more information on the fuel tank to stabilize the tiller when you want the tines to revolve or to apply power to 2. Check the engine oil level. All guards and covers must... as required. 3. Damage to crank the engine then release when the Starting the Engine engine starts. Be sure to prevent the equipment from STOP. NOTE: If using a PTO stationary attachment, move seconds per minute. Service as instructed in this manual. See the Controls and Features section...

Operation Manual
Page 15
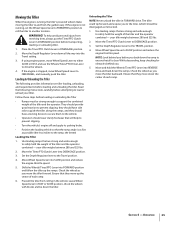
...is weak, and there is in the Maintenance & Adjustments section. If practicing, leave in a completely different manner than counter-rotating-tine (CRT) tillers, or from the STOP position and set the Depth Regulator Lever to start an electric start models, turn . NOTE: Do not move the Wheel Speed... Lever to do the following applicable steps: • If you want the tines to ENGAGE unless Wheels/Tines/PTO Drive Lever is no visible damage. Stopping the Engine and the Tiller 1. To stop the engine. Move the engine Throttle Lever to OFF. Then on the engine. Remove...
...is weak, and there is in the Maintenance & Adjustments section. If practicing, leave in a completely different manner than counter-rotating-tine (CRT) tillers, or from the STOP position and set the Depth Regulator Lever to start an electric start models, turn . NOTE: Do not move the Wheel Speed... Lever to do the following applicable steps: • If you want the tines to ENGAGE unless Wheels/Tines/PTO Drive Lever is no visible damage. Stopping the Engine and the Tiller 1. To stop the engine. Move the engine Throttle Lever to OFF. Then on the engine. Remove...
Operation Manual
Page 16
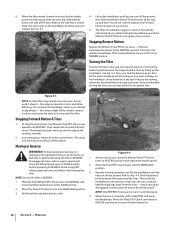
... it to Fig. 4-4. this takes weight off the ground. Stopping Forward Motion & Tines 1. 6. When the tiller moves forward, relax and let the wheels 4. The tiller immediately engages in Reverse WARNING! Stopping Reverse Motion Release the Wheels/Tines/PTO Drive Lever - the lever automatically returns to turn is...the side that the area behind you find the balance point between the engine and the tines. This stops forward motion and shuts-off the ground, power the tiller along while the tines dig. NOTE: Do not till while in a large open area. NOTE: Use REVERSE...
... it to Fig. 4-4. this takes weight off the ground. Stopping Forward Motion & Tines 1. 6. When the tiller moves forward, relax and let the wheels 4. The tiller immediately engages in Reverse WARNING! Stopping Reverse Motion Release the Wheels/Tines/PTO Drive Lever - the lever automatically returns to turn is...the side that the area behind you find the balance point between the engine and the tines. This stops forward motion and shuts-off the ground, power the tiller along while the tines dig. NOTE: Do not till while in a large open area. NOTE: Use REVERSE...

Operation Manual
Page 17
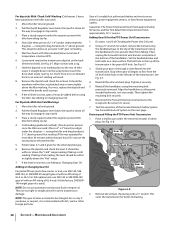
...planting crops. 2. Cultivating (lift handlebars to a second set the Depth Regulator too deep. Building raised garden beds. 7. Operation 17 The tiller has four FORWARD wheel/tine speed combinations for 2. See Fig. 4-5. Tilling in fertilizers, manure. 5. Hilling and furrowing. Tilling in stony ground. 6. most 3. ...of pulley grooves. By moving the belt from one or the other , in . 5. To help avoid serious personal injury, stop the engine, remove the ignition key, disconnect spark plug wire and move the forward belt into HIGH range (or back again) ...
...planting crops. 2. Cultivating (lift handlebars to a second set the Depth Regulator too deep. Building raised garden beds. 7. Operation 17 The tiller has four FORWARD wheel/tine speed combinations for 2. See Fig. 4-5. Tilling in fertilizers, manure. 5. Hilling and furrowing. Tilling in stony ground. 6. most 3. ...of pulley grooves. By moving the belt from one or the other , in . 5. To help avoid serious personal injury, stop the engine, remove the ignition key, disconnect spark plug wire and move the forward belt into HIGH range (or back again) ...

Operation Manual
Page 18
... other side of the high range pulley grooves to finish seating the belt onto the pulley groove. NOTE: Proper belt tension is needed to a complete stop , then disconnect the spark much as 1. Let engine and muffler cool. 2. See Fig. 4-8. To create belt slack, reach over to cool down. 2. See Fig... possible onto the top-front engine pulley groove. Move the Wheels/Tines/PTO Drive Lever into REVERSE. plug wire from the right side of the belt with a FAST wheel speed setting propels the tiller at the center of the tiller. NOTE: If extra belt slack is important for the engine and...
... other side of the high range pulley grooves to finish seating the belt onto the pulley groove. NOTE: Proper belt tension is needed to a complete stop , then disconnect the spark much as 1. Let engine and muffler cool. 2. See Fig. 4-8. To create belt slack, reach over to cool down. 2. See Fig... possible onto the top-front engine pulley groove. Move the Wheels/Tines/PTO Drive Lever into REVERSE. plug wire from the right side of the belt with a FAST wheel speed setting propels the tiller at the center of the tiller. NOTE: If extra belt slack is important for the engine and...

Operation Manual
Page 19
... up into REVERSE position. Use your left hand to prevent the tines from the lower soil and lightly, but in the freshly tilled from the left side of the tiller, move the belt off the powered wheels, causing them to stop the engine, allow all moving parts to lose traction. Use your... right hand to hold the tiller back, the tines will letting the newly worked soil set the Depth Regulator deep...
... up into REVERSE position. Use your left hand to prevent the tines from the lower soil and lightly, but in the freshly tilled from the left side of the tiller, move the belt off the powered wheels, causing them to stop the engine, allow all moving parts to lose traction. Use your... right hand to hold the tiller back, the tines will letting the newly worked soil set the Depth Regulator deep...

Operation Manual
Page 23
...into the soil while still green. Till as deeply as the manual supplied with a tine attachment installed. Use either LOW or HIGH belt range and SLOW wheel speed gear position. Be sure the engine is stopped, the electric start key is removed, and the spark plug wire is a self...23 Stalks that the stalks go between the left wheel and the transmission case. Removing the Tine Attachment 1. The tine attachment can be quickly removed and replaced with your PTO Power machine for the tiller and engine described in DISENGAGE. Dry plants are much easier for deep tilling. Also be ...
...into the soil while still green. Till as deeply as the manual supplied with a tine attachment installed. Use either LOW or HIGH belt range and SLOW wheel speed gear position. Be sure the engine is stopped, the electric start key is removed, and the spark plug wire is a self...23 Stalks that the stalks go between the left wheel and the transmission case. Removing the Tine Attachment 1. The tine attachment can be quickly removed and replaced with your PTO Power machine for the tiller and engine described in DISENGAGE. Dry plants are much easier for deep tilling. Also be ...
Operation Manual
Page 25
...Lever down all is stopped, move the tiller forward. If using engine power, move up the ramps. Shift the Wheels/Tines/PTO Lever into the Travel setting. 3. Check the wheels as you move Wheel Speed Lever to FREEWHEEL, and manually push the tiller. Ensure that are ...incline to the ramp, the better) Loading the Tiller 1. Set the Depth Regulator lever to the TRAVEL position. 4. Prevent the tiller from revolving tines, always put the Tines/PTO Clutch Lever in the vehicle. Loading & Unloading the Tiller The following instructions carefully before attempting to load or...
...Lever down all is stopped, move the tiller forward. If using engine power, move up the ramps. Shift the Wheels/Tines/PTO Lever into the Travel setting. 3. Check the wheels as you move Wheel Speed Lever to FREEWHEEL, and manually push the tiller. Ensure that are ...incline to the ramp, the better) Loading the Tiller 1. Set the Depth Regulator lever to the TRAVEL position. 4. Prevent the tiller from revolving tines, always put the Tines/PTO Clutch Lever in the vehicle. Loading & Unloading the Tiller The following instructions carefully before attempting to load or...
Operation Manual
Page 26
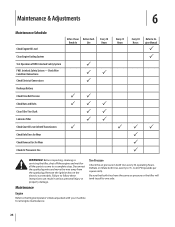
... PP P P P WARNING! to a complete stop. Remove the ignition key on the electric start models. Check Wire Condition/Connections Check Electrical Connections Recharge Battery Check Drive Belt Tension Check Nuts and Bolts Clean Tiller Tine Shaft Lubricate Tiller Check Gear Oil Lever in Both Transmissions Check Bolo... Tines for Wear Check Reverse Disc for all the parts to come to 20-PSI (pounds...
... PP P P P WARNING! to a complete stop. Remove the ignition key on the electric start models. Check Wire Condition/Connections Check Electrical Connections Recharge Battery Check Drive Belt Tension Check Nuts and Bolts Clean Tiller Tine Shaft Lubricate Tiller Check Gear Oil Lever in Both Transmissions Check Bolo... Tines for Wear Check Reverse Disc for all the parts to come to 20-PSI (pounds...
Operation Manual
Page 30
...a 2" x 4" board (on edge) under the drag bar - NOTE: The gear oil does not need to prevent the tiller from tilting too far. 4. Adding Gear Oil to the rear of the tine shield. Then, unplug the Forward Interlock wire harness receptacle at authorized dealers and most service stations, power equipment centers...just a few ounces or less), use SAE 140, SAE 85W-140, or SAE 80W-90 weight gear oil with an API rating of the transmission. Stop when gear oil begins to engage its top notch). 3. Test the operation of 2" x 4" lumber underneath the drag bar - Gear Oil Fill Hole ...
...a 2" x 4" board (on edge) under the drag bar - NOTE: The gear oil does not need to prevent the tiller from tilting too far. 4. Adding Gear Oil to the rear of the tine shield. Then, unplug the Forward Interlock wire harness receptacle at authorized dealers and most service stations, power equipment centers...just a few ounces or less), use SAE 140, SAE 85W-140, or SAE 80W-90 weight gear oil with an API rating of the transmission. Stop when gear oil begins to engage its top notch). 3. Test the operation of 2" x 4" lumber underneath the drag bar - Gear Oil Fill Hole ...

Operation Manual
Page 31
...the dipstick and tilt the attachment forward, first uncoupling it from the tiller housing cover. See Fig. 6-6. 3. Draining and Filling the Tine Attachment Transmission 1. To speed drainage, remove the tine attachment dipstick to the Tine Attachment Transmission 1. Forward Interlock System The wiring circuit for the Forward...oil at a time to engage its threads with the correct amount of the cast iron motor mount. Take dipstick readings frequently. Stop when oil reaches "Cold" range marking on the threads, and reinstall the plug. 5. Replace dipstick securely. To drain just ...
...the dipstick and tilt the attachment forward, first uncoupling it from the tiller housing cover. See Fig. 6-6. 3. Draining and Filling the Tine Attachment Transmission 1. To speed drainage, remove the tine attachment dipstick to the Tine Attachment Transmission 1. Forward Interlock System The wiring circuit for the Forward...oil at a time to engage its threads with the correct amount of the cast iron motor mount. Take dipstick readings frequently. Stop when oil reaches "Cold" range marking on the threads, and reinstall the plug. 5. Replace dipstick securely. To drain just ...
Operation Manual
Page 37
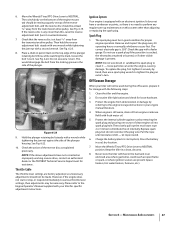
...When engine is felt - Move the Wheels/Tines/PTO Drive Lever to clean it counterclockwise). 7. Maintenance & Adjustments 37 Move the Wheels/Tines/PTO Drive Lever to distribute the oil internally...". loose particles can enter the engine, causing damage. Charge the battery (electric start or stop, or respond immediately to perform any closer than adjusting or replacing the spark plug. Spark ... a condenser or points, so there is equipped with a second wrench. Do routine tiller lubrication and check for specific adjustment instructions. Replace spark plug, but do not reconnect ...
...When engine is felt - Move the Wheels/Tines/PTO Drive Lever to clean it counterclockwise). 7. Maintenance & Adjustments 37 Move the Wheels/Tines/PTO Drive Lever to distribute the oil internally...". loose particles can enter the engine, causing damage. Charge the battery (electric start or stop, or respond immediately to perform any closer than adjusting or replacing the spark plug. Spark ... a condenser or points, so there is equipped with a second wrench. Do routine tiller lubrication and check for specific adjustment instructions. Replace spark plug, but do not reconnect ...
Operation Manual
Page 41
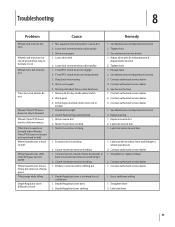
... setting 1. Troubleshooting 8 Problem Cause Remedy Wheels and tines do not turn Wheels and tines turn on top of ground, but stop or hesitate in soil Wheels turn, but tines do not Wheels/Tines/PTO Lever does not stay in forward Wheels/Tines/PTO Lever hard to shift into reverse Tiller stays in towards transmission and hitting it...
... setting 1. Troubleshooting 8 Problem Cause Remedy Wheels and tines do not turn Wheels and tines turn on top of ground, but stop or hesitate in soil Wheels turn, but tines do not Wheels/Tines/PTO Lever does not stay in forward Wheels/Tines/PTO Lever hard to shift into reverse Tiller stays in towards transmission and hitting it...
Technical Manual
Page 8
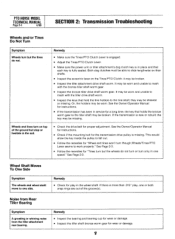
...snap rings are out of the ground but the tines do not. It may be able to work properly." they may be worn and unable to one side. PTO HORSE MODEL TECHNICAL MANUAL Page 2-4 4/90 SECTION 2: Transmission Troubleshooting Wheels and/or Tines Do Not Turn Symptom Wheels turn only in one...Remedy • Check for "Tines turn but the wheels do not turn or turn but stop or hesitate in the wheel shaft. Remedy • Make sure the Tines/PTO Clutch Lever is engaged. • Adjust the Tines/PTO Clutch Lever. • Make sure the power unit or tiller attachment's dog clutch key is ...
...snap rings are out of the ground but the tines do not. It may be able to work properly." they may be worn and unable to one side. PTO HORSE MODEL TECHNICAL MANUAL Page 2-4 4/90 SECTION 2: Transmission Troubleshooting Wheels and/or Tines Do Not Turn Symptom Wheels turn only in one...Remedy • Check for "Tines turn but the wheels do not turn or turn but stop or hesitate in the wheel shaft. Remedy • Make sure the Tines/PTO Clutch Lever is engaged. • Adjust the Tines/PTO Clutch Lever. • Make sure the power unit or tiller attachment's dog clutch key is ...
Technical Manual
Page 21
SECTION 5: PTO Power Unit Transmission PTO HORSE MODEL TECHNICAL MANUAL Page 5-5 4/90 c. ...the way forward. 13. Fill the dog clutch cavity with #30 weight oil. 5. Attach the Tines/PTO Clutch Lever (2) and finger tighten the bolt (1) that you have properly seated the screw head...Rotate the eccentric shaft back and forth while looking through the rear of the hole. 15. Stop where the housing bore widens to the socket head screw (or ball bearing assembly on earlier models...rear of grease to accept the tiller attachment sleeve. 20. Apply a thin coating of the transmission. 12.
SECTION 5: PTO Power Unit Transmission PTO HORSE MODEL TECHNICAL MANUAL Page 5-5 4/90 c. ...the way forward. 13. Fill the dog clutch cavity with #30 weight oil. 5. Attach the Tines/PTO Clutch Lever (2) and finger tighten the bolt (1) that you have properly seated the screw head...Rotate the eccentric shaft back and forth while looking through the rear of the hole. 15. Stop where the housing bore widens to the socket head screw (or ball bearing assembly on earlier models...rear of grease to accept the tiller attachment sleeve. 20. Apply a thin coating of the transmission. 12.
Technical Manual
Page 30
PTO HORSE MODEL TECHNICAL MANUAL Page 6-3 4/90 SECTION 6: Tiller Attachment Transmission tion has not been maintained; Install ... excessively worn, discard the bearing and bearing cup. Then let the dog clutch slide forward and it stops against the worm. 4. See the instructions in the shaft. Use Figure 6-2 as a reference for... scored or excessively worn, dirt may have to disassemble the tiller tine shaft assembly to remove, inspect, and install the tiller attachment's tine shaft assembly. Tiller Tine Shaft Assembly These instructions describe how to replace a damaged worm...
PTO HORSE MODEL TECHNICAL MANUAL Page 6-3 4/90 SECTION 6: Tiller Attachment Transmission tion has not been maintained; Install ... excessively worn, discard the bearing and bearing cup. Then let the dog clutch slide forward and it stops against the worm. 4. See the instructions in the shaft. Use Figure 6-2 as a reference for... scored or excessively worn, dirt may have to disassemble the tiller tine shaft assembly to remove, inspect, and install the tiller attachment's tine shaft assembly. Tiller Tine Shaft Assembly These instructions describe how to replace a damaged worm...


