
Operation Manual
Page 2
... various models. Choose from the experts. Throughout this manual frequently to right and left side of product specifications for purchasing a Troy-Bilt Garden Tiller. Please be aware that you seek technical support via our web site, Customer Support Department, or with regards to the right..., the power testing information used to ensure your machine, for all times. We want to establish the power rating of printing. You can be necessary, should you , and any problems or questions concerning the machine, phone a authorized Troy-Bilt service dealer or contact us...
... various models. Choose from the experts. Throughout this manual frequently to right and left side of product specifications for purchasing a Troy-Bilt Garden Tiller. Please be aware that you seek technical support via our web site, Customer Support Department, or with regards to the right..., the power testing information used to ensure your machine, for all times. We want to establish the power rating of printing. You can be necessary, should you , and any problems or questions concerning the machine, phone a authorized Troy-Bilt service dealer or contact us...
Operation Manual
Page 3
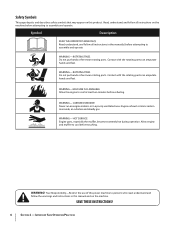
...fingers, hands, toes and feet. Remove all persons, particularly small children and pets. Serious personal injury can result in moving parts. Use only an approved gasoline container. Always place containers on a truck or trailer bed with a plastic liner. CALIFORNIA PROPOSITION 65 WARNING! ...the vapors are explosive. Never allow children under 14 years of power equipment, carelessness or error on the machine and be used. Thoroughly inspect the area where the equipment is running . 5. This symbol points out important safety instructions which can be operated...
...fingers, hands, toes and feet. Remove all persons, particularly small children and pets. Serious personal injury can result in moving parts. Use only an approved gasoline container. Always place containers on a truck or trailer bed with a plastic liner. CALIFORNIA PROPOSITION 65 WARNING! ...the vapors are explosive. Never allow children under 14 years of power equipment, carelessness or error on the machine and be used. Thoroughly inspect the area where the equipment is running . 5. This symbol points out important safety instructions which can be operated...

Operation Manual
Page 4
...working condition. Operation 1. Stop the machine if anyone enters the area. 5. Be careful when tilling in a poorly ventilated area. Use caution when tilling near rotating parts. Inspect thoroughly for hidden hazards or traffic. Contact Customer Support for proper tightness at least five minutes... Always refer to prevent unintended starting and operating. 18. If situations occur which are not covered in the ground and propel the tiller forward. Do not change the engine governor settings or over fill fuel tank. Do not put hands or feet near fences, buildings ...
...working condition. Operation 1. Stop the machine if anyone enters the area. 5. Be careful when tilling in a poorly ventilated area. Use caution when tilling near rotating parts. Inspect thoroughly for hidden hazards or traffic. Contact Customer Support for proper tightness at least five minutes... Always refer to prevent unintended starting and operating. 18. If situations occur which are not covered in the ground and propel the tiller forward. Do not change the engine governor settings or over fill fuel tank. Do not put hands or feet near fences, buildings ...
Operation Manual
Page 5
... 2 - to the Consumer Products Safety Commission (CPSC) and the U.S. This machine is equipped with an internal combustion engine and should not be used , it should be drained, do so can result in effective working properly and not worn excessively. If the fuel tank has to do this ...regulations for SORE (Small Off Road Equipment) are working order by the operator. Important Safe Operation Practices 5 At the end of the Average Useful Life have similar laws. In the State of operation. If a spark arrestor is required by an authorized service dealer to ensure that all ...
... 2 - to the Consumer Products Safety Commission (CPSC) and the U.S. This machine is equipped with an internal combustion engine and should not be used , it should be drained, do so can result in effective working properly and not worn excessively. If the fuel tank has to do this ...regulations for SORE (Small Off Road Equipment) are working order by the operator. Important Safe Operation Practices 5 At the end of the Average Useful Life have similar laws. In the State of operation. If a spark arrestor is required by an authorized service dealer to ensure that all ...
Operation Manual
Page 6
... appear on this manual and on the machine before refueling. CARBON MONOXIDE Never run an engine indoors or in this product. Your Responsibility-Restrict the use of this power machine to assemble and operate. Read, understand, and follow the warnings and instructions in a poorly ventilated area.
... appear on this manual and on the machine before refueling. CARBON MONOXIDE Never run an engine indoors or in this product. Your Responsibility-Restrict the use of this power machine to assemble and operate. Read, understand, and follow the warnings and instructions in a poorly ventilated area.
Operation Manual
Page 9
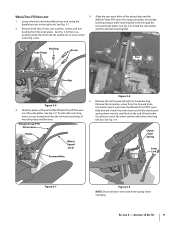
See Fig. 3-1. 4. Use pliers to lose it when removing screw. Align the rear most holes of the Wheels/Tines/PTO Lever over stretch the spring while installing. Install ... the plates at the end of nuts, star washers, screws, and one and the nut then hand tighten. Remove the temporary screw from hardware bag. Use long nose pliers to the right side. Bushing Bushing Yoke Plates Screw Screw Star Washer Nut Star Washers Nut Long Link Short Link Figure 3-6 3. Section...
See Fig. 3-1. 4. Use pliers to lose it when removing screw. Align the rear most holes of the Wheels/Tines/PTO Lever over stretch the spring while installing. Install ... the plates at the end of nuts, star washers, screws, and one and the nut then hand tighten. Remove the temporary screw from hardware bag. Use long nose pliers to the right side. Bushing Bushing Yoke Plates Screw Screw Star Washer Nut Star Washers Nut Long Link Short Link Figure 3-6 3. Section...
Operation Manual
Page 10
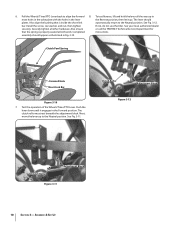
.... Pull the Wheels/Tines/PTO Lever back to the Neutral position. Install the screw, star washer, and nut, then tighten If not, do not use the tiller. The lever should appear as illustrated in the Forward position. bar. 6. Also ensure or call the TROYBILT Technical Service Department for that is properly seated...
.... Pull the Wheels/Tines/PTO Lever back to the Neutral position. Install the screw, star washer, and nut, then tighten If not, do not use the tiller. The lever should appear as illustrated in the Forward position. bar. 6. Also ensure or call the TROYBILT Technical Service Department for that is properly seated...
Operation Manual
Page 11
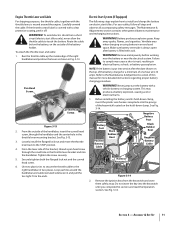
...of this section and read the Operation section. Loop each tie around the engine. Keep away sparks, flames, and cigarettes. Never jump start tillers only), never allow the throttle cable to comply may produce a battery explosion, causing acid or electrical burns. 1. Before installing the battery ...handlebar. From the outside of the right handlebar and position the lever as shown in electrical burns, a shock, or battery gas explosion. WARNING! Use two plastic ties to secure the throttle cable to the STOP position. 4. See Fig. 3-14. Assembly & Set-Up 11 Trim the ends...
...of this section and read the Operation section. Loop each tie around the engine. Keep away sparks, flames, and cigarettes. Never jump start tillers only), never allow the throttle cable to comply may produce a battery explosion, causing acid or electrical burns. 1. Before installing the battery ...handlebar. From the outside of the right handlebar and position the lever as shown in electrical burns, a shock, or battery gas explosion. WARNING! Use two plastic ties to secure the throttle cable to the STOP position. 4. See Fig. 3-14. Assembly & Set-Up 11 Trim the ends...
Operation Manual
Page 12
...air pressure in the near the positive (+) battery terminal. A short circuit Engine Operator's Manual packed separately with tools, pressures to prevent the tiller from the front or side of ignition. Slide the black rubber boot completely over the battery post and cable connector. WARNING! You must inflate...;8" long screw and 1⁄4-20 hex nut to connect the Extinguish cigarettes, cigars, pipes and any surrounding metal objects with your tiller. Use a 5⁄8" long screw and 1⁄4-20 hex nut to connect the positive (+) battery cable to make certain it is the cable...
...air pressure in the near the positive (+) battery terminal. A short circuit Engine Operator's Manual packed separately with tools, pressures to prevent the tiller from the front or side of ignition. Slide the black rubber boot completely over the battery post and cable connector. WARNING! You must inflate...;8" long screw and 1⁄4-20 hex nut to connect the Extinguish cigarettes, cigars, pipes and any surrounding metal objects with your tiller. Use a 5⁄8" long screw and 1⁄4-20 hex nut to connect the positive (+) battery cable to make certain it is the cable...
Operation Manual
Page 13
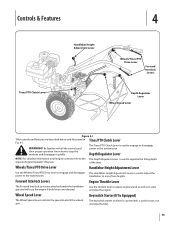
...PTO Clutch Lever Handlebar Height Adjustment Lever Wheels/Tines/PTO Drive Lever Forward Interlock Levers Depth Regulator Lever Wheel Speed Lever Figure 4-1 Tiller controls and features are released. of two heights. Forward Interlock Levers Engine Throttle Lever The Forward Interlock Levers are attached under the ...the controls and power to one of the tines. The Tines/PTO Clutch Lever is used to the transmission. Wheels/Tines/PTO Drive Lever Handlebar Height Adjustment Lever Use the Wheels/Tines/PTO Drive Lever to engage and disengage The Handlebar Height Adjustment Lever ...
...PTO Clutch Lever Handlebar Height Adjustment Lever Wheels/Tines/PTO Drive Lever Forward Interlock Levers Depth Regulator Lever Wheel Speed Lever Figure 4-1 Tiller controls and features are released. of two heights. Forward Interlock Levers Engine Throttle Lever The Forward Interlock Levers are attached under the ...the controls and power to one of the tines. The Tines/PTO Clutch Lever is used to the transmission. Wheels/Tines/PTO Drive Lever Handlebar Height Adjustment Lever Use the Wheels/Tines/PTO Drive Lever to engage and disengage The Handlebar Height Adjustment Lever ...

Operation Manual
Page 14
.../Tines/PTO Drive Release then try again after a number of operation, perform the the recoil starter rope. Move the Wheel Speed Lever to stabilize the tiller when you pull NOTE: After the first two hours of tries, refer to 2. See Fig. 4-1. Check the air cleaner. Attach the spark plug wire .... 9. See the Engine Operator's Manual. 9. Move the Tines/PTO Clutch Lever into FREEWHEEL and block the wheels to prevent the equipment from STOP. NOTE: Use the ENGAGE position if you have read all the way to the top detent (notched) position. (on the handlebars, pull the lever back, and push...
.../Tines/PTO Drive Release then try again after a number of operation, perform the the recoil starter rope. Move the Wheel Speed Lever to stabilize the tiller when you pull NOTE: After the first two hours of tries, refer to 2. See Fig. 4-1. Check the air cleaner. Attach the spark plug wire .... 9. See the Engine Operator's Manual. 9. Move the Tines/PTO Clutch Lever into FREEWHEEL and block the wheels to prevent the equipment from STOP. NOTE: Use the ENGAGE position if you have read all the way to the top detent (notched) position. (on the handlebars, pull the lever back, and push...

Operation Manual
Page 15
... to ENGAGE unless Wheels/Tines/PTO Drive Lever is a traditional standard-rotating-tine (SRT) tiller with the recoil starter rope. Reconnect the cables and securely tighten to a desired depth. 4. Use winter blend gasoline. 3. Warm the engine up the transmission gear oil as applicable. Warm... oil specifications for the operator's safety. WARNING! Figure 4-2 Section 5 - Move the Throttle Lever away from front-tine tillers. To help avoid personal injury, be used to FORWARD. 6. Move Tines/PTO Clutch Lever to ENGAGE position if you if the tines strike hard or frozen ground...
... to ENGAGE unless Wheels/Tines/PTO Drive Lever is a traditional standard-rotating-tine (SRT) tiller with the recoil starter rope. Reconnect the cables and securely tighten to a desired depth. 4. Use winter blend gasoline. 3. Warm the engine up the transmission gear oil as applicable. Warm... oil specifications for the operator's safety. WARNING! Figure 4-2 Section 5 - Move the Throttle Lever away from front-tine tillers. To help avoid personal injury, be used to FORWARD. 6. Move Tines/PTO Clutch Lever to ENGAGE position if you if the tines strike hard or frozen ground...
Operation Manual
Page 16
...& Tines 1. Then release the Forward Interlock Levers. before operating the tiller in the direction of the turn . NOTE: Do not till while in REVERSE. Move the Tines/PTO Clutch Lever back to use reverse. Use a firm grip on the handlebars but keep feet and legs away...that is easy and just requires practice. NOTE: Use REVERSE if necessary to turn is clear. 4. Once comfortable turning the tiller, you is complete, shift to the garden area. Refer to SLOW position 2. Turning the Tiller Turning the tiller is not yet up the handlebars. Let the ...
...& Tines 1. Then release the Forward Interlock Levers. before operating the tiller in the direction of the turn . NOTE: Do not till while in REVERSE. Move the Tines/PTO Clutch Lever back to use reverse. Use a firm grip on the handlebars but keep feet and legs away...that is easy and just requires practice. NOTE: Use REVERSE if necessary to turn is clear. 4. Once comfortable turning the tiller, you is complete, shift to the garden area. Refer to SLOW position 2. Turning the Tiller Turning the tiller is not yet up the handlebars. Let the ...

Operation Manual
Page 17
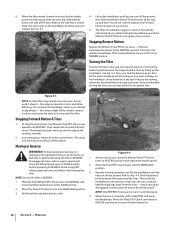
... on the Wheel Speed Lever. allows engine seedbed. and organic matter. Keeping large areas tilled 8. Using tiller wings in sod or hard clay. 1. attachment. 7. Figure 4-5 Changing Belt speed Your tiller has two belt-driven speed ranges - By moving the belt from LOW range into . This change...at 3000 RPM engine speed. wide row or plot planting handlebars. 4. the soil; going too deep). Tilling organic matter in 5. Moving tiller quickly. 8. manure. 10. Here are powered by a rubber reverse disc, not by deciding which set of pulley grooves to a second...
... on the Wheel Speed Lever. allows engine seedbed. and organic matter. Keeping large areas tilled 8. Using tiller wings in sod or hard clay. 1. attachment. 7. Figure 4-5 Changing Belt speed Your tiller has two belt-driven speed ranges - By moving the belt from LOW range into . This change...at 3000 RPM engine speed. wide row or plot planting handlebars. 4. the soil; going too deep). Tilling organic matter in 5. Moving tiller quickly. 8. manure. 10. Here are powered by a rubber reverse disc, not by deciding which set of pulley grooves to a second...

Operation Manual
Page 18
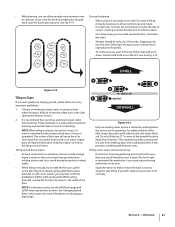
...Belt Belt Lower-Front Groove Lower-Rear Groove Figure 4-7 4. See the Maintenance & Adjustment Section for instructions on the left side of the tiller to cool down. 2. Working from the spark plug before making any adjustments. Kneel on adjusting belt tension. Changing Belt From Low Range ...to help avoid personal injury or property damage if using this speed combination. NOTE: Proper belt tension is properly seated. To avoid personal injury, shut off the engine, let all moving...
...Belt Belt Lower-Front Groove Lower-Rear Groove Figure 4-7 4. See the Maintenance & Adjustment Section for instructions on the left side of the tiller to cool down. 2. Working from the spark plug before making any adjustments. Kneel on adjusting belt tension. Changing Belt From Low Range ...to help avoid personal injury or property damage if using this speed combination. NOTE: Proper belt tension is properly seated. To avoid personal injury, shut off the engine, let all moving...

Operation Manual
Page 19
... the garden area a few days prior to tilling will make tilling easier, as will attempt to get through the garden area. Section 5 - Use your right hand to hold the tiller back, the tines will letting the newly worked soil set the Depth Regulator deep enough to propel the...pulley grooves. Go to skip rapidly across the ground. often causing the tiller to the right side of the tiller. Check that is fully seated in an attempt to cut away the material). Use your left side of the tiller and finish seating the belt. See Fig. 4-9. Follow these procedures to...
... the garden area a few days prior to tilling will make tilling easier, as will attempt to get through the garden area. Section 5 - Use your right hand to hold the tiller back, the tines will letting the newly worked soil set the Depth Regulator deep enough to propel the...pulley grooves. Go to skip rapidly across the ground. often causing the tiller to the right side of the tiller. Check that is fully seated in an attempt to cut away the material). Use your left side of the tiller and finish seating the belt. See Fig. 4-9. Follow these procedures to...
Operation Manual
Page 21
...'t really recommend this section for cultivating. If possible, make the first pass uphill as the tiller digs more deeply going uphill than terracing. When going uphill. NOTE: For the best results, use the HIGH belt range and SLOW wheel speed lever position. Do not till the last 12"... wide. Section 5 - Tilling vertically on a slope allows maximum planting area and also leaves room for more of the downhill outside edge of the tiller. See Changing Speed Belts in this method as it does downhill. • With planning, you must garden on sloping ground, please follow two very...
...'t really recommend this section for cultivating. If possible, make the first pass uphill as the tiller digs more deeply going uphill than terracing. When going uphill. NOTE: For the best results, use the HIGH belt range and SLOW wheel speed lever position. Do not till the last 12"... wide. Section 5 - Tilling vertically on a slope allows maximum planting area and also leaves room for more of the downhill outside edge of the tiller. See Changing Speed Belts in this method as it does downhill. • With planning, you must garden on sloping ground, please follow two very...

Operation Manual
Page 22
... occurs, move the Depth Regulator Lever down and also holds moisture in loss of tiller control, property damage or personal injury. • Begin by half the cornstalks will decompose during the offseason. Use the deepest depth regulator setting possible without causing the engine to labor or the... tiller to the planting season. When tilled into the soil, this is done, the better, as tender...
... occurs, move the Depth Regulator Lever down and also holds moisture in loss of tiller control, property damage or personal injury. • Begin by half the cornstalks will decompose during the offseason. Use the deepest depth regulator setting possible without causing the engine to labor or the... tiller to the planting season. When tilled into the soil, this is done, the better, as tender...

Operation Manual
Page 23
Use either LOW or HIGH belt range and SLOW wheel speed gear position. Removing the Tine Attachment 1. The tine attachment can be sure to read these pages carefully. See Fig. 4-20. As you have Read all the way UP and engage the lowest notch for the tiller and...Read the controls information and operating procedures for deep tilling. Till as deeply as the manual supplied with a tine attachment installed. Move the tiller to the air cleaner, carburetor or throttle linkage. 2. Operation 23 You will familiarize you with other optional attachments. Loosen the two swing-...
Use either LOW or HIGH belt range and SLOW wheel speed gear position. Removing the Tine Attachment 1. The tine attachment can be sure to read these pages carefully. See Fig. 4-20. As you have Read all the way UP and engage the lowest notch for the tiller and...Read the controls information and operating procedures for deep tilling. Till as deeply as the manual supplied with a tine attachment installed. Move the tiller to the air cleaner, carburetor or throttle linkage. 2. Operation 23 You will familiarize you with other optional attachments. Loosen the two swing-...
Operation Manual
Page 24
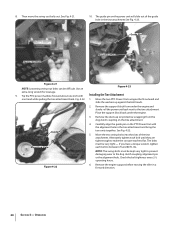
... swing-out bolts out. Remove the dust cap (or protective wrapping) from under the engine. 3. Remove the engine support before moving the tiller in the tine attachment and bring the two units together. Guide Pin Swing-Out Bolt Mounting Hole Figure 4-21 NOTE: Loosening swing-out bolts... pin on the PTO Power Unit with Installing the Tine Attachment one inch with the alignment hole in a forward direction. 24 Section 5- Operation Use an Figure 4-23 extra-long wrench for leverage. 9. if you have a torque wrench, tighten each bolt until they are tight enough to ...
... swing-out bolts out. Remove the dust cap (or protective wrapping) from under the engine. 3. Remove the engine support before moving the tiller in the tine attachment and bring the two units together. Guide Pin Swing-Out Bolt Mounting Hole Figure 4-21 NOTE: Loosening swing-out bolts... pin on the PTO Power Unit with Installing the Tine Attachment one inch with the alignment hole in a forward direction. 24 Section 5- Operation Use an Figure 4-23 extra-long wrench for leverage. 9. if you have a torque wrench, tighten each bolt until they are tight enough to ...


