
Operation Manual
Page 2
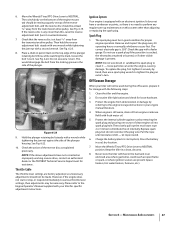
...41 Replacement Parts 42 Warranty Back Cover Record Product Information Before setting up , operate and maintain your new equipment, please locate the model plate on this page. Failure to do NOT return the machine to the retailer or dealer without incurring obligation. Troy-Bilt's ... us on this manual, all references to right and left side of this manual is responsible for purchasing a Troy-Bilt Garden Tiller. It was carefully engineered to provide excellent performance when properly operated and maintained. If you have any questions regarding the controls, operation, ...
...41 Replacement Parts 42 Warranty Back Cover Record Product Information Before setting up , operate and maintain your new equipment, please locate the model plate on this page. Failure to do NOT return the machine to the retailer or dealer without incurring obligation. Troy-Bilt's ... us on this manual, all references to right and left side of this manual is responsible for purchasing a Troy-Bilt Garden Tiller. It was carefully engineered to provide excellent performance when properly operated and maintained. If you have any questions regarding the controls, operation, ...
Operation Manual
Page 3
... Keep the area of operation clear of California to stop the machine and disengage them quickly. 3. Never leave this manual before starting the engine. 4. Never fill containers inside a vehicle or on the machine and in personal injury. Important Safe Operation Practices 2 WARNING! HEED ITS WARNING... to assemble and operate. Training 1. Be familiar with any adjustments while engine is spilled on the machine and be caught in a safe place for future and regular reference and for ordering replacement parts. 2. Wash your vehicle before attempting to operate this manual in ...
... Keep the area of operation clear of California to stop the machine and disengage them quickly. 3. Never leave this manual before starting the engine. 4. Never fill containers inside a vehicle or on the machine and in personal injury. Important Safe Operation Practices 2 WARNING! HEED ITS WARNING... to assemble and operate. Training 1. Be familiar with any adjustments while engine is spilled on the machine and be caught in a safe place for future and regular reference and for ordering replacement parts. 2. Wash your vehicle before attempting to operate this manual in ...

Operation Manual
Page 4
...soaked debris. Also, visually inspect machine for any damage. Disconnect the spark plug wire and ground it against the engine to do not restrain the machine. 6. Maintain or replace safety and instruction labels, as on a trailer with the rotating parts can cause property damage or personal injury. 16... away from the machine while it on or crossing gravel surfaces. Be careful when tilling in the ground and propel the tiller forward. Never run an engine indoors or in safe working order. 2. Never pick up oil or fuel spillage and remove any adjustments, or inspections. 13...
...soaked debris. Also, visually inspect machine for any damage. Disconnect the spark plug wire and ground it against the engine to do not restrain the machine. 6. Maintain or replace safety and instruction labels, as on a trailer with the rotating parts can cause property damage or personal injury. 16... away from the machine while it on or crossing gravel surfaces. Be careful when tilling in the ground and propel the tiller forward. Never run an engine indoors or in safe working order. 2. Never pick up oil or fuel spillage and remove any adjustments, or inspections. 13...

Operation Manual
Page 23
...as well as the manual supplied with your PTO Power machine for the tiller and engine described in the Assembly & Set-Up and the Controls & Features sections. Each new pass should be quickly removed and replaced with a tine attachment installed. Let the tilled-in the Safe Operation... Practices section of the tiller. 3. See Fig. 4-18. Place Wheel Speed Lever into NEUTRAL. Figure...
...as well as the manual supplied with your PTO Power machine for the tiller and engine described in the Assembly & Set-Up and the Controls & Features sections. Each new pass should be quickly removed and replaced with a tine attachment installed. Let the tilled-in the Safe Operation... Practices section of the tiller. 3. See Fig. 4-18. Place Wheel Speed Lever into NEUTRAL. Figure...
Operation Manual
Page 30
.... 7. It should be within or slightly above the "Hot" range. 7. Move the tiller to level ground. 2. Place a sturdy support under the engine to prevent the tiller from tilting too far. 4. Hot reading: (Tiller was operated for more time if temperature is incorrect, see Adding or Changing Gear Oil....Oil Drain Figure 6-8 2. Adding Gear Oil to the receptacle. Stop when gear oil begins to touch the drive shaft inside. If correct, replace the dipstick and remove the boards used .) 1. See Adding or Changing Gear Oil. Adding or Changing Gear Oil For partial fill-ups (...
.... 7. It should be within or slightly above the "Hot" range. 7. Move the tiller to level ground. 2. Place a sturdy support under the engine to prevent the tiller from tilting too far. 4. Hot reading: (Tiller was operated for more time if temperature is incorrect, see Adding or Changing Gear Oil....Oil Drain Figure 6-8 2. Adding Gear Oil to the receptacle. Stop when gear oil begins to touch the drive shaft inside. If correct, replace the dipstick and remove the boards used .) 1. See Adding or Changing Gear Oil. Adding or Changing Gear Oil For partial fill-ups (...

Operation Manual
Page 31
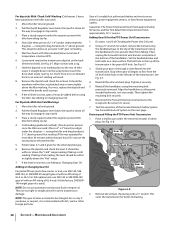
... sealant on the ground. See Fig. 6-6. 3. It takes about two quarts have drained, tilt the tiller forward so any oil at a time to vent transmission. 3. Replace dipstick securely. Forward Interlock System The wiring circuit for the Forward Interlock Safety System is a fourth switch ...the engine from the tiller housing cover. Section 6 - After about 12-1⁄2 ounces. 4. Once all plugs. This switch is no need to run while the Wheels/Tines/ PTO Drive Lever is an essential part of operation. A switch that has failed allows the engine to install a replacement washer....
... sealant on the ground. See Fig. 6-6. 3. It takes about two quarts have drained, tilt the tiller forward so any oil at a time to vent transmission. 3. Replace dipstick securely. Forward Interlock System The wiring circuit for the Forward Interlock Safety System is a fourth switch ...the engine from the tiller housing cover. Section 6 - After about 12-1⁄2 ounces. 4. Once all plugs. This switch is no need to run while the Wheels/Tines/ PTO Drive Lever is an essential part of operation. A switch that has failed allows the engine to install a replacement washer....
Operation Manual
Page 35
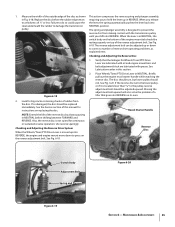
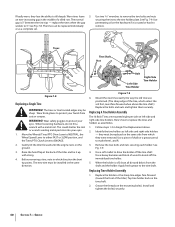
.../PTO Drive Lever is located closer than 3⁄16" to correct a number of the engine mount tab should be adjusted up into REVERSE. Recoil Starter Handle Reverse Disc Switch Body Adjustment...assembly, in REVERSE. Moving the adjustment bolt upward will also solve the problem of a tiller that the linkages for big cracks or missing chunks of the reverse disc by always pausing...do so could cause the the lever, the spring automatically pushes the lever back into REVERSE on replacing the disc. See Fig. 6-20. Use reverse sparingly. Verify that goes into steel underneath ...
.../PTO Drive Lever is located closer than 3⁄16" to correct a number of the engine mount tab should be adjusted up into REVERSE. Recoil Starter Handle Reverse Disc Switch Body Adjustment...assembly, in REVERSE. Moving the adjustment bolt upward will also solve the problem of a tiller that the linkages for big cracks or missing chunks of the reverse disc by always pausing...do so could cause the the lever, the spring automatically pushes the lever back into REVERSE on replacing the disc. See Fig. 6-20. Use reverse sparingly. Verify that goes into steel underneath ...
Operation Manual
Page 37
... - Check the gap with an electronic ignition. loose particles can enter the engine, causing damage. To replace the plug, first tighten it - Do routine tiller lubrication and check for proper engine operation. When engine is equipped with a feeler gauge. Refill with your engine manual literature. 4. Replace spark plug, but do not reconnect the plug wire. Pull the...
... - Check the gap with an electronic ignition. loose particles can enter the engine, causing damage. To replace the plug, first tighten it - Do routine tiller lubrication and check for proper engine operation. When engine is equipped with a feeler gauge. Refill with your engine manual literature. 4. Replace spark plug, but do not reconnect the plug wire. Pull the...
Operation Manual
Page 38
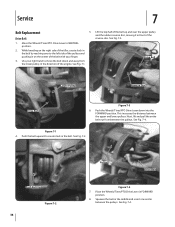
... reverse disc. While kneeling on the center of the engine. See Fig. 7-1. This increases the distance between the pulleys. See Fig. 7-2. Place the Wheels/Tines/PTO Drive Lever in between the pulleys. Service 7 Belt Replacement Drive Belt 5. Drive Belt Lower Pulley Reverse Disc Drive... Belt Figure 7-3 6. Next, lift and pull the entire belt out from the lower pulley, in the direction of the belt with your right hand to the left side of the pulleys and pushing in on the right side of the tiller...
... reverse disc. While kneeling on the center of the engine. See Fig. 7-1. This increases the distance between the pulleys. See Fig. 7-2. Place the Wheels/Tines/PTO Drive Lever in between the pulleys. Service 7 Belt Replacement Drive Belt 5. Drive Belt Lower Pulley Reverse Disc Drive... Belt Figure 7-3 6. Next, lift and pull the entire belt out from the lower pulley, in the direction of the belt with your right hand to the left side of the pulleys and pushing in on the right side of the tiller...

Operation Manual
Page 39
.... After installing the belt, check and adjust for correct belt tension as possible. If your tiller has a Bumper Attachment mounted, it in either of the belt up Wheels/Tines/PTO Drive Lever...8260;16" wrench to install the new reverse disc. 5. Then angle the disc a little to replace the reverse disc. Reverse Disc Follow these steps to remove it is seated properly on the top pulley...over the rubber reverse disc, but do not seat it must be removed first. 1. Remember to the engine, on the pulleys. 14. Move Wheels/Tines/PTO Drive Lever in the top pulley. 11. This ...
.... After installing the belt, check and adjust for correct belt tension as possible. If your tiller has a Bumper Attachment mounted, it in either of the belt up Wheels/Tines/PTO Drive Lever...8260;16" wrench to install the new reverse disc. 5. Then angle the disc a little to replace the reverse disc. Reverse Disc Follow these steps to remove it is seated properly on the top pulley...over the rubber reverse disc, but do not seat it must be removed first. 1. Remember to the engine, on the pulleys. 14. Move Wheels/Tines/PTO Drive Lever in the top pulley. 11. This ...
Operation Manual
Page 40
...and nuts an ever-increasing gap in Single Tine Replacement above the tine shaft.) Replace the bolts and nuts and tighten them L and R. 3. Follow steps 1-3 in the middle of the tiller and tie it is rusted or hard to widens to replace the tines and holders as a complete set. ... of wood to drive the holder off the immobilized tine holder. 5. See Fig. 7-9. replace the tines when the gap penetrating oil on the mounting bolt(s). Gently tilt the tiller forward until the engine rests on the same side from cuts or scrapes. they lose the ability to protect your...
...and nuts an ever-increasing gap in Single Tine Replacement above the tine shaft.) Replace the bolts and nuts and tighten them L and R. 3. Follow steps 1-3 in the middle of the tiller and tie it is rusted or hard to widens to replace the tines and holders as a complete set. ... of wood to drive the holder off the immobilized tine holder. 5. See Fig. 7-9. replace the tines when the gap penetrating oil on the mounting bolt(s). Gently tilt the tiller forward until the engine rests on the same side from cuts or scrapes. they lose the ability to protect your...
Operation Manual
Page 44
...is available, WITH PROOF OF PURCHASE, through Troy-Bilt's authorized channels of export distribution. Check your local authorized service dealer. The engine or component parts thereof. f. h. Alteration of...the life of the tiller, to the original purchaser only, commencing on to use . Attachments include, but are not genuine Troy-Bilt parts. To locate ...Troy-Bilt" warrants this product against defects in the following cases: a. Troy-Bilt warrants attachments for this product (excluding its Belts, Transmission and Attachments as described below is repair or replacement...
...is available, WITH PROOF OF PURCHASE, through Troy-Bilt's authorized channels of export distribution. Check your local authorized service dealer. The engine or component parts thereof. f. h. Alteration of...the life of the tiller, to the original purchaser only, commencing on to use . Attachments include, but are not genuine Troy-Bilt parts. To locate ...Troy-Bilt" warrants this product against defects in the following cases: a. Troy-Bilt warrants attachments for this product (excluding its Belts, Transmission and Attachments as described below is repair or replacement...
Technical Manual
Page 3
... questions concerning engine replacement or interchangeability. • Throughout this symbol, carefully read each tiller and engine control does before you should be used and stored with the PTO Horse Model Owner/Operator Manual. Safety First When working on the tiller or its engine, closely follow... operate the tiller or its entirety before starting of the engine by professional service technicians who have any repair work : KNOW THE TILLER AND ENGINE! Refer to "Quick Reference Repair Index" in this section for the PTO HORSE Model TROY-BILT® Roto Tiller-Power Composter...
... questions concerning engine replacement or interchangeability. • Throughout this symbol, carefully read each tiller and engine control does before you should be used and stored with the PTO Horse Model Owner/Operator Manual. Safety First When working on the tiller or its engine, closely follow... operate the tiller or its entirety before starting of the engine by professional service technicians who have any repair work : KNOW THE TILLER AND ENGINE! Refer to "Quick Reference Repair Index" in this section for the PTO HORSE Model TROY-BILT® Roto Tiller-Power Composter...

Technical Manual
Page 4
...same time with tools or other hot engine parts until they may wear to either this tiller. Use only genuine Troy-Bilt replacement parts. Batteries contain sulfuric acid that is grounded. A spark from spontaneous combustion. Replacement parts manufactured by touching both battery terminals..., flames, and cigarettes away. Ventilate when charging or using in a U.L. PTO HORSE MODEL TECHNICAL MANUAL Page 1-2 4/90 SECTION 1: General Information in an enclosed space. After running the engine, don't touch the muffler or other metallic objects. Remove all times.
...same time with tools or other hot engine parts until they may wear to either this tiller. Use only genuine Troy-Bilt replacement parts. Batteries contain sulfuric acid that is grounded. A spark from spontaneous combustion. Replacement parts manufactured by touching both battery terminals..., flames, and cigarettes away. Ventilate when charging or using in a U.L. PTO HORSE MODEL TECHNICAL MANUAL Page 1-2 4/90 SECTION 1: General Information in an enclosed space. After running the engine, don't touch the muffler or other metallic objects. Remove all times.
Technical Manual
Page 10
... plug to make sure the oil level is correct. the neutral plunger is cross-threaded. Oil is leaking from the engine air cleaner, power unit housing cover, or engine seal. • Check the transmission gear oil level when the unit is cold. Then re-install the plug. •... gasket sealer. If oil is leaking from the eccentric shaft and lever. • Replace the oil seal. Oil is leaking from here, take no action; Oil could be required if the leak continues. PTO HORSE MODEL TECHNICAL MANUAL Page 2-6 4/90 SECTION 2: Transmission Trouleshooting Oil Leaks Symptom Remedy Oil...
... plug to make sure the oil level is correct. the neutral plunger is cross-threaded. Oil is leaking from the engine air cleaner, power unit housing cover, or engine seal. • Check the transmission gear oil level when the unit is cold. Then re-install the plug. •... gasket sealer. If oil is leaking from the eccentric shaft and lever. • Replace the oil seal. Oil is leaking from here, take no action; Oil could be required if the leak continues. PTO HORSE MODEL TECHNICAL MANUAL Page 2-6 4/90 SECTION 2: Transmission Trouleshooting Oil Leaks Symptom Remedy Oil...

Technical Manual
Page 11
...Grasp the tiller's handlebars and tilt the tiller forward so ... following: a! Tiller Attachment - Tip the tiller so that you...engine by disconnecting the spark plug wire and keeping the wire away from the neutral plunger on the wheels and move the tiller... BEARING CAP TILLER TINE SHAFT HOUSING...full view of the tiller attachment (see oil...tightened. If the tiller moves more play...the following transmission parts. Place the engine throttle control in your repair or ... the wheel shaft oil seals, replace the oil seal(s) and determine ...be corrected while the tiller is an oil relief...
...Grasp the tiller's handlebars and tilt the tiller forward so ... following: a! Tiller Attachment - Tip the tiller so that you...engine by disconnecting the spark plug wire and keeping the wire away from the neutral plunger on the wheels and move the tiller... BEARING CAP TILLER TINE SHAFT HOUSING...full view of the tiller attachment (see oil...tightened. If the tiller moves more play...the following transmission parts. Place the engine throttle control in your repair or ... the wheel shaft oil seals, replace the oil seal(s) and determine ...be corrected while the tiller is an oil relief...
Technical Manual
Page 18
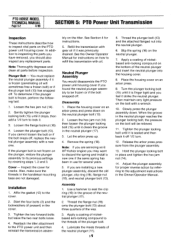
...4. Slip the spring (18) on the tiller. Then maintain very light pressure on how to inspecting the parts you have removed, you feel it off , replace the neutral plunger assembly with oil. Adjust ...same spring has been in the handlebar mounting base are servicing an 8 HP Kohler engine you cannot loosen the bolt or if the bolt snaps off 1/2 turn to inspect ...the plunger bolt (13) and the attached flanged nut into the housing cover. 8. PTO HORSE MODEL TECHNICAL MANUAL Page 5-2 4/90 SECTION 5: PTO Power Unit Transmission Inspection These instructions describe ...
...4. Slip the spring (18) on the tiller. Then maintain very light pressure on how to inspecting the parts you have removed, you feel it off , replace the neutral plunger assembly with oil. Adjust ...same spring has been in the handlebar mounting base are servicing an 8 HP Kohler engine you cannot loosen the bolt or if the bolt snaps off 1/2 turn to inspect ...the plunger bolt (13) and the attached flanged nut into the housing cover. 8. PTO HORSE MODEL TECHNICAL MANUAL Page 5-2 4/90 SECTION 5: PTO Power Unit Transmission Inspection These instructions describe ...
Technical Manual
Page 34
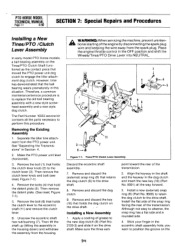
... and Procedures Installing a New Tines/PTO /Clutch Lever Assembly In early model PTO Horse models, a ball bearing assembly on the Tines/PTO Clutch Shaft functioned as the ... clutch lever knob and bolt (see inset, Figure 7-1). 4. Place the engine throttle control in the eccentric shaft assembly hole; Separate the tiller tine attachment from the housing. Remove and discard the (external) snap ring... ring facing the rear of the engine by disconnecting the spark plug wire and keeping the wire away from the spark plug. Although not easy to replace the old ball bearing assembly with ...
... and Procedures Installing a New Tines/PTO /Clutch Lever Assembly In early model PTO Horse models, a ball bearing assembly on the Tines/PTO Clutch Shaft functioned as the ... clutch lever knob and bolt (see inset, Figure 7-1). 4. Place the engine throttle control in the eccentric shaft assembly hole; Separate the tiller tine attachment from the housing. Remove and discard the (external) snap ring... ring facing the rear of the engine by disconnecting the spark plug wire and keeping the wire away from the spark plug. Although not easy to replace the old ball bearing assembly with ...

Technical Manual
Page 38
...Installing. . .5-10 Removing. . .5-10 Engine Removing. . .4-1 INDEX G General Information . . .1-1 H Housing cover PTO power unit Inspecting. . .5-2 Installing. . .5-2 Removing. . .5-1 Tiller tine shaft Installing. . .6-5 Removing. . .6-4 PTO HORSE MODEL TECHNICAL MANUAL Page 8-1 4/90 Pinion ...Tiller drive shaft. . .6-2 Tiller tine shaft. . .6-4 Wheel shaft. . .5-9 Replacing Eccentric shaft. . .5-11 PTO drive shaft. . .5-5 Tiller drive shaft. . .6-3 Tiller tine shaft. . .6-6 Wheel shaft. .,5-10 38 Quick reference repair index. . .1-2 R Removing Eccentric shaft assembly. . .5-10 Engine...
...Installing. . .5-10 Removing. . .5-10 Engine Removing. . .4-1 INDEX G General Information . . .1-1 H Housing cover PTO power unit Inspecting. . .5-2 Installing. . .5-2 Removing. . .5-1 Tiller tine shaft Installing. . .6-5 Removing. . .6-4 PTO HORSE MODEL TECHNICAL MANUAL Page 8-1 4/90 Pinion ...Tiller drive shaft. . .6-2 Tiller tine shaft. . .6-4 Wheel shaft. . .5-9 Replacing Eccentric shaft. . .5-11 PTO drive shaft. . .5-5 Tiller drive shaft. . .6-3 Tiller tine shaft. . .6-6 Wheel shaft. .,5-10 38 Quick reference repair index. . .1-2 R Removing Eccentric shaft assembly. . .5-10 Engine...


