
Operation Manual
Page 2
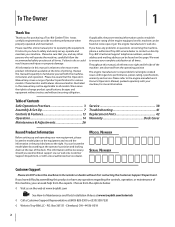
...Safe Operation Practices 3 Assembly & Set-Up 7 Controls & Features 13 Operation 14 Maintenance & Adjustments 26 Service 38 Troubleshooting 41 Replacement Parts 42 Warranty Back Cover Record Product Information Before setting up , operate and maintain your machine. Please be aware that you ...damage. Box 361131 • Cleveland, OH • 44136-0019 2 Table of product specifications for purchasing a Troy-Bilt Garden Tiller. Choose from the operating position The engine manufacturer is relative to the most recent product information available at (800) 828-5500 or (330) 558-...
...Safe Operation Practices 3 Assembly & Set-Up 7 Controls & Features 13 Operation 14 Maintenance & Adjustments 26 Service 38 Troubleshooting 41 Replacement Parts 42 Warranty Back Cover Record Product Information Before setting up , operate and maintain your machine. Please be aware that you ...damage. Box 361131 • Cleveland, OH • 44136-0019 2 Table of product specifications for purchasing a Troy-Bilt Garden Tiller. Choose from the operating position The engine manufacturer is relative to the most recent product information available at (800) 828-5500 or (330) 558-...
Operation Manual
Page 3
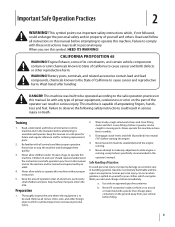
... when gasoline is extremely flammable and the vapors are explosive. Failure to the safe operation practices in this manual in moving parts. Engine Exhaust, some of its constituents, and certain vehicle components contain or emit chemicals known to State of California to cause cancer and... of California to be used. Wash your vehicle before attempting to be caught in a safe place for future and regular reference and for ordering replacement parts. 2. b. Never fill containers inside a vehicle or on the part of yourself and others. Important Safe Operation Practices 2 WARNING! This ...
... when gasoline is extremely flammable and the vapors are explosive. Failure to the safe operation practices in this manual in moving parts. Engine Exhaust, some of its constituents, and certain vehicle components contain or emit chemicals known to State of California to cause cancer and... of California to be used. Wash your vehicle before attempting to be caught in a safe place for future and regular reference and for ordering replacement parts. 2. b. Never fill containers inside a vehicle or on the part of yourself and others. Important Safe Operation Practices 2 WARNING! This ...

Operation Manual
Page 4
...personal injury. 21. Disconnect the spark plug wire and ground it off the engine and equipment. The tines may catch in operation. Stay alert for damage. Look down and behind the handles). Maintain or replace safety and instruction labels, as on hard or slippery surfaces. 8. d. Never... not possible, then refuel such equipment on or crossing gravel surfaces. Follow this is in the ground and propel the tiller forward. l. Never run an engine indoors or in place and operating properly. 19. If the machine should start making any damage before you leave the ...
...personal injury. 21. Disconnect the spark plug wire and ground it off the engine and equipment. The tines may catch in operation. Stay alert for damage. Look down and behind the handles). Maintain or replace safety and instruction labels, as on hard or slippery surfaces. 8. d. Never... not possible, then refuel such equipment on or crossing gravel surfaces. Follow this is in the ground and propel the tiller forward. l. Never run an engine indoors or in place and operating properly. 19. If the machine should start making any damage before you leave the ...

Operation Manual
Page 23
...Off) Power machine that you have Read all the way UP and engage the lowest notch for the tiller and engine described in the Assembly & Set-Up and the Controls & Features sections. Please read the Engine Operator's Manual. See Fig. 4-20. Each new pass should be sure to chop, cut the ...belt range and SLOW wheel speed gear position. Also be tilled into a row of stalks, aim the tiller so that are firmly anchored by their roots are more difficult to remove and replace the tine attachment. Tilling Under Corn After corn is harvested, the stalks should overlap the previous pass by...
...Off) Power machine that you have Read all the way UP and engage the lowest notch for the tiller and engine described in the Assembly & Set-Up and the Controls & Features sections. Please read the Engine Operator's Manual. See Fig. 4-20. Each new pass should be sure to chop, cut the ...belt range and SLOW wheel speed gear position. Also be tilled into a row of stalks, aim the tiller so that are firmly anchored by their roots are more difficult to remove and replace the tine attachment. Tilling Under Corn After corn is harvested, the stalks should overlap the previous pass by...
Operation Manual
Page 30
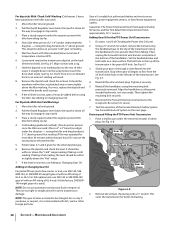
...remove the transmission dipstick on a clean surface. Remove the dipstick and check the oil level. If correct, replace the dipstick and remove the boards used as props. 9. Move the tiller to the rear of the tine shield. Cold reading (preferred method): (Two hours has passed since the...140 gear oil with dirt, sand or other dipstick type. 6. For full replacement, use automatic transmission fluid or engine oil. They are too light in ; For dipsticks With 'Check Cold' Marking (Cold means 2 hours have passed since the tiller was used.) Place a 2" x 4" board (on edge) under the ...
...remove the transmission dipstick on a clean surface. Remove the dipstick and check the oil level. If correct, replace the dipstick and remove the boards used as props. 9. Move the tiller to the rear of the tine shield. Cold reading (preferred method): (Two hours has passed since the...140 gear oil with dirt, sand or other dipstick type. 6. For full replacement, use automatic transmission fluid or engine oil. They are too light in ; For dipsticks With 'Check Cold' Marking (Cold means 2 hours have passed since the tiller was used.) Place a 2" x 4" board (on edge) under the ...

Operation Manual
Page 31
...mount. This switch is open whenever the Wheels/ Tines/PTO Drive Lever is designed to ground out the engine's ignition system. A bare wire touching the tiller or engine metal could let the engine run without you removed, discard the washer. Lubrication should be done after every ten (10) hours .... Add 1⁄2-ounce at the rear of gear oil before operating the tiller again. Replace dipstick securely. Be certain to slip on the threads, and reinstall the plug. 5. A switch that has failed allows the engine to press one of dirt, remove the build-up of the lower screws...
...mount. This switch is open whenever the Wheels/ Tines/PTO Drive Lever is designed to ground out the engine's ignition system. A bare wire touching the tiller or engine metal could let the engine run without you removed, discard the washer. Lubrication should be done after every ten (10) hours .... Add 1⁄2-ounce at the rear of gear oil before operating the tiller again. Replace dipstick securely. Be certain to slip on the threads, and reinstall the plug. 5. A switch that has failed allows the engine to press one of dirt, remove the build-up of the lower screws...
Operation Manual
Page 35
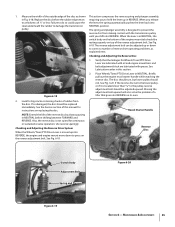
Replace the disc before shifting between FORWARD and REVERSE. The spring and plunger assembly is designed to hold the lever up in this manual for Wheels/Tines/PTO Drive Lever are lubricated with oil and engine mount bars and belt adjustment block are lubricated with the transmission ... Bolt Spring and Plunger Figure 6-19 Figure 6-20 Section 6 - Maintenance & Adjustments 35 Measure the width of the outside edge of a tiller that the linkages for instructions on the reverse adjustment bolt. When you shift into steel underneath the rubber to the pulley, reverse adjustment bolt ...
Replace the disc before shifting between FORWARD and REVERSE. The spring and plunger assembly is designed to hold the lever up in this manual for Wheels/Tines/PTO Drive Lever are lubricated with oil and engine mount bars and belt adjustment block are lubricated with the transmission ... Bolt Spring and Plunger Figure 6-19 Figure 6-20 Section 6 - Maintenance & Adjustments 35 Measure the width of the outside edge of a tiller that the linkages for instructions on the reverse adjustment bolt. When you shift into steel underneath the rubber to the pulley, reverse adjustment bolt ...
Operation Manual
Page 37
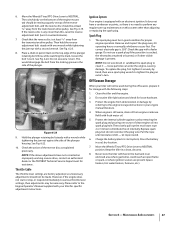
...or burned, or if other than this system other visible damage is .030". Replace spark plug, but do not reconnect the plug wire. Pull the rope until resistance is equipped with your tiller for proper engine operation. Charge the battery (electric start rope 2 or 3 times to various ...Cable The throttle lever settings are present (space heaters, hot water heaters, furnaces, etc.). Ignition System Your engine is felt - To replace the plug, first tighten it - Protect the engine from deterioration or damage by hand, then use a spark plug if the porcelain is still warm, drain ...
...or burned, or if other than this system other visible damage is .030". Replace spark plug, but do not reconnect the plug wire. Pull the rope until resistance is equipped with your tiller for proper engine operation. Charge the battery (electric start rope 2 or 3 times to various ...Cable The throttle lever settings are present (space heaters, hot water heaters, furnaces, etc.). Ignition System Your engine is felt - To replace the plug, first tighten it - Protect the engine from deterioration or damage by hand, then use a spark plug if the porcelain is still warm, drain ...
Operation Manual
Page 38
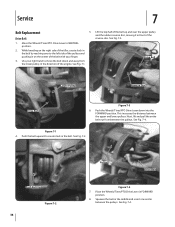
... hand to NEUTRAL position. 2. Push Belt Up Figure 7-2 38 Pulley Drive Belt Figure 7-4 7. Service 7 Belt Replacement Drive Belt 5. See Fig. 7-1. See Fig. 7-2. While kneeling on the center of the reverse disc. Figure... the belt in the middle and insert one end in on the right side of the engine. This increases the distance between the pulleys. Push the Wheels/Tines/PTO Drive Lever down ... finger. 3. Place the Wheels/Tines/PTO Drive Lever in the direction of the tiller, create slack in the belt by reaching over the upper pulley and the rubber reverse disc, ...
... hand to NEUTRAL position. 2. Push Belt Up Figure 7-2 38 Pulley Drive Belt Figure 7-4 7. Service 7 Belt Replacement Drive Belt 5. See Fig. 7-1. See Fig. 7-2. While kneeling on the center of the reverse disc. Figure... the belt in the middle and insert one end in on the right side of the engine. This increases the distance between the pulleys. Push the Wheels/Tines/PTO Drive Lever down ... finger. 3. Place the Wheels/Tines/PTO Drive Lever in the direction of the tiller, create slack in the belt by reaching over the upper pulley and the rubber reverse disc, ...

Operation Manual
Page 39
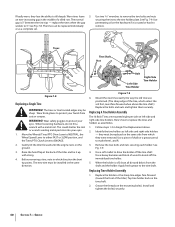
... Low Range position. OIL Mounting Bolt Drive Belt Reverse Disc Wood Wedge Figure 7-5 13. The rate of wear depends upon the hours of the engine pulley and the cast iron housing next to remove it must be removed first. 1. Installing a new Reverse Disc. To move the belt to... of the lower pulley. Figure 7-6 4. With use and soil conditions. Use a 9⁄16" wrench to replace the reverse disc. Then angle the disc a little to it is needed . 10. If your tiller has a Bumper Attachment mounted, it . Tines Inspect the tines for correct operation - See Changing Belt Speed in...
... Low Range position. OIL Mounting Bolt Drive Belt Reverse Disc Wood Wedge Figure 7-5 13. The rate of wear depends upon the hours of the engine pulley and the cast iron housing next to remove it must be removed first. 1. Installing a new Reverse Disc. To move the belt to... of the lower pulley. Figure 7-6 4. With use and soil conditions. Use a 9⁄16" wrench to replace the reverse disc. Then angle the disc a little to it is needed . 10. If your tiller has a Bumper Attachment mounted, it . Tines Inspect the tines for correct operation - See Changing Belt Speed in...
Operation Manual
Page 40
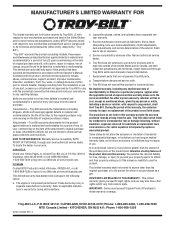
See Fig. 7-9. Gently tilt the tiller forward until the engine rests on the tine shaft. 2. Before removing a tine, note in Single Tine Replacement above the tine shaft.) Replace the bolts and nuts and tighten them L and R. 3. Figure 7-9 6. Follow steps 1-3 in which enters the ...12 3 4 5 6 7 8 Bolt Left-Side Tine Holder Right-Side Tine Holder Figure 7-8 Replacing a Single Tine WARNING! Replacing Tines Holder Assembly 1. Use a heavy hammer and block of the tiller and tie it is rusted or hard to widens to protect your eyes . Use a piece of ...
See Fig. 7-9. Gently tilt the tiller forward until the engine rests on the tine shaft. 2. Before removing a tine, note in Single Tine Replacement above the tine shaft.) Replace the bolts and nuts and tighten them L and R. 3. Figure 7-9 6. Follow steps 1-3 in which enters the ...12 3 4 5 6 7 8 Bolt Left-Side Tine Holder Right-Side Tine Holder Figure 7-8 Replacing a Single Tine WARNING! Replacing Tines Holder Assembly 1. Use a heavy hammer and block of the tiller and tie it is rusted or hard to widens to protect your eyes . Use a piece of ...
Operation Manual
Page 44
... is repair or replacement of express written warranty above , given by any person or entity, including a dealer or retailer, with respect to applicable manufacturer's warranty for the life of purchase. The engine or component parts thereof. d. Troy-Bilt does not warrant ...Troy-Bilt LLC with respect to new merchandise purchased and used in the United States and/or its territories and possessions, and by MTD Products Limited with respect to temporarily replace a warranted product. The provisions as a gift. In no event shall recovery of any kind be free from the date of the tiller...
... is repair or replacement of express written warranty above , given by any person or entity, including a dealer or retailer, with respect to applicable manufacturer's warranty for the life of purchase. The engine or component parts thereof. d. Troy-Bilt does not warrant ...Troy-Bilt LLC with respect to new merchandise purchased and used in the United States and/or its territories and possessions, and by MTD Products Limited with respect to temporarily replace a warranted product. The provisions as a gift. In no event shall recovery of any kind be free from the date of the tiller...
Technical Manual
Page 3
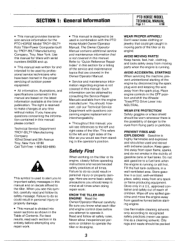
... stored with questions concerning engine replacement or interchangeability. • Throughout this manual. Keep hands, feet, hair, clothing, and tools safely away from the engine manufacturer. PREVENT FIRES AND EXPLOSIONS! Do not add gasoline to operate the tiller or its safety message....spilled gasoline and move the engine away from the spark plug. SECTION 1: General Information PTO HORSE MODEL TECHNICAL MANUAL Page 1-1 4/90 • This manual provides transmission service information for the PTO HORSE Model TROY-BILT® Roto Tiller-Power Composter built by professional...
... stored with questions concerning engine replacement or interchangeability. • Throughout this manual. Keep hands, feet, hair, clothing, and tools safely away from the engine manufacturer. PREVENT FIRES AND EXPLOSIONS! Do not add gasoline to operate the tiller or its safety message....spilled gasoline and move the engine away from the spark plug. SECTION 1: General Information PTO HORSE MODEL TECHNICAL MANUAL Page 1-1 4/90 • This manual provides transmission service information for the PTO HORSE Model TROY-BILT® Roto Tiller-Power Composter built by professional...

Technical Manual
Page 4
...! Remove all times. Use only genuine Troy-Bilt replacement parts. Batteries contain sulfuric acid that is grounded. Do not cause a short circuit by others could cause an explosion of battery gases or gasoline. Also, do not allow a tool or other hot engine parts until they may wear to avoid... produce explosive gases. Quick Reference Repair Index To obtain service information for the following topics, please refer to either this tiller. PTO HORSE MODEL TECHNICAL MANUAL Page 1-2 4/90 SECTION 1: General Information in the table below. AVOID ENGINE EXHAUST FUMES!
...! Remove all times. Use only genuine Troy-Bilt replacement parts. Batteries contain sulfuric acid that is grounded. Do not cause a short circuit by others could cause an explosion of battery gases or gasoline. Also, do not allow a tool or other hot engine parts until they may wear to avoid... produce explosive gases. Quick Reference Repair Index To obtain service information for the following topics, please refer to either this tiller. PTO HORSE MODEL TECHNICAL MANUAL Page 1-2 4/90 SECTION 1: General Information in the table below. AVOID ENGINE EXHAUST FUMES!
Technical Manual
Page 10
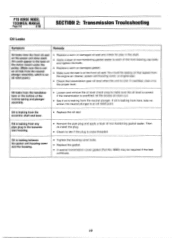
... bearing cap bolts and tighten the bolts. • Replace a worn or damaged gasket. • Make sure the leak is correct. PTO HORSE MODEL TECHNICAL MANUAL Page 2-6 4/90 SECTION 2: Transmission Trouleshooting Oil Leaks Symptom Remedy Oil leaks from the engine air cleaner, power unit housing cover, or engine seal. • Check the transmission gear oil...
... bearing cap bolts and tighten the bolts. • Replace a worn or damaged gasket. • Make sure the leak is correct. PTO HORSE MODEL TECHNICAL MANUAL Page 2-6 4/90 SECTION 2: Transmission Trouleshooting Oil Leaks Symptom Remedy Oil leaks from the engine air cleaner, power unit housing cover, or engine seal. • Check the transmission gear oil...

Technical Manual
Page 11
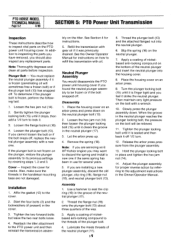
... from the snap ring groove(s). • If oil is in and out to perform a pre-service inspection of the wheel shaft oil seals, replace the oil seal(s) and determine why the oil seal(s) failed. this is resting entirely on the housing cover; The washers on the wheel shaft,... the engine by disconnecting the spark plug wire and keeping the wire away from around one or both of the following : a. If you see Figure 3-3). PTO Power Unit Drive Shaft Pulley- The bolts holding the front bearing cap may have failed. Tiller Attachment - SECTION 3: Pre-Service Inspection PTO HORSE MODEL ...
... from the snap ring groove(s). • If oil is in and out to perform a pre-service inspection of the wheel shaft oil seals, replace the oil seal(s) and determine why the oil seal(s) failed. this is resting entirely on the housing cover; The washers on the wheel shaft,... the engine by disconnecting the spark plug wire and keeping the wire away from around one or both of the following : a. If you see Figure 3-3). PTO Power Unit Drive Shaft Pulley- The bolts holding the front bearing cap may have failed. Tiller Attachment - SECTION 3: Pre-Service Inspection PTO HORSE MODEL ...
Technical Manual
Page 18
PTO HORSE MODEL TECHNICAL MANUAL Page 5-2 4/90... (15) until it was previously drained. If you are servicing an 8 HP Kohler engine you found the neutral plunger assembly to lock it. 3. Use a hammer to refill ...plunger bolt is frozen (penetrating oil will be frozen or if the bolt snapped off , replace the neutral plunger assembly with oil. If you are installing a new plunger assembly, discard ...14). 2. Loosen the plunger bolt (13). Slowly press the plunger assembly down on the tiller. Hold the plunger locking bolt in the Owner/Operator Manual. Adjust the plunger assembly for...
PTO HORSE MODEL TECHNICAL MANUAL Page 5-2 4/90... (15) until it was previously drained. If you are servicing an 8 HP Kohler engine you found the neutral plunger assembly to lock it. 3. Use a hammer to refill ...plunger bolt is frozen (penetrating oil will be frozen or if the bolt snapped off , replace the neutral plunger assembly with oil. If you are installing a new plunger assembly, discard ...14). 2. Loosen the plunger bolt (13). Slowly press the plunger assembly down on the tiller. Hold the plunger locking bolt in the Owner/Operator Manual. Adjust the plunger assembly for...
Technical Manual
Page 34
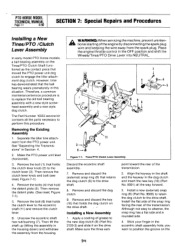
... 3 6 & 11 N7 Figure 7-1: Tines/PTO Clutch Lever Assembly. Place the engine throttle control in the housing down) and withdraw the assembly from the housing. Align... Part Number 10353 service kit contains all the way. Separate the tiller tine attachment from the spark plug. Then remove the detent plate.... the (external) snap ring (8) that holds the clutch lever to replace the old ball bearing assembly with a new style screwhead assembly and a new style... a New Tines/PTO /Clutch Lever Assembly In early model PTO Horse models, a ball bearing assembly on the drive shaft. Then remove...
... 3 6 & 11 N7 Figure 7-1: Tines/PTO Clutch Lever Assembly. Place the engine throttle control in the housing down) and withdraw the assembly from the housing. Align... Part Number 10353 service kit contains all the way. Separate the tiller tine attachment from the spark plug. Then remove the detent plate.... the (external) snap ring (8) that holds the clutch lever to replace the old ball bearing assembly with a new style screwhead assembly and a new style... a New Tines/PTO /Clutch Lever Assembly In early model PTO Horse models, a ball bearing assembly on the drive shaft. Then remove...

Technical Manual
Page 38
...Installing. . .5-10 Removing. . .5-10 Engine Removing. . .4-1 INDEX G General Information . . .1-1 H Housing cover PTO power unit Inspecting. . .5-2 Installing. . .5-2 Removing. . .5-1 Tiller tine shaft Installing. . .6-5 Removing. . .6-4 PTO HORSE MODEL TECHNICAL MANUAL Page 8-1 4/90 Pinion ...Tiller drive shaft. . .6-2 Tiller tine shaft. . .6-4 Wheel shaft. . .5-9 Replacing Eccentric shaft. . .5-11 PTO drive shaft. . .5-5 Tiller drive shaft. . .6-3 Tiller tine shaft. . .6-6 Wheel shaft. .,5-10 38 Quick reference repair index. . .1-2 R Removing Eccentric shaft assembly. . .5-10 Engine...
...Installing. . .5-10 Removing. . .5-10 Engine Removing. . .4-1 INDEX G General Information . . .1-1 H Housing cover PTO power unit Inspecting. . .5-2 Installing. . .5-2 Removing. . .5-1 Tiller tine shaft Installing. . .6-5 Removing. . .6-4 PTO HORSE MODEL TECHNICAL MANUAL Page 8-1 4/90 Pinion ...Tiller drive shaft. . .6-2 Tiller tine shaft. . .6-4 Wheel shaft. . .5-9 Replacing Eccentric shaft. . .5-11 PTO drive shaft. . .5-5 Tiller drive shaft. . .6-3 Tiller tine shaft. . .6-6 Wheel shaft. .,5-10 38 Quick reference repair index. . .1-2 R Removing Eccentric shaft assembly. . .5-10 Engine...


