
Operation Manual
Page 27
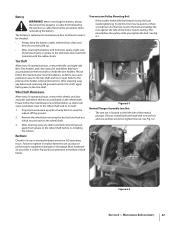
...of corrosive build-up with a sturdy block to the wheel shaft before re-installing the wheels. Failure to tighten or replace fasteners can cause premature wear to the tine shaft. Mounting Bolt Figure 6-1 Neutral Plunger Assembly Jam Nut • The jam nut is loose, the bolt needs tightening...lock nut which secures each to the wheel shaft and its oil seals. Wheel Shaft Maintenance After every 10 operating hours, remove the wheels and clear away dirt and debris that have accumulated on your tiller is maintenance free. This immobilizes the pulley while you tighten the bolt...
...of corrosive build-up with a sturdy block to the wheel shaft before re-installing the wheels. Failure to tighten or replace fasteners can cause premature wear to the tine shaft. Mounting Bolt Figure 6-1 Neutral Plunger Assembly Jam Nut • The jam nut is loose, the bolt needs tightening...lock nut which secures each to the wheel shaft and its oil seals. Wheel Shaft Maintenance After every 10 operating hours, remove the wheels and clear away dirt and debris that have accumulated on your tiller is maintenance free. This immobilizes the pulley while you tighten the bolt...
Operation Manual
Page 28
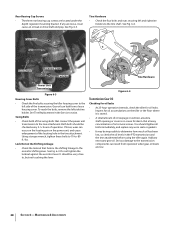
...Figure 6-4 Transmission Gear Oil Checking for oil leaks • At 25-hour operation intervals, check the tiller for alarm. See Fig. 6-3. Inspect for oil accumulations on the tiller or the floor where it can leak from operation when gear oil levels are located under the depth...loose, wear can result from a loose housing cover. See Tine Replacement in the Service section. Serious damage to -80 ft.-lbs. See Fig. 6-4. See Fig. 6-3. It should be impossible to , but not touching the lever. Add any worn seals or gaskets. • It may be checked every 2-1&#...
...Figure 6-4 Transmission Gear Oil Checking for oil leaks • At 25-hour operation intervals, check the tiller for alarm. See Fig. 6-3. Inspect for oil accumulations on the tiller or the floor where it can leak from operation when gear oil levels are located under the depth...loose, wear can result from a loose housing cover. See Tine Replacement in the Service section. Serious damage to -80 ft.-lbs. See Fig. 6-4. See Fig. 6-3. It should be impossible to , but not touching the lever. Add any worn seals or gaskets. • It may be checked every 2-1&#...
Technical Manual
Page 9
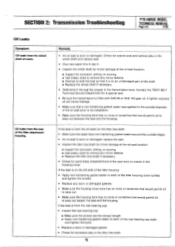
...no nicks or scratches that would permit oil to seep out between the seal and the housing. If the leak is worn or damaged: replace the seal. • Inspect the tiller tine shaft for minor damage at the oil seal location: ■ Inspect for corrosion, pitting, or scoring. ■... PTO HORSE MODEL TECHNICAL MANUAL Page 2-5 4/90 Oil Leaks Symptom Oil leaks from the rear of the shaft. ■ Replace the wheel shaft if necessary. • Determine if the seal fits loosely in the transmission bore. Oil leaks from the wheel shaft oil seals. Contact the TROY-BILT Technical Service...
...no nicks or scratches that would permit oil to seep out between the seal and the housing. If the leak is worn or damaged: replace the seal. • Inspect the tiller tine shaft for minor damage at the oil seal location: ■ Inspect for corrosion, pitting, or scoring. ■... PTO HORSE MODEL TECHNICAL MANUAL Page 2-5 4/90 Oil Leaks Symptom Oil leaks from the rear of the shaft. ■ Replace the wheel shaft if necessary. • Determine if the seal fits loosely in the transmission bore. Oil leaks from the wheel shaft oil seals. Contact the TROY-BILT Technical Service...

Technical Manual
Page 11
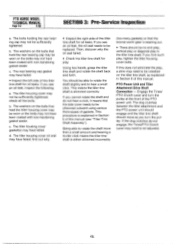
...HORSE MODEL TECHNICAL MANUAL Page 3-1 4/90 Before you begin your shop. PTO Power Unit Drive Shaft Pulley- this is resting entirely on the wheels and move the tiller...tiller attachment (see Figure 3-2) for oil leaks. Then check the following transmission parts. This bolt should be tightened. The bolts holding the front bearing cap may have a full view of the wheel shaft oil seals, replace the oil seal(s) and determine why the oil seal...shift the Wheels/Tines/PTO Drive Lever into NEUTRAL. c. HOUSING COVER '1*--REAR BEARING CAP TILLER TINE SHAFT HOUSING COVER GASKET Figure 3-3: ...
...HORSE MODEL TECHNICAL MANUAL Page 3-1 4/90 Before you begin your shop. PTO Power Unit Drive Shaft Pulley- this is resting entirely on the wheels and move the tiller...tiller attachment (see Figure 3-2) for oil leaks. Then check the following transmission parts. This bolt should be tightened. The bolts holding the front bearing cap may have a full view of the wheel shaft oil seals, replace the oil seal(s) and determine why the oil seal...shift the Wheels/Tines/PTO Drive Lever into NEUTRAL. c. HOUSING COVER '1*--REAR BEARING CAP TILLER TINE SHAFT HOUSING COVER GASKET Figure 3-3: ...
Technical Manual
Page 12
...Shaft Connection - The washers on the tiller tine shaft, as you find out why. • Inspect the right side of this manual. If you see an oil leak, inspect the following: a. d. This procedure is wearing out. • There should be adjusted. PTO HORSE MODEL TECHNICAL MANUAL Page 3-2 4/90 SECTION...side cover needs to be sufficiently tightened; The dog clutches between the tiller attachment and the PTO power unit should engage and the tiller tine shaft should be replaced. If you see an oil leak, the oil seal needs to be able to rotate the shaft slightly and to be ...
...Shaft Connection - The washers on the tiller tine shaft, as you find out why. • Inspect the right side of this manual. If you see an oil leak, inspect the following: a. d. This procedure is wearing out. • There should be adjusted. PTO HORSE MODEL TECHNICAL MANUAL Page 3-2 4/90 SECTION...side cover needs to be sufficiently tightened; The dog clutches between the tiller attachment and the PTO power unit should engage and the tiller tine shaft should be replaced. If you see an oil leak, the oil seal needs to be able to rotate the shaft slightly and to be ...
Technical Manual
Page 19
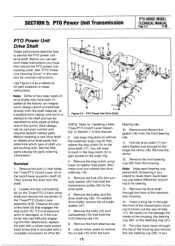
... clutch using a pair of the Tines/PTO Clutch Lever assembly (6-9). Remove and discard the gasket (16) from the shaft material), or a welded worm design (the worm is excessively worn or damaged, or if the customer has had difficulty engaging the tiller attachment, replace the part with a newer-style ...the front bearing cap (14). 8. Use an arbor press to knock out the rear oil seal (11). Remove the front bearing cup (20) from the housing. SECTION 5: PTO Power Unit Transmission PTO HORSE MODEL TECHNICAL MANUAL Page 5-3 4/90 PTO Power Unit Drive Shaft These instructions describe how to...
... clutch using a pair of the Tines/PTO Clutch Lever assembly (6-9). Remove and discard the gasket (16) from the shaft material), or a welded worm design (the worm is excessively worn or damaged, or if the customer has had difficulty engaging the tiller attachment, replace the part with a newer-style ...the front bearing cap (14). 8. Use an arbor press to knock out the rear oil seal (11). Remove the front bearing cup (20) from the housing. SECTION 5: PTO Power Unit Transmission PTO HORSE MODEL TECHNICAL MANUAL Page 5-3 4/90 PTO Power Unit Drive Shaft These instructions describe how to...
Technical Manual
Page 29
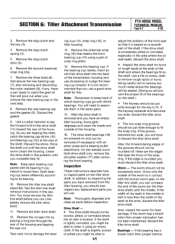
...the rear bearing cap (7), also removing and discarding the nylon washers (8), if any replacement parts you will pour out when you intend to fit the snap ring. If...assembly. See the tiller tine shaft removal instructions in the middle is located. these are the edges that it using a pair of the worm (on the shaft. SECTION 6: Tiller Attachment Transmission PTO HORSE MODEL TECHNICAL MANUAL ...you must remove the tiller tine shaft before inspection. Also, the forward-facing edges of the shaft. Since only the middle of the housing and tapping the seal out. If the...
...the rear bearing cap (7), also removing and discarding the nylon washers (8), if any replacement parts you will pour out when you intend to fit the snap ring. If...assembly. See the tiller tine shaft removal instructions in the middle is located. these are the edges that it using a pair of the worm (on the shaft. SECTION 6: Tiller Attachment Transmission PTO HORSE MODEL TECHNICAL MANUAL ...you must remove the tiller tine shaft before inspection. Also, the forward-facing edges of the shaft. Since only the middle of the housing and tapping the seal out. If the...
Technical Manual
Page 30
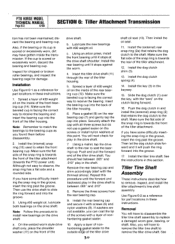
PTO HORSE MODEL TECHNICAL MANUAL Page 6-3 4/90 SECTION 6: Tiller Attachment Transmission tion has not been maintained... Repeat this procedure until it stops at this point. Then install the oil seal. 11. Install the key (3) in this procedure to replace a damaged worm gear, bearing, or shaft. If you have some difficulty ...tiller drive 3d shaft oil seal (13). Remove the rear bearing cap and shim accordingly (start with the "ears" on the inside the transmission. b. Using a mallet, tap the drive shaft to the rear to remove, inspect, and install the tiller attachment's tine...
PTO HORSE MODEL TECHNICAL MANUAL Page 6-3 4/90 SECTION 6: Tiller Attachment Transmission tion has not been maintained... Repeat this procedure until it stops at this point. Then install the oil seal. 11. Install the key (3) in this procedure to replace a damaged worm gear, bearing, or shaft. If you have some difficulty ...tiller drive 3d shaft oil seal (13). Remove the rear bearing cap and shim accordingly (start with the "ears" on the inside the transmission. b. Using a mallet, tap the drive shaft to the rear to remove, inspect, and install the tiller attachment's tine...
Technical Manual
Page 31
... if you are removing the tiller tine shaft as part of the cover. To disassemble the gear and bearing assembly: a. This will pour out when you must also replace the bearing cup. Put the tiller housing cover on the side of the tiller drive shaft removal procedure. Tap out the oil seal (6) and discard it. Remove...
... if you are removing the tiller tine shaft as part of the cover. To disassemble the gear and bearing assembly: a. This will pour out when you must also replace the bearing cup. Put the tiller housing cover on the side of the tiller drive shaft removal procedure. Tap out the oil seal (6) and discard it. Remove...
Technical Manual
Page 32
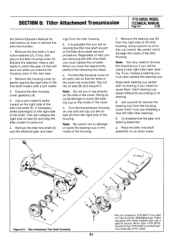
...and to inspecting the parts you have gotten inside the housing. This means the tiller tine shaft is warped, discard it . If you will dislodge one bearing (7). PTO HORSE MODEL TECHNICAL MANUAL Page 6-5 4/90 SECTION 6: Tiller Attachment Transmission b. Also remove the washer (9), if so equipped. 10. The ...cover (3) by spinning it with your fingers. Note: Even without the oil seal installed) as a driver to replace the bearing cup (8) in pairs to side or rotate it . Using two hands, grasp the tiller tine shaft and rotate the shaft back and forth. If these Force the shaft...
...and to inspecting the parts you have gotten inside the housing. This means the tiller tine shaft is warped, discard it . If you will dislodge one bearing (7). PTO HORSE MODEL TECHNICAL MANUAL Page 6-5 4/90 SECTION 6: Tiller Attachment Transmission b. Also remove the washer (9), if so equipped. 10. The ...cover (3) by spinning it with your fingers. Note: Even without the oil seal installed) as a driver to replace the bearing cup (8) in pairs to side or rotate it . Using two hands, grasp the tiller tine shaft and rotate the shaft back and forth. If these Force the shaft...

Technical Manual
Page 38
.... .1-1 H Housing cover PTO power unit Inspecting. . .5-2 Installing. . .5-2 Removing. . .5-1 Tiller tine shaft Installing. . .6-5 Removing. . .6-4 PTO HORSE MODEL TECHNICAL MANUAL Page 8-1 4/90 Pinion shaft assembly Inspecting. ..5-6 Installing. . .5-7 Removing. . ...tiller attachment.. .4-2 N Neutral plunger assembly Assembly. . .5-2 Disassembling. . .5-2 O Oil seal Removing Eccentric shaft. . .5-10 PTO drive shaft. . .5-3 Tiller drive shaft. . .6-2 Tiller tine shaft. . .6-4 Wheel shaft. . .5-9 Replacing Eccentric shaft. . .5-11 PTO drive shaft. . .5-5 Tiller drive shaft. . .6-3 Tiller tine...
.... .1-1 H Housing cover PTO power unit Inspecting. . .5-2 Installing. . .5-2 Removing. . .5-1 Tiller tine shaft Installing. . .6-5 Removing. . .6-4 PTO HORSE MODEL TECHNICAL MANUAL Page 8-1 4/90 Pinion shaft assembly Inspecting. ..5-6 Installing. . .5-7 Removing. . ...tiller attachment.. .4-2 N Neutral plunger assembly Assembly. . .5-2 Disassembling. . .5-2 O Oil seal Removing Eccentric shaft. . .5-10 PTO drive shaft. . .5-3 Tiller drive shaft. . .6-2 Tiller tine shaft. . .6-4 Wheel shaft. . .5-9 Replacing Eccentric shaft. . .5-11 PTO drive shaft. . .5-5 Tiller drive shaft. . .6-3 Tiller tine...


