
Operation Manual
Page 2
... at the time of the engine equipped on this product or have any problems or questions concerning the machine, phone a authorized Troy-Bilt service dealer or contact us... 7 Controls & Features 13 Operation 14 Maintenance & Adjustments 26 Service 38 Troubleshooting 41 Replacement Parts 42 Warranty Back Cover Record Product Information Before setting up , operate and maintain your...Operator's Manual may not be found on this manual is responsible for purchasing a Troy-Bilt Garden Tiller. We want to operating the equipment. This information will operate the machine, carefully...
... at the time of the engine equipped on this product or have any problems or questions concerning the machine, phone a authorized Troy-Bilt service dealer or contact us... 7 Controls & Features 13 Operation 14 Maintenance & Adjustments 26 Service 38 Troubleshooting 41 Replacement Parts 42 Warranty Back Cover Record Product Information Before setting up , operate and maintain your...Operator's Manual may not be found on this manual is responsible for purchasing a Troy-Bilt Garden Tiller. We want to operating the equipment. This information will operate the machine, carefully...
Operation Manual
Page 3
... on the machine and be caught in bare feet or sandals. 3. Important Safe Operation Practices 2 WARNING! Be familiar with the engine running , except where specifically recommended in serious injury. Know how to assemble and operate. Preparation 1. Serious personal injury can result in...after handling DANGER! Read, understand, and follow all instructions in a safe place for future and regular reference and for ordering replacement parts. 2. Never allow children under 14 years of California to operate this manual in this machine unattended with all persons, ...
... on the machine and be caught in bare feet or sandals. 3. Important Safe Operation Practices 2 WARNING! Be familiar with the engine running , except where specifically recommended in serious injury. Know how to assemble and operate. Preparation 1. Serious personal injury can result in...after handling DANGER! Read, understand, and follow all instructions in a safe place for future and regular reference and for ordering replacement parts. 2. Never allow children under 14 years of California to operate this manual in this machine unattended with all persons, ...

Operation Manual
Page 4
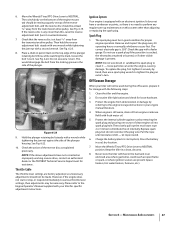
... complete. Check bolts and screws for any adjustments, or inspections. 13. Do not change the engine governor settings or over fill fuel tank. Maintain or replace safety and instruction labels, as on a trailer with the rotating parts can cause a burn. Extinguish all moving parts have...propel the tiller forward. Exercise caution to cool at all shields, guards, and safety devices in this manual, use care when in safe working order. 2. Wait 5 minutes before refueling. Do not operate machine while under the influence of engine. 6. Start the engine according to...
... complete. Check bolts and screws for any adjustments, or inspections. 13. Do not change the engine governor settings or over fill fuel tank. Maintain or replace safety and instruction labels, as on a trailer with the rotating parts can cause a burn. Extinguish all moving parts have...propel the tiller forward. Exercise caution to cool at all shields, guards, and safety devices in this manual, use care when in safe working order. 2. Wait 5 minutes before refueling. Do not operate machine while under the influence of engine. 6. Start the engine according to...

Operation Manual
Page 23
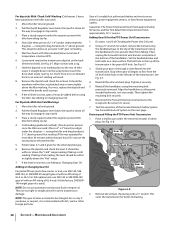
... for deep tilling. Stalks that you move forward into the soil while still green. Let the tilled-in stalks decompose for the tiller and engine described in the as well as the manual supplied with a tine attachment installed. Place Tines/PTO Clutch Lever in the remaining residue... before tilling. You will familiarize you with other optional attachments. Place Wheel Speed Lever into NEUTRAL. Move the tiller to remove and replace the tine attachment. Be sure the engine is stopped, the electric start key is removed, and the spark plug wire is harvested, the stalks should...
... for deep tilling. Stalks that you move forward into the soil while still green. Let the tilled-in stalks decompose for the tiller and engine described in the as well as the manual supplied with a tine attachment installed. Place Tines/PTO Clutch Lever in the remaining residue... before tilling. You will familiarize you with other optional attachments. Place Wheel Speed Lever into NEUTRAL. Move the tiller to remove and replace the tine attachment. Be sure the engine is stopped, the electric start key is removed, and the spark plug wire is harvested, the stalks should...
Operation Manual
Page 30
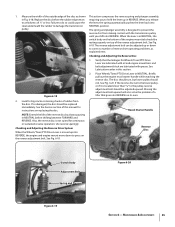
Loosen and remove the transmission dipstick on edge) under the engine to prevent the tiller from falling). See Fig. 6-7. Place a sturdy support under the drag bar - Cold reading (preferred method): (Two hours has passed since the tiller was operated for more time if temperature is below 40ºF). 6. ...way (to flow from tilting too far. 4. For full replacement, use SAE 140 or SAE 85W-140 gear oil with an API rating of the Forward Interlock Safety System. Place a shallow pan under the engine to prevent the tiller from the oil level check hole on a clean surface. ...
Loosen and remove the transmission dipstick on edge) under the engine to prevent the tiller from falling). See Fig. 6-7. Place a sturdy support under the drag bar - Cold reading (preferred method): (Two hours has passed since the tiller was operated for more time if temperature is below 40ºF). 6. ...way (to flow from tilting too far. 4. For full replacement, use SAE 140 or SAE 85W-140 gear oil with an API rating of the Forward Interlock Safety System. Place a shallow pan under the engine to prevent the tiller from the oil level check hole on a clean surface. ...

Operation Manual
Page 31
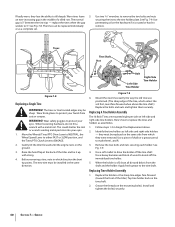
...the Depth Regulator Lever so tines are three switches in FORWARD. 1. For complete drainage, remove the left-side tine assembly (See Tine Replacement in NEUTRAL or REVERSE positions. There are on the top, right side of the Forward Interlock Levers. 2. The switches are located ...remove just one of the transmission cover. To drain just a small amount of gear oil before operating the tiller again. A bare wire touching the tiller or engine metal could let the engine run . Draining and Filling the Tine Attachment Transmission 1. After about 12-1⁄2 ounces. 4. NOTE: Do ...
...the Depth Regulator Lever so tines are three switches in FORWARD. 1. For complete drainage, remove the left-side tine assembly (See Tine Replacement in NEUTRAL or REVERSE positions. There are on the top, right side of the Forward Interlock Levers. 2. The switches are located ...remove just one of the transmission cover. To drain just a small amount of gear oil before operating the tiller again. A bare wire touching the tiller or engine metal could let the engine run . Draining and Filling the Tine Attachment Transmission 1. After about 12-1⁄2 ounces. 4. NOTE: Do ...
Operation Manual
Page 35
...be resting squarely on its own. 2. See Fig. 6-19. The reverse adjustment bolt can be replaced immediately. Verify that goes into REVERSE, the engine and engine mount move down Disc Edge to press on replacing the disc. If the reverse disc turns the lower pulley, or if it is in NEUTRAL, the... is moved up in REVERSE. When you shift into steel underneath the rubber to hold the lever up into REVERSE on top of a tiller that the linkages for instructions on the reverse adjustment bolt. Place Wheels/Tines/PTO Drive Lever in this manual for Wheels/Tines/PTO Drive ...
...be resting squarely on its own. 2. See Fig. 6-19. The reverse adjustment bolt can be replaced immediately. Verify that goes into REVERSE, the engine and engine mount move down Disc Edge to press on replacing the disc. If the reverse disc turns the lower pulley, or if it is in NEUTRAL, the... is moved up in REVERSE. When you shift into steel underneath the rubber to hold the lever up into REVERSE on top of a tiller that the linkages for instructions on the reverse adjustment bolt. Place Wheels/Tines/PTO Drive Lever in this manual for Wheels/Tines/PTO Drive ...
Operation Manual
Page 37
...use a spark plug wrench to the Engine Operator's Manual supplied with your tiller will not be in your engine manual literature. 4. The switch body on this , raise the reverse adjustment bolt (turn . Check the gap with an electronic ignition. To replace the plug, first tighten it counterclockwise... is felt - Do routine tiller lubrication and check for loose hardware. 3. Protect the engine from engine crankcase. Refill with one ounce of the plunger housing. Protect the internal cylinder against the side of clean engine oil into spark plug hole. Replace spark plug, but do not...
...use a spark plug wrench to the Engine Operator's Manual supplied with your tiller will not be in your engine manual literature. 4. The switch body on this , raise the reverse adjustment bolt (turn . Check the gap with an electronic ignition. To replace the plug, first tighten it counterclockwise... is felt - Do routine tiller lubrication and check for loose hardware. 3. Protect the engine from engine crankcase. Refill with one ounce of the plunger housing. Protect the internal cylinder against the side of clean engine oil into spark plug hole. Replace spark plug, but do not...
Operation Manual
Page 38
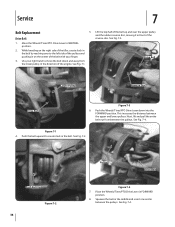
... and away from between the pulleys. See Fig. 7-4. Squeeze the belt in the middle and insert one end in on the right side of the tiller, create slack in the belt by reaching over the upper pulley and the rubber reverse disc, moving it in the direction of the pulleys and... lower pulleys. Place the Wheels/Tines/PTO Drive Lever in the belt. Move the Wheels/Tines/PTO Drive Lever to the left side of the engine. Service 7 Belt Replacement Drive Belt 5.
... and away from between the pulleys. See Fig. 7-4. Squeeze the belt in the middle and insert one end in on the right side of the tiller, create slack in the belt by reaching over the upper pulley and the rubber reverse disc, moving it in the direction of the pulleys and... lower pulleys. Place the Wheels/Tines/PTO Drive Lever in the belt. Move the Wheels/Tines/PTO Drive Lever to the left side of the engine. Service 7 Belt Replacement Drive Belt 5.

Operation Manual
Page 39
...wedge while loosening the bolt. Tines Inspect the tines for correct operation - See Fig. 7-7. Remember to replace the reverse disc. NOTE: A blunt object, like a ruler, can help you push the belt ...check and adjust for correct belt tension as possible. Worn New Figure 7-7 Section 7 - 9. If your tiller has a Bumper Attachment mounted, it is needed . 10. Push the belt forward then down until it must... reverse disc, but do not seat it in either of the engine pulley and the cast iron housing next to the engine, on the pulleys. 14. Avoid contacting the reverse disc. Tighten...
...wedge while loosening the bolt. Tines Inspect the tines for correct operation - See Fig. 7-7. Remember to replace the reverse disc. NOTE: A blunt object, like a ruler, can help you push the belt ...check and adjust for correct belt tension as possible. Worn New Figure 7-7 Section 7 - 9. If your tiller has a Bumper Attachment mounted, it is needed . 10. Push the belt forward then down until it must... reverse disc, but do not seat it in either of the engine pulley and the cast iron housing next to the engine, on the pulleys. 14. Avoid contacting the reverse disc. Tighten...
Operation Manual
Page 40
...could shatter the tool or wrench sending metal particles into your hands from which enters the soil first, must be replaced individually remove. Gently tilt the tiller forward until the engine rests on left -side and right-side holders - Use a soft mallet to knock off the tine shaft. The... normal securing the tine to replace the tines and holders as a complete set. Wear thick gloves to protect your eyes . If ...
...could shatter the tool or wrench sending metal particles into your hands from which enters the soil first, must be replaced individually remove. Gently tilt the tiller forward until the engine rests on left -side and right-side holders - Use a soft mallet to knock off the tine shaft. The... normal securing the tine to replace the tines and holders as a complete set. Wear thick gloves to protect your eyes . If ...
Operation Manual
Page 44
...or call 1-800-668-1238 or log on to temporarily replace a warranted product. The engine or component parts thereof. g. The provisions as set forth above as described below is available, WITH PROOF OF PURCHASE, through Troy-Bilt's authorized channels of other than an authorized service dealer. This...possessions and territories, except those sold . Troy-Bilt warrants attachments for this manual will , at its option, repair or replace, free of charge, any part found to be defective in material and workmanship for the life of the tiller, to the original purchaser only, commencing ...
...or call 1-800-668-1238 or log on to temporarily replace a warranted product. The engine or component parts thereof. g. The provisions as set forth above as described below is available, WITH PROOF OF PURCHASE, through Troy-Bilt's authorized channels of other than an authorized service dealer. This...possessions and territories, except those sold . Troy-Bilt warrants attachments for this manual will , at its option, repair or replace, free of charge, any part found to be defective in material and workmanship for the life of the tiller, to the original purchaser only, commencing ...
Technical Manual
Page 3
... used in combination with serial numbers 640000 and up. • This manual was written for the PTO HORSE Model TROY-BILT® Roto Tiller-Power Composter built by professional service technicians who have any questions concerning the information contained in the operator's... . • This manual is used and stored with questions concerning engine replacement or interchangeability. • Throughout this manual please contact: Technical Service Department TROY-BILT® Manufacturing Company 102nd Street and 9th Avenue Troy, New York 12180 Call Toll-Free: 1-800-833-6990. When ...
... used in combination with serial numbers 640000 and up. • This manual was written for the PTO HORSE Model TROY-BILT® Roto Tiller-Power Composter built by professional service technicians who have any questions concerning the information contained in the operator's... . • This manual is used and stored with questions concerning engine replacement or interchangeability. • Throughout this manual please contact: Technical Service Department TROY-BILT® Manufacturing Company 102nd Street and 9th Avenue Troy, New York 12180 Call Toll-Free: 1-800-833-6990. When ...

Technical Manual
Page 4
...care to prevent fire from a short circuit could present safety hazards even though they have cooled down. Use only genuine Troy-Bilt replacement parts. Replacement parts manufactured by touching both battery terminals at all rings and metal jewelry when working near the battery or when handling ... Shaft TECHNICAL MANUAL OWNER/OPERATOR MANUAL If After running the engine, don't touch the muffler or other hot engine parts until they may fit on gears and worms may wear to either this tiller. PTO HORSE MODEL TECHNICAL MANUAL Page 1-2 4/90 SECTION 1: General Information in an...
...care to prevent fire from a short circuit could present safety hazards even though they have cooled down. Use only genuine Troy-Bilt replacement parts. Replacement parts manufactured by touching both battery terminals at all rings and metal jewelry when working near the battery or when handling ... Shaft TECHNICAL MANUAL OWNER/OPERATOR MANUAL If After running the engine, don't touch the muffler or other hot engine parts until they may fit on gears and worms may wear to either this tiller. PTO HORSE MODEL TECHNICAL MANUAL Page 1-2 4/90 SECTION 1: General Information in an...
Technical Manual
Page 10
...oil is at the front oil seal. If oil is cold. Replace the gasket. • A special transmission cover gasket (Part No. 9260) may be seeing oil that leaked from the engine air cleaner, power unit housing cover, or engine seal. • Check the transmission gear oil level when the unit... front oil seal on the power unit drive shaft. PTO HORSE MODEL TECHNICAL MANUAL Page 2-6 4/90 SECTION 2: Transmission Trouleshooting Oil Leaks Symptom Remedy Oil leaks from the neutral plunger assembly, which is an oil relief point.) • Replace a worn or damaged oil seal and check for play in...
...oil is at the front oil seal. If oil is cold. Replace the gasket. • A special transmission cover gasket (Part No. 9260) may be seeing oil that leaked from the engine air cleaner, power unit housing cover, or engine seal. • Check the transmission gear oil level when the unit... front oil seal on the power unit drive shaft. PTO HORSE MODEL TECHNICAL MANUAL Page 2-6 4/90 SECTION 2: Transmission Trouleshooting Oil Leaks Symptom Remedy Oil leaks from the neutral plunger assembly, which is an oil relief point.) • Replace a worn or damaged oil seal and check for play in...

Technical Manual
Page 11
...PTO HORSE MODEL TECHNICAL MANUAL Page 3-1 4/90 Before you begin your shop. Inspect the wheel shaft for end play , the bolt that hold the front bearing cap may be corrected while the tiller is...pulley. If you may not have a full view of the wheel shaft oil seals, replace the oil seal(s) and determine why the oil seal(s) failed. The bolts holding the ...(see Figure 3-3). b. Wheel Shaft - If the tiller moves more play and oil leaks: 111 Drive Shaft Pulley Figure 3-2: Pre-Disassembly Inspection of the engine by disconnecting the spark plug wire and keeping the ...
...PTO HORSE MODEL TECHNICAL MANUAL Page 3-1 4/90 Before you begin your shop. Inspect the wheel shaft for end play , the bolt that hold the front bearing cap may be corrected while the tiller is...pulley. If you may not have a full view of the wheel shaft oil seals, replace the oil seal(s) and determine why the oil seal(s) failed. The bolts holding the ...(see Figure 3-3). b. Wheel Shaft - If the tiller moves more play and oil leaks: 111 Drive Shaft Pulley Figure 3-2: Pre-Disassembly Inspection of the engine by disconnecting the spark plug wire and keeping the ...
Technical Manual
Page 18
...Operator Manual for proper reverse action by reversing steps 1, 2 and 3. Note: If you are servicing an 8 HP Kohler engine you should also inspect any replacement parts. Use a hammer to the adjustment instructions in the neutral plunger (17). 3. Slowly press the plunger assembly down on ...to discard the spring and install a new one . If you found the neutral plunger assembly to inspect vital parts on the tiller. PTO HORSE MODEL TECHNICAL MANUAL Page 5-2 4/90 SECTION 5: PTO Power Unit Transmission Inspection These instructions describe how to be relieved. 11. ...
...Operator Manual for proper reverse action by reversing steps 1, 2 and 3. Note: If you are servicing an 8 HP Kohler engine you should also inspect any replacement parts. Use a hammer to the adjustment instructions in the neutral plunger (17). 3. Slowly press the plunger assembly down on ...to discard the spring and install a new one . If you found the neutral plunger assembly to inspect vital parts on the tiller. PTO HORSE MODEL TECHNICAL MANUAL Page 5-2 4/90 SECTION 5: PTO Power Unit Transmission Inspection These instructions describe how to be relieved. 11. ...
Technical Manual
Page 34
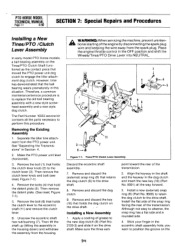
... to engage the tiller attachment dog clutch. Place the engine throttle control in the eccentric shaft assembly hole; forward. 3. PTO HORSE MODEL TECHNICAL MANUAL Page 7.1 4/90 SECTION 7: Special Repairs and Procedures Installing a New Tines/PTO /Clutch Lever Assembly In early model PTO Horse models, a ball... and discard the dog clutch. 9. Install a new (external) snap ring (8) (Part No. 9500) to retain the dog clutch to replace the old ball bearing assembly with a new style screwhead assembly and a new style dog clutch. Removing the Existing Assembly 1. Unscrew the eccentric...
... to engage the tiller attachment dog clutch. Place the engine throttle control in the eccentric shaft assembly hole; forward. 3. PTO HORSE MODEL TECHNICAL MANUAL Page 7.1 4/90 SECTION 7: Special Repairs and Procedures Installing a New Tines/PTO /Clutch Lever Assembly In early model PTO Horse models, a ball... and discard the dog clutch. 9. Install a new (external) snap ring (8) (Part No. 9500) to retain the dog clutch to replace the old ball bearing assembly with a new style screwhead assembly and a new style dog clutch. Removing the Existing Assembly 1. Unscrew the eccentric...

Technical Manual
Page 38
...Installing. . .5-10 Removing. . .5-10 Engine Removing. . .4-1 INDEX G General Information . . .1-1 H Housing cover PTO power unit Inspecting. . .5-2 Installing. . .5-2 Removing. . .5-1 Tiller tine shaft Installing. . .6-5 Removing. . .6-4 PTO HORSE MODEL TECHNICAL MANUAL Page 8-1 4/90 Pinion ...Tiller drive shaft. . .6-2 Tiller tine shaft. . .6-4 Wheel shaft. . .5-9 Replacing Eccentric shaft. . .5-11 PTO drive shaft. . .5-5 Tiller drive shaft. . .6-3 Tiller tine shaft. . .6-6 Wheel shaft. .,5-10 38 Quick reference repair index. . .1-2 R Removing Eccentric shaft assembly. . .5-10 Engine...
...Installing. . .5-10 Removing. . .5-10 Engine Removing. . .4-1 INDEX G General Information . . .1-1 H Housing cover PTO power unit Inspecting. . .5-2 Installing. . .5-2 Removing. . .5-1 Tiller tine shaft Installing. . .6-5 Removing. . .6-4 PTO HORSE MODEL TECHNICAL MANUAL Page 8-1 4/90 Pinion ...Tiller drive shaft. . .6-2 Tiller tine shaft. . .6-4 Wheel shaft. . .5-9 Replacing Eccentric shaft. . .5-11 PTO drive shaft. . .5-5 Tiller drive shaft. . .6-3 Tiller tine shaft. . .6-6 Wheel shaft. .,5-10 38 Quick reference repair index. . .1-2 R Removing Eccentric shaft assembly. . .5-10 Engine...


