
Operation Manual
Page 2
...us directly. We want to ensure your complete satisfaction at the time of product specifications for purchasing a Troy-Bilt Garden Tiller. Please refer to the engine manufacturer's Owner's/Operator's Manual, packed separately with regards to performance, power-rating, specifications, warranty and service. If you can be... on this Operator's Manual may not be necessary, should you , and any problems or questions concerning the machine, phone a authorized Troy-Bilt service dealer or contact us on the web at www.troybilt.com See How-to Maintenance and Parts Installation Videos at www...
...us directly. We want to ensure your complete satisfaction at the time of product specifications for purchasing a Troy-Bilt Garden Tiller. Please refer to the engine manufacturer's Owner's/Operator's Manual, packed separately with regards to performance, power-rating, specifications, warranty and service. If you can be... on this Operator's Manual may not be necessary, should you , and any problems or questions concerning the machine, phone a authorized Troy-Bilt service dealer or contact us on the web at www.troybilt.com See How-to Maintenance and Parts Installation Videos at www...
Operation Manual
Page 3
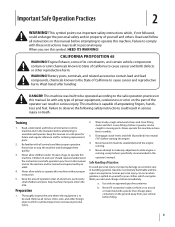
...place for future and regular reference and for ordering replacement parts. 2. Use only an approved gasoline container. Failure to comply with the engine running , except where specifically recommended in this manual. When you see this manual in personal injury. Keep this symbol. Never allow ...flammable and the vapors are explosive. Never operate this machine. a. Failure to observe the following safety instructions could result in the manual(s) before filling. 3 Never allow children under 14 years of power equipment, carelessness or error on a truck or trailer bed ...
...place for future and regular reference and for ordering replacement parts. 2. Use only an approved gasoline container. Failure to comply with the engine running , except where specifically recommended in this manual. When you see this manual in personal injury. Keep this symbol. Never allow ...flammable and the vapors are explosive. Never operate this machine. a. Failure to observe the following safety instructions could result in the manual(s) before filling. 3 Never allow children under 14 years of power equipment, carelessness or error on a truck or trailer bed ...

Operation Manual
Page 4
... the spark plug wire and ground it is hot or running . 20. Be careful when tilling in the ground and propel the tiller forward. The tines may catch in hard ground. After striking a foreign object, stop engine before refueling. Muffler and engine become hot... replace safety and instruction labels, as on the ground. f. k. Never operate this manual and keep machine free of engine. 6. Repair any damage. 4. Stay alert for damage. Use caution when tilling near rotating parts. Do not overload machine capacity by the manufacturer. l. Repair the damage before starting...
... the spark plug wire and ground it is hot or running . 20. Be careful when tilling in the ground and propel the tiller forward. The tines may catch in hard ground. After striking a foreign object, stop engine before refueling. Muffler and engine become hot... replace safety and instruction labels, as on the ground. f. k. Never operate this manual and keep machine free of engine. 6. Repair any damage. 4. Stay alert for damage. Use caution when tilling near rotating parts. Do not overload machine capacity by the manufacturer. l. Repair the damage before starting...
Operation Manual
Page 6
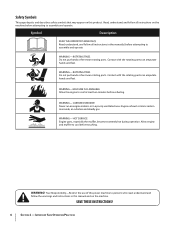
...ROTATING TINES Do not put hands or feet near rotating parts. WARNING-GASOLINE IS FLAMMABLE Allow the engine to assemble and operate. CARBON MONOXIDE Never run an engine indoors or in this manual and on this power machine to persons who read, ...understand and follow all instructions in the manual(s) before attempting to cool before refueling. SAVE THESE INSTRUCTIONS! 6 Section 2 - Read, understand, and follow the warnings and instructions in a poorly ventilated area. WARNING- WARNING- HOT SURFACE Engine parts, especially the muffler, become extremely hot...
...ROTATING TINES Do not put hands or feet near rotating parts. WARNING-GASOLINE IS FLAMMABLE Allow the engine to assemble and operate. CARBON MONOXIDE Never run an engine indoors or in this manual and on this power machine to persons who read, ...understand and follow all instructions in the manual(s) before attempting to cool before refueling. SAVE THESE INSTRUCTIONS! 6 Section 2 - Read, understand, and follow the warnings and instructions in a poorly ventilated area. WARNING- WARNING- HOT SURFACE Engine parts, especially the muffler, become extremely hot...

Operation Manual
Page 7
...included in your local dealer or the Troy-Bilt Technical Service Department if any items are ...8226; Flanged Lock Nut, 1⁄4-20 (1) • Pan Head Screw, #10-32 x 1⁄2 (1) • The following parts (electric start the engine until instructed to do not start models only), packaged separately. • Nuts, 1⁄4-20 for battery terminals... gauge (1) • 4-1⁄2" high wood block to one of Carton • One Tiller • One Hardware Pack • One Engine Operator's Manual • One Handlebar Support • One Wheels/Tines PTO Lever • One Handlebar ...
...included in your local dealer or the Troy-Bilt Technical Service Department if any items are ...8226; Flanged Lock Nut, 1⁄4-20 (1) • Pan Head Screw, #10-32 x 1⁄2 (1) • The following parts (electric start the engine until instructed to do not start models only), packaged separately. • Nuts, 1⁄4-20 for battery terminals... gauge (1) • 4-1⁄2" high wood block to one of Carton • One Tiller • One Hardware Pack • One Engine Operator's Manual • One Handlebar Support • One Wheels/Tines PTO Lever • One Handlebar ...
Operation Manual
Page 26
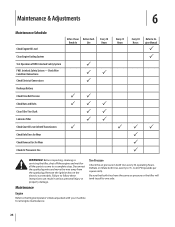
...25 Hours P Every 30 Hours Refer to 15- Be sure that both tires evenly to Engine Manual P P PP P P P WARNING! Before inspecting, cleaning or servicing the tiller, shut off the engine and wait for all the parts to come to one side. Disconnect the spark plug wire and move the wire away from ...the spark plug. Deflate or inflate both tires have the same air pressure or the tiller will tend to pull to a complete stop. Maintenance & Adjustments 6 ...
...25 Hours P Every 30 Hours Refer to 15- Be sure that both tires evenly to Engine Manual P P PP P P P WARNING! Before inspecting, cleaning or servicing the tiller, shut off the engine and wait for all the parts to come to one side. Disconnect the spark plug wire and move the wire away from ...the spark plug. Deflate or inflate both tires have the same air pressure or the tiller will tend to pull to a complete stop. Maintenance & Adjustments 6 ...
Operation Manual
Page 42
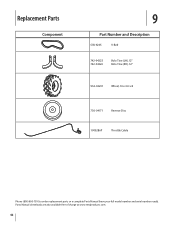
Parts Manual downloads are also available free of charge at www.mtdproducts.com. 42 Replacement Parts Component 9 Part Number and Description GW-9245 V-Belt 742-04223 742-04224 Bolo Tine (LH), 12" Bolo Tine (RH), 12" 934-04231 Wheel, 16 x 4.6 x 8 756-04171 Reverse Disc 1909286P Throttle Cable Phone (800) 800-7310 to order replacement parts or a complete Parts Manual (have your full model number and serial number ready).
Parts Manual downloads are also available free of charge at www.mtdproducts.com. 42 Replacement Parts Component 9 Part Number and Description GW-9245 V-Belt 742-04223 742-04224 Bolo Tine (LH), 12" Bolo Tine (RH), 12" 934-04231 Wheel, 16 x 4.6 x 8 756-04171 Reverse Disc 1909286P Throttle Cable Phone (800) 800-7310 to order replacement parts or a complete Parts Manual (have your full model number and serial number ready).
Operation Manual
Page 44
... www.mtdcanada.com. The engine or component parts thereof. Refer to applicable manufacturer's warranty for the life of the tiller, to the original purchaser only, commencing on...abuse, commercial use or exposure. Transportation charges and service calls. Troy-Bilt does not warrant this manual will , at P.O. In no event shall recovery of any ...items may also have a separate oneyear warranty. c. h. Belts are not genuine Troy-Bilt parts. Transmission - Troy-Bilt warrants attachments for this product (excluding its territories and possessions (either entity respectively,...
... www.mtdcanada.com. The engine or component parts thereof. Refer to applicable manufacturer's warranty for the life of the tiller, to the original purchaser only, commencing on...abuse, commercial use or exposure. Transportation charges and service calls. Troy-Bilt does not warrant this manual will , at P.O. In no event shall recovery of any ...items may also have a separate oneyear warranty. c. h. Belts are not genuine Troy-Bilt parts. Transmission - Troy-Bilt warrants attachments for this product (excluding its territories and possessions (either entity respectively,...
Technical Manual
Page 3
...fuel tanks. Keep hands, feet, hair, clothing, and tools safely away from flying parts or particles. Failure to do so could result in personal injury or property damage. • This manual is not covered in the operator's position. Read and follow all times when doing... are covered in combination with serial numbers 640000 and up. • This manual was written for the PTO HORSE Model TROY-BILT® Roto Tiller-Power Composter built by consulting the Service Repair Manuals available from any time without notice. Safety First When working on the latest information...
...fuel tanks. Keep hands, feet, hair, clothing, and tools safely away from flying parts or particles. Failure to do so could result in personal injury or property damage. • This manual is not covered in the operator's position. Read and follow all times when doing... are covered in combination with serial numbers 640000 and up. • This manual was written for the PTO HORSE Model TROY-BILT® Roto Tiller-Power Composter built by consulting the Service Repair Manuals available from any time without notice. Safety First When working on the latest information...

Technical Manual
Page 4
...combustion. Do not run the engine in an enclosed space. HANDLE PARTS CAREFULLY! Use only genuine Troy-Bilt replacement parts. Ventilate when charging or using in an enclosed area. Do ...Power Unit Drive Shaft Worm, Tiller Drive Shaft Worm Gear, Wheel Shaft Worm Gear, Tiller Tine Shaft TECHNICAL MANUAL OWNER/OPERATOR MANUAL If Batteries also produce explosive...handling battery acid. HANDLE BATTERIES WITH CARE! REPLACEMENT PARTS! Batteries contain sulfuric acid that is grounded. PTO HORSE MODEL TECHNICAL MANUAL Page 1-2 4/90 SECTION 1: General Information in...
...combustion. Do not run the engine in an enclosed space. HANDLE PARTS CAREFULLY! Use only genuine Troy-Bilt replacement parts. Ventilate when charging or using in an enclosed area. Do ...Power Unit Drive Shaft Worm, Tiller Drive Shaft Worm Gear, Wheel Shaft Worm Gear, Tiller Tine Shaft TECHNICAL MANUAL OWNER/OPERATOR MANUAL If Batteries also produce explosive...handling battery acid. HANDLE BATTERIES WITH CARE! REPLACEMENT PARTS! Batteries contain sulfuric acid that is grounded. PTO HORSE MODEL TECHNICAL MANUAL Page 1-2 4/90 SECTION 1: General Information in...
Technical Manual
Page 9
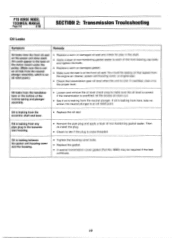
...TROY-BILT Technical Service Department for excessive play in the wheel shaft and replace seal. • Give new seals time to lap in the housing cover. If the leak is from the rear of the shaft. ■ Replace the wheel shaft if necessary. • Determine if the seal fits loosely in the tiller... tine shaft. If the leak is on an undamaged part of the tiller attachment housing. A lighter ...from the wheel shaft oil seals. SECTION 2: Transmission Troubleshooting PTO HORSE MODEL TECHNICAL MANUAL Page 2-5 4/90 Oil Leaks Symptom Oil leaks from the ...
...TROY-BILT Technical Service Department for excessive play in the wheel shaft and replace seal. • Give new seals time to lap in the housing cover. If the leak is from the rear of the shaft. ■ Replace the wheel shaft if necessary. • Determine if the seal fits loosely in the tiller... tine shaft. If the leak is on an undamaged part of the tiller attachment housing. A lighter ...from the wheel shaft oil seals. SECTION 2: Transmission Troubleshooting PTO HORSE MODEL TECHNICAL MANUAL Page 2-5 4/90 Oil Leaks Symptom Oil leaks from the ...
Technical Manual
Page 10
Oil leaks from the handlebar base or the bottom of non-hardening gasket sealer. Oil is an oil relief point. PTO HORSE MODEL TECHNICAL MANUAL Page 2-6 4/90 SECTION 2: Transmission Trouleshooting Oil Leaks Symptom Remedy Oil leaks from here, take no action; If overfilled, drain it to see if.... Oil is leaking from the eccentric shaft and lever. • Replace the oil seal. Replace the gasket. • A special transmission cover gasket (Part No. 9260) may be seeing oil that leaked from the neutral plunger. You could appear in the base of the motor mount under the pulley...
Oil leaks from the handlebar base or the bottom of non-hardening gasket sealer. Oil is an oil relief point. PTO HORSE MODEL TECHNICAL MANUAL Page 2-6 4/90 SECTION 2: Transmission Trouleshooting Oil Leaks Symptom Remedy Oil leaks from here, take no action; If overfilled, drain it to see if.... Oil is leaking from the eccentric shaft and lever. • Replace the oil seal. Replace the gasket. • A special transmission cover gasket (Part No. 9260) may be seeing oil that leaked from the neutral plunger. You could appear in the base of the motor mount under the pulley...

Technical Manual
Page 11
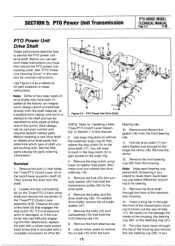
...inspect the following transmission parts. If you suspect an oil leak from the spark plug. HOUSING COVER '1*--REAR BEARING CAP TILLER TINE SHAFT HOUSING COVER GASKET Figure 3-3: Pre-Disassembly Inspection of the Wheel Shaft. SECTION 3: Pre-Service Inspection PTO HORSE MODEL TECHNICAL MANUAL Page 3-1 4/90... Before you begin your shop. PTO Power Unit Drive Shaft Pulley- The front bearing cap gasket may not have failed; Tip the tiller so that can be worn or the bolts may...
...inspect the following transmission parts. If you suspect an oil leak from the spark plug. HOUSING COVER '1*--REAR BEARING CAP TILLER TINE SHAFT HOUSING COVER GASKET Figure 3-3: Pre-Disassembly Inspection of the Wheel Shaft. SECTION 3: Pre-Service Inspection PTO HORSE MODEL TECHNICAL MANUAL Page 3-1 4/90... Before you begin your shop. PTO Power Unit Drive Shaft Pulley- The front bearing cap gasket may not have failed; Tip the tiller so that can be worn or the bolts may...

Technical Manual
Page 13
... from the keyswitch wire harness to the Owner/Operator Manual for part locations in this section. Disconnect the red starter cable from the tiller as a complete assembly by following the instructions in these instructions. PTO HORSE MODEL SECTION 4: Transmission Removal and Installation TECHNICAL MANUAL Page 4-1 4/90 The PTO Horse Model transmission consists of the handlebar base. 2.
... from the keyswitch wire harness to the Owner/Operator Manual for part locations in this section. Disconnect the red starter cable from the tiller as a complete assembly by following the instructions in these instructions. PTO HORSE MODEL SECTION 4: Transmission Removal and Installation TECHNICAL MANUAL Page 4-1 4/90 The PTO Horse Model transmission consists of the handlebar base. 2.
Technical Manual
Page 17
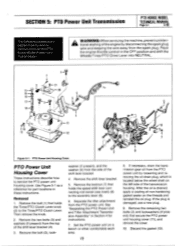
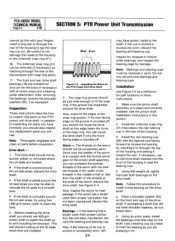
... secure the PTO power unit housing cover (11), and remove the cover. 10. See "Separating the PTO Power Unit and Tiller Attachment Transmission Assembly" in Section 4 for part locations in the OFF position and shift the Wheels/Tines/PTO Drive Lever into NEUTRAL. 2 4 (.51 2 1163--.48? .... Set the PTO power unit on the threads and reinstall the oil plug. SECTION 5: PTO Power Unit Transmission PTO HORSE MODEL TECHNICAL MANUAL Page 5-1 4/90 The following subsections explain how to the Tines/PTO Clutch Lever. Place the engine throttle control in these instructions.
... secure the PTO power unit housing cover (11), and remove the cover. 10. See "Separating the PTO Power Unit and Tiller Attachment Transmission Assembly" in Section 4 for part locations in the OFF position and shift the Wheels/Tines/PTO Drive Lever into NEUTRAL. 2 4 (.51 2 1163--.48? .... Set the PTO power unit on the threads and reinstall the oil plug. SECTION 5: PTO Power Unit Transmission PTO HORSE MODEL TECHNICAL MANUAL Page 5-1 4/90 The following subsections explain how to the Tines/PTO Clutch Lever. Place the engine throttle control in these instructions.
Technical Manual
Page 18
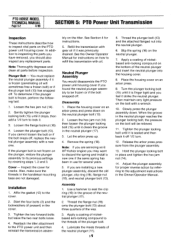
...the pressure on the PTO power unit housing cover. Affix the gasket (12) to inspect vital parts on the bolt will sometimes free a frozen bolt) or if the plunger bolt (13) has...gear oil if it is not frozen on the bottom of the neutral plunger (17). 2. PTO HORSE MODEL TECHNICAL MANUAL Page 5-2 4/90 SECTION 5: PTO Power Unit Transmission Inspection These instructions describe how to the cover....and insert the neutral plunger into the neutral plunger. 6. Slip the spring (18) on the tiller. Place the housing cover on an arbor press and press down . Release the arbor press ...
...the pressure on the PTO power unit housing cover. Affix the gasket (12) to inspect vital parts on the bolt will sometimes free a frozen bolt) or if the plunger bolt (13) has...gear oil if it is not frozen on the bottom of the neutral plunger (17). 2. PTO HORSE MODEL TECHNICAL MANUAL Page 5-2 4/90 SECTION 5: PTO Power Unit Transmission Inspection These instructions describe how to the cover....and insert the neutral plunger into the neutral plunger. 6. Slip the spring (18) on the tiller. Place the housing cover on an arbor press and press down . Release the arbor press ...
Technical Manual
Page 19
... front bearing cap. 11. Each bearing cup wears differently according to push in this manual. 3. Put your hand down through the front of the transmission housing. 14. See the tiller parts catalog for parts ordering information. If it is excessively worn or damaged, or if the customer has... the shoulder washer (27). 7. Also make sure you retrieve the drive shaft key (10). 5. SECTION 5: PTO Power Unit Transmission PTO HORSE MODEL TECHNICAL MANUAL Page 5-3 4/90 PTO Power Unit Drive Shaft These instructions describe how to "Installing a New Tines/PTO Clutch Lever Assembly" in Section 7...
... front bearing cap. 11. Each bearing cup wears differently according to push in this manual. 3. Put your hand down through the front of the transmission housing. 14. See the tiller parts catalog for parts ordering information. If it is excessively worn or damaged, or if the customer has... the shoulder washer (27). 7. Also make sure you retrieve the drive shaft key (10). 5. SECTION 5: PTO Power Unit Transmission PTO HORSE MODEL TECHNICAL MANUAL Page 5-3 4/90 PTO Power Unit Drive Shaft These instructions describe how to "Installing a New Tines/PTO Clutch Lever Assembly" in Section 7...
Technical Manual
Page 20
...drive shaft inserted into the front of the housing to receive the bearing, by reaching through the rear of the housing to inspect vital parts on and can compare the outside threads of the worm, discard the drive shaft. Since only the middle of the worm is half ... threads. Install the rear bearing cup (20) with the tapered end facing forward to seat the bearing cup. 4. If necessary, use . PTO HORSE MODEL TECHNICAL MANUAL Page 5.4 4/90 SECTION 5: PTO Power Unit Transmission cannot do not install them. Inspection These instructions describe how to tap the bearing cup out. ...
...drive shaft inserted into the front of the housing to receive the bearing, by reaching through the rear of the housing to inspect vital parts on and can compare the outside threads of the worm, discard the drive shaft. Since only the middle of the worm is half ... threads. Install the rear bearing cup (20) with the tapered end facing forward to seat the bearing cup. 4. If necessary, use . PTO HORSE MODEL TECHNICAL MANUAL Page 5.4 4/90 SECTION 5: PTO Power Unit Transmission cannot do not install them. Inspection These instructions describe how to tap the bearing cup out. ...
Technical Manual
Page 21
...coating of the housing. Remove the shims (4) from each side of the drive shaft removal instructions. SECTION 5: PTO Power Unit Transmission PTO HORSE MODEL TECHNICAL MANUAL Page 5-5 4/90 c. Hold the bearing cap firmly in the outer surface. Correct end play is at this section. 22. If there...cap and secure it by reversing steps 5 and 6 of the housing. 2. Although not easy to accept the tiller attachment sleeve. 20. you check the drive shaft for part locations in the clutch groove. Fill the dog clutch cavity with a mallet. If the end play is between ...
...coating of the housing. Remove the shims (4) from each side of the drive shaft removal instructions. SECTION 5: PTO Power Unit Transmission PTO HORSE MODEL TECHNICAL MANUAL Page 5-5 4/90 c. Hold the bearing cap firmly in the outer surface. Correct end play is at this section. 22. If there...cap and secure it by reversing steps 5 and 6 of the housing. 2. Although not easy to accept the tiller attachment sleeve. 20. you check the drive shaft for part locations in the clutch groove. Fill the dog clutch cavity with a mallet. If the end play is between ...
Technical Manual
Page 22
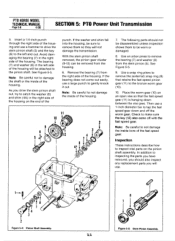
... to the pinion shaft. In addition to remove the bearing (7) and washer (8) from the stem pinion (5). Use an arbor press to inspecting the parts you have removed, you will be worn or damaged. 8. Place the worm gear (10) on the end of the housing will use a 1-... (12) also came off the worm gear. Then use . (05 t 1 3 2 Figure 5-4: Pinion Shaft Assembly. 8 1 Figure 5-5: Stem Pinion Assembly. PTO HORSE MODEL TECHNICAL MANUAL Page 5.6 4/90 SECTION 5: PTO Power Unit Transmission 5. Avoid damaging the bearing (7) in the right side of the housing on an open vise so that...
... to the pinion shaft. In addition to remove the bearing (7) and washer (8) from the stem pinion (5). Use an arbor press to inspecting the parts you have removed, you will be worn or damaged. 8. Place the worm gear (10) on the end of the housing will use a 1-... (12) also came off the worm gear. Then use . (05 t 1 3 2 Figure 5-4: Pinion Shaft Assembly. 8 1 Figure 5-5: Stem Pinion Assembly. PTO HORSE MODEL TECHNICAL MANUAL Page 5.6 4/90 SECTION 5: PTO Power Unit Transmission 5. Avoid damaging the bearing (7) in the right side of the housing on an open vise so that...


