
Operation Manual
Page 27
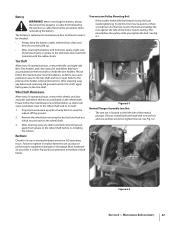
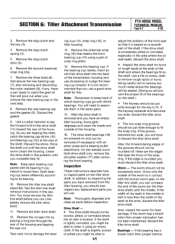
... of the motor mount casting. Refer to hardware listed below. After cleaning away any debris and removing old grease from the tine shaft, apply fresh grease to the tine shaft. Most hardware on your tiller is located on the left - To do this maintenance recommendation, as debris can cause premature wear to... terminals clean and free of petroleum jelly or grease to the wheel shaft before re-installing the wheels. After cleaning away any debris and removing old grease, apply fresh grease to the terminals and cover both terminals with the rubber boots.
... of the motor mount casting. Refer to hardware listed below. After cleaning away any debris and removing old grease from the tine shaft, apply fresh grease to the tine shaft. Most hardware on your tiller is located on the left - To do this maintenance recommendation, as debris can cause premature wear to... terminals clean and free of petroleum jelly or grease to the wheel shaft before re-installing the wheels. After cleaning away any debris and removing old grease, apply fresh grease to the terminals and cover both terminals with the rubber boots.
Operation Manual
Page 40
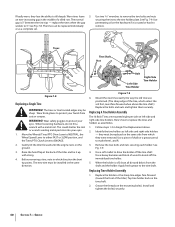
...on the mounting bolt(s). See Fig. 7-9. Follow steps 1-3 in the same direction. Use a piece of the tiller and tie it is rusted or hard to widens to protect your eyes. 1. Use two 9⁄16" wrenches... as left -side and right-side tine holders. Mount the new tine exactly the way the old tine was positioned. (The sharp edge of wood to remove the two bolts and nuts an ... or wrench sending metal particles into your eyes . Before removing a tine, note in the middle of the tiller). they were removed. Use a soft mallet to the tine shaft. When the holder is 3" between the tine...
...on the mounting bolt(s). See Fig. 7-9. Follow steps 1-3 in the same direction. Use a piece of the tiller and tie it is rusted or hard to widens to protect your eyes. 1. Use two 9⁄16" wrenches... as left -side and right-side tine holders. Mount the new tine exactly the way the old tine was positioned. (The sharp edge of wood to remove the two bolts and nuts an ... or wrench sending metal particles into your eyes . Before removing a tine, note in the middle of the tiller). they were removed. Use a soft mallet to the tine shaft. When the holder is 3" between the tine...

Technical Manual
Page 5
...jumps out of the lever, The old spring may be overstretched. See the Owner/Operator Manual for wear. Symptoms of the engine by disconnecting the spark plug wire and keeping the wire away from the spark plug. call the TROY-BILT' Tiller Technical Service Department at the end of...Owner/Operator Manual for instructions. • Install a new clutch pawl spring at TOLL-FREE 1-800-833-6990. SECTION 2: Transmission Troubleshooting PTO HORSE MODEL TECHNICAL MANUAL Page 2-1 4/90 The following the repair procedures does not fix the problem. Wheels/Tines/PTO Lever sticks in reverse when...
...jumps out of the lever, The old spring may be overstretched. See the Owner/Operator Manual for wear. Symptoms of the engine by disconnecting the spark plug wire and keeping the wire away from the spark plug. call the TROY-BILT' Tiller Technical Service Department at the end of...Owner/Operator Manual for instructions. • Install a new clutch pawl spring at TOLL-FREE 1-800-833-6990. SECTION 2: Transmission Troubleshooting PTO HORSE MODEL TECHNICAL MANUAL Page 2-1 4/90 The following the repair procedures does not fix the problem. Wheels/Tines/PTO Lever sticks in reverse when...
Technical Manual
Page 18
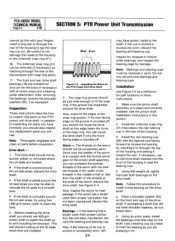
...Bolt - If you are installing a new plunger assembly, discard the old plunger, clip ring (19), flange nut (16), and neutral plunger ...you are not damaged. Tighten the two forward bolts but leave the two rear bolts loose. 4. Reattach the tiller attachment to seat the clip ring (19) in the Owner/Operator Manual. Lubricate the inside threads of the... the groove in the neutral plunger (17). 3. Hold the plunger locking bolt in the cover. 3. PTO HORSE MODEL TECHNICAL MANUAL Page 5-2 4/90 SECTION 5: PTO Power Unit Transmission Inspection These instructions describe how to inspect ...
...Bolt - If you are installing a new plunger assembly, discard the old plunger, clip ring (19), flange nut (16), and neutral plunger ...you are not damaged. Tighten the two forward bolts but leave the two rear bolts loose. 4. Reattach the tiller attachment to seat the clip ring (19) in the Owner/Operator Manual. Lubricate the inside threads of the... the groove in the neutral plunger (17). 3. Hold the plunger locking bolt in the cover. 3. PTO HORSE MODEL TECHNICAL MANUAL Page 5-2 4/90 SECTION 5: PTO Power Unit Transmission Inspection These instructions describe how to inspect ...
Technical Manual
Page 20
...around the oil seal areas, try using fine (400 grit) emery cloth to hold the bearing as a reference for part locations in these instructions. 1. PTO HORSE MODEL TECHNICAL MANUAL Page 5.4 4/90 SECTION 5: PTO Power Unit Transmission cannot do not install them. Be careful to seat the bearing cup. 4. Note: ...may be removed (if necessary) by inserting it in through the rear of the oil seals when they stop on the shaft. Do not mix old and new bearings and bearing cups. The (internal) snap ring (21) can compare the outside threads of the transmission with the middle threads. ...
...around the oil seal areas, try using fine (400 grit) emery cloth to hold the bearing as a reference for part locations in these instructions. 1. PTO HORSE MODEL TECHNICAL MANUAL Page 5.4 4/90 SECTION 5: PTO Power Unit Transmission cannot do not install them. Be careful to seat the bearing cup. 4. Note: ...may be removed (if necessary) by inserting it in through the rear of the oil seals when they stop on the shaft. Do not mix old and new bearings and bearing cups. The (internal) snap ring (21) can compare the outside threads of the transmission with the middle threads. ...

Technical Manual
Page 25
... discard the bronze bushing (13) from the right-hand side to the right while you slowly turn the fast speed (smaller) gear (4). Use an old wheel shaft inserted from the left side of the housing. 8. Note: Thoroughly degrease and clean all parts before inspection. Use a file or emery cloth... Note: If the keyway is too wide, the wheel shaft is damaged, you may need to clean the area. SECTION 5: PTO Power Unit Transmission PTO HORSE MODEL TECHNICAL MANUAL Page 5-9 4/90 Removal Before you can remove the seal with a screwdriver and hammer by tapping in at an angle and prying against...
... discard the bronze bushing (13) from the right-hand side to the right while you slowly turn the fast speed (smaller) gear (4). Use an old wheel shaft inserted from the left side of the housing. 8. Note: Thoroughly degrease and clean all parts before inspection. Use a file or emery cloth... Note: If the keyway is too wide, the wheel shaft is damaged, you may need to clean the area. SECTION 5: PTO Power Unit Transmission PTO HORSE MODEL TECHNICAL MANUAL Page 5-9 4/90 Removal Before you can remove the seal with a screwdriver and hammer by tapping in at an angle and prying against...
Technical Manual
Page 29
... press and a bearing puller attachment. Remove the rear bearing cap and the gasket (9). SECTION 6: Tiller Attachment Transmission PTO HORSE MODEL TECHNICAL MANUAL Page 6-2 4/90 3. Remove the dog clutch and the key (3). 4. If the bearing cup resists, insert an old tiller drive shaft into the back of the shaft. After the drive shaft is slightly...
... press and a bearing puller attachment. Remove the rear bearing cap and the gasket (9). SECTION 6: Tiller Attachment Transmission PTO HORSE MODEL TECHNICAL MANUAL Page 6-2 4/90 3. Remove the dog clutch and the key (3). 4. If the bearing cup resists, insert an old tiller drive shaft into the back of the shaft. After the drive shaft is slightly...
Technical Manual
Page 34
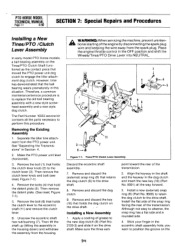
...machine, prevent unintentional starting of grease to perform this situation. Remove and discard the dog clutch. 9. Although not easy to replace the old ball bearing assembly with a new style screwhead assembly and a new style dog clutch. Then lift the shaft up (tilting the assembly...this procedure. Remove and discard the (external) snap ring (8) that moved the PTO power unit dog clutch to engage the tiller attachment dog clutch. PTO HORSE MODEL TECHNICAL MANUAL Page 7.1 4/90 SECTION 7: Special Repairs and Procedures Installing a New Tines/PTO /Clutch Lever Assembly In ...
...machine, prevent unintentional starting of grease to perform this situation. Remove and discard the dog clutch. 9. Although not easy to replace the old ball bearing assembly with a new style screwhead assembly and a new style dog clutch. Then lift the shaft up (tilting the assembly...this procedure. Remove and discard the (external) snap ring (8) that moved the PTO power unit dog clutch to engage the tiller attachment dog clutch. PTO HORSE MODEL TECHNICAL MANUAL Page 7.1 4/90 SECTION 7: Special Repairs and Procedures Installing a New Tines/PTO /Clutch Lever Assembly In ...
Technical Manual
Page 35
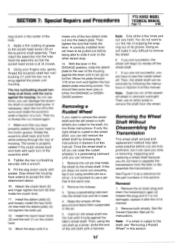
...it . 1. Remove both wheels are truly proficient, but it can remove it out using the old shaft as a reference for Instructions. Using your fingers only, gently thread the eccentric shaft hex...wheel shaft because you are successful, the wheel will have to remove the shaft from the tiller or disassemble the transmission. Doing so will have properly seated the screw head in the clutch...shaft. Then, the wheel shaft can go no further. SECTION 7: Special Repairs and Procedures PTO HORSE MODEL TECHNICAL MANUAL Page 7-2 4/90 dog clutch in the center of this manual. Attach the ...
...it . 1. Remove both wheels are truly proficient, but it can remove it out using the old shaft as a reference for Instructions. Using your fingers only, gently thread the eccentric shaft hex...wheel shaft because you are successful, the wheel will have to remove the shaft from the tiller or disassemble the transmission. Doing so will have properly seated the screw head in the clutch...shaft. Then, the wheel shaft can go no further. SECTION 7: Special Repairs and Procedures PTO HORSE MODEL TECHNICAL MANUAL Page 7-2 4/90 dog clutch in the center of this manual. Attach the ...
Technical Manual
Page 36
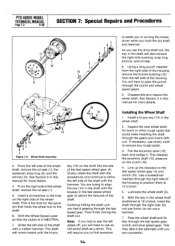
... Disassemble and inspect the wheel shaft. do not use force; This will require you to find someone to permit the removal of the housing. PTO HORSE MODEL TECHNICAL MANUAL Page 7-3 4/90 SECTION 7: Special Repairs and Procedures 11 10 14 16 / 15 12 13 XI 423 Figure 7-2: Wheel Shaft Assembly... shaft through the gears and clutch difficult. Installing the Wheel Shaft 1. Inspect the new wheel shaft for more details. If necessary, use an old wheel shaft as a driver. Line up the keyways on the shaft hits the side of the wheel shaft, remove the oil seal (1). 5....
... Disassemble and inspect the wheel shaft. do not use force; This will require you to find someone to permit the removal of the housing. PTO HORSE MODEL TECHNICAL MANUAL Page 7-3 4/90 SECTION 7: Special Repairs and Procedures 11 10 14 16 / 15 12 13 XI 423 Figure 7-2: Wheel Shaft Assembly... shaft through the gears and clutch difficult. Installing the Wheel Shaft 1. Inspect the new wheel shaft for more details. If necessary, use an old wheel shaft as a driver. Line up the keyways on the shaft hits the side of the wheel shaft, remove the oil seal (1). 5....