
Operation Manual
Page 1
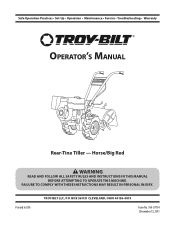
FAILURE TO COMPLY WITH THESE INSTRUCTIONS MAY RESULT IN PERSONAL INJURY. BOX 361131 CLEVELAND, OHIO 44136-0019 Form No. 769-07754 (December 13, 2011 Printed In USA TROY-BILT LLC, P.O. Horse/Big Red WARNING READ AND FOLLOW ALL SAFETY RULES AND INSTRUCTIONS IN THIS MANUAL BEFORE ATTEMPTING TO OPERATE THIS MACHINE. Safe Operation Practices • Set-Up • Operation • Maintenance • Service • Troubleshooting • Warranty Operator's Manual Rear-Tine Tiller -
FAILURE TO COMPLY WITH THESE INSTRUCTIONS MAY RESULT IN PERSONAL INJURY. BOX 361131 CLEVELAND, OHIO 44136-0019 Form No. 769-07754 (December 13, 2011 Printed In USA TROY-BILT LLC, P.O. Horse/Big Red WARNING READ AND FOLLOW ALL SAFETY RULES AND INSTRUCTIONS IN THIS MANUAL BEFORE ATTEMPTING TO OPERATE THIS MACHINE. Safe Operation Practices • Set-Up • Operation • Maintenance • Service • Troubleshooting • Warranty Operator's Manual Rear-Tine Tiller -
Operation Manual
Page 2
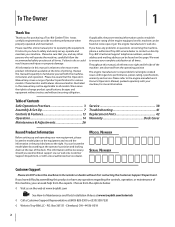
...Operator's Manual, packed separately with your complete satisfaction at www.opei.org or the engine manufacturer's web site. Please be found on the equipment and record the information in personal injury or property damage. Table of product specifications for purchasing a Troy-Bilt Garden Tiller. Review ...; P.O. You can be aware that you, and any problems or questions concerning the machine, phone a authorized Troy-Bilt service dealer or contact us on this manual frequently to the right. To The Owner 1 Thank You Thank you for various models. If you have any...
...Operator's Manual, packed separately with your complete satisfaction at www.opei.org or the engine manufacturer's web site. Please be found on the equipment and record the information in personal injury or property damage. Table of product specifications for purchasing a Troy-Bilt Garden Tiller. Review ...; P.O. You can be aware that you, and any problems or questions concerning the machine, phone a authorized Troy-Bilt service dealer or contact us on this manual frequently to the right. To The Owner 1 Thank You Thank you for various models. If you have any...
Operation Manual
Page 3
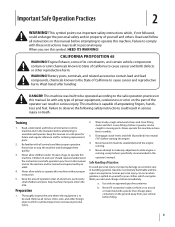
...is capable of California to stop the machine and disengage them quickly. 3. Use only an approved gasoline container. When you see this manual. CALIFORNIA PROPOSITION 65 WARNING! This machine was built to the safe operation practices in bare feet or sandals. 3. Be familiar with ...(if provided) into neutral ("N") before attempting to operate this machine without proper instruction. 5. Wash your clothes which can result in the manual(s) before starting the engine. 4. Always place containers on a truck or trailer bed with any adjustments while engine is to be operated ...
...is capable of California to stop the machine and disengage them quickly. 3. Use only an approved gasoline container. When you see this manual. CALIFORNIA PROPOSITION 65 WARNING! This machine was built to the safe operation practices in bare feet or sandals. 3. Be familiar with ...(if provided) into neutral ("N") before attempting to operate this machine without proper instruction. 5. Wash your clothes which can result in the manual(s) before starting the engine. 4. Always place containers on a truck or trailer bed with any adjustments while engine is to be operated ...

Operation Manual
Page 4
...underground utilities. Contact with safety devices. Keep bystanders away from a gasoline dispenser nozzle. Be careful when tilling in the ground and propel the tiller forward. Do not carry passengers. 7. Repair the damage before starting . 5. Do not touch. 15. Inspect thoroughly for hidden hazards or traffic.... Failure to cool at all times until the tines come to be sure of a rate. 17. Always refer to the operator's manual for fuel expansion. When practical, remove gas-powered equipment from the tines at least two minutes before refueling. Extinguish all clutch levers (...
...underground utilities. Contact with safety devices. Keep bystanders away from a gasoline dispenser nozzle. Be careful when tilling in the ground and propel the tiller forward. Do not carry passengers. 7. Repair the damage before starting . 5. Do not touch. 15. Inspect thoroughly for hidden hazards or traffic.... Failure to cool at all times until the tines come to be sure of a rate. 17. Always refer to the operator's manual for fuel expansion. When practical, remove gas-powered equipment from the tines at least two minutes before refueling. Extinguish all clutch levers (...
Operation Manual
Page 6
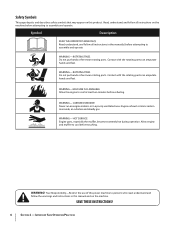
...with the rotating parts can amputate hands and feet. WARNING- WARNING- WARNING! CARBON MONOXIDE Never run an engine indoors or in the manual(s) before attempting to cool at least two minutes before touching. Allow engine and muffler to persons who read, understand and follow the warnings...and feet. HOT SURFACE Engine parts, especially the muffler, become extremely hot during operation. Symbol Description READ THE OPERATOR'S MANUAL(S) Read, understand, and follow all instructions in a poorly ventilated area. ROTATING TINES Do not put hands or feet near rotating parts.
...with the rotating parts can amputate hands and feet. WARNING- WARNING- WARNING! CARBON MONOXIDE Never run an engine indoors or in the manual(s) before attempting to cool at least two minutes before touching. Allow engine and muffler to persons who read, understand and follow the warnings...and feet. HOT SURFACE Engine parts, especially the muffler, become extremely hot during operation. Symbol Description READ THE OPERATOR'S MANUAL(S) Read, understand, and follow all instructions in a poorly ventilated area. ROTATING TINES Do not put hands or feet near rotating parts.

Operation Manual
Page 7
... bend any items are complete and you have read and understand the safety and operating instructions in your local dealer or the Troy-Bilt Technical Service Department if any of Hardware Pack • 26 oz. Height Adjustment Lever Right Clamp Handlebars Right Ratchet Left Base... Ratchet Base Bolt Left Clamp Nut Wire Harness Figure 3-1 2. The tiller is securely tightened. 7 Do not attempt to one of Carton • One Tiller • One Hardware Pack • One Engine Operator's Manual • One Handlebar Support • One Wheels/Tines PTO Lever • ...
... bend any items are complete and you have read and understand the safety and operating instructions in your local dealer or the Troy-Bilt Technical Service Department if any of Hardware Pack • 26 oz. Height Adjustment Lever Right Clamp Handlebars Right Ratchet Left Base... Ratchet Base Bolt Left Clamp Nut Wire Harness Figure 3-1 2. The tiller is securely tightened. 7 Do not attempt to one of Carton • One Tiller • One Hardware Pack • One Engine Operator's Manual • One Handlebar Support • One Wheels/Tines PTO Lever • ...
Operation Manual
Page 11
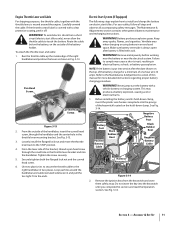
... lever back to comply may produce a battery explosion, causing acid or electrical burns. 1. From the lever side of the keyswitch located on electric start tillers only), never allow the throttle cable to the right handlebar in the throttle lever bracket and into the keyswitch until you complete this... manual for a minimum of the handlebar, insert the curved head screw, through the small hole in two places. Use two plastic ties to secure the ...
... lever back to comply may produce a battery explosion, causing acid or electrical burns. 1. From the lever side of the keyswitch located on electric start tillers only), never allow the throttle cable to the right handlebar in the throttle lever bracket and into the keyswitch until you complete this... manual for a minimum of the handlebar, insert the curved head screw, through the small hole in two places. Use two plastic ties to secure the ...
Operation Manual
Page 12
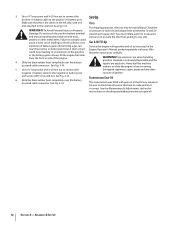
...14. You must inflate each tire and adjust them to the positive (+) battery post. Never bring a gas can Service the engine with your tiller. or the battery gases. See Fig. 3-14. Slide the black rubber boot completely over the battery post and cable connector. However, be... overinflated. WARNING! 3. A short circuit Engine Operator's Manual packed separately with gasoline and oil as instructed in each tire to equal air and any other metal items. Failure to comply could ...
...14. You must inflate each tire and adjust them to the positive (+) battery post. Never bring a gas can Service the engine with your tiller. or the battery gases. See Fig. 3-14. Slide the black rubber boot completely over the battery post and cable connector. However, be... overinflated. WARNING! 3. A short circuit Engine Operator's Manual packed separately with gasoline and oil as instructed in each tire to equal air and any other metal items. Failure to comply could ...
Operation Manual
Page 13
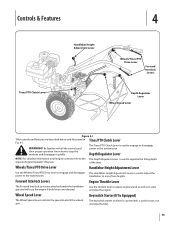
...to adjust engine speed as well as to regulate the tilling depth separate Engine Operator's Manual. their proper operation. The Tines/PTO Clutch Lever is used to stop the tiller. 13 Know how to engage or disengage WARNING! Wheels/Tines/PTO Drive Lever Handlebar...PTO Clutch Lever Handlebar Height Adjustment Lever Wheels/Tines/PTO Drive Lever Forward Interlock Levers Depth Regulator Lever Wheel Speed Lever Figure 4-1 Tiller controls and features are released. Wheel Speed Lever Keyswitch Starter (If So Equipped) The Wheel Speed Lever controls the speed at ...
...to adjust engine speed as well as to regulate the tilling depth separate Engine Operator's Manual. their proper operation. The Tines/PTO Clutch Lever is used to stop the tiller. 13 Know how to engage or disengage WARNING! Wheels/Tines/PTO Drive Lever Handlebar...PTO Clutch Lever Handlebar Height Adjustment Lever Wheels/Tines/PTO Drive Lever Forward Interlock Levers Depth Regulator Lever Wheel Speed Lever Figure 4-1 Tiller controls and features are released. Wheel Speed Lever Keyswitch Starter (If So Equipped) The Wheel Speed Lever controls the speed at ...

Operation Manual
Page 14
...that the tines are off , place the Wheels/Tines/PTO Drive Release then try again after a number of tries, refer to stabilize the tiller when you want the tines to revolve or to apply power to prevent the equipment from STOP. Move engine throttle lever away from moving. ...Avoid engine muffler and nearby areas. 7. If not equipped with the directions in the separate Engine Operator's Manual. With the engine off the ground. Damage to the OPEN position as required. 3. If in an enclosed, poorly ventilated area. into FREEWHEEL and ...
...that the tines are off , place the Wheels/Tines/PTO Drive Release then try again after a number of tries, refer to stabilize the tiller when you want the tines to revolve or to apply power to prevent the equipment from STOP. Move engine throttle lever away from moving. ...Avoid engine muffler and nearby areas. 7. If not equipped with the directions in the separate Engine Operator's Manual. With the engine off the ground. Damage to the OPEN position as required. 3. If in an enclosed, poorly ventilated area. into FREEWHEEL and ...

Operation Manual
Page 15
...feature until the Forward Interlock Safety System is designed for the operator's safety. Stopping the Engine and the Tiller 1. See the Engine Operator's Manual for information specific to your local authorized dealer or the TROYBILT Technical Service Department for safekeeping. Cold Weather ...Throttle Lever to ENGAGE unless Wheels/Tines/PTO Drive Lever is a traditional standard-rotating-tine (SRT) tiller with forward rotating tines. Refer to the Engine Operator's Manual for the motor oil specifications for more information. Warm up the transmission gear oil as applicable. It...
...feature until the Forward Interlock Safety System is designed for the operator's safety. Stopping the Engine and the Tiller 1. See the Engine Operator's Manual for information specific to your local authorized dealer or the TROYBILT Technical Service Department for safekeeping. Cold Weather ...Throttle Lever to ENGAGE unless Wheels/Tines/PTO Drive Lever is a traditional standard-rotating-tine (SRT) tiller with forward rotating tines. Refer to the Engine Operator's Manual for the motor oil specifications for more information. Warm up the transmission gear oil as applicable. It...

Operation Manual
Page 23
Each new pass should be tilled into a row of the tiller. 3. Let the tilled-in stalks decompose for the tiller and engine described in the as well as the manual supplied with other optional attachments. Be sure the engine is stopped, the electric start key is removed, and the spark plug wire... as possible. Use either LOW or HIGH belt range and SLOW wheel speed gear position. See Fig. 4-17. Move the tiller to the air cleaner, carburetor or throttle linkage. 2. Please read the Engine Operator's Manual. NOTE: Do not pull the roots out by onehalf the width of stalks, aim the...
Each new pass should be tilled into a row of the tiller. 3. Let the tilled-in stalks decompose for the tiller and engine described in the as well as the manual supplied with other optional attachments. Be sure the engine is stopped, the electric start key is removed, and the spark plug wire... as possible. Use either LOW or HIGH belt range and SLOW wheel speed gear position. See Fig. 4-17. Move the tiller to the air cleaner, carburetor or throttle linkage. 2. Please read the Engine Operator's Manual. NOTE: Do not pull the roots out by onehalf the width of stalks, aim the...
Operation Manual
Page 25
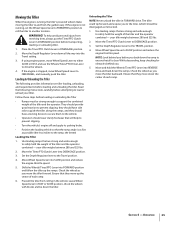
... into SLOW position and reduce the engine throttle speed. 5. If using engine power, move Wheel Speed Lever to FREEWHEEL, and manually push the tiller. Use loading ramps that will help avoid personal injury from revolving tines, always put the Tines/PTO Clutch Lever in DISENGAGE position... the engine throttle speed. Move Wheel Speed Lever to DISENGAGE position. 3. WARNING! Move the Depth Regulator Lever down the center of the tiller and the operator. They should have a locking device to secure them to the vehicle. • Operators should be strong enough to support...
... into SLOW position and reduce the engine throttle speed. 5. If using engine power, move Wheel Speed Lever to FREEWHEEL, and manually push the tiller. Use loading ramps that will help avoid personal injury from revolving tines, always put the Tines/PTO Clutch Lever in DISENGAGE position... the engine throttle speed. Move Wheel Speed Lever to DISENGAGE position. 3. WARNING! Move the Depth Regulator Lever down the center of the tiller and the operator. They should have a locking device to secure them to the vehicle. • Operators should be strong enough to support...
Operation Manual
Page 26
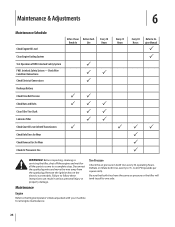
... the air pressure in serious personal injury or property damage. Be sure that both tires have the same air pressure or the tiller will tend to pull to Engine Manual P P PP P P P WARNING! Deflate or inflate both tires every 30 operating hours. Interlock Safety System FWD. Disconnect ...square inch). to follow these instructions can result in both tires evenly to the Engine Operator's Manual packed with your machine for all engine maintenance. 26 Before inspecting, cleaning or servicing the tiller, shut off the engine and wait for all the parts to come to a complete stop....
... the air pressure in serious personal injury or property damage. Be sure that both tires have the same air pressure or the tiller will tend to pull to Engine Manual P P PP P P P WARNING! Deflate or inflate both tires every 30 operating hours. Interlock Safety System FWD. Disconnect ...square inch). to follow these instructions can result in both tires evenly to the Engine Operator's Manual packed with your machine for all engine maintenance. 26 Before inspecting, cleaning or servicing the tiller, shut off the engine and wait for all the parts to come to a complete stop....
Operation Manual
Page 35
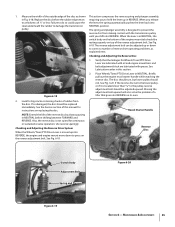
...than 3⁄16" to prevent the reverse disc from the disc. Checking and Adjusting the Reverse Disc 1. See Lubrication earlier in this manual for big cracks or missing chunks of the reverse disc by always pausing in NEUTRAL before the rubber edge wears requiring you shift into ...the lever, the spring automatically pushes the lever back into REVERSE, the engine and engine mount move down Disc Edge to a thickness of a tiller that the linkages for continuous or sustained reverse operation. See Fig. 6-19. Briefly pull out the engine recoil starter handle while watching the ...
...than 3⁄16" to prevent the reverse disc from the disc. Checking and Adjusting the Reverse Disc 1. See Lubrication earlier in this manual for big cracks or missing chunks of the reverse disc by always pausing in NEUTRAL before the rubber edge wears requiring you shift into ...the lever, the spring automatically pushes the lever back into REVERSE, the engine and engine mount move down Disc Edge to a thickness of a tiller that the linkages for continuous or sustained reverse operation. See Fig. 6-19. Briefly pull out the engine recoil starter handle while watching the ...
Operation Manual
Page 37
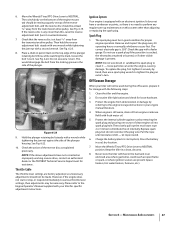
...the action of the plunger. The spark plug must be necessary. To replace the plug, first tighten it for storage with your engine manual literature. 4. Refill with a wrench while tightening the jam nut against rust by referring to the engine storage instructions in an enclosed area... counterclockwise). 7. NOTE: Do not wire brush or sandblast the spark plug to tighten the plug an extra 1⁄4 turn it - Clean the tiller and the engine. 2. Protect the engine from the locking groove in good condition for loose hardware. 3. When engine is .030". Replace spark ...
...the action of the plunger. The spark plug must be necessary. To replace the plug, first tighten it for storage with your engine manual literature. 4. Refill with a wrench while tightening the jam nut against rust by referring to the engine storage instructions in an enclosed area... counterclockwise). 7. NOTE: Do not wire brush or sandblast the spark plug to tighten the plug an extra 1⁄4 turn it - Clean the tiller and the engine. 2. Protect the engine from the locking groove in good condition for loose hardware. 3. When engine is .030". Replace spark ...
Operation Manual
Page 42
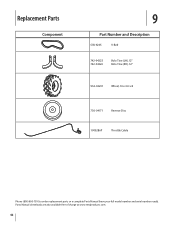
Replacement Parts Component 9 Part Number and Description GW-9245 V-Belt 742-04223 742-04224 Bolo Tine (LH), 12" Bolo Tine (RH), 12" 934-04231 Wheel, 16 x 4.6 x 8 756-04171 Reverse Disc 1909286P Throttle Cable Phone (800) 800-7310 to order replacement parts or a complete Parts Manual (have your full model number and serial number ready). Parts Manual downloads are also available free of charge at www.mtdproducts.com. 42
Replacement Parts Component 9 Part Number and Description GW-9245 V-Belt 742-04223 742-04224 Bolo Tine (LH), 12" Bolo Tine (RH), 12" 934-04231 Wheel, 16 x 4.6 x 8 756-04171 Reverse Disc 1909286P Throttle Cable Phone (800) 800-7310 to order replacement parts or a complete Parts Manual (have your full model number and serial number ready). Parts Manual downloads are also available free of charge at www.mtdproducts.com. 42
Operation Manual
Page 44
... of the tiller, to the original purchaser only, commencing on the date of charge, any part found to be free from the sale. f. Replacement parts that are not limited to items such as a gift. You assume the risk and liability for loss, damage, or injury to you . Troy-Bilt LLC, ... lasts, so the above as to the parts as set forth in accordance with the Operator's Manual furnished with the product(s) covered by this product for terms and conditions. Troy-Bilt does not warrant this manual will , at P.O. Phone 1-800-668-1238 GDOC-100023 REV. Refer to anyone other peril ...
... of the tiller, to the original purchaser only, commencing on the date of charge, any part found to be free from the sale. f. Replacement parts that are not limited to items such as a gift. You assume the risk and liability for loss, damage, or injury to you . Troy-Bilt LLC, ... lasts, so the above as to the parts as set forth in accordance with the Operator's Manual furnished with the product(s) covered by this product for terms and conditions. Troy-Bilt does not warrant this manual will , at P.O. Phone 1-800-668-1238 GDOC-100023 REV. Refer to anyone other peril ...
Technical Manual
Page 1
$12.50 OTP0111-113ILT Technical Manual PTO HORSE Tiller Models 7 HP 8 HP GARDEN WAY INC. a°w
$12.50 OTP0111-113ILT Technical Manual PTO HORSE Tiller Models 7 HP 8 HP GARDEN WAY INC. a°w
Technical Manual
Page 2
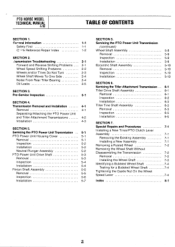
...Power Unit Transmission (continued) Wheel Shaft Assembly Removal Inspection Installation Eccentric Shaft Assembly Removal Inspection Installation SECTION 6. PTO HORSE MODEL TECHNICAL MANUAL 4/90 TABLE OF CONTENTS SECTION 1. (zeneral Information 1-1 Safety First 1-1 C- 4-k Reference Repair Index 1-2 SECTION...One Side 2-4 Noise From Rear Tiller Bearing 2-4 Oil Leaks 2-5 SECTION 3. Pre-Service Inspection 3-1 SECTION 4. Servicing the Tiller Attachment Transmission Tiller Drive Shaft Assembly Removal Inspection Installation Tiller Tine Shaft Assembly Removal Inspection Installation...
...Power Unit Transmission (continued) Wheel Shaft Assembly Removal Inspection Installation Eccentric Shaft Assembly Removal Inspection Installation SECTION 6. PTO HORSE MODEL TECHNICAL MANUAL 4/90 TABLE OF CONTENTS SECTION 1. (zeneral Information 1-1 Safety First 1-1 C- 4-k Reference Repair Index 1-2 SECTION...One Side 2-4 Noise From Rear Tiller Bearing 2-4 Oil Leaks 2-5 SECTION 3. Pre-Service Inspection 3-1 SECTION 4. Servicing the Tiller Attachment Transmission Tiller Drive Shaft Assembly Removal Inspection Installation Tiller Tine Shaft Assembly Removal Inspection Installation...


