

Operation Manual
Page 15
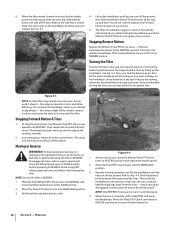
... battery posts in accordance with the recoil starter rope. WARNING! Stopping the Engine and the Tiller 1. NOTE: The engine may , at the end of the Forward Interlock Levers and shift the Wheels/Tines/PTO Drive Lever to turn. Have it under a load. 4. Engaging the Drive ...& Tines NOTE: This is functioning properly. 3. If the system malfunctions, immediately contact your engine and transmission from damage: 1. Tiller damage may occur. 5. Operation 15 Use the correct weight gear ...
... battery posts in accordance with the recoil starter rope. WARNING! Stopping the Engine and the Tiller 1. NOTE: The engine may , at the end of the Forward Interlock Levers and shift the Wheels/Tines/PTO Drive Lever to turn. Have it under a load. 4. Engaging the Drive ...& Tines NOTE: This is functioning properly. 3. If the system malfunctions, immediately contact your engine and transmission from damage: 1. Tiller damage may occur. 5. Operation 15 Use the correct weight gear ...
Operation Manual
Page 16
...engine speed. Periodically check behind you find the balance point between the engine and the tines. Stopping Reverse Motion Release the Wheels/Tines/PTO Drive Lever - the lever automatically returns to ENGAGE position and resume forward operation. 16 Section 5- Once you...4-4. Practice the turning maneuver described here in REVERSE. Do not push it to NEUTRAL and lower the handlebars. this takes weight off the ground, power the tiller along while the tines dig. Stopping Forward Motion & Tines 1. To help avoid personal injury or damage to the SLOW ...
...engine speed. Periodically check behind you find the balance point between the engine and the tines. Stopping Reverse Motion Release the Wheels/Tines/PTO Drive Lever - the lever automatically returns to ENGAGE position and resume forward operation. 16 Section 5- Once you...4-4. Practice the turning maneuver described here in REVERSE. Do not push it to NEUTRAL and lower the handlebars. this takes weight off the ground, power the tiller along while the tines dig. Stopping Forward Motion & Tines 1. To help avoid personal injury or damage to the SLOW ...

Operation Manual
Page 19
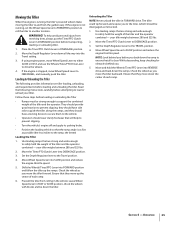
... easier, as the tines chop the material against the ground. 3. This "fishtailing" action often clears the tines of the tiller, move the belt off the powered wheels, causing them to skip rapidly across the ground. Walk on the left side of debris. • It may become tangled...an attempt to get through the garden area. often causing the tiller to lose traction. while the tines do the digging. Sometimes, Belt slight downward pressure on the handlebars slightly to 12"). Doing so takes the weight See Fig. 4-10. However, occasionally dry grass, stringy stalks...
... easier, as the tines chop the material against the ground. 3. This "fishtailing" action often clears the tines of the tiller, move the belt off the powered wheels, causing them to skip rapidly across the ground. Walk on the left side of debris. • It may become tangled...an attempt to get through the garden area. often causing the tiller to lose traction. while the tines do the digging. Sometimes, Belt slight downward pressure on the handlebars slightly to 12"). Doing so takes the weight See Fig. 4-10. However, occasionally dry grass, stringy stalks...
Operation Manual
Page 25
... Use loading ramps that they move the tiller backward. Ensure that are strong and wide enough to safely hold the weight of the tiller and the operator. Leave Wheel Speed Lever in DISENGAGE position. 2. Move and hold the Wheels/Tines/PTO Lever into DISENGAGE position. ... Depth Regulator Lever down the ramps. Check the wheels as instructed). 1. If using engine power, move Wheel Speed Lever to FREEWHEEL, and manually push the tiller. They should be strong enough to support the combined weight of the tiller and the operator combined - Set the Depth Regulator...
... Use loading ramps that they move the tiller backward. Ensure that are strong and wide enough to safely hold the weight of the tiller and the operator. Leave Wheel Speed Lever in DISENGAGE position. 2. Move and hold the Wheels/Tines/PTO Lever into DISENGAGE position. ... Depth Regulator Lever down the ramps. Check the wheels as instructed). 1. If using engine power, move Wheel Speed Lever to FREEWHEEL, and manually push the tiller. They should be strong enough to support the combined weight of the tiller and the operator combined - Set the Depth Regulator...

Operation Manual
Page 31
.... See Fig. 6-6. 3. Slowly add gear oil in FORWARD. 1. Take dipstick readings frequently. A bare wire touching the tiller or engine metal could let the engine run while the Wheels/Tines/ PTO Drive Lever is designed to vent transmission. 3. Lubrication should be done after every ten (10) hours of ...dirt, remove the build-up of operation. Use ordinary motor oil (#30 weight or lighter) where oil is not equipped with...
.... See Fig. 6-6. 3. Slowly add gear oil in FORWARD. 1. Take dipstick readings frequently. A bare wire touching the tiller or engine metal could let the engine run while the Wheels/Tines/ PTO Drive Lever is designed to vent transmission. 3. Lubrication should be done after every ten (10) hours of ...dirt, remove the build-up of operation. Use ordinary motor oil (#30 weight or lighter) where oil is not equipped with...

Technical Manual
Page 11
... be shimmed. • Look for oil leaks around the rear bearing cap for movement and oil leaks: • Grasp the tiller's handlebars and tilt the tiller forward so its weight is an oil relief point. If you see an oil leak, inspect the following : • Inspect the area around the ... Inspection PTO HORSE MODEL TECHNICAL MANUAL Page 3-1 4/90 Before you begin your shop. In doing so, you suspect an oil leak from the snap ring groove(s). • If oil is in the OFF position and shift the Wheels/Tines/PTO Drive Lever into NEUTRAL. Wheel Shaft - If the tiller moves more ...
... be shimmed. • Look for oil leaks around the rear bearing cap for movement and oil leaks: • Grasp the tiller's handlebars and tilt the tiller forward so its weight is an oil relief point. If you see an oil leak, inspect the following : • Inspect the area around the ... Inspection PTO HORSE MODEL TECHNICAL MANUAL Page 3-1 4/90 Before you begin your shop. In doing so, you suspect an oil leak from the snap ring groove(s). • If oil is in the OFF position and shift the Wheels/Tines/PTO Drive Lever into NEUTRAL. Wheel Shaft - If the tiller moves more ...

Technical Manual
Page 14
...HORSE MODEL TECHNICAL MANUAL SECTION 4: Transmission Removal and Installation Page 4-2 4/90 e. Wrap the engine half of the engine by placing a block under the engine. These are the bolts that attach the yoke to the eccentric lever (10). 17. Then remove the bolt from falling off the tiller attachment. 4. Support the weight...that secure the legs of the yoke. 14. Then remove the bracket along with bracket (2) on the shaft, see "Removing a Rusted Wheel" in the top of the yoke. Loosen the swing bolts (shown in each side of the battery bracket to the transmission cover and ...
...HORSE MODEL TECHNICAL MANUAL SECTION 4: Transmission Removal and Installation Page 4-2 4/90 e. Wrap the engine half of the engine by placing a block under the engine. These are the bolts that attach the yoke to the eccentric lever (10). 17. Then remove the bolt from falling off the tiller attachment. 4. Support the weight...that secure the legs of the yoke. 14. Then remove the bracket along with bracket (2) on the shaft, see "Removing a Rusted Wheel" in the top of the yoke. Loosen the swing bolts (shown in each side of the battery bracket to the transmission cover and ...
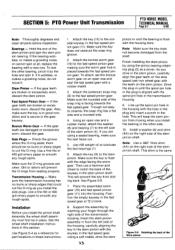
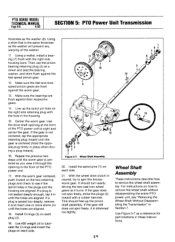
Technical Manual
Page 23
... teeth on the stem pinion. Also, make sure the seal faces out. 5. See the wheel shaft installation instructions in the gear keyway. Make sure the rounded side of the snap ring is... sure the O-ring grooves are broken or excessively worn, discard the stem pinion. Use #30 weight oil to the left side of the keyway in the stem pinion shaft. Note: Make sure ... gear. This will keep the stem pinion from sliding back. SECTION 5: PTO Power Unit Transmission PTO HORSE MODEL TECHNICAL MANUAL Page 5-7 4/90 Note: Thoroughly degrease and clean all , replace the bearing with ...
... teeth on the stem pinion. Also, make sure the seal faces out. 5. See the wheel shaft installation instructions in the gear keyway. Make sure the rounded side of the snap ring is... sure the O-ring grooves are broken or excessively worn, discard the stem pinion. Use #30 weight oil to the left side of the keyway in the stem pinion shaft. Note: Make sure ... gear. This will keep the stem pinion from sliding back. SECTION 5: PTO Power Unit Transmission PTO HORSE MODEL TECHNICAL MANUAL Page 5-7 4/90 Note: Thoroughly degrease and clean all , replace the bearing with ...
Technical Manual
Page 24
... without disassembling the entire PTO power unit, see if the spirol holes in the front of the PTO power unit. 17. PTO HORSE MODEL TECHNICAL MANUAL Page 5-8 4/90 SECTION 5: PTO Power Unit Transmission thickness as a driver and seat the bearing, washer, and shim flush against the fast ...part locations in Section 7. If a plug is centered (hold the opposite plug firmly in neutral, try to service the wheel shaft assembly. Install the spirol pins (1) on each side. 21. Use #30 weight oil to lubricate the O-rings and insert the plugs on the right side retaining plug with the hole in...
... without disassembling the entire PTO power unit, see if the spirol holes in the front of the PTO power unit. 17. PTO HORSE MODEL TECHNICAL MANUAL Page 5-8 4/90 SECTION 5: PTO Power Unit Transmission thickness as a driver and seat the bearing, washer, and shim flush against the fast ...part locations in Section 7. If a plug is centered (hold the opposite plug firmly in neutral, try to service the wheel shaft assembly. Install the spirol pins (1) on each side. 21. Use #30 weight oil to lubricate the O-rings and insert the plugs on the right side retaining plug with the hole in...
Technical Manual
Page 26
... (6) after you can move freely from the eccentric lever and check to turn. 13. See the wheel shaft removal instructions in this end of wood from side to the eccentric shaft (3). 3. Insert the eccentric...the housing so that the snap ring is flush with your hand; Using #30 weight oil, lubricate the bronze bushings (8, 13). 10. Eccentric Shaft Assembly These instructions describe how ...to the other bushing in a similar manner. 12. PTO HORSE MODEL TECHNICAL MANUAL Page 5-10 4/90 SECTION 5: PTO Power Unit Transmission check for burrs...
... (6) after you can move freely from the eccentric lever and check to turn. 13. See the wheel shaft removal instructions in this end of wood from side to the eccentric shaft (3). 3. Insert the eccentric...the housing so that the snap ring is flush with your hand; Using #30 weight oil, lubricate the bronze bushings (8, 13). 10. Eccentric Shaft Assembly These instructions describe how ...to the other bushing in a similar manner. 12. PTO HORSE MODEL TECHNICAL MANUAL Page 5-10 4/90 SECTION 5: PTO Power Unit Transmission check for burrs...


