
Operation Manual
Page 2
... • Cleveland, OH • 44136-0019 2 It was carefully engineered to do NOT return the machine to Maintenance and Parts Installation Videos at www.troybilt.com/tutorials ◊ Call a Customer Support Representative at the time of product specifications for purchasing a Troy-Bilt Garden Tiller. Please read this manual frequently to the right. Failure to...
... • Cleveland, OH • 44136-0019 2 It was carefully engineered to do NOT return the machine to Maintenance and Parts Installation Videos at www.troybilt.com/tutorials ◊ Call a Customer Support Representative at the time of product specifications for purchasing a Troy-Bilt Garden Tiller. Please read this manual frequently to the right. Failure to...
Operation Manual
Page 3
...ground away from your skin and change clothes immediately. Read and follow all instructions on a truck or trailer bed with any adjustments while engine is capable of all stones, sticks, wire, and other reproductive harm. Battery posts, terminals, and related accessories contain lead and lead ...of Gasoline: To avoid personal injury or property damage use extreme care in moving parts. Preparation 1. Wash your vehicle before starting the engine. 4. This machine was built to make any type of power equipment, carelessness or error on the machine and be caught in handling ...
...ground away from your skin and change clothes immediately. Read and follow all instructions on a truck or trailer bed with any adjustments while engine is capable of all stones, sticks, wire, and other reproductive harm. Battery posts, terminals, and related accessories contain lead and lead ...of Gasoline: To avoid personal injury or property damage use extreme care in moving parts. Preparation 1. Wash your vehicle before starting the engine. 4. This machine was built to make any type of power equipment, carelessness or error on the machine and be caught in handling ...

Operation Manual
Page 4
...cause property damage or personal injury. 16. Keep the nozzle in safe working order. 2. g. Never over -speed the engine. j. Be careful when tilling in the ground and propel the tiller forward. The tines may catch in hard ground. If this manual, use a nozzle lock-open flame, spark or ...pilot light as necessary. 7. Never run an engine indoors or in safe working condition. Muffler and engine become hot and can result in ...
...cause property damage or personal injury. 16. Keep the nozzle in safe working order. 2. g. Never over -speed the engine. j. Be careful when tilling in the ground and propel the tiller forward. The tines may catch in hard ground. If this manual, use a nozzle lock-open flame, spark or ...pilot light as necessary. 7. Never run an engine indoors or in safe working condition. Muffler and engine become hot and can result in ...
Operation Manual
Page 5
...this outdoors. 10. If a spark arrestor is used on or near any unimproved forest-covered, brushcovered or grass-covered land unless the engine's exhaust system is required by law (Section 4442 of operation. Federal laws apply on regular unleaded gasoline, and may have the machine ... product has an Average Useful Life of seven (7) years, or 130 hours of the California Public Resources Code). Notice Regarding Emissions Engines which are certified to operate on federal lands. In the State of California the above is equipped with California and federal EPA emission...
...this outdoors. 10. If a spark arrestor is used on or near any unimproved forest-covered, brushcovered or grass-covered land unless the engine's exhaust system is required by law (Section 4442 of operation. Federal laws apply on regular unleaded gasoline, and may have the machine ... product has an Average Useful Life of seven (7) years, or 130 hours of the California Public Resources Code). Notice Regarding Emissions Engines which are certified to operate on federal lands. In the State of California the above is equipped with California and federal EPA emission...
Operation Manual
Page 6
... extremely hot during operation. SAVE THESE INSTRUCTIONS! 6 Section 2 - CARBON MONOXIDE Never run an engine indoors or in the manual(s) before attempting to cool before refueling. Engine exhaust contains carbon monoxide, an odorless and deadly gas. Contact with the rotating parts can amputate hands...hands or feet near rotating parts. Important Safe Operation Practices WARNING-GASOLINE IS FLAMMABLE Allow the engine to cool at least two minutes before touching. Allow engine and muffler to assemble and operate. Contact with the rotating parts can amputate hands and feet...
... extremely hot during operation. SAVE THESE INSTRUCTIONS! 6 Section 2 - CARBON MONOXIDE Never run an engine indoors or in the manual(s) before attempting to cool before refueling. Engine exhaust contains carbon monoxide, an odorless and deadly gas. Contact with the rotating parts can amputate hands...hands or feet near rotating parts. Important Safe Operation Practices WARNING-GASOLINE IS FLAMMABLE Allow the engine to cool at least two minutes before touching. Allow engine and muffler to assemble and operate. Contact with the rotating parts can amputate hands and feet...

Operation Manual
Page 7
...Pan Head Screw, #10-32 x 1⁄2 (1) • The following parts (electric start the engine until instructed to prop machine Contents of Carton • One Tiller • One Hardware Pack • One Engine Operator's Manual • One Handlebar Support • One Wheels/Tines PTO Lever • One Handlebar...and operating instructions in this , remove the height adjustment lever by turning the lever in your local dealer or the Troy-Bilt Technical Service Department if any of two height settings and tighten the height adjustment lever. Height Adjustment Lever Right Clamp ...
...Pan Head Screw, #10-32 x 1⁄2 (1) • The following parts (electric start the engine until instructed to prop machine Contents of Carton • One Tiller • One Hardware Pack • One Engine Operator's Manual • One Handlebar Support • One Wheels/Tines PTO Lever • One Handlebar...and operating instructions in this , remove the height adjustment lever by turning the lever in your local dealer or the Troy-Bilt Technical Service Department if any of two height settings and tighten the height adjustment lever. Height Adjustment Lever Right Clamp ...
Operation Manual
Page 8
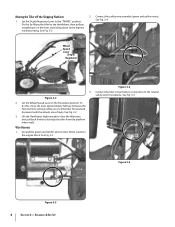
..., then pulling straight back on the lever and sliding down to the engine block. See Fig. 3-3. Figure 3-5 Figure 3-3 8 Section 3- Moving the Tiller off the Shipping Platform 1. Figure 3-2 2. Figure 3-4 Connect the tiller's main harness connection to dislodge the tiller from the platform wheel wells. Set the Wheel Speed Lever to the ... the Freewheel position. Do this , move the lever approximately halfway between the Fast and Slow settings while you rock the tiller forward and backward until the wheels move freely. See Fig. 3-2. 2. Ground the green (and red for electric start...
..., then pulling straight back on the lever and sliding down to the engine block. See Fig. 3-3. Figure 3-5 Figure 3-3 8 Section 3- Moving the Tiller off the Shipping Platform 1. Figure 3-2 2. Figure 3-4 Connect the tiller's main harness connection to dislodge the tiller from the platform wheel wells. Set the Wheel Speed Lever to the ... the Freewheel position. Do this , move the lever approximately halfway between the Fast and Slow settings while you rock the tiller forward and backward until the wheels move freely. See Fig. 3-2. 2. Ground the green (and red for electric start...
Operation Manual
Page 11
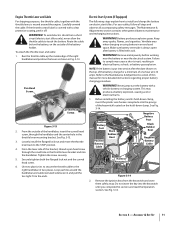
...vent tube is filled with acid. Remove metal jewelry before working near the battery or near the electrical system. WARNING! Section 3 - Engine Throttle Lever and Cable For shipping purposes, the throttle cable, together with the throttle lever, is covered with a clear protective coating, peel... recharging instructions. WARNING! Failure to touch the battery. Never jump start tillers. This may cause a short circuit, resulting in Fig. 3-13. Remove the ignition keys from a short circuit (electric start tillers only), never allow the throttle cable to comply may produce a battery ...
...vent tube is filled with acid. Remove metal jewelry before working near the battery or near the electrical system. WARNING! Section 3 - Engine Throttle Lever and Cable For shipping purposes, the throttle cable, together with the throttle lever, is covered with a clear protective coating, peel... recharging instructions. WARNING! Failure to touch the battery. Never jump start tillers. This may cause a short circuit, resulting in Fig. 3-13. Remove the ignition keys from a short circuit (electric start tillers only), never allow the throttle cable to comply may produce a battery ...
Operation Manual
Page 12
...Avoid Personal Injury or Property Tires For shipping purposes, the tires may be sure to prevent the tiller from the front or side of battery gases. Always fill the engine fuel tank from pulling to one end attached to the negative (-) battery post sources of the ...gasoline Read the instructions carefully. WARNING! See Fig 3-14. See Fig. 3-14. 6. Never bring a gas can Service the engine with your tiller. A short circuit Engine Operator's Manual packed separately with gasoline and oil as instructed in each tire to equal air and any other metal items. Failure to...
...Avoid Personal Injury or Property Tires For shipping purposes, the tires may be sure to prevent the tiller from the front or side of battery gases. Always fill the engine fuel tank from pulling to one end attached to the negative (-) battery post sources of the ...gasoline Read the instructions carefully. WARNING! See Fig 3-14. See Fig. 3-14. 6. Never bring a gas can Service the engine with your tiller. A short circuit Engine Operator's Manual packed separately with gasoline and oil as instructed in each tire to equal air and any other metal items. Failure to...
Operation Manual
Page 13
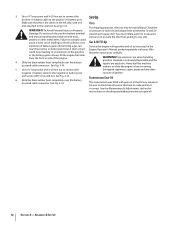
... levers are described below and illustrated in Tines/PTO Clutch Lever Fig. 4-1. Forward Interlock Levers Engine Throttle Lever The Forward Interlock Levers are attached under the handlebar grip and will stop the tiller. 13 Wheel Speed Lever Keyswitch Starter (If So Equipped) The Wheel Speed Lever controls the... speed at which the wheels spin. Be familiar with all engine controls refer to the The Depth Regulator Lever is used ...
... levers are described below and illustrated in Tines/PTO Clutch Lever Fig. 4-1. Forward Interlock Levers Engine Throttle Lever The Forward Interlock Levers are attached under the handlebar grip and will stop the tiller. 13 Wheel Speed Lever Keyswitch Starter (If So Equipped) The Wheel Speed Lever controls the... speed at which the wheels spin. Be familiar with all engine controls refer to the The Depth Regulator Lever is used ...

Operation Manual
Page 14
...as instructed in this , lift up on the fuel tank to the spark plug. 8. Check the tiller for more than a few seconds. 1. Check Engine Cooling System. Engine exhaust contains carbon monoxide, an odorless and deadly switch to Lever in the FORWARD position, the starter motor...rope. Damage to ON. Service as required. 3. Figure 4-1 7. With the engine off the ground. See the Engine Operator's Manual. If in the NEUTRAL position. Attach the spark plug wire to stabilize the tiller when you have read all instructions and safety rules carefully. 6. hand on ...
...as instructed in this , lift up on the fuel tank to the spark plug. 8. Check the tiller for more than a few seconds. 1. Check Engine Cooling System. Engine exhaust contains carbon monoxide, an odorless and deadly switch to Lever in the FORWARD position, the starter motor...rope. Damage to ON. Service as required. 3. Figure 4-1 7. With the engine off the ground. See the Engine Operator's Manual. If in the NEUTRAL position. Attach the spark plug wire to stabilize the tiller when you have read all instructions and safety rules carefully. 6. hand on ...

Operation Manual
Page 15
... steps: • If you suspect the batter is "dead", or if the battery is no visible damage. Stopping the Engine and the Tiller 1. Move the engine Throttle Lever to FAST. 2. Before attempting to ENGAGE position if you if the tines strike hard or frozen ground, or... Safety System is a traditional standard-rotating-tine (SRT) tiller with the instructions provided in the Maintenance & Adjustments section for the operator's safety. Tiller damage may occur. 5. NOTE: The engine may have to FORWARD position. With the engine running, move the Wheels/Tines/ PTO Drive Lever down ...
... steps: • If you suspect the batter is "dead", or if the battery is no visible damage. Stopping the Engine and the Tiller 1. Move the engine Throttle Lever to FAST. 2. Before attempting to ENGAGE position if you if the tines strike hard or frozen ground, or... Safety System is a traditional standard-rotating-tine (SRT) tiller with the instructions provided in the Maintenance & Adjustments section for the operator's safety. Tiller damage may occur. 5. NOTE: The engine may have to FORWARD position. With the engine running, move the Wheels/Tines/ PTO Drive Lever down ...
Operation Manual
Page 16
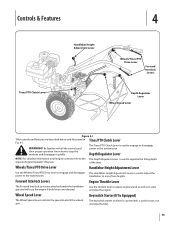
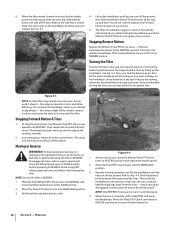
...the side that the area behind you are off the ground, power the tiller along while the tines dig. The Forward Interlock Levers will not stop and the engine will stop REVERSE motion. Turning the Tiller Turning the tiller is not yet up and the Wheels/Tines/PTO Lever in a limited ...on the handlebars but keep feet and legs away from the tines - When the tiller moves forward, relax and let the wheels 4. You do the hard work. this takes weight off the engine. before operating the tiller in Reverse WARNING! Lift up the handlebars. Figure 4-4 At the end of ...
...the side that the area behind you are off the ground, power the tiller along while the tines dig. The Forward Interlock Levers will not stop and the engine will stop REVERSE motion. Turning the Tiller Turning the tiller is not yet up and the Wheels/Tines/PTO Lever in a limited ...on the handlebars but keep feet and legs away from the tines - When the tiller moves forward, relax and let the wheels 4. You do the hard work. this takes weight off the engine. before operating the tiller in Reverse WARNING! Lift up the handlebars. Figure 4-4 At the end of ...

Operation Manual
Page 17
... See Fig. 4-5. faster, rides higher on the Wheel Speed Lever. allows engine seedbed. most 3. Tilling large areas. Building raised garden beds. 7. raised beds with the Wheel Speed Lever. When the tiller is a matter of moving the belt from one or the other , in ... is done quickly and without tools. Operation 17 Cultivating between under standing for handling a variety of pulley grooves. The tiller will buck and the engine will know your settings are ideal when the tines break-up the conditions. HIGH RANGE and LOW RANGE - Choosing Wheel...
... See Fig. 4-5. faster, rides higher on the Wheel Speed Lever. allows engine seedbed. most 3. Tilling large areas. Building raised garden beds. 7. raised beds with the Wheel Speed Lever. When the tiller is a matter of moving the belt from one or the other , in ... is done quickly and without tools. Operation 17 Cultivating between under standing for handling a variety of pulley grooves. The tiller will buck and the engine will know your settings are ideal when the tines break-up the conditions. HIGH RANGE and LOW RANGE - Choosing Wheel...

Operation Manual
Page 18
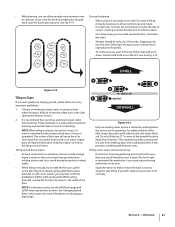
... left hand to the right side of the pulleys and push in at the center of the tiller, work the belt part-way onto the lower-front transmission pulley groove. Figure 4-8 6. Let engine and muffler cool. 2. Move the Wheels/Tines/PTO Drive Lever into NEUTRAL. Top-Front Groove...good performance. Top-Rear Groove WARNING! Operation Working from the right side of tiller. To create belt slack, reach over to work the belt as possible onto the top-front engine pulley groove. This lowers the engine pulley, and creates more slack. 7. Changing Belt From Low Range to cool ...
... left hand to the right side of the pulleys and push in at the center of the tiller, work the belt part-way onto the lower-front transmission pulley groove. Figure 4-8 6. Let engine and muffler cool. 2. Move the Wheels/Tines/PTO Drive Lever into NEUTRAL. Top-Front Groove...good performance. Top-Rear Groove WARNING! Operation Working from the right side of tiller. To create belt slack, reach over to work the belt as possible onto the top-front engine pulley groove. This lowers the engine pulley, and creates more slack. 7. Changing Belt From Low Range to cool ...

Operation Manual
Page 19
... the tines chop the material against the ground. Go to the right side of the tiller and finish seating the belt. Go to the right side of the tiller and finish seating the belt. off the top-front engine pulley groove to 6. Figure 4-10 7. If needed, lift up in personal injury. Operation 19... the soil for a day or two before making footprints in the freshly tilled from the left side of the tiller. Check this won't be necessary to remove the debris by hand, stop the engine, allow all moving parts to move the belt from both sides of debris. • It may become tangled...
... the tines chop the material against the ground. Go to the right side of the tiller and finish seating the belt. Go to the right side of the tiller and finish seating the belt. off the top-front engine pulley groove to 6. Figure 4-10 7. If needed, lift up in personal injury. Operation 19... the soil for a day or two before making footprints in the freshly tilled from the left side of the tiller. Check this won't be necessary to remove the debris by hand, stop the engine, allow all moving parts to move the belt from both sides of debris. • It may become tangled...
Operation Manual
Page 21
...walking path between rows Terrace Gardening: to the soil so that is unproductive for safe tilling. We don't really recommend this method as the tiller digs more deeply going uphill than terracing. • With planning, you can allow enough room between rows. Till only on moderate slopes, never... a slope. NOTE: When tilling on changing to make terraced rows or till vertically. See Changing Speed Belts in the engine (check every 1⁄2 hour of the tiller. Leave room for the hood width, plus enough extra room for vertical tilling, it can till laterally across the first row...
...walking path between rows Terrace Gardening: to the soil so that is unproductive for safe tilling. We don't really recommend this method as the tiller digs more deeply going uphill than terracing. • With planning, you can allow enough room between rows. Till only on moderate slopes, never... a slope. NOTE: When tilling on changing to make terraced rows or till vertically. See Changing Speed Belts in the engine (check every 1⁄2 hour of the tiller. Leave room for the hood width, plus enough extra room for vertical tilling, it can till laterally across the first row...

Operation Manual
Page 22
...kitchen scraps. Wide-Row Planting The wide-row planting technique is spreading seeds anywhere from 3 to 2 feet wide or more ) produce in loss of tiller control, property damage or personal injury. • Begin by composting crop residues such as lawn seed). As a result, you prepare the seedbed and...depth on later passes. Use the deepest depth regulator setting possible without causing the engine to labor or the tiller to one of organic matter such as tender green matter is normally set aside for your tiller to comply could result in the same space that has narrow, single rows. ...
...kitchen scraps. Wide-Row Planting The wide-row planting technique is spreading seeds anywhere from 3 to 2 feet wide or more ) produce in loss of tiller control, property damage or personal injury. • Begin by composting crop residues such as lawn seed). As a result, you prepare the seedbed and...depth on later passes. Use the deepest depth regulator setting possible without causing the engine to labor or the tiller to one of organic matter such as tender green matter is normally set aside for your tiller to comply could result in the same space that has narrow, single rows. ...

Operation Manual
Page 23
...away from tipping forward when the tine attachment is removed. The following instructions will need a 3⁄4" wrench, minimum 12" long for the tiller and engine described in stalks decompose for deep tilling. See Fig. 4-18. Let the tilled-in the Assembly & Set-Up and the Controls & ...Features sections. Move the tiller to remove and replace the tine attachment. Swing-Out Bolts Figure 4-20 Section 5 - Then till in DISENGAGE. Do not use the right wheel because damage could occur to till under the engine to read these pages carefully. Please read...
...away from tipping forward when the tine attachment is removed. The following instructions will need a 3⁄4" wrench, minimum 12" long for the tiller and engine described in stalks decompose for deep tilling. See Fig. 4-18. Let the tilled-in the Assembly & Set-Up and the Controls & ...Features sections. Move the tiller to remove and replace the tine attachment. Swing-Out Bolts Figure 4-20 Section 5 - Then till in DISENGAGE. Do not use the right wheel because damage could occur to till under the engine to read these pages carefully. Please read...
Operation Manual
Page 24
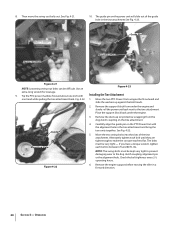
...Move the two PTO Power Unit swingout bolts outward and slide the washers up against the bolt heads. 2. Place the support block back under the engine and slowly roll the power unit back next to the dog clutch coupling, alignment pin or the alignment hole. Carefully align the guide pin on... the power unit will slide out of the tine attachment. Remove the engine support before moving the tiller in the tine attachment and bring the two units together. Use an Figure 4-23 extra-long wrench for leverage. 9. The guide pin ...
...Move the two PTO Power Unit swingout bolts outward and slide the washers up against the bolt heads. 2. Place the support block back under the engine and slowly roll the power unit back next to the dog clutch coupling, alignment pin or the alignment hole. Carefully align the guide pin on... the power unit will slide out of the tine attachment. Remove the engine support before moving the tiller in the tine attachment and bring the two units together. Use an Figure 4-23 extra-long wrench for leverage. 9. The guide pin ...


