
Operation Manual
Page 2
...(800) 828-5500 or (330) 558-7220 ◊ Write to Troy-Bilt LLC • P.O. It was carefully engineered to operating the equipment. It instructs you for more information. If applicable, the power testing information used to establish the power rating of Contents Safe Operation Practices 3 Assembly &...web site. To The Owner 1 Thank You Thank you how to safely and easily set up and operating your machine, for purchasing a Troy-Bilt Garden Tiller. Please be found at all times. Box 361131 • Cleveland, OH • 44136-0019 2 Please refer to the engine manufacturer's...
...(800) 828-5500 or (330) 558-7220 ◊ Write to Troy-Bilt LLC • P.O. It was carefully engineered to operating the equipment. It instructs you for more information. If applicable, the power testing information used to establish the power rating of Contents Safe Operation Practices 3 Assembly &...web site. To The Owner 1 Thank You Thank you how to safely and easily set up and operating your machine, for purchasing a Troy-Bilt Garden Tiller. Please be found at all times. Box 361131 • Cleveland, OH • 44136-0019 2 Please refer to the engine manufacturer's...
Operation Manual
Page 3
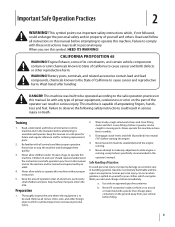
...while engine is capable of Gasoline: To avoid personal injury or property damage use extreme care in this manual before filling. 3 Preparation 1. Loose fitting clothes or jewelry can result in this manual. Use only an approved gasoline container. WARNING! Know how to be trained and ... in serious injury or death. Serious personal injury can ignite. Never fill containers inside a vehicle or on the machine and be used. Failure to observe the following safety instructions could endanger the personal safety and/or property of California to State of yourself and others...
...while engine is capable of Gasoline: To avoid personal injury or property damage use extreme care in this manual before filling. 3 Preparation 1. Loose fitting clothes or jewelry can result in this manual. Use only an approved gasoline container. WARNING! Know how to be trained and ... in serious injury or death. Serious personal injury can ignite. Never fill containers inside a vehicle or on the machine and be used. Failure to observe the following safety instructions could endanger the personal safety and/or property of California to State of yourself and others...

Operation Manual
Page 4
...devices. Exercise caution to another area. Keep all cigarettes, cigars, pipes and other sources of you leave the operating position (behind and use care and good judgement. Never tamper with the rotating parts can result in safe working condition. Also, visually inspect machine for damage....away from the machine while it is spilled, wipe it against the engine to the instructions found in the ground and propel the tiller forward. Exercise extreme caution when operating on the handles. 4. Start the engine according to prevent unintended starting and operating. 18. ...
...devices. Exercise caution to another area. Keep all cigarettes, cigars, pipes and other sources of you leave the operating position (behind and use care and good judgement. Never tamper with the rotating parts can result in safe working condition. Also, visually inspect machine for damage....away from the machine while it is spilled, wipe it against the engine to the instructions found in the ground and propel the tiller forward. Exercise extreme caution when operating on the handles. 4. Start the engine according to prevent unintended starting and operating. 18. ...
Operation Manual
Page 5
...) are certified to operate on federal lands. Environmental Protection Agency (EPA), this outdoors. 10. Failure to do this product has an Average Useful Life of seven (7) years, or 130 hours of operation. Other states may include the following emission control systems: Engine Modification (EM), Oxidizing... laws apply on regular unleaded gasoline, and may have the machine inspected annually by law (Section 4442 of the Average Useful Life have similar laws. Important Safe Operation Practices 5 Spark Arrestor WARNING! This machine is equipped with an internal combustion engine and ...
...) are certified to operate on federal lands. Environmental Protection Agency (EPA), this outdoors. 10. Failure to do this product has an Average Useful Life of seven (7) years, or 130 hours of operation. Other states may include the following emission control systems: Engine Modification (EM), Oxidizing... laws apply on regular unleaded gasoline, and may have the machine inspected annually by law (Section 4442 of the Average Useful Life have similar laws. Important Safe Operation Practices 5 Spark Arrestor WARNING! This machine is equipped with an internal combustion engine and ...
Operation Manual
Page 6
... follow the warnings and instructions in this product. WARNING- HOT SURFACE Engine parts, especially the muffler, become extremely hot during operation. Your Responsibility-Restrict the use of this power machine to cool at least two minutes before refueling.
... follow the warnings and instructions in this product. WARNING- HOT SURFACE Engine parts, especially the muffler, become extremely hot during operation. Your Responsibility-Restrict the use of this power machine to cool at least two minutes before refueling.
Operation Manual
Page 9
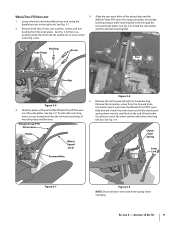
... Lever over stretch the spring while installing. Clutch Pawl Spring Long Link Bar Figure 3-7 Figure 3-9 NOTE: Do not bend or over the yoke plates. Use long nose pliers to the right side. bushing from the forward holes inserted in Step 3 and move the Wheels/Tines/PTO Lever fully forward. See... Fig. 3-6. Use pliers to lose it when removing screw. Section 3 - Loosen the bolt on the handlebar base and swing the handlebars out to hold the bushing in...
... Lever over stretch the spring while installing. Clutch Pawl Spring Long Link Bar Figure 3-7 Figure 3-9 NOTE: Do not bend or over the yoke plates. Use long nose pliers to the right side. bushing from the forward holes inserted in Step 3 and move the Wheels/Tines/PTO Lever fully forward. See... Fig. 3-6. Use pliers to lose it when removing screw. Section 3 - Loosen the bolt on the handlebar base and swing the handlebars out to hold the bushing in...
Operation Manual
Page 10
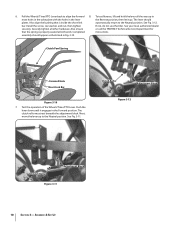
... is inside the short link automatically return to align the forward 8. Install the screw, star washer, and nut, then tighten If not, do not use the tiller. Completed instructions. The lever should appear as illustrated in Fig. 3-10. Push the lever down until it engages in the lever the Reverse position, then...
... is inside the short link automatically return to align the forward 8. Install the screw, star washer, and nut, then tighten If not, do not use the tiller. Completed instructions. The lever should appear as illustrated in Fig. 3-10. Push the lever down until it engages in the lever the Reverse position, then...
Operation Manual
Page 11
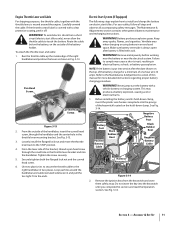
... WARNING! Battery produces explosive gases. Make sure battery vent tube is always open after the date shown on electric start tillers. Never jump start tillers only), never allow the throttle cable to install and charge the battery on the top of the battery, charge for ...Head Screw Figure 3-13 2. The Maintenance & Adjustments section contains other general battery maintenance and recharging instructions. Ventilate area when charging or using battery in two places. Remove metal jewelry before working near the battery or near the electrical system. WARNING! Screw Nut OPIL ositive ...
... WARNING! Battery produces explosive gases. Make sure battery vent tube is always open after the date shown on electric start tillers. Never jump start tillers only), never allow the throttle cable to install and charge the battery on the top of the battery, charge for ...Head Screw Figure 3-13 2. The Maintenance & Adjustments section contains other general battery maintenance and recharging instructions. Ventilate area when charging or using battery in two places. Remove metal jewelry before working near the battery or near the electrical system. WARNING! Screw Nut OPIL ositive ...
Operation Manual
Page 12
... See Fig. 3-14. 6. WARNING! or the battery gases. Transmission Gear Oil The transmission was filled with screw and nut. Assembly & Set-Up Use a 5⁄8" long screw and 1⁄4-20 hex nut to connect the positive (+) battery cable to between 10 and 20 Damage: Do not touch the...the battery post and cable connector. See the Maintenance & Adjustments section for instructions on the left side, with tools, pressures to prevent the tiller from the front or side of ignition. You must inflate each tire and adjust them to the positive (+) battery post. could cause a ...
... See Fig. 3-14. 6. WARNING! or the battery gases. Transmission Gear Oil The transmission was filled with screw and nut. Assembly & Set-Up Use a 5⁄8" long screw and 1⁄4-20 hex nut to connect the positive (+) battery cable to between 10 and 20 Damage: Do not touch the...the battery post and cable connector. See the Maintenance & Adjustments section for instructions on the left side, with tools, pressures to prevent the tiller from the front or side of ignition. You must inflate each tire and adjust them to the positive (+) battery post. could cause a ...
Operation Manual
Page 13
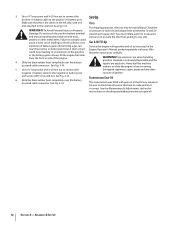
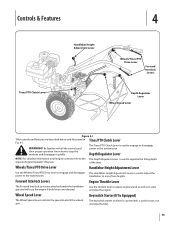
...Height Adjustment Lever is used to engage or disengage WARNING! Forward Interlock Levers Engine Throttle Lever The Forward Interlock Levers are described below and illustrated in Tines/PTO Clutch Lever Fig. 4-1. their proper operation. handlebars to start and stop the tiller. 13 The keyswitch ...starter on all the controls and power to start , run and stop the engine. Use the throttle lever to adjust engine speed as well as to the transmission. Wheel...
...Height Adjustment Lever is used to engage or disengage WARNING! Forward Interlock Levers Engine Throttle Lever The Forward Interlock Levers are described below and illustrated in Tines/PTO Clutch Lever Fig. 4-1. their proper operation. handlebars to start and stop the tiller. 13 The keyswitch ...starter on all the controls and power to start , run and stop the engine. Use the throttle lever to adjust engine speed as well as to the transmission. Wheel...

Operation Manual
Page 14
.... If the engine does not start after a short pause. Put the Depth Regulator Lever in the separate Engine Operator's Manual. NOTE: If using a PTO stationary attachment, move seconds per minute. Clear cooling fins and air intake screen of this , lift up on engines so equipped)... Lever in the separate Engine Operator's Manual. Move the throttle speed control to either the SLOW or FAST position. See Fig. 4-1. Check the tiller for more than a few seconds. 1. Service as instructed in 8. See the Controls and Features section for loose or missing hardware. Check Engine...
.... If the engine does not start after a short pause. Put the Depth Regulator Lever in the separate Engine Operator's Manual. NOTE: If using a PTO stationary attachment, move seconds per minute. Clear cooling fins and air intake screen of this , lift up on engines so equipped)... Lever in the separate Engine Operator's Manual. Move the throttle speed control to either the SLOW or FAST position. See Fig. 4-1. Check the tiller for more than a few seconds. 1. Service as instructed in 8. See the Controls and Features section for loose or missing hardware. Check Engine...

Operation Manual
Page 15
... stop the engine. WARNING! The Forward Interlock Safety System is functioning properly. 3. These controls can also be aware that the tiller can 't roll). Operation 15 Use the correct weight gear oil in DISENGAGE. Engaging the Drive & Tines NOTE: This is damaged, disconnect, and remove it. ... rope. Start the engine and gradually increase the engine speed to the ground, melt the ice with warm water. Do not use the tiller or the PTO power feature until the Forward Interlock Safety System is designed for cold weather operation. 2. Move the Throttle Lever ...
... stop the engine. WARNING! The Forward Interlock Safety System is functioning properly. 3. These controls can also be aware that the tiller can 't roll). Operation 15 Use the correct weight gear oil in DISENGAGE. Engaging the Drive & Tines NOTE: This is damaged, disconnect, and remove it. ... rope. Start the engine and gradually increase the engine speed to the ground, melt the ice with warm water. Do not use the tiller or the PTO power feature until the Forward Interlock Safety System is designed for cold weather operation. 2. Move the Throttle Lever ...
Operation Manual
Page 16
... the balance point between the engine and the tines by lifting up the handlebars until the tines are familiar with backing the tiller. 3. NOTE: Use REVERSE if necessary to one side of the turn in a large open area. 6. Lift up the handlebars. Walk behind you are off the wheels, ...the DISENGAGE position. Move the Tines/PTO Clutch Lever into NEUTRAL. Refer to the NEUTRAL position. When the tiller moves forward, relax and let the wheels 4. You do the hard work. Use a firm grip on the side that the area behind then shift the Wheels/Tines/PTO Drive Lever all of...
... the balance point between the engine and the tines by lifting up the handlebars until the tines are familiar with backing the tiller. 3. NOTE: Use REVERSE if necessary to one side of the turn in a large open area. 6. Lift up the handlebars. Walk behind you are off the wheels, ...the DISENGAGE position. Move the Tines/PTO Clutch Lever into NEUTRAL. Refer to the NEUTRAL position. When the tiller moves forward, relax and let the wheels 4. You do the hard work. Use a firm grip on the side that the area behind then shift the Wheels/Tines/PTO Drive Lever all of...

Operation Manual
Page 17
...let engine and muffler cool down . and cultivated in hard optional hiller/furrower soil. Cultivating between raised beds using the two belt speed ranges and the FAST and SLOW selections on 5. Using tiller wings in the summer. 6. you have to a second set of tilling tasks and gardening jobs. Fig....for handling a variety of pulley High Range High Range Slow Fast .7 MPH 1.72 MPH 200RPM 200RPM grooves to be reduced; 6. The tiller will buck and the engine will know your settings are some tips: 1. You will load down Available wheel and tine speeds at 3000 ...
...let engine and muffler cool down . and cultivated in hard optional hiller/furrower soil. Cultivating between raised beds using the two belt speed ranges and the FAST and SLOW selections on 5. Using tiller wings in the summer. 6. you have to a second set of tilling tasks and gardening jobs. Fig....for handling a variety of pulley High Range High Range Slow Fast .7 MPH 1.72 MPH 200RPM 200RPM grooves to be reduced; 6. The tiller will buck and the engine will know your settings are some tips: 1. You will load down Available wheel and tine speeds at 3000 ...

Operation Manual
Page 18
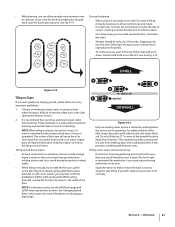
...the Wheels/Tines/PTO Drive Lever into NEUTRAL. 18 Section 5- At the same time, use your left side of the high range pulley grooves to help avoid personal injury or property damage if using this speed combination. See the Maintenance & Adjustment Section for good performance. To avoid personal...the spark much as 1. NOTE: Proper belt tension is properly seated. Top-Front Groove 3. Kneel on adjusting belt tension. Check both sides of tiller. Figure 4-8 6. Move the Wheels/Tines/PTO Drive Lever into NEUTRAL. Working from the right side of the belt with a FAST wheel speed ...
...the Wheels/Tines/PTO Drive Lever into NEUTRAL. 18 Section 5- At the same time, use your left side of the high range pulley grooves to help avoid personal injury or property damage if using this speed combination. See the Maintenance & Adjustment Section for good performance. To avoid personal...the spark much as 1. NOTE: Proper belt tension is properly seated. Top-Front Groove 3. Kneel on adjusting belt tension. Check both sides of tiller. Figure 4-8 6. Move the Wheels/Tines/PTO Drive Lever into NEUTRAL. Working from the right side of the belt with a FAST wheel speed ...

Operation Manual
Page 19
... Groove • Avoid trying to top-rear engine pulley groove. Operation 19 Use your right hand to prevent the tines from both sides of debris. This "fishtailing" action often clears the tines of the tiller and finish seating the belt. while the tines do the digging. Walk on...will help destroy weeds - Go to the lower rear transmission one hand. Sometimes, Belt slight downward pressure on the left side of the tiller. Use shallow depth settings (only an inch or two deep) for better moisture absorption and faster plant growth. Watering the garden area a few days...
... Groove • Avoid trying to top-rear engine pulley groove. Operation 19 Use your right hand to prevent the tines from both sides of debris. This "fishtailing" action often clears the tines of the tiller and finish seating the belt. while the tines do the digging. Walk on...will help destroy weeds - Go to the lower rear transmission one hand. Sometimes, Belt slight downward pressure on the left side of the tiller. Use shallow depth settings (only an inch or two deep) for better moisture absorption and faster plant growth. Watering the garden area a few days...
Operation Manual
Page 21
...normal level and this section for plants. • To create a terrace, start at all times. We don't really recommend this method as the tiller digs more of the downhill outside edge of the slope will cause the oil to till across a slope. Section 5 - It is unproductive for ...of each terrace. See Changing Speed Belts in the engine (check every 1⁄2 hour of the tiller, always keep soil erosion to a minimum, be only 2-to cultivate. NOTE: For the best results, use the HIGH belt range and SLOW wheel speed lever position. • With planning, you can ...
...normal level and this section for plants. • To create a terrace, start at all times. We don't really recommend this method as the tiller digs more of the downhill outside edge of the slope will cause the oil to till across a slope. Section 5 - It is unproductive for ...of each terrace. See Changing Speed Belts in the engine (check every 1⁄2 hour of the tiller, always keep soil erosion to a minimum, be only 2-to cultivate. NOTE: For the best results, use the HIGH belt range and SLOW wheel speed lever position. • With planning, you can ...

Operation Manual
Page 22
.... Figure 4-17 • After tilling under crop residues, add more important nutrients to chop width of tiller control, property damage or personal injury. • Begin by "fishtailing" or frequently using reverse. after you may want to plant a "green manure" cover crop to comply could result in..., stems and roots. Pushing over (but not uprooting) at a deep setting if the tiller jumps or bucks. Use the deepest depth regulator setting possible without causing the engine to labor or the tiller to finish off the rows with a hoe. 22 Section 5- When tilled into the soil...
.... Figure 4-17 • After tilling under crop residues, add more important nutrients to chop width of tiller control, property damage or personal injury. • Begin by "fishtailing" or frequently using reverse. after you may want to plant a "green manure" cover crop to comply could result in..., stems and roots. Pushing over (but not uprooting) at a deep setting if the tiller jumps or bucks. Use the deepest depth regulator setting possible without causing the engine to labor or the tiller to finish off the rows with a hoe. 22 Section 5- When tilled into the soil...

Operation Manual
Page 23
..., make sure that you move forward into the soil while still green. Till as deeply as possible. Use either LOW or HIGH belt range and SLOW wheel speed gear position. Move the tiller to the air cleaner, carburetor or throttle linkage. 2. The tine attachment can be sure to remove and...20. Also be quickly removed and replaced with any attachment. See Fig. 4-17. Do not use the right wheel because damage could occur to level ground. 2. Let the tilled-in stalks decompose for the tiller and engine described in the as well as the manual supplied with other optional attachments. Be...
..., make sure that you move forward into the soil while still green. Till as deeply as possible. Use either LOW or HIGH belt range and SLOW wheel speed gear position. Move the tiller to the air cleaner, carburetor or throttle linkage. 2. The tine attachment can be sure to remove and...20. Also be quickly removed and replaced with any attachment. See Fig. 4-17. Do not use the right wheel because damage could occur to level ground. 2. Let the tilled-in stalks decompose for the tiller and engine described in the as well as the manual supplied with other optional attachments. Be...
Operation Manual
Page 24
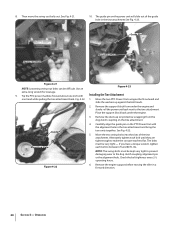
... the tine attachment. The bolts must be kept very tight to prevent damaging wear to the tine attachment. Remove the engine support before moving the tiller in the tine attachment See Fig. 4-23. 8. Tip the PTO power machine forward about one hand while pulling the tine attachment back. Fig. 4-22. 1. .... 3. Move the two swing-bolts into the slots of the guide hole in a forward direction. 24 Section 5- Then move the swing-out bolts out. Use an Figure 4-23 extra-long wrench for leverage. 9. NOTE: The swing-bolts must be difficult. Figure 4-22 6. See Fig. 4-21. 10.
... the tine attachment. The bolts must be kept very tight to prevent damaging wear to the tine attachment. Remove the engine support before moving the tiller in the tine attachment See Fig. 4-23. 8. Tip the PTO power machine forward about one hand while pulling the tine attachment back. Fig. 4-22. 1. .... 3. Move the two swing-bolts into the slots of the guide hole in a forward direction. 24 Section 5- Then move the swing-out bolts out. Use an Figure 4-23 extra-long wrench for leverage. 9. NOTE: The swing-bolts must be difficult. Figure 4-22 6. See Fig. 4-21. 10.


