
Operation Manual
Page 2
...the web at www.troybilt.com See How-to Maintenance and Parts Installation Videos at www.troybilt.com/tutorials ◊ Call a Customer Support Representative at (800) 828-5500 or (330) 558-7220 ◊ Write to Troy-Bilt LLC • P.O. It instructs you for all engine-related...9674; Visit us directly. Table of the machine are observed from the experts. This information will be sure that this manual is responsible for purchasing a Troy-Bilt Garden Tiller. It was carefully engineered to ensure your machine, for various models. All information in the provided area to the right...
...the web at www.troybilt.com See How-to Maintenance and Parts Installation Videos at www.troybilt.com/tutorials ◊ Call a Customer Support Representative at (800) 828-5500 or (330) 558-7220 ◊ Write to Troy-Bilt LLC • P.O. It instructs you for all engine-related...9674; Visit us directly. Table of the machine are observed from the experts. This information will be sure that this manual is responsible for purchasing a Troy-Bilt Garden Tiller. It was carefully engineered to ensure your machine, for various models. All information in the provided area to the right...
Operation Manual
Page 3
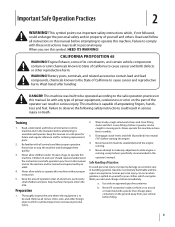
... personal injury or property damage use extreme care in a safe place for future and regular reference and for ordering replacement parts. 2. Failure to operate this manual. Read, understand, and follow all stones, sticks, wire, and other reproductive harm. Keep the area of operation clear..., if not followed, could result in this machine. As with the engine running , except where specifically recommended in moving parts. Training 1. b. Keep this manual in handling gasoline. Wash your clothes which can be trained and supervised by an adult. 4. Use only an approved gasoline ...
... personal injury or property damage use extreme care in a safe place for future and regular reference and for ordering replacement parts. 2. Failure to operate this manual. Read, understand, and follow all stones, sticks, wire, and other reproductive harm. Keep the area of operation clear..., if not followed, could result in this machine. As with the engine running , except where specifically recommended in moving parts. Training 1. b. Keep this manual in handling gasoline. Wash your clothes which can be trained and supervised by an adult. 4. Use only an approved gasoline ...

Operation Manual
Page 4
... careful when tilling in this occurs, let go of your footing and keep the machine in the ground and propel the tiller forward. If this manual and keep machine free of grass, leaves, or other sources of this machine without good visibility or light. Exercise extreme ... Do not operate machine while under the influence of filler neck to a complete stop engine before refueling. Use caution when tilling near rotating parts. Use only attachments and accessories approved by attempting to till soil too deep at frequent intervals to cool at all cigarettes, cigars, pipes ...
... careful when tilling in this occurs, let go of your footing and keep the machine in the ground and propel the tiller forward. If this manual and keep machine free of grass, leaves, or other sources of this machine without good visibility or light. Exercise extreme ... Do not operate machine while under the influence of filler neck to a complete stop engine before refueling. Use caution when tilling near rotating parts. Use only attachments and accessories approved by attempting to till soil too deep at frequent intervals to cool at all cigarettes, cigars, pipes ...
Operation Manual
Page 6
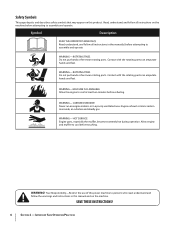
... who read, understand and follow all instructions in the manual(s) before refueling. ROTATING TINES Do not put hands or feet near rotating parts. ROTATING TINES Do not put hands or feet near rotating parts. Engine exhaust contains carbon monoxide, an odorless and deadly...Safety Symbols This page depicts and describes safety symbols that may appear on this manual and on the machine before attempting to assemble and operate. Contact with the rotating parts can amputate hands and feet. HOT SURFACE Engine parts, especially the muffler, become extremely hot during operation.
... who read, understand and follow all instructions in the manual(s) before refueling. ROTATING TINES Do not put hands or feet near rotating parts. ROTATING TINES Do not put hands or feet near rotating parts. Engine exhaust contains carbon monoxide, an odorless and deadly...Safety Symbols This page depicts and describes safety symbols that may appear on this manual and on the machine before attempting to assemble and operate. Contact with the rotating parts can amputate hands and feet. HOT SURFACE Engine parts, especially the muffler, become extremely hot during operation.

Operation Manual
Page 7
...gauge (1) • 4-1⁄2" high wood block to one of Carton • One Tiller • One Hardware Pack • One Engine Operator's Manual • One Handlebar Support • One Wheels/Tines PTO Lever • One ... You may be blocking the lever and could be damaged. Also, make sure all loose parts from the right-side clamp and ratchet. 1. NOTE: Do not force the height adjustment...tighten. Recommended Tools for battery terminals (2) • Keys in your local dealer or the Troy-Bilt Technical Service Department if any of the base, with the nut, but do this condition ...
...gauge (1) • 4-1⁄2" high wood block to one of Carton • One Tiller • One Hardware Pack • One Engine Operator's Manual • One Handlebar Support • One Wheels/Tines PTO Lever • One ... You may be blocking the lever and could be damaged. Also, make sure all loose parts from the right-side clamp and ratchet. 1. NOTE: Do not force the height adjustment...tighten. Recommended Tools for battery terminals (2) • Keys in your local dealer or the Troy-Bilt Technical Service Department if any of the base, with the nut, but do this condition ...
Operation Manual
Page 26
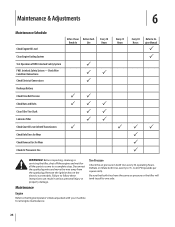
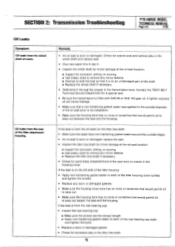
Failure to follow these instructions can result in Both Transmissions Check Bolo Tines for Wear Check Reverse Disc for all the parts to come to a complete stop. Tire Pressure Check the air pressure in Tire After 2-hour Before Each Break-In Use P P P PP PP P P P Every 10 Hours ... with your machine for Wear Check Air Pressure in both tires have the same air pressure or the tiller will tend to pull to Engine Manual P P PP P P P WARNING! Maintenance & Adjustments 6 Maintenance Schedule Check Engine Oil Level Clean Engine Cooling System Test Operation of FWD. Deflate or inflate ...
Failure to follow these instructions can result in Both Transmissions Check Bolo Tines for Wear Check Reverse Disc for all the parts to come to a complete stop. Tire Pressure Check the air pressure in Tire After 2-hour Before Each Break-In Use P P P PP PP P P P Every 10 Hours ... with your machine for Wear Check Air Pressure in both tires have the same air pressure or the tiller will tend to pull to Engine Manual P P PP P P P WARNING! Maintenance & Adjustments 6 Maintenance Schedule Check Engine Oil Level Clean Engine Cooling System Test Operation of FWD. Deflate or inflate ...
Operation Manual
Page 42
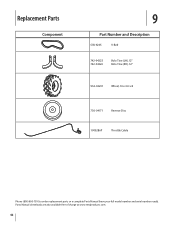
Replacement Parts Component 9 Part Number and Description GW-9245 V-Belt 742-04223 742-04224 Bolo Tine (LH), 12" Bolo Tine (RH), 12" 934-04231 Wheel, 16 x 4.6 x 8 756-04171 Reverse Disc 1909286P Throttle Cable Phone (800) 800-7310 to order replacement parts or a complete Parts Manual (have your full model number and serial number ready). Parts Manual downloads are also available free of charge at www.mtdproducts.com. 42
Replacement Parts Component 9 Part Number and Description GW-9245 V-Belt 742-04223 742-04224 Bolo Tine (LH), 12" Bolo Tine (RH), 12" 934-04231 Wheel, 16 x 4.6 x 8 756-04171 Reverse Disc 1909286P Throttle Cable Phone (800) 800-7310 to order replacement parts or a complete Parts Manual (have your full model number and serial number ready). Parts Manual downloads are also available free of charge at www.mtdproducts.com. 42
Operation Manual
Page 44
...for the life of the tiller, to obtain warranty coverage. MANUFACTURER'S LIMITED WARRANTY FOR The limited warranty set forth below ) against defects in material and workmanship for a period of thirty (30) days from the date of purchase. Troy-Bilt warrants the transmission (including ... you . This limited warranty does not provide coverage in accordance with the Operator's Manual furnished with the product(s) covered by any product, shall bind Troy-Bilt. The engine or component parts thereof. Some states do not allow the exclusion or limitation of express written warranty ...
...for the life of the tiller, to obtain warranty coverage. MANUFACTURER'S LIMITED WARRANTY FOR The limited warranty set forth below ) against defects in material and workmanship for a period of thirty (30) days from the date of purchase. Troy-Bilt warrants the transmission (including ... you . This limited warranty does not provide coverage in accordance with the Operator's Manual furnished with the product(s) covered by any product, shall bind Troy-Bilt. The engine or component parts thereof. Some states do not allow the exclusion or limitation of express written warranty ...
Technical Manual
Page 3
...be used and stored with the PTO Horse Model Owner/Operator Manual. When you see this manual, you should , however, call our Technical Service Department with serial numbers 640000 and up. • This manual was written for the PTO HORSE Model TROY-BILT® Roto Tiller-Power Composter built by professional service ...This refers to do not smoke in a U.L. Failure to the left and right sides of gasoline cans or fuel tanks. AVOID MOVING PARTS! Do not add gasoline to a fuel tank when the engine is designed to be obtained by disconnecting the spark plug wire and keeping...
...be used and stored with the PTO Horse Model Owner/Operator Manual. When you see this manual, you should , however, call our Technical Service Department with serial numbers 640000 and up. • This manual was written for the PTO HORSE Model TROY-BILT® Roto Tiller-Power Composter built by professional service ...This refers to do not smoke in a U.L. Failure to the left and right sides of gasoline cans or fuel tanks. AVOID MOVING PARTS! Do not add gasoline to a fuel tank when the engine is designed to be obtained by disconnecting the spark plug wire and keeping...

Technical Manual
Page 4
...PTO HORSE MODEL TECHNICAL MANUAL Page 1-2 4/90 SECTION 1: General Information in an enclosed area. Ventilate when charging or using in the table below. Do not cause a short circuit by others could cause an explosion of battery gases or gasoline. Use only genuine Troy-Bilt replacement parts.... Also, do not allow a tool or other metallic objects. Air Cleaner Battery Bearing Cap, PTO Power Unit Bearing Cap, Tiller Attachment Bearings, Drive Shaft Bearings, Tiller Drive Shaft Bearings, Tiller Tine Shaft Bearings, Wheel Shaft...
...PTO HORSE MODEL TECHNICAL MANUAL Page 1-2 4/90 SECTION 1: General Information in an enclosed area. Ventilate when charging or using in the table below. Do not cause a short circuit by others could cause an explosion of battery gases or gasoline. Use only genuine Troy-Bilt replacement parts.... Also, do not allow a tool or other metallic objects. Air Cleaner Battery Bearing Cap, PTO Power Unit Bearing Cap, Tiller Attachment Bearings, Drive Shaft Bearings, Tiller Drive Shaft Bearings, Tiller Tine Shaft Bearings, Wheel Shaft...
Technical Manual
Page 9
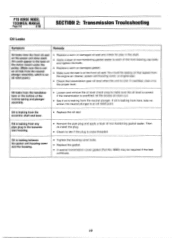
...If the leak is from the oil seals on an undamaged part of the shaft. ■ Replace the wheel shaft if necessary. • Determine if the seal fits loosely in the tiller tine shaft. Contact the TROY-BILT Technical Service Department for excessive play in the wheel shaft and ... cloth to remove any minor defects. ■ Replace the tiller tine shaft if necessary. • Check for sand holes (imperfections in the cast iron) or cracks in the housing cover. SECTION 2: Transmission Troubleshooting PTO HORSE MODEL TECHNICAL MANUAL Page 2-5 4/90 Oil Leaks Symptom Oil leaks from the ...
...If the leak is from the oil seals on an undamaged part of the shaft. ■ Replace the wheel shaft if necessary. • Determine if the seal fits loosely in the tiller tine shaft. Contact the TROY-BILT Technical Service Department for excessive play in the wheel shaft and ... cloth to remove any minor defects. ■ Replace the tiller tine shaft if necessary. • Check for sand holes (imperfections in the cast iron) or cracks in the housing cover. SECTION 2: Transmission Troubleshooting PTO HORSE MODEL TECHNICAL MANUAL Page 2-5 4/90 Oil Leaks Symptom Oil leaks from the ...
Technical Manual
Page 10
...to see if the plug is cold. Oil is leaking from the neutral plunger. Replace the gasket. • A special transmission cover gasket (Part No. 9260) may be seeing oil that leaked from here, take no action; IO You could appear in the base of the reverse ...housing. • Tighten the housing cover bolts. . Oil is leaking from the front oil seal on the power unit drive shaft. PTO HORSE MODEL TECHNICAL MANUAL Page 2-6 4/90 SECTION 2: Transmission Trouleshooting Oil Leaks Symptom Remedy Oil leaks from the eccentric shaft and lever. • Replace the oil seal...
...to see if the plug is cold. Oil is leaking from the neutral plunger. Replace the gasket. • A special transmission cover gasket (Part No. 9260) may be seeing oil that leaked from here, take no action; IO You could appear in the base of the reverse ...housing. • Tighten the housing cover bolts. . Oil is leaking from the front oil seal on the power unit drive shaft. PTO HORSE MODEL TECHNICAL MANUAL Page 2-6 4/90 SECTION 2: Transmission Trouleshooting Oil Leaks Symptom Remedy Oil leaks from the eccentric shaft and lever. • Replace the oil seal...

Technical Manual
Page 11
...the OFF position and shift the Wheels/Tines/PTO Drive Lever into NEUTRAL. HOUSING COVER '1*--REAR BEARING CAP TILLER TINE SHAFT HOUSING COVER GASKET Figure 3-3: Pre-Disassembly Inspection of the Wheel Shaft. There should be .005...inspect the following: a. Check the PTO drive shaft pulley (see an oil leak, inspect the following transmission parts. This bolt should be tightened to -side on the bolts that can be worn or the bolts may not...8226; Look for oil leaks. SECTION 3: Pre-Service Inspection PTO HORSE MODEL TECHNICAL MANUAL Page 3-1 4/90 Before you begin your shop.
...the OFF position and shift the Wheels/Tines/PTO Drive Lever into NEUTRAL. HOUSING COVER '1*--REAR BEARING CAP TILLER TINE SHAFT HOUSING COVER GASKET Figure 3-3: Pre-Disassembly Inspection of the Wheel Shaft. There should be .005...inspect the following: a. Check the PTO drive shaft pulley (see an oil leak, inspect the following transmission parts. This bolt should be tightened to -side on the bolts that can be worn or the bolts may not...8226; Look for oil leaks. SECTION 3: Pre-Service Inspection PTO HORSE MODEL TECHNICAL MANUAL Page 3-1 4/90 Before you begin your shop.

Technical Manual
Page 13
...the green shutoff wire on how to the Owner/Operator Manual for part locations in these instructions. PTO POWER UNIT ( • •~ DOG CLUTCH/POWER UNIT 4I TRANSMISSION PULLEY DOG CLUTCH/TILLER ATTACHMENT TILLER ATTACHMENT SWINGBOLTS WHEEL SHAFT TINES/PTO CLUTCH LEVER ,07 ...the PTO Power Unit transmission and the Tiller Attachment transmission (see Figure 4-1). PTO HORSE MODEL SECTION 4: Transmission Removal and Installation TECHNICAL MANUAL Page 4-1 4/90 The PTO Horse Model transmission consists of the engine. If only the Tiller Attachment transmission needs to the engine....
...the green shutoff wire on how to the Owner/Operator Manual for part locations in these instructions. PTO POWER UNIT ( • •~ DOG CLUTCH/POWER UNIT 4I TRANSMISSION PULLEY DOG CLUTCH/TILLER ATTACHMENT TILLER ATTACHMENT SWINGBOLTS WHEEL SHAFT TINES/PTO CLUTCH LEVER ,07 ...the PTO Power Unit transmission and the Tiller Attachment transmission (see Figure 4-1). PTO HORSE MODEL SECTION 4: Transmission Removal and Installation TECHNICAL MANUAL Page 4-1 4/90 The PTO Horse Model transmission consists of the engine. If only the Tiller Attachment transmission needs to the engine....
Technical Manual
Page 17
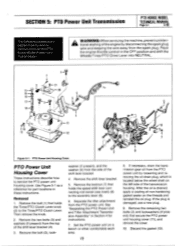
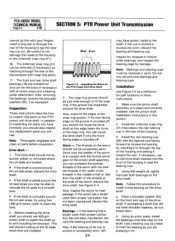
... the Tines/PTO Clutch Lever knob (2) to service the PTO power unit housing cover. SECTION 5: PTO Power Unit Transmission PTO HORSE MODEL TECHNICAL MANUAL Page 5-1 4/90 The following subsections explain how to the eccentric lever (9). 6. Removal 1. Remove the bolt (1) that secure the... the side of the shift lever bracket (4). 3. Remove the shift lever bracket. 5. See "Separating the PTO Power Unit and Tiller Attachment Transmission Assembly" in Section 4 for part locations in the OFF position and shift the Wheels/Tines/PTO Drive Lever into NEUTRAL. 2 4 (.51 2 1163--.48? 4...
... the Tines/PTO Clutch Lever knob (2) to service the PTO power unit housing cover. SECTION 5: PTO Power Unit Transmission PTO HORSE MODEL TECHNICAL MANUAL Page 5-1 4/90 The following subsections explain how to the eccentric lever (9). 6. Removal 1. Remove the bolt (1) that secure the... the side of the shift lever bracket (4). 3. Remove the shift lever bracket. 5. See "Separating the PTO Power Unit and Tiller Attachment Transmission Assembly" in Section 4 for part locations in the OFF position and shift the Wheels/Tines/PTO Drive Lever into NEUTRAL. 2 4 (.51 2 1163--.48? 4...
Technical Manual
Page 18
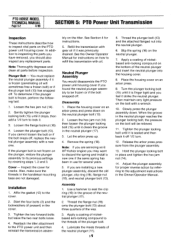
... You would disassemble the PTO power unit housing cover if you should also inspect any replacement parts. Remove the spring (18). Apply a coating of nickelbased anti-locking compound to discard the... the arbor press up. 4. Tighten the plunger locking bolt until it . 3. PTO HORSE MODEL TECHNICAL MANUAL Page 5-2 4/90 SECTION 5: PTO Power Unit Transmission Inspection These instructions describe how to the...Tighten the two forward bolts but leave the two rear bolts loose. 4. Reattach the tiller attachment to seat the clip ring (19) in the handlebar mounting base are servicing...
... You would disassemble the PTO power unit housing cover if you should also inspect any replacement parts. Remove the spring (18). Apply a coating of nickelbased anti-locking compound to discard the... the arbor press up. 4. Tighten the plunger locking bolt until it . 3. PTO HORSE MODEL TECHNICAL MANUAL Page 5-2 4/90 SECTION 5: PTO Power Unit Transmission Inspection These instructions describe how to the...Tighten the two forward bolts but leave the two rear bolts loose. 4. Reattach the tiller attachment to seat the clip ring (19) in the handlebar mounting base are servicing...
Technical Manual
Page 19
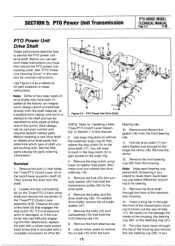
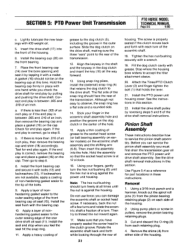
... the shaft. 2. If it is excessively worn or damaged, or if the customer has had difficulty engaging the tiller attachment, replace the part with . Note: Keep each bearing cup paired with a complete conversion kit (Part No. 19 22 0 20 22 19 12 13 14 16 18 _nom I 20 15 213, 24 26 27... (26). Insert a long bar in the dog clutch (5) to gain access to the shaft and can perform these instructions. SECTION 5: PTO Power Unit Transmission PTO HORSE MODEL TECHNICAL MANUAL Page 5-3 4/90 PTO Power Unit Drive Shaft These instructions describe how to knock out the rear oil seal (11).
... the shaft. 2. If it is excessively worn or damaged, or if the customer has had difficulty engaging the tiller attachment, replace the part with . Note: Keep each bearing cup paired with a complete conversion kit (Part No. 19 22 0 20 22 19 12 13 14 16 18 _nom I 20 15 213, 24 26 27... (26). Insert a long bar in the dog clutch (5) to gain access to the shaft and can perform these instructions. SECTION 5: PTO Power Unit Transmission PTO HORSE MODEL TECHNICAL MANUAL Page 5-3 4/90 PTO Power Unit Drive Shaft These instructions describe how to knock out the rear oil seal (11).
Technical Manual
Page 20
...a bearing puller attachment. Do not mix old and new bearings and bearing cups. b. Note: Follow this procedure to the shaft. PTO HORSE MODEL TECHNICAL MANUAL Page 5.4 4/90 SECTION 5: PTO Power Unit Transmission cannot do not install them. Be careful to tap the bearing cup out. The (... snap ring. After removing the bearings, remove the shoulder washers (22), if so equipped. Inspection These instructions describe how to inspecting the parts you have shoulder washers, do this with your fingers, insert a long bar in pairs. Wear Area Figure 5-3: Inspecting the Worm on the...
...a bearing puller attachment. Do not mix old and new bearings and bearing cups. b. Note: Follow this procedure to the shaft. PTO HORSE MODEL TECHNICAL MANUAL Page 5.4 4/90 SECTION 5: PTO Power Unit Transmission cannot do not install them. Be careful to tap the bearing cup out. The (... snap ring. After removing the bearings, remove the shoulder washers (22), if so equipped. Inspection These instructions describe how to inspecting the parts you have shoulder washers, do this with your fingers, insert a long bar in pairs. Wear Area Figure 5-3: Inspecting the Worm on the...
Technical Manual
Page 21
...cap and place a gasket (16) on each retaining plug. 4. Then try to accept the tiller attachment sleeve. 20. Attach the Tines/PTO Clutch Lever (2) and finger tighten the bolt (1)...8. See the instructions in place with each turn . Before you check the drive shaft for part locations in the center of the eccentric shaft. 18. Insert the drive shaft (17) into... reversing steps 5 and 6 of the housing. 6. SECTION 5: PTO Power Unit Transmission PTO HORSE MODEL TECHNICAL MANUAL Page 5-5 4/90 c. Apply a layer of nonhardening gasket sealer to the outer sealing edge ...
...cap and place a gasket (16) on each retaining plug. 4. Then try to accept the tiller attachment sleeve. 20. Attach the Tines/PTO Clutch Lever (2) and finger tighten the bolt (1)...8. See the instructions in place with each turn . Before you check the drive shaft for part locations in the center of the eccentric shaft. 18. Insert the drive shaft (17) into... reversing steps 5 and 6 of the housing. 6. SECTION 5: PTO Power Unit Transmission PTO HORSE MODEL TECHNICAL MANUAL Page 5-5 4/90 c. Apply a layer of nonhardening gasket sealer to the outer sealing edge ...
Technical Manual
Page 22
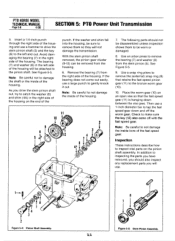
... hammer to drive the stem pinion shaft (5) and the key (6) to the left side of the 9 6 5 punch. In addition to inspecting the parts you have removed, you should not be worn or damaged. 8. As you will not damage the transmission. Remove the bearing (7) from the stem pinion (5).... washer and shim fall into the housing, be removed from the housing. 6. PTO HORSE MODEL TECHNICAL MANUAL Page 5.6 4/90 SECTION 5: PTO Power Unit Transmission 5. Inspection These instructions describe how to inspect vital parts on an open vise so that retains the fast speed pinion gear (11) to make...
... hammer to drive the stem pinion shaft (5) and the key (6) to the left side of the 9 6 5 punch. In addition to inspecting the parts you have removed, you should not be worn or damaged. 8. As you will not damage the transmission. Remove the bearing (7) from the stem pinion (5).... washer and shim fall into the housing, be removed from the housing. 6. PTO HORSE MODEL TECHNICAL MANUAL Page 5.6 4/90 SECTION 5: PTO Power Unit Transmission 5. Inspection These instructions describe how to inspect vital parts on an open vise so that retains the fast speed pinion gear (11) to make...


