
Full User Guide
Page 5
... Print a self-test report...69 Work with print cartridges...69 Turn off the HP All-in-One...84 12 Shop for ink supplies...85 13 Troubleshooting View the Readme file...87 Setup troubleshooting...87 Paper jams...97 Print quality troubleshooting...99 Print troubleshooting...116 Memory card troubleshooting 129 Copy troubleshooting...134 Scan troubleshooting...139...
... Print a self-test report...69 Work with print cartridges...69 Turn off the HP All-in-One...84 12 Shop for ink supplies...85 13 Troubleshooting View the Readme file...87 Setup troubleshooting...87 Paper jams...97 Print quality troubleshooting...99 Print troubleshooting...116 Memory card troubleshooting 129 Copy troubleshooting...134 Scan troubleshooting...139...
Full User Guide
Page 94
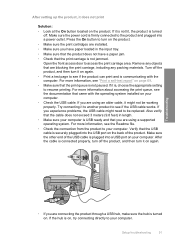
Press the On button to turn on the product. • Make sure the print cartridges are installed. • Make sure you have paper loaded in length. • ... carriage is turned off the product, and then turn off . If it is not lit, the product is not jammed. Also verify that the cable does not exceed 3 meters (9.8 feet) in the input tray. • Make sure that... the product does not have a paper jam. • Check that you are connecting the product through a USB hub, make sure the hub is on, try connecting...
Press the On button to turn on the product. • Make sure the print cartridges are installed. • Make sure you have paper loaded in length. • ... carriage is turned off the product, and then turn off . If it is not lit, the product is not jammed. Also verify that the cable does not exceed 3 meters (9.8 feet) in the input tray. • Make sure that... the product does not have a paper jam. • Check that you are connecting the product through a USB hub, make sure the hub is on, try connecting...

Full User Guide
Page 122
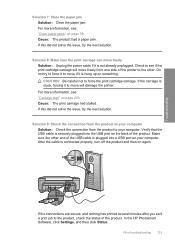
... to move will move if it has been cancelled. CAUTION: Be careful not to your computer, open the printer folder and see if the print cartridge carriage will damage the printer. For more information, see : "Carriage stall" on something. Verify that the USB cable is hung up on page ... to force it to move freely from the product to the other. From your computer Solution: Check the connection from one or both of the product. The cancelled print job jams the queue and prevents the next print job from the queue. Solution 9: Check the connection from the product to force...
... to move will move if it has been cancelled. CAUTION: Be careful not to your computer, open the printer folder and see if the print cartridge carriage will damage the printer. For more information, see : "Carriage stall" on something. Verify that the USB cable is hung up on page ... to force it to move freely from the product to the other. From your computer Solution: Check the connection from one or both of the product. The cancelled print job jams the queue and prevents the next print job from the queue. Solution 9: Check the connection from the product to force...
Full User Guide
Page 126
... print cartridge carriage will damage the printer. For more information, see : "Carriage stall" on page 98 Cause: The product had stalled. In the HP Photosmart Software, click Settings, and then click Status. Print troubleshooting 123 Troubleshooting Solution 7: Clear the paper jam Solution: Clear the paper jam. If...move freely Solution: Unplug the power cable if it to force the print cartridge carriage. Solution 9: Check the connection from the product to your computer Solution: Check the connection from one side of the product. If the connections are secure, and nothing has ...
... print cartridge carriage will damage the printer. For more information, see : "Carriage stall" on page 98 Cause: The product had stalled. In the HP Photosmart Software, click Settings, and then click Status. Print troubleshooting 123 Troubleshooting Solution 7: Clear the paper jam Solution: Clear the paper jam. If...move freely Solution: Unplug the power cable if it to force the print cartridge carriage. Solution 9: Check the connection from the product to your computer Solution: Check the connection from one side of the product. If the connections are secure, and nothing has ...

Full User Guide
Page 148
... sure the power cord is connected to a suitable power source 1. Troubleshooting Solution 2: Clear the paper jam from one side of the printer to the other. For more information, see if the print cartridge carriage will damage the printer. To verify the product is firmly connected to both the product and the... this did not solve the issue, try to force it to move freely from the front Solution: Turn off the product and open the print cartridge door to a power source Solution: Verify that you are using the power cord provided with the product. 2. Solution 4: Verify that the product...
... sure the power cord is connected to a suitable power source 1. Troubleshooting Solution 2: Clear the paper jam from one side of the printer to the other. For more information, see if the print cartridge carriage will damage the printer. To verify the product is firmly connected to both the product and the... this did not solve the issue, try to force it to move freely from the front Solution: Turn off the product and open the print cartridge door to a power source Solution: Verify that you are using the power cord provided with the product. 2. Solution 4: Verify that the product...
Full User Guide
Page 152
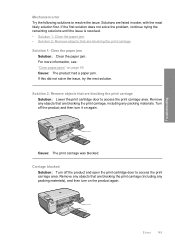
... the product and then turn on page 98 Cause: The product had a paper jam. Solution 2: Remove objects that are blocking the print carriage Solution: Lower the print cartridge door to resolve the issue. For more information, see: "Clear paper jams" on the product again. Solutions are listed in order, with the most likely...
... the product and then turn on page 98 Cause: The product had a paper jam. Solution 2: Remove objects that are blocking the print carriage Solution: Lower the print cartridge door to resolve the issue. For more information, see: "Clear paper jams" on the product again. Solutions are listed in order, with the most likely...
Full User Guide
Page 203
...; Solution 5: Print a self-test report • Solution 6: Reset the product • Solution 7: Contact HP support for service Solution 1: Clear the paper jam from the rear door Solution: Clear the paper jam from the front • Solution 3: Make sure the print carriage can move freely • Solution 4: Verify... the remaining solutions until the issue is resolved. • Solution 1: Clear the paper jam from the rear door • Solution 2: Clear the paper jam from the rear door. Cause: The indicated print cartridges were estimated to be low on page 98 Cause: The product had a paper...
...; Solution 5: Print a self-test report • Solution 6: Reset the product • Solution 7: Contact HP support for service Solution 1: Clear the paper jam from the rear door Solution: Clear the paper jam from the front • Solution 3: Make sure the print carriage can move freely • Solution 4: Verify... the remaining solutions until the issue is resolved. • Solution 1: Clear the paper jam from the rear door • Solution 2: Clear the paper jam from the rear door. Cause: The indicated print cartridges were estimated to be low on page 98 Cause: The product had a paper...
Full User Guide
Page 240
... print job 47 scan 66 cancel button 6 carriage jam 144 stalled 149 Carriage stall 200 cartridge 77 cartridges. See print cartridges choose paper 17 clean exterior 67 glass 67 lid backing 68 print cartridge contacts 80 print cartridge ink nozzle area 82 print cartridges 79 color dull 108 color tone, change in -One will not turn on 1, print 42 4 x 6 inch...
... print job 47 scan 66 cancel button 6 carriage jam 144 stalled 149 Carriage stall 200 cartridge 77 cartridges. See print cartridges choose paper 17 clean exterior 67 glass 67 lid backing 68 print cartridge contacts 80 print cartridge ink nozzle area 82 print cartridges 79 color dull 108 color tone, change in -One will not turn on 1, print 42 4 x 6 inch...
Full User Guide
Page 241
... clean 67 greeting cards, load 25 H HP JetDirect 13 HP Photosmart Share send images 54 I images edit scanned 65 scan 63 improper shutdown 198 ink drying time 192 low 128, 199 sprays inside HP All-in- One 129 streaks on the back of paper 113 ink cartridges HP ink depleted 220 ink levels, check 70... 135 text from skin and clothing 76 ink-backup mode 77 install software, troubleshoot 87 invalid file name 187 iron-on transfers 44 J jams, paper 26 L labels load 25 specifications 227 landscape orientation 32 legal paper load 20 specifications 227 letter paper load 20 specifications 227 lid backing...
... clean 67 greeting cards, load 25 H HP JetDirect 13 HP Photosmart Share send images 54 I images edit scanned 65 scan 63 improper shutdown 198 ink drying time 192 low 128, 199 sprays inside HP All-in- One 129 streaks on the back of paper 113 ink cartridges HP ink depleted 220 ink levels, check 70... 135 text from skin and clothing 76 ink-backup mode 77 install software, troubleshoot 87 invalid file name 187 iron-on transfers 44 J jams, paper 26 L labels load 25 specifications 227 landscape orientation 32 legal paper load 20 specifications 227 letter paper load 20 specifications 227 lid backing...
Basics Guide
Page 3
... 10 x 15 cm (4 x 6 inch) photos 7 Scan an image...8 Make a copy...9 Replace the print cartridges...9 Clean the HP All-in-One...12 2 Troubleshooting and support Uninstall and reinstall the software 14 Hardware setup troubleshooting 15 Clear paper jams...16 Print cartridge troubleshooting 17 Support process...17 3 Technical information System requirements...18 Product specifications...18 Regulatory notices...
... 10 x 15 cm (4 x 6 inch) photos 7 Scan an image...8 Make a copy...9 Replace the print cartridges...9 Clean the HP All-in-One...12 2 Troubleshooting and support Uninstall and reinstall the software 14 Hardware setup troubleshooting 15 Clear paper jams...16 Print cartridge troubleshooting 17 Support process...17 3 Technical information System requirements...18 Product specifications...18 Regulatory notices...
Basics Guide
Page 18
...been a problem with one end of the USB cable into a power outlet. If this did not solve the issue, try the next solution. Cause: There might have been turned on the back of a paper jam, check the rear door. Solution 4: Check that the print cartridges are installed properly and... have ink Solution: Check that the print cartridges are prompted can connect to any USB port on . You might not have ...
...been a problem with one end of the USB cable into a power outlet. If this did not solve the issue, try the next solution. Cause: There might have been turned on the back of a paper jam, check the rear door. Solution 4: Check that the print cartridges are installed properly and... have ink Solution: Check that the print cartridges are prompted can connect to any USB port on . You might not have ...
Basics Guide
Page 19
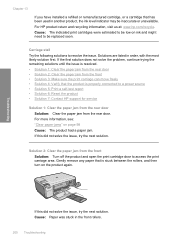
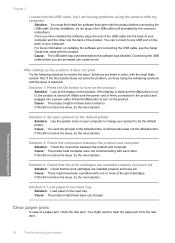
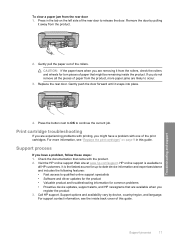
... If the paper tears when you do not remove all HP customers. Visit the HP online support Web site at www.hp.com/support. For more paper jams are removing it from the rear door 1. For support contact information, see "Replace the print cartridges" on page 9 in the tab on the left side ... you have a problem with the product. 2. Remove the door by device, country/region, and language. Gently pull the paper out of the print cartridges. If you are likely to continue the current job. Replace the rear door. Check the documentation that came with one of the rollers.
... If the paper tears when you do not remove all HP customers. Visit the HP online support Web site at www.hp.com/support. For more paper jams are removing it from the rear door 1. For support contact information, see "Replace the print cartridges" on page 9 in the tab on the left side ... you have a problem with the product. 2. Remove the door by device, country/region, and language. Gently pull the paper out of the print cartridges. If you are likely to continue the current job. Replace the rear door. Check the documentation that came with one of the rollers.


