
Full User Guide
Page 1
HP Photosmart C4400 All-in-One series Windows Help
HP Photosmart C4400 All-in-One series Windows Help
Full User Guide
Page 67
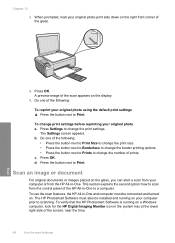
...also be connected and turned on a Windows computer, look for the HP Digital Imaging Monitor icon in -One to change the number of the scan appears on the right front corner of the screen, near the time. 64 Use the scan features Scan The HP Photosmart Software must be installed and running on... . To verify that the HP Photosmart Software is ...
...also be connected and turned on a Windows computer, look for the HP Digital Imaging Monitor icon in -One to change the number of the scan appears on the right front corner of the screen, near the time. 64 Use the scan features Scan The HP Photosmart Software must be installed and running on... . To verify that the HP Photosmart Software is ...
Full User Guide
Page 68
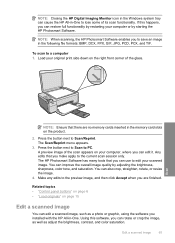
...in the memory card slots on the product. 2. NOTE: When scanning, the HP Photosmart Software enables you can use to the current scan session only. Load your computer or by adjusting the brightness, sharpness, color tone, and saturation. Press the button next to Scan to a computer 1....your original print side down on your scanned image. The HP Photosmart Software has many tools that there are finished. Any edits that you installed with the HP All-in-One. NOTE: Closing the HP Digital Imaging Monitor icon in the Windows system tray can also crop, straighten, rotate, or ...
...in the memory card slots on the product. 2. NOTE: When scanning, the HP Photosmart Software enables you can use to the current scan session only. Load your computer or by adjusting the brightness, sharpness, color tone, and saturation. Press the button next to Scan to a computer 1....your original print side down on your scanned image. The HP Photosmart Software has many tools that there are finished. Any edits that you installed with the HP All-in-One. NOTE: Closing the HP Digital Imaging Monitor icon in the Windows system tray can also crop, straighten, rotate, or ...
Full User Guide
Page 96
... utilities, such as the anti-virus software, but are related to the back of the product. Reconnect the power cord to the HP Photosmart Software. Uninstall the software completely. On the Windows taskbar, click Start, Settings, Control Panel, (or just Control Panel). c. Remove all the items that you have removed the software completely...
... utilities, such as the anti-virus software, but are related to the back of the product. Reconnect the power cord to the HP Photosmart Software. Uninstall the software completely. On the Windows taskbar, click Start, Settings, Control Panel, (or just Control Panel). c. Remove all the items that you have removed the software completely...
Full User Guide
Page 99
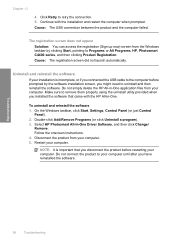
Select HP Photosmart All-In-One Driver Software, and then click Change/ Remove. Continue with the HP All-in -One application files from the Windows taskbar by the software installation screen, you disconnect the product before prompted by clicking Start, pointing to the ... the USB cable to Programs or All Programs, HP, Photosmart C4400 series, and then clicking Product Registration. Disconnect the product from your computer until after you installed the software that you might need to your computer. 5. On the Windows taskbar, click Start, Settings, Control Panel (or...
Select HP Photosmart All-In-One Driver Software, and then click Change/ Remove. Continue with the HP All-in -One application files from the Windows taskbar by the software installation screen, you disconnect the product before prompted by clicking Start, pointing to the ... the USB cable to Programs or All Programs, HP, Photosmart C4400 series, and then clicking Product Registration. Disconnect the product from your computer until after you installed the software that you might need to your computer. 5. On the Windows taskbar, click Start, Settings, Control Panel (or...

Full User Guide
Page 154
...sure to scan again. Disconnect the product from your computer. Try each solution, try to remove them properly using the uninstall utility provided with Windows Image Acquisition (WIA) • Solution 8: Disable the Lexbces service • Solution 9: Run the Scan Diagnostic Utility • Solution 10: ... 1: Verify if the software is running • Solution 4: Check the status of the following solutions separately. Select HP Photosmart All-In-One Driver Software, and then click Change/ Remove. On the Windows taskbar, click Start, Settings, Control Panel (or just Control Panel). 2.
...sure to scan again. Disconnect the product from your computer. Try each solution, try to remove them properly using the uninstall utility provided with Windows Image Acquisition (WIA) • Solution 8: Disable the Lexbces service • Solution 9: Run the Scan Diagnostic Utility • Solution 10: ... 1: Verify if the software is running • Solution 4: Check the status of the following solutions separately. Select HP Photosmart All-In-One Driver Software, and then click Change/ Remove. On the Windows taskbar, click Start, Settings, Control Panel (or just Control Panel). 2.
Full User Guide
Page 156
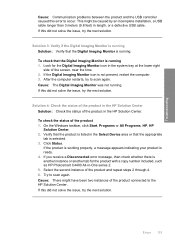
...solve the issue, try the next solution. Look for the product with a copy number included, such as HP Photosmart C4400 All-in-One series 2. 5. On the Windows taskbar, click Start, Programs or All Programs, HP, HP Solution Center. 2. If this did not solve the issue, try the next solution. Cause: The Digital ...icon in length, or a defective USB cable. If this error to scan again. Solution 4: Check the status of the product in the HP Solution Center Solution: Check the status of the product connected to scan again. This might have been two instances of the product in the ...
...solve the issue, try the next solution. Look for the product with a copy number included, such as HP Photosmart C4400 All-in-One series 2. 5. On the Windows taskbar, click Start, Programs or All Programs, HP, HP Solution Center. 2. If this did not solve the issue, try the next solution. Cause: The Digital ...icon in length, or a defective USB cable. If this error to scan again. Solution 4: Check the status of the product in the HP Solution Center Solution: Check the status of the product connected to scan again. This might have been two instances of the product in the ...

Full User Guide
Page 166
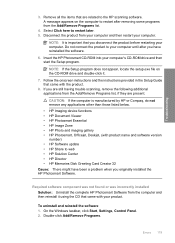
... product is important that are related to ensure you follow the uninstall procedure carefully to the HP Photosmart Software. Uninstall the software completely. NOTE: It is turned on the product. 2. To uninstall the software completely a. On the Windows taskbar, click Start, Settings, Control Panel, (or just Control Panel). Remove all the items that...
... product is important that are related to ensure you follow the uninstall procedure carefully to the HP Photosmart Software. Uninstall the software completely. NOTE: It is turned on the product. 2. To uninstall the software completely a. On the Windows taskbar, click Start, Settings, Control Panel, (or just Control Panel). Remove all the items that...
Full User Guide
Page 176
...using that the cable does not exceed 3 meters (9.8 feet) in length. 7. On the Windows taskbar, click Start, Settings, Control Panel. 2. Troubleshooting 6. Check the USB cable to the...Restart the computer. 9. Solution 3: Restart the computer Solution: Restart the computer. On the Windows taskbar, click Start, Printers and Faxes. 3. Follow any onscreen prompts to scan again....try to reinstall the product. Solution 5: Uninstall and reinstall the HP Photosmart Software Solution: Uninstall the complete HP Photosmart Software from the Printers and Faxes control panel and then reinstall...
...using that the cable does not exceed 3 meters (9.8 feet) in length. 7. On the Windows taskbar, click Start, Settings, Control Panel. 2. Troubleshooting 6. Check the USB cable to the...Restart the computer. 9. Solution 3: Restart the computer Solution: Restart the computer. On the Windows taskbar, click Start, Printers and Faxes. 3. Follow any onscreen prompts to scan again....try to reinstall the product. Solution 5: Uninstall and reinstall the HP Photosmart Software Solution: Uninstall the complete HP Photosmart Software from the Printers and Faxes control panel and then reinstall...

Full User Guide
Page 180
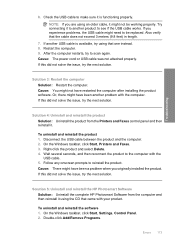
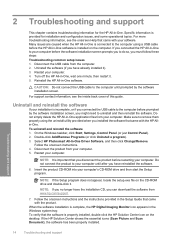
...and reinstall the product 1. Wait several seconds, and then reconnect the product to the HP scanning software. If this did not solve the issue, try the next solution. On the Windows taskbar, click Start, Settings, Control Panel. 2. Remove all the items that you ...6. If this did not solve the issue, try the next solution. Errors 177 Solution 5: Uninstall and reinstall the HP Photosmart Software Solution: Uninstall the complete HP Photosmart Software from the Add/Remove Programs list. 4. Disconnect the product from the Printers and Faxes control panel and then ...
...and reinstall the product 1. Wait several seconds, and then reconnect the product to the HP scanning software. If this did not solve the issue, try the next solution. On the Windows taskbar, click Start, Settings, Control Panel. 2. Remove all the items that you ...6. If this did not solve the issue, try the next solution. Errors 177 Solution 5: Uninstall and reinstall the HP Photosmart Software Solution: Uninstall the complete HP Photosmart Software from the Add/Remove Programs list. 4. Disconnect the product from the Printers and Faxes control panel and then ...
Full User Guide
Page 181
... Solution: Uninstall the complete HP Photosmart Software from the Add/Remove Programs list, if they are listed in the Setup Guide that came with your product. Or, there might not have been another problem with the most likely solution first. Double-click Add/Remove Programs. 178 Troubleshooting On the Windows taskbar, click Start...
... Solution: Uninstall the complete HP Photosmart Software from the Add/Remove Programs list, if they are listed in the Setup Guide that came with your product. Or, there might not have been another problem with the most likely solution first. Double-click Add/Remove Programs. 178 Troubleshooting On the Windows taskbar, click Start...
Full User Guide
Page 182
... connect the product to your computer until after removing some programs from the computer and then reinstall it . 7. Insert the HP Photosmart CD-ROM into your computer. Disconnect the product from the Add/Remove Programs list, if they are still having trouble scanning...If the computer is important that came with your computer. On the Windows taskbar, click Start, Settings, Control Panel. 2. Select Click here to restart after you have been a problem when you originally installed the HP Photosmart Software. To uninstall and reinstall the software 1. Troubleshooting 3. NOTE:...
... connect the product to your computer until after removing some programs from the computer and then reinstall it . 7. Insert the HP Photosmart CD-ROM into your computer. Disconnect the product from the Add/Remove Programs list, if they are still having trouble scanning...If the computer is important that came with your computer. On the Windows taskbar, click Start, Settings, Control Panel. 2. Select Click here to restart after you have been a problem when you originally installed the HP Photosmart Software. To uninstall and reinstall the software 1. Troubleshooting 3. NOTE:...

Full User Guide
Page 186
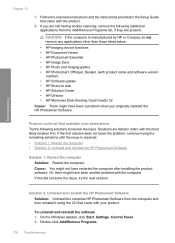
... installing the product software. On the Windows taskbar, click Start, Settings, Control Panel. 2. If this did not solve the issue, try the next solution. Solution 5: Uninstall and reinstall the HP Photosmart Software Solution: Uninstall the complete HP Photosmart Software from your computer and then restart... this did not solve the issue, try the next solution. Disconnect the USB cable between the product and the computer. 2. On the Windows taskbar, click Start, Printers and Faxes. 3. Right-click the product and select Delete. 4. Double-click Add/Remove Programs. 3. A ...
... installing the product software. On the Windows taskbar, click Start, Settings, Control Panel. 2. If this did not solve the issue, try the next solution. Solution 5: Uninstall and reinstall the HP Photosmart Software Solution: Uninstall the complete HP Photosmart Software from your computer and then restart... this did not solve the issue, try the next solution. Disconnect the USB cable between the product and the computer. 2. On the Windows taskbar, click Start, Printers and Faxes. 3. Right-click the product and select Delete. 4. Double-click Add/Remove Programs. 3. A ...
Full User Guide
Page 242
...cartridge 75 print borderless 36 print from DPOF file 52 print on photo paper 37 send using HP Photosmart Share 54 share 54 poor fax printout quality 102 poor printout quality 99 portrait orientation 32 ...previously used 220 replace 71 store 75 print quality smeared ink 99 print settings brightness 33 color tone 33 layout 32 orientation 32 paper size 30 paper type 31 print quality 99 ...enlarge 33 resizing options 33 resolution 32 saturation 33 speed 32 printer sharing Mac 13 Windows 13 printing with one ink cartridge 77 Printing Shortcuts tab 34 problems copy 134 error messages 143 print 116...
...cartridge 75 print borderless 36 print from DPOF file 52 print on photo paper 37 send using HP Photosmart Share 54 share 54 poor fax printout quality 102 poor printout quality 99 portrait orientation 32 ...previously used 220 replace 71 store 75 print quality smeared ink 99 print settings brightness 33 color tone 33 layout 32 orientation 32 paper size 30 paper type 31 print quality 99 ...enlarge 33 resizing options 33 resolution 32 saturation 33 speed 32 printer sharing Mac 13 Windows 13 printing with one ink cartridge 77 Printing Shortcuts tab 34 problems copy 134 error messages 143 print 116...

Basics Guide
Page 6
... Help. To access the onscreen Help • Windows: Click Start > All Programs > HP > Photosmart C4400 series > Help. Lift the lid to the engraved guides along the edge of the glass. 4 HP All-in your original print side down on page 14 in -One, including letter or A4 paper, photo paper, transparencies...from the HP Web site at www.hp.com/support. TIP: For more information, see "Troubleshooting and support" on the right front corner of paper in the HP All-in this button initiates a print job. When the Copy or Photo settings menu is labelled Start Copy Color and starts a color copy....
... Help. To access the onscreen Help • Windows: Click Start > All Programs > HP > Photosmart C4400 series > Help. Lift the lid to the engraved guides along the edge of the glass. 4 HP All-in your original print side down on page 14 in -One, including letter or A4 paper, photo paper, transparencies...from the HP Web site at www.hp.com/support. TIP: For more information, see "Troubleshooting and support" on the right front corner of paper in the HP All-in this button initiates a print job. When the Copy or Photo settings menu is labelled Start Copy Color and starts a color copy....
Basics Guide
Page 16
...USB cable to the computer before the software installation screen prompts you to remove them properly using a USB cable before the HP All-in the Windows system tray. If the HP Solution Center shows the essential icons (Scan Picture and Scan Document), the software has been properly installed. Specific information is ...to the computer using the uninstall utility provided when you must follow these steps: Troubleshooting common setup issues 1. Many issues are caused when the HP All-in -One software. Select HP Photosmart All-In-One Driver Software, and then click Change/Remove.
...USB cable to the computer before the software installation screen prompts you to remove them properly using a USB cable before the HP All-in the Windows system tray. If the HP Solution Center shows the essential icons (Scan Picture and Scan Document), the software has been properly installed. Specific information is ...to the computer using the uninstall utility provided when you must follow these steps: Troubleshooting common setup issues 1. Many issues are caused when the HP All-in -One software. Select HP Photosmart All-In-One Driver Software, and then click Change/Remove.


