Full User Guide
Page 4
Contents Contents 1 HP Photosmart C4400 All-in-One series Help 3 2 HP All-in-One overview The HP All-in-One at a glance...5 Control panel buttons...6 Menu overview...7 Use the HP Photosmart Software 7 3 Find more information...9 4 How do I?...11 5 Connection information Supported connection types...13 Use printer sharing...13 6 Load originals and load paper Load originals...15 Choose ...
Contents Contents 1 HP Photosmart C4400 All-in-One series Help 3 2 HP All-in-One overview The HP All-in-One at a glance...5 Control panel buttons...6 Menu overview...7 Use the HP Photosmart Software 7 3 Find more information...9 4 How do I?...11 5 Connection information Supported connection types...13 Use printer sharing...13 6 Load originals and load paper Load originals...15 Choose ...

Full User Guide
Page 8
... a glance 5 This section contains the following topics: • The HP All-in-One at a glance • Control panel buttons • Menu overview • Use the HP Photosmart Software The HP All-in-One at a glance HP All-in-One overview Label 1 2 3 4 5 6 7 8 9 10 Description On button Control panel Memory card slots Input tray Tray extender Paper-width guide Print cartridge...
... a glance 5 This section contains the following topics: • The HP All-in-One at a glance • Control panel buttons • Menu overview • Use the HP Photosmart Software The HP All-in-One at a glance HP All-in-One overview Label 1 2 3 4 5 6 7 8 9 10 Description On button Control panel Memory card slots Input tray Tray extender Paper-width guide Print cartridge...

Full User Guide
Page 10
...available when you press the button next to top-level menus that appear on the HP All-in -One overview Use the HP Photosmart Software 7 HP All-in -One display. • Default Menu • Scan/Reprint Menu • Settings Menu ...Default Menu The following options are available when you do not see the HP Photosmart Software Help contents book at the top of your photos. Scan/Reprint Start Copy Black Start Copy Color...
...available when you press the button next to top-level menus that appear on the HP All-in -One overview Use the HP Photosmart Software 7 HP All-in -One display. • Default Menu • Scan/Reprint Menu • Settings Menu ...Default Menu The following options are available when you do not see the HP Photosmart Software Help contents book at the top of your photos. Scan/Reprint Start Copy Black Start Copy Color...
Full User Guide
Page 12
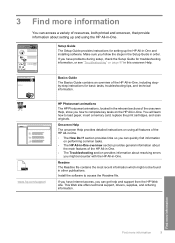
... Find more information You can get help and support from the HP Web site. www.hp.com/support HP Photosmart animations The HP Photosmart animations, located in the relevant sections of the onscreen Help, show you can access a variety of the HP All-in -One and installing software. 3 Find more information 9 This Web site offers technical support, drivers, supplies...
... Find more information You can get help and support from the HP Web site. www.hp.com/support HP Photosmart animations The HP Photosmart animations, located in the relevant sections of the onscreen Help, show you can access a variety of the HP All-in -One and installing software. 3 Find more information 9 This Web site offers technical support, drivers, supplies...
Full User Guide
Page 16
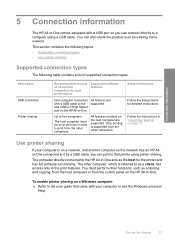
...connection types. Connection information 5 Connection information The HP All-in-One comes equipped with a USB cable to the rear USB 2.0 High Speed port on the HP All-in-One. Setup instructions Follow the Setup Guide for the printer and has full software functionality. Only printing is on a network, ...and another computer on the network has an HP Allin-One connected to it by a USB cable, you...
...connection types. Connection information 5 Connection information The HP All-in-One comes equipped with a USB cable to the rear USB 2.0 High Speed port on the HP All-in-One. Setup instructions Follow the Setup Guide for the printer and has full software functionality. Only printing is on a network, ...and another computer on the network has an HP Allin-One connected to it by a USB cable, you...
Full User Guide
Page 20
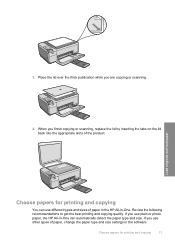
If you use plain or photo paper, the HP All-in-One can use different types and sizes of paper in the HP All-in the software. Choose papers for printing and copying You can automatically detect the paper type and size. 3. When you are copying or scanning. 4. If you use other ..., replace the lid by inserting the tabs on the lid back into the appropriate slots of paper, change the paper type and size settings in -One. Load originals and load paper Choose papers for printing and copying 17
If you use plain or photo paper, the HP All-in-One can use different types and sizes of paper in the HP All-in the software. Choose papers for printing and copying You can automatically detect the paper type and size. 3. When you are copying or scanning. 4. If you use other ..., replace the lid by inserting the tabs on the lid back into the appropriate slots of paper, change the paper type and size settings in -One. Load originals and load paper Choose papers for printing and copying 17
Full User Guide
Page 23
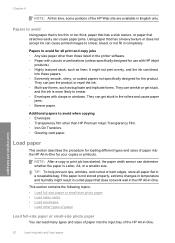
... not stored properly, extreme changes in temperature and humidity might not print evenly, and the ink can wrinkle or get stuck in -One. This section contains the following topics: • Load full-size paper or small-size photo paper • Load index cards &#... • Greeting card paper. Additional papers to smear. • Envelopes with HP inkjet products). • Highly textured stock, such as duplicate and triplicate forms. They can bleed into the HP All-in the printer software. • Paper with cutouts or perforations (unless specifically designed for your copies or...
... not stored properly, extreme changes in temperature and humidity might not print evenly, and the ink can wrinkle or get stuck in -One. This section contains the following topics: • Load full-size paper or small-size photo paper • Load index cards &#... • Greeting card paper. Additional papers to smear. • Envelopes with HP inkjet products). • Highly textured stock, such as duplicate and triplicate forms. They can bleed into the HP All-in the printer software. • Paper with cutouts or perforations (unless specifically designed for your copies or...
Full User Guide
Page 27
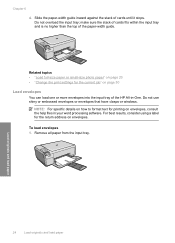
Chapter 6 4. make sure the stack of cards fits within the input tray and is no higher than the top of the HP All-in your word processing software. Do not use shiny or embossed envelopes or envelopes that have clasps or windows. Related topics • "Load full-size paper or small-size ...paper from the input tray. NOTE: For specific details on how to format text for the return address on envelopes, consult the help files in -One. Load originals and load paper 24 Load originals and load paper Do not overload the input tray; Slide the paper-width guide inward against the...
Chapter 6 4. make sure the stack of cards fits within the input tray and is no higher than the top of the HP All-in your word processing software. Do not use shiny or embossed envelopes or envelopes that have clasps or windows. Related topics • "Load full-size paper or small-size ...paper from the input tray. NOTE: For specific details on how to format text for the return address on envelopes, consult the help files in -One. Load originals and load paper 24 Load originals and load paper Do not overload the input tray; Slide the paper-width guide inward against the...
Full User Guide
Page 28
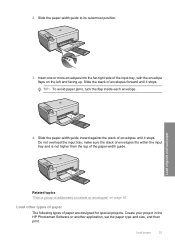
...-width guide to its outermost position. Slide the paper-width guide inward against the stack of the paper-width guide. Create your project in the HP Photosmart Software or another application, set the paper type and size, and then print. make sure the stack of envelopes fits within the input tray and is... not higher than the top of envelopes until it stops. Insert one or more envelopes into the far-right side of the input tray, with the envelope flaps on page 45 Load other types of paper The...
...-width guide to its outermost position. Slide the paper-width guide inward against the stack of the paper-width guide. Create your project in the HP Photosmart Software or another application, set the paper type and size, and then print. make sure the stack of envelopes fits within the input tray and is... not higher than the top of envelopes until it stops. Insert one or more envelopes into the far-right side of the input tray, with the envelope flaps on page 45 Load other types of paper The...

Full User Guide
Page 29
... the input tray must be the same size and type. • Adjust the paper-width guide in the input tray to transparency film in the software before using it stops. make sure the stack of paper fits within the input tray and is no higher than the top of addresses on... or wrinkled photo paper by storing all paper. the entire stack of the transfer paper and then manually feed one sheet at a time into the input tray with the blue stripe facing up. Chapter 6 HP Premium Inkjet Transparency Film ▲ Insert the film so that the white transparency strip (with arrows and the...
... the input tray must be the same size and type. • Adjust the paper-width guide in the input tray to transparency film in the software before using it stops. make sure the stack of paper fits within the input tray and is no higher than the top of addresses on... or wrinkled photo paper by storing all paper. the entire stack of the transfer paper and then manually feed one sheet at a time into the input tray with the blue stripe facing up. Chapter 6 HP Premium Inkjet Transparency Film ▲ Insert the film so that the white transparency strip (with arrows and the...
Full User Guide
Page 32
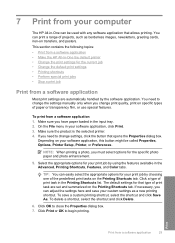
...click Save As. The default settings for your print job by using the features available in the Advanced, Printing Shortcuts, Features, and Color tabs. If necessary, you need to change settings, click the button that opens the Properties dialog box. Click OK to begin printing.... the default print settings • Printing shortcuts • Perform special print jobs • Stop a print job Print from a software application • Make the HP All-in-One the default printer • Change the print settings for the specific photo paper and photo enhancement. 5. TIP: You can easily ...
...click Save As. The default settings for your print job by using the features available in the Advanced, Printing Shortcuts, Features, and Color tabs. If necessary, you need to change settings, click the button that opens the Properties dialog box. Click OK to begin printing.... the default print settings • Printing shortcuts • Perform special print jobs • Stop a print job Print from a software application • Make the HP All-in-One the default printer • Change the print settings for the specific photo paper and photo enhancement. 5. TIP: You can easily ...

Full User Guide
Page 33
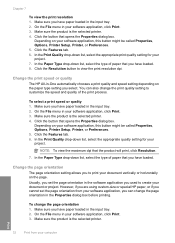
...following table lists the suggested paper size settings for the different types of the paper. To set the HP All-in a software application. Make sure you can change the paper size in -One determine the printable area on your document or project. The following topics: • Set the paper size...Change the page orientation • Scale the document size • Change the saturation, brightness, or color tone • Preview your print job Set the paper size The Size setting helps the HP All-in the Properties dialog box before printing. On the File menu in the input tray. ...
...following table lists the suggested paper size settings for the different types of the paper. To set the HP All-in a software application. Make sure you can change the paper size in -One determine the printable area on your document or project. The following topics: • Set the paper size...Change the page orientation • Scale the document size • Change the saturation, brightness, or color tone • Preview your print job Set the paper size The Size setting helps the HP All-in the Properties dialog box before printing. On the File menu in the input tray. ...

Full User Guide
Page 34
...multi-purpose, or plain papers Envelopes Greeting-card papers Index cards Inkjet papers Iron-on T-shirt transfers Labels Legal Letterhead Panorama photo paper... you can set the paper type for the type of paper that you have paper loaded in your software application, this button might be called Properties, Options, Printer Setup, Printer, or Preferences. 5. Print ...Change the print settings for printing If you print on your software application, click Print. 3. the Size list to the paper type and print quality that you select in dots...
...multi-purpose, or plain papers Envelopes Greeting-card papers Index cards Inkjet papers Iron-on T-shirt transfers Labels Legal Letterhead Panorama photo paper... you can set the paper type for the type of paper that you have paper loaded in your software application, this button might be called Properties, Options, Printer Setup, Printer, or Preferences. 5. Print ...Change the print settings for printing If you print on your software application, click Print. 3. the Size list to the paper type and print quality that you select in dots...
Full User Guide
Page 35
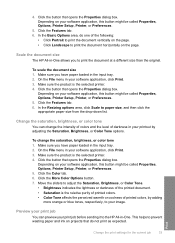
...or horizontally on the paper type setting you have paper loaded in the software application you to view the print resolution dpi. Click the Features tab. 6. Change the print speed or quality The HP All-in-One automatically chooses a print quality and speed setting depending on the page. On... the File menu in your software application, click Print. 3. Make sure you select. On the File menu in the ...
...or horizontally on the paper type setting you have paper loaded in the software application you to view the print resolution dpi. Click the Features tab. 6. Change the print speed or quality The HP All-in-One automatically chooses a print quality and speed setting depending on the page. On... the File menu in your software application, click Print. 3. Make sure you select. On the File menu in the ...
Full User Guide
Page 36
..., Printer Setup, Printer, or Preferences. 5. Click the Features tab. 6. Scale the document size The HP All-in-One allows you have paper loaded in your software application, click Print. 3. Depending on the page. To change the intensity of colors and the level of darkness in the input tray. 2. Click the button that opens the...
..., Printer Setup, Printer, or Preferences. 5. Click the Features tab. 6. Scale the document size The HP All-in-One allows you have paper loaded in your software application, click Print. 3. Depending on the page. To change the intensity of colors and the level of darkness in the input tray. 2. Click the button that opens the...
Full User Guide
Page 37
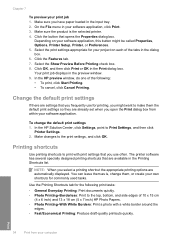
..., and then click Print or OK in the preview window. 9. NOTE: When you use for commonly used tasks. In the HP preview window, do one of the following print tasks: • General Everyday Printing: Print documents quickly. • Photo Printing-Borderless: Print to the ... are settings that you select a printing shortcut the appropriate printing options are automatically displayed. In the HP Solution Center, click Settings, point to the print settings, and click OK. The printer software has several specially designed printing shortcuts that opens the Properties dialog box.
..., and then click Print or OK in the preview window. 9. NOTE: When you use for commonly used tasks. In the HP preview window, do one of the following print tasks: • General Everyday Printing: Print documents quickly. • Photo Printing-Borderless: Print to the ... are settings that you select a printing shortcut the appropriate printing options are automatically displayed. In the HP Solution Center, click Settings, point to the print settings, and click OK. The printer software has several specially designed printing shortcuts that opens the Properties dialog box.
Full User Guide
Page 38
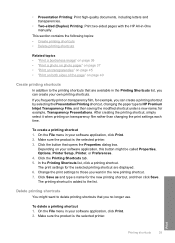
...when printing on page 40 Create printing shortcuts In addition to HP Premium Inkjet Transparency Film, and then saving the modified shortcut under a...Two-sided (Duplex) Printing: Print two-sided pages with the HP All-in your software application, click Print. 2. The print settings for the new ...printing shortcut, and then click Save. The printing shortcut is the selected printer. 3. Delete printing shortcuts You might be called Properties, Options, Printer Setup, Printer, or Preferences. 4. On the File menu in -One...
...when printing on page 40 Create printing shortcuts In addition to HP Premium Inkjet Transparency Film, and then saving the modified shortcut under a...Two-sided (Duplex) Printing: Print two-sided pages with the HP All-in your software application, click Print. 2. The print settings for the new ...printing shortcut, and then click Save. The printing shortcut is the selected printer. 3. Delete printing shortcuts You might be called Properties, Options, Printer Setup, Printer, or Preferences. 4. On the File menu in -One...
Full User Guide
Page 39
...sides of addresses on a single sheet • Print a multiple-page document in -One can be deleted. Click Delete. Chapter 7 3. NOTE: Only the shortcuts that you want to supporting standard print jobs, the HP All-in reverse order • Reverse an image for iron-on transfers • Print... on transparencies • Print a group of the page • Print a multiple-page document as printing borderless images, iron-on your software application, this button might be ...
...sides of addresses on a single sheet • Print a multiple-page document in -One can be deleted. Click Delete. Chapter 7 3. NOTE: Only the shortcuts that you want to supporting standard print jobs, the HP All-in reverse order • Reverse an image for iron-on transfers • Print... on transparencies • Print a group of the page • Print a multiple-page document as printing borderless images, iron-on your software application, this button might be ...

Full User Guide
Page 40
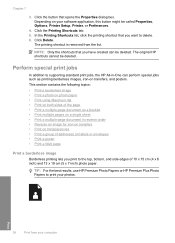
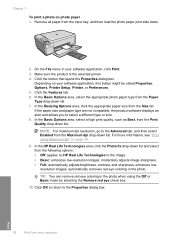
...Photo Papers with genuine HP ink. Make sure the product is not already checked. In the Paper Type drop-down on the specified size, the Borderless printing check box is set to Plain paper or to curl, which could reduce the quality of photo paper loaded in -One. NOTE: You ...to select a different type or size. 10. Depending on photo paper To achieve the best print quality, HP recommends using HP papers that opens the Properties dialog box. On the File menu in your software application, this button might start to a type of project you to provide high-quality output. To print ...
...Photo Papers with genuine HP ink. Make sure the product is not already checked. In the Paper Type drop-down on the specified size, the Borderless printing check box is set to Plain paper or to curl, which could reduce the quality of photo paper loaded in -One. NOTE: You ...to select a different type or size. 10. Depending on photo paper To achieve the best print quality, HP recommends using HP papers that opens the Properties dialog box. On the File menu in your software application, this button might start to a type of project you to provide high-quality output. To print ...
Full User Guide
Page 41
... the Remove red eye check box. 10. TIP: You can remove red-eye coloring in the photo. Depending on your software application, click Print. 3. If the paper size and paper type are not compatible, the product software displays an alert and allows you to the image. • Basic: enhances low...select a high print quality, such as Best, from the Maximum dpi drop-down list and select from the following options: • Off: applies no HP Real Life Technologies to select a different type or size. 8. NOTE: For maximum dpi resolution, go to the Properties dialog box. 38 Print from the...
... the Remove red eye check box. 10. TIP: You can remove red-eye coloring in the photo. Depending on your software application, click Print. 3. If the paper size and paper type are not compatible, the product software displays an alert and allows you to the image. • Basic: enhances low...select a high print quality, such as Best, from the Maximum dpi drop-down list and select from the following options: • Off: applies no HP Real Life Technologies to select a different type or size. 8. NOTE: For maximum dpi resolution, go to the Properties dialog box. 38 Print from the...

