Quick Setup Guide - English
Page 23
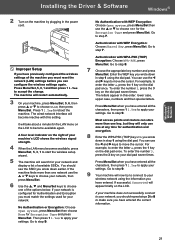
...WEP key you have entered all the characters, then press 1 1.Yes to apply your machine, press Menu/Set, 5, 6, then press a or b to start the wireless setup wizard. 5 The machine will appear briefly on the LCD. Go to enter the letter a, press the 1 key on the dial pad once. Authentication with this.... 3 On your settings. You should repeat steps 3 to 8 to make sure you have entered the correct information. 21 If the machine finds more than one network use the d and c keys to step 7. Go to accept the change. Go to move the cursor. The letters appear in step 1 using the...
...WEP key you have entered all the characters, then press 1 1.Yes to apply your machine, press Menu/Set, 5, 6, then press a or b to start the wireless setup wizard. 5 The machine will appear briefly on the LCD. Go to enter the letter a, press the 1 key on the dial pad once. Authentication with this.... 3 On your settings. You should repeat steps 3 to 8 to make sure you have entered the correct information. 21 If the machine finds more than one network use the d and c keys to step 7. Go to accept the change. Go to move the cursor. The letters appear in step 1 using the...

Quick Setup Guide - English
Page 24
...screen appears, choose your language. 13 The CD-ROM main menu will need to manually configure the IP address, subnet mask and gateway of the Brother CD-ROM. • If you are installed your PC may restart. If your access point does not have DHCP enabled you can print after... your CD-ROM drive. Note • If this window does not appear, use Windows® Explorer to run the setup.exe program from Step 13 to suit your network. Wireless setup is normally enabled as default for details. If the model name screen appears, choose your machine. Close any applications running ...
...screen appears, choose your language. 13 The CD-ROM main menu will need to manually configure the IP address, subnet mask and gateway of the Brother CD-ROM. • If you are installed your PC may restart. If your access point does not have DHCP enabled you can print after... your CD-ROM drive. Note • If this window does not appear, use Windows® Explorer to run the setup.exe program from Step 13 to suit your network. Wireless setup is normally enabled as default for details. If the model name screen appears, choose your machine. Close any applications running ...
Quick Setup Guide - English
Page 37
.... Then press 1 1.Yes to step 7. Go to apply your machine's LCD shows the wireless signal strength. 4 When the LAN menu becomes available, press Menu/Set, 5, 3, 1 to start the wireless setup wizard. 5 The machine will become available again. The letters appear in the power cord. ... dial pad once. Go to your network. Improper Setup If you have previously configured the wireless settings of available SSIDs. Most access points and routers can configure the wireless settings again. Go to step 9. 9 Your machine will only use one network use the d and c keys to step...
.... Then press 1 1.Yes to step 7. Go to apply your machine's LCD shows the wireless signal strength. 4 When the LAN menu becomes available, press Menu/Set, 5, 3, 1 to start the wireless setup wizard. 5 The machine will become available again. The letters appear in the power cord. ... dial pad once. Go to your network. Improper Setup If you have previously configured the wireless settings of available SSIDs. Most access points and routers can configure the wireless settings again. Go to step 9. 9 Your machine will only use one network use the d and c keys to step...

Quick Setup Guide - English
Page 38
...Software Macintosh® 10 Disconnect and then reconnect the power cord to 15 characters long. (For more information on the CD-ROM.) Macintosh® Wireless Network 36 If your access point does not have also connected a USB interface cable to the machine before restarting your Macintosh or if you are...of the Brother Software. You can enter any name up menu in the main screen of the Software User's Guide on network scanning, see Chapter 10 in the Software User's Guide on your Macintosh®. 12 Put the supplied CD-ROM into your Macintosh® in Display Name. Wireless setup is ...
...Software Macintosh® 10 Disconnect and then reconnect the power cord to 15 characters long. (For more information on the CD-ROM.) Macintosh® Wireless Network 36 If your access point does not have also connected a USB interface cable to the machine before restarting your Macintosh or if you are...of the Brother Software. You can enter any name up menu in the main screen of the Software User's Guide on network scanning, see Chapter 10 in the Software User's Guide on your Macintosh®. 12 Put the supplied CD-ROM into your Macintosh® in Display Name. Wireless setup is ...

Network Users Manual - English
Page 8
8 9 10 11 12 Wireless network troubleshooting...7-8 Wireless setup problems ...7-8 Wireless connection problem ...7-9 The wireless network connection is sometimes disabled 7-9 Wireless installation for Windows® Installation using a wireless computer in Infrastructure mode 8-1 For Windows® 98/98SE/Me/2000 Professional/... Windows® systems ...A-3 UNIX®/Linux systems ...A-3 Using the TELNET console to configure the IP address A-4 Using the Brother Web BRAdmin server software for IIS* to configure the IP address A-5 Updating other machines through the network (Windows® ...
8 9 10 11 12 Wireless network troubleshooting...7-8 Wireless setup problems ...7-8 Wireless connection problem ...7-9 The wireless network connection is sometimes disabled 7-9 Wireless installation for Windows® Installation using a wireless computer in Infrastructure mode 8-1 For Windows® 98/98SE/Me/2000 Professional/... Windows® systems ...A-3 UNIX®/Linux systems ...A-3 Using the TELNET console to configure the IP address A-4 Using the Brother Web BRAdmin server software for IIS* to configure the IP address A-5 Updating other machines through the network (Windows® ...

Network Users Manual - English
Page 70
... Restoring the network settings to factory default on page 3-3 7 - 8 You will be changed to wireless LAN automatically or during the course of the setup. Troubleshooting Wireless network troubleshooting Wireless setup problems 7 The Brother print server is not found during setup by the Wireless Device Setup Wizard. 1 Make sure that the machine is powered on, is recommended you are using...
... Restoring the network settings to factory default on page 3-3 7 - 8 You will be changed to wireless LAN automatically or during the course of the setup. Troubleshooting Wireless network troubleshooting Wireless setup problems 7 The Brother print server is not found during setup by the Wireless Device Setup Wizard. 1 Make sure that the machine is powered on, is recommended you are using...

Network Users Manual - English
Page 74
... step 9. If you can temporarily connect with a network cable: Choose I 'm not able to connect my device to a free port on your Brother wireless device directly to my access point with a network cable and then click Next. Go to step 10. 8 8 - 3 If you do not... have a network cable or cannot temporarily connect the Brother wireless device to your access point: Choose I 'm able to temporarily connect my device to my access point with a network cable and then click Next. Wireless installation for Windows® 6 Choose Wireless Setup and Driver Install, and then click Next. 7 ...
... step 9. If you can temporarily connect with a network cable: Choose I 'm not able to connect my device to a free port on your Brother wireless device directly to my access point with a network cable and then click Next. Go to step 10. 8 8 - 3 If you do not... have a network cable or cannot temporarily connect the Brother wireless device to your access point: Choose I 'm able to temporarily connect my device to my access point with a network cable and then click Next. Wireless installation for Windows® 6 Choose Wireless Setup and Driver Install, and then click Next. 7 ...

Network Users Manual - English
Page 81
... of MFL-Pro Suite. 24 When the Brother MFL-Pro Suite Software License Agreement window appears, click Yes if you chose to install the drivers in step 11, return the wireless settings of your machine's LCD represents the wireless signal strength. Click Next. 8 You have completed the wireless setup. Wireless installation for Windows® 21 Using...
... of MFL-Pro Suite. 24 When the Brother MFL-Pro Suite Software License Agreement window appears, click Yes if you chose to install the drivers in step 11, return the wireless settings of your machine's LCD represents the wireless signal strength. Click Next. 8 You have completed the wireless setup. Wireless installation for Windows® 21 Using...

Network Users Manual - English
Page 86
... to step 10. 8 8 - 15 If you temporarily connect your Brother wireless device directly to a free port on your access point: Choose I 'm able to temporarily connect my device to my access point with a network cable and then click Next. Wireless installation for Windows® 6 Choose Wireless Setup and Driver Install, and then click Next. 7 Choose Automatic...
... to step 10. 8 8 - 15 If you temporarily connect your Brother wireless device directly to a free port on your access point: Choose I 'm able to temporarily connect my device to my access point with a network cable and then click Next. Wireless installation for Windows® 6 Choose Wireless Setup and Driver Install, and then click Next. 7 Choose Automatic...

Network Users Manual - English
Page 91
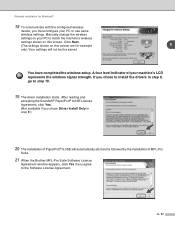
You have completed the wireless setup. After reading and accepting the ScanSoft® PaperPort® 9.0SE License Agreement, click Yes. (Not available if you chose to install the drivers in step 6.) ... is followed by the installation of PaperPort® 9.0SE will restart automatically. After the machine is restarted, check Checked and confirmed., and then click Next. Wireless installation for Windows® 17 Disconnect the network cable between your machine's LCD represents the...
You have completed the wireless setup. After reading and accepting the ScanSoft® PaperPort® 9.0SE License Agreement, click Yes. (Not available if you chose to install the drivers in step 6.) ... is followed by the installation of PaperPort® 9.0SE will restart automatically. After the machine is restarted, check Checked and confirmed., and then click Next. Wireless installation for Windows® 17 Disconnect the network cable between your machine's LCD represents the...

Network Users Manual - English
Page 96
and click Next. 8 Ensure the on-screen message and click Next. 9 Temporary place the machine within a 50 cm/20 inch range from the access point. 8 8 - 25 Wireless installation for Windows® 6 Choose Wireless Setup and Driver Install, and then click Next. 7 Choose I'd like to use the SecureEasySetupTM function of my access point to configure my wireless device.
and click Next. 8 Ensure the on-screen message and click Next. 9 Temporary place the machine within a 50 cm/20 inch range from the access point. 8 8 - 25 Wireless installation for Windows® 6 Choose Wireless Setup and Driver Install, and then click Next. 7 Choose I'd like to use the SecureEasySetupTM function of my access point to configure my wireless device.

Network Users Manual - English
Page 97
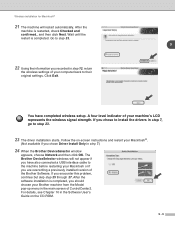
... Error, please try again. 13 Click Next. 14 The configuration is turned on. 12 Press Menu/Set. You have completed the wireless setup. Relocate the machine to set the SecureEasySetupTM mode of your access point. A four level indicator of your access point. 11 Put ...Wireless installation for SecureEasySetup and press OK. Note It will take approximately one minute for LAN and press OK. For MFC-640CW, press Menu/Set, 5, 3, 2 on the LCD to step 15. 8 - 26 For MFC-820CW: Press Menu, ▲ or ▼ for the LAN menu on the control panel. Press ▲ or ▼ for Setup...
... Error, please try again. 13 Click Next. 14 The configuration is turned on. 12 Press Menu/Set. You have completed the wireless setup. Relocate the machine to set the SecureEasySetupTM mode of your access point. A four level indicator of your access point. 11 Put ...Wireless installation for SecureEasySetup and press OK. Note It will take approximately one minute for LAN and press OK. For MFC-640CW, press Menu/Set, 5, 3, 2 on the LCD to step 15. 8 - 26 For MFC-820CW: Press Menu, ▲ or ▼ for the LAN menu on the control panel. Press ▲ or ▼ for Setup...

Network Users Manual - English
Page 103
Click Next. 8 8 - 32 Wireless installation for Windows® 6 Choose Wireless Setup and Driver Install, and then click Next. 7 Choose Automatic (Recommended) and then click Next. 8 Choose I am using a wireless computer, choose This PC has wireless capability, and make sure I 'm not able to connect my device to my access point with a network cable. Click Next. 9 If you are using an access point in infrastructure mode is not checked.
Click Next. 8 8 - 32 Wireless installation for Windows® 6 Choose Wireless Setup and Driver Install, and then click Next. 7 Choose Automatic (Recommended) and then click Next. 8 Choose I am using a wireless computer, choose This PC has wireless capability, and make sure I 'm not able to connect my device to my access point with a network cable. Click Next. 9 If you are using an access point in infrastructure mode is not checked.
Network Users Manual - English
Page 108
...® 9.0SE will not be the same.) You have completed the wireless setup. If you agree to step 19. 19 The driver installation starts. Manually change the wireless settings on your PC to use same wireless settings. Wireless installation for example 8 only. Click Next. (The settings shown on ..., you must configure your machine's LCD represents the wireless signal strength. Your settings will automatically start and is followed by the installation of MFL-Pro Suite. 21 When the Brother MFL-Pro Suite Software License Agreement window appears, click Yes if you chose to install the ...
...® 9.0SE will not be the same.) You have completed the wireless setup. If you agree to step 19. 19 The driver installation starts. Manually change the wireless settings on your PC to use same wireless settings. Wireless installation for example 8 only. Click Next. (The settings shown on ..., you must configure your machine's LCD represents the wireless signal strength. Your settings will automatically start and is followed by the installation of MFL-Pro Suite. 21 When the Brother MFL-Pro Suite Software License Agreement window appears, click Yes if you chose to install the ...

Network Users Manual - English
Page 112
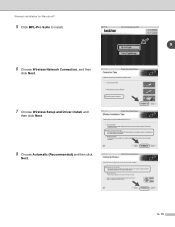
Wireless installation for Macintosh® 5 Click MFL-Pro Suite to install. 6 Choose Wireless Network Connection, and then click Next. 7 Choose Wireless Setup and Driver Install, and then click Next. 8 Choose Automatic (Recommended) and then click Next. 9 9 - 2
Wireless installation for Macintosh® 5 Click MFL-Pro Suite to install. 6 Choose Wireless Network Connection, and then click Next. 7 Choose Wireless Setup and Driver Install, and then click Next. 8 Choose Automatic (Recommended) and then click Next. 9 9 - 2
Network Users Manual - English
Page 119
... your computer back to step 23. 9 22 Using the information you recorded in step 12, return the wireless settings of your Brother machine from the Model pop-up menu in the main screen of ControlCenter2. After the machine is completed. ...Brother Software. Follow the on the CD-ROM. 9 - 9 The Brother DeviceSelector windows will restart automatically. For details, see Chapter 10 in step 7.) 24 When the Brother DeviceSelector window appears, choose Network and then click OK. Wireless installation for Macintosh® 21 The machine will not appear if you have completed wireless setup...
... your computer back to step 23. 9 22 Using the information you recorded in step 12, return the wireless settings of your Brother machine from the Model pop-up menu in the main screen of ControlCenter2. After the machine is completed. ...Brother Software. Follow the on the CD-ROM. 9 - 9 The Brother DeviceSelector windows will restart automatically. For details, see Chapter 10 in step 7.) 24 When the Brother DeviceSelector window appears, choose Network and then click OK. Wireless installation for Macintosh® 21 The machine will not appear if you have completed wireless setup...
Network Users Manual - English
Page 125
Wireless installation for Macintosh® 5 Click MFL-Pro Suite to install. 6 Choose Wireless Network Connection, and then click Next. 7 Choose Wireless Setup and Driver Install, and then click Next. 8 Choose Automatic (Recommended) and then click Next. 9 9 - 15
Wireless installation for Macintosh® 5 Click MFL-Pro Suite to install. 6 Choose Wireless Network Connection, and then click Next. 7 Choose Wireless Setup and Driver Install, and then click Next. 8 Choose Automatic (Recommended) and then click Next. 9 9 - 15

Network Users Manual - English
Page 130
...click Change IP Address and enter the necessary IP address settings for your machine. Wireless installation for available wireless networks. • The control panel settings will be automatically changed to WLAN when the wireless settings are sent to your network. The settings will restart automatically. If you ... is restarted, check Checked and confirmed., and then click Next. After the machine is completed. You have completed the wireless setup. The settings will be sent to your machine. 18 Disconnect the network cable between your machine's LCD represents the...
...click Change IP Address and enter the necessary IP address settings for your machine. Wireless installation for available wireless networks. • The control panel settings will be automatically changed to WLAN when the wireless settings are sent to your network. The settings will restart automatically. If you ... is restarted, check Checked and confirmed., and then click Next. After the machine is completed. You have completed the wireless setup. The settings will be sent to your machine. 18 Disconnect the network cable between your machine's LCD represents the...

Network Users Manual - English
Page 136
Wireless installation for Macintosh® 5 Click MFL-Pro Suite to install. 6 Choose Wireless Network Connection, and then click Next. 7 Choose Wireless Setup and Driver Install, and then click Next. 8 Choose Automatic (Recommended) and then click Next. 9 9 - 26
Wireless installation for Macintosh® 5 Click MFL-Pro Suite to install. 6 Choose Wireless Network Connection, and then click Next. 7 Choose Wireless Setup and Driver Install, and then click Next. 8 Choose Automatic (Recommended) and then click Next. 9 9 - 26
Network Users Manual - English
Page 141
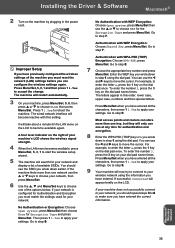
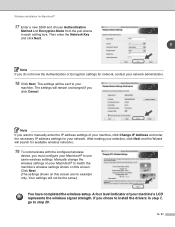
...the Wizard will not be sent to manually enter the IP address settings of your machine's LCD represents the wireless signal strength. A four level indicator of your machine, click Change IP Address and enter the necessary IP...wireless settings shown on this screen. Wireless installation for network, contact your network administrator. 18 Click Next. Click Next. (The settings shown on this screen are for available wireless networks. 19 To communicate with the configured wireless device, you want to your machine. The settings will be the same.) You have completed the wireless setup...
...the Wizard will not be sent to manually enter the IP address settings of your machine's LCD represents the wireless signal strength. A four level indicator of your machine, click Change IP Address and enter the necessary IP...wireless settings shown on this screen. Wireless installation for network, contact your network administrator. 18 Click Next. Click Next. (The settings shown on this screen are for available wireless networks. 19 To communicate with the configured wireless device, you want to your machine. The settings will be the same.) You have completed the wireless setup...


