Users Manual - English
Page 14
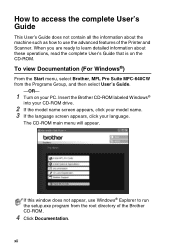
..., read the complete User's Guide that is on your language. To view Documentation (For Windows®) From the Start menu, select Brother, MFL Pro Suite MFC-640CW from the root directory of the Printer and Scanner. xii When you are ready to learn detailed information about the machine such as how... to use Windows® Explorer to run the setup.exe program from the Programs Group, and then select User's Guide. -OR- 1 Turn on the CD-ROM. Insert the Brother CD-ROM labeled Windows® into your CD-ROM drive. 2 If the model name...
..., read the complete User's Guide that is on your language. To view Documentation (For Windows®) From the Start menu, select Brother, MFL Pro Suite MFC-640CW from the root directory of the Printer and Scanner. xii When you are ready to learn detailed information about the machine such as how... to use Windows® Explorer to run the setup.exe program from the Programs Group, and then select User's Guide. -OR- 1 Turn on the CD-ROM. Insert the Brother CD-ROM labeled Windows® into your CD-ROM drive. 2 If the model name...
Users Manual - English
Page 15
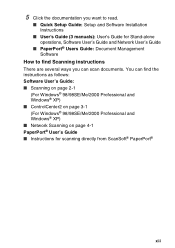
...: Document Management Software How to find Scanning instructions There are several ways you can scan documents. 5 Click the documentation you want to read. ■ Quick Setup Guide: Setup and Software Installation Instructions ■ User's Guide (3 manuals): User's Guide for scanning directly from ScanSoft® PaperPort® xiii
...: Document Management Software How to find Scanning instructions There are several ways you can scan documents. 5 Click the documentation you want to read. ■ Quick Setup Guide: Setup and Software Installation Instructions ■ User's Guide (3 manuals): User's Guide for scanning directly from ScanSoft® PaperPort® xiii
Users Manual - English
Page 16
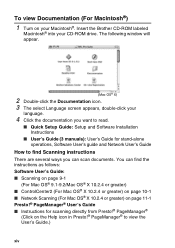
... scan documents. Insert the Brother CD-ROM labeled Macintosh® into your CD-ROM drive. The following window will appear. (Mac OS® X) 2 Double-click the Documentation icon. 3 The select Language screen appears, double-click your language. 4 Click the documentation you want to read. ■ Quick Setup Guide: Setup and Software Installation Instructions...
... scan documents. Insert the Brother CD-ROM labeled Macintosh® into your CD-ROM drive. The following window will appear. (Mac OS® X) 2 Double-click the Documentation icon. 3 The select Language screen appears, double-click your language. 4 Click the documentation you want to read. ■ Quick Setup Guide: Setup and Software Installation Instructions...

Users Manual - English
Page 18
... avoid possible problems 1-18 Fax tones and handshake 1-19 ECM (Error Correction Mode 1-20 Getting started 2-1 Initial Setup 2-1 Setting the Date and Time 2-1 Setting Tone and Pulse dialing mode 2-1 Setting the Station ID 2-2 General Setup 2-3 Setting the Mode Timer 2-3 Setting the Paper Type 2-4 Setting the Paper Size 2-4 Setting the Ring Volume 2-5 Setting...
... avoid possible problems 1-18 Fax tones and handshake 1-19 ECM (Error Correction Mode 1-20 Getting started 2-1 Initial Setup 2-1 Setting the Date and Time 2-1 Setting Tone and Pulse dialing mode 2-1 Setting the Station ID 2-2 General Setup 2-3 Setting the Mode Timer 2-3 Setting the Paper Type 2-4 Setting the Paper Size 2-4 Setting the Ring Volume 2-5 Setting...

Users Manual - English
Page 19
...Turning on Automatic Daylight Savings Time........... 2-10 Setting the LCD Contrast 2-10 3 Setup Send 3-1 How to enter Fax mode 3-1 How to dial 3-1 Manual dialing 3-1 Speed-Dialing 3-2 Search 3-2 Manual and automatic fax Redial 3-2 How to Fax 3-3 Color fax transmission 3-3 Faxing from the ADF 3-3 Faxing from the scanner glass 3-4 Automatic... & White only) ..... 3-14 Delayed Batch Transmission (Black & White only) .. 3-15 Faxing A4 size documents from the scanner glass 3-15 4 Setup Receive 4-1 Basic receiving operations 4-1 Choosing the Receive Mode 4-1 xvii
...Turning on Automatic Daylight Savings Time........... 2-10 Setting the LCD Contrast 2-10 3 Setup Send 3-1 How to enter Fax mode 3-1 How to dial 3-1 Manual dialing 3-1 Speed-Dialing 3-2 Search 3-2 Manual and automatic fax Redial 3-2 How to Fax 3-3 Color fax transmission 3-3 Faxing from the ADF 3-3 Faxing from the scanner glass 3-4 Automatic... & White only) ..... 3-14 Delayed Batch Transmission (Black & White only) .. 3-15 Faxing A4 size documents from the scanner glass 3-15 4 Setup Receive 4-1 Basic receiving operations 4-1 Choosing the Receive Mode 4-1 xvii

Users Manual - English
Page 26
Symbols used special fonts and added some of the machine. Warnings inform you what to do to a related topic. Improper Setup alerts you to devices and operations that are listed in the Table of Contents. You will be able to find information about how the.... Notes tell you how you should respond to a situation that will appear in this Guide Throughout this Guide Thank you for buying a Brother Multi-Function Center (MFC). To make the most of this Guide. Italicized typeface emphasizes an important point or refers you to avoid possible personal injury. Cautions specify ...
Symbols used special fonts and added some of the machine. Warnings inform you what to do to a related topic. Improper Setup alerts you to devices and operations that are listed in the Table of Contents. You will be able to find information about how the.... Notes tell you how you should respond to a situation that will appear in this Guide Throughout this Guide Thank you for buying a Brother Multi-Function Center (MFC). To make the most of this Guide. Italicized typeface emphasizes an important point or refers you to avoid possible personal injury. Cautions specify ...
Users Manual - English
Page 30
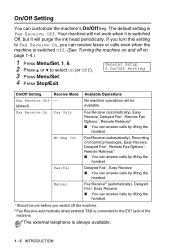
... on and off the machine. 2 Fax Receive automatically when external TAD is connected to select On (or Off). 3 Press Menu/Set. 4 Press Stop/Exit. General Setup 6.On/Off Setting On/Off Setting Receive Mode Available Operations Fax Receive:Off - (default) No machine operations will be set before you can answer calls...
... on and off the machine. 2 Fax Receive automatically when external TAD is connected to select On (or Off). 3 Press Menu/Set. 4 Press Stop/Exit. General Setup 6.On/Off Setting On/Off Setting Receive Mode Available Operations Fax Receive:Off - (default) No machine operations will be set before you can answer calls...
Users Manual - English
Page 46
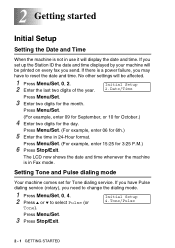
... the Date and Time When the machine is in Fax mode. Initial Setup 2.Date/Time Press Menu/Set. 3 Enter two digits for 3:25 P.M.) 6 Press Stop/Exit. The LCD now shows the date and time whenever the machine is ... mode. 1 Press Menu/Set, 0, 4. 2 Press ▲ or ▼ to reset the date and time. Press Menu/Set. (For example, enter 06 for the day. Initial Setup 4.Tone/Pulse Press Menu/Set. 3 Press Stop/Exit. 2 - 1 GETTING STARTED If there is a power failure, you may have Pulse dialing service (rotary), you send.
... the Date and Time When the machine is in Fax mode. Initial Setup 2.Date/Time Press Menu/Set. 3 Enter two digits for 3:25 P.M.) 6 Press Stop/Exit. The LCD now shows the date and time whenever the machine is ... mode. 1 Press Menu/Set, 0, 4. 2 Press ▲ or ▼ to reset the date and time. Press Menu/Set. (For example, enter 06 for the day. Initial Setup 4.Tone/Pulse Press Menu/Set. 3 Press Stop/Exit. 2 - 1 GETTING STARTED If there is a power failure, you may have Pulse dialing service (rotary), you send.
Users Manual - English
Page 47
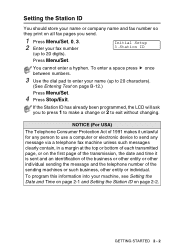
... identification of the business or other entity or other individual sending the message and the telephone number of each transmitted page, or on page 2-2. Initial Setup 3.Station ID Press Menu/Set. ▲ You cannot enter a hyphen. To program this information into your machine, see Setting the Date and Time on page...
... identification of the business or other entity or other individual sending the message and the telephone number of each transmitted page, or on page 2-2. Initial Setup 3.Station ID Press Menu/Set. ▲ You cannot enter a hyphen. To program this information into your machine, see Setting the Date and Time on page...

Users Manual - English
Page 48
Press Menu/Set. 3 Press Stop/Exit. General Setup 1.Mode Timer 2 - 3 GETTING STARTED If you select Off, the machine stays in the mode you used last. 1 Press Menu/Set, 1, 1. 2 Press ▲ or ▼ to Fax mode. General Setup Setting the Mode Timer The machine has four temporary mode keys on the control panel: PhotoCapture, Copy, Fax and Scan. You can change the number of seconds or minutes the machine takes after the last Copy, Scan or PhotoCapture operation before it returns to select 0 Sec, 30 Secs, 1 Min, 2 Mins, 5 Mins or Off.
Press Menu/Set. 3 Press Stop/Exit. General Setup 1.Mode Timer 2 - 3 GETTING STARTED If you select Off, the machine stays in the mode you used last. 1 Press Menu/Set, 1, 1. 2 Press ▲ or ▼ to Fax mode. General Setup Setting the Mode Timer The machine has four temporary mode keys on the control panel: PhotoCapture, Copy, Fax and Scan. You can change the number of seconds or minutes the machine takes after the last Copy, Scan or PhotoCapture operation before it returns to select 0 Sec, 30 Secs, 1 Min, 2 Mins, 5 Mins or Off.
Users Manual - English
Page 49
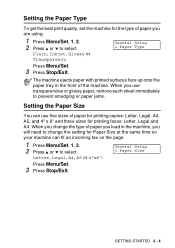
... Type Press Menu/Set. 3 Press Stop/Exit. GETTING STARTED 2 - 4 General Setup 3.Paper Size Press Menu/Set. 3 Press Stop/Exit. When you change the setting for printing faxes: Letter, Legal and A4. Setting the Paper Type To ... on the page. 1 Press Menu/Set, 1, 3. 2 Press ▲ or ▼ to select Letter, Legal, A4, A5 or 4"x6". When you will need to select Plain, Inkjet, Glossy or Transparency. The machine ejects paper with printed surfaces face up onto the paper tray in the machine, you use five sizes of the...
... Type Press Menu/Set. 3 Press Stop/Exit. GETTING STARTED 2 - 4 General Setup 3.Paper Size Press Menu/Set. 3 Press Stop/Exit. When you change the setting for printing faxes: Letter, Legal and A4. Setting the Paper Type To ... on the page. 1 Press Menu/Set, 1, 3. 2 Press ▲ or ▼ to select Letter, Legal, A4, A5 or 4"x6". When you will need to select Plain, Inkjet, Glossy or Transparency. The machine ejects paper with printed surfaces face up onto the paper tray in the machine, you use five sizes of the...

Users Manual - English
Page 55
...Make sure you are having difficulty reading the LCD from your position, try changing the contrast setting for Daylight Savings Time. GETTING STARTED 2 - 10 General Setup 7.LCD Contrast Press Menu/Set. 3 Press Stop/Exit. If you have set the machine to change automatically for improved viewing. 1 Press Menu/Set,... 1, 7. 2 Press ▲ or ▼ to select On (or Off). It will reset itself forward one hour in the Spring and backward one hour in the Date/Time setting. 1 Press Menu/Set, 1, 5. 2 Press ▲ or ▼ to select Light or Dark.
...Make sure you are having difficulty reading the LCD from your position, try changing the contrast setting for Daylight Savings Time. GETTING STARTED 2 - 10 General Setup 7.LCD Contrast Press Menu/Set. 3 Press Stop/Exit. If you have set the machine to change automatically for improved viewing. 1 Press Menu/Set,... 1, 7. 2 Press ▲ or ▼ to select On (or Off). It will reset itself forward one hour in the Spring and backward one hour in the Date/Time setting. 1 Press Menu/Set, 1, 5. 2 Press ▲ or ▼ to select Light or Dark.
Users Manual - English
Page 56
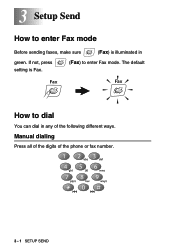
3 Setup Send How to enter Fax mode Before sending faxes, make sure (Fax) is Fax. (Fax) to dial You can dial in green. If not, press setting is illuminated in any of the phone or fax number. 3 - 1 SETUP SEND The default How to enter Fax mode. Manual dialing Press all of the digits of the following different ways.
3 Setup Send How to enter Fax mode Before sending faxes, make sure (Fax) is Fax. (Fax) to dial You can dial in green. If not, press setting is illuminated in any of the phone or fax number. 3 - 1 SETUP SEND The default How to enter Fax mode. Manual dialing Press all of the digits of the following different ways.
Users Manual - English
Page 57
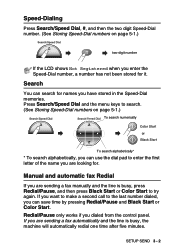
... manually and the line is busy, the machine will automatically redial one time after five minutes. Manual and automatic fax Redial If you are looking for names you can save time by pressing Redial/Pause and Black Start or Color Start. SETUP SEND 3 - 2 Redial/Pause only works if you enter the Speed-Dial... the first letter of the name you are sending a fax automatically and the line is busy, press Redial/Pause, and then press Black Start or Color Start to try again. If you want to make a second call to the last number dialed, you have stored in the Speed-Dial memories.
... manually and the line is busy, the machine will automatically redial one time after five minutes. Manual and automatic fax Redial If you are looking for names you can save time by pressing Redial/Pause and Black Start or Color Start. SETUP SEND 3 - 2 Redial/Pause only works if you enter the Speed-Dial... the first letter of the name you are sending a fax automatically and the line is busy, press Redial/Pause, and then press Black Start or Color Start to try again. If you want to make a second call to the last number dialed, you have stored in the Speed-Dial memories.
Users Manual - English
Page 58
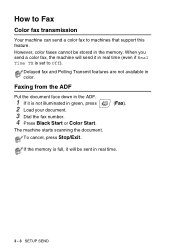
... (even if Real Time TX is not illuminated in green, press 2 Load your document. 3 Dial the fax number. 4 Press Black Start or Color Start. Faxing from the ADF Put the document face down in the memory. If the memory is full, it will send it is set to... that support this feature. Delayed fax and Polling Transmit features are not available in real time. 3 - 3 SETUP SEND However, color faxes cannot be sent in color. To cancel, press Stop/Exit. (Fax). How to Fax Color fax transmission Your machine can send a color fax to Off). The machine starts scanning the document.
... (even if Real Time TX is not illuminated in green, press 2 Load your document. 3 Dial the fax number. 4 Press Black Start or Color Start. Faxing from the ADF Put the document face down in the memory. If the memory is full, it will send it is set to... that support this feature. Delayed fax and Polling Transmit features are not available in real time. 3 - 3 SETUP SEND However, color faxes cannot be sent in color. To cancel, press Stop/Exit. (Fax). How to Fax Color fax transmission Your machine can send a color fax to Off). The machine starts scanning the document.

Users Manual - English
Page 59
...page on the scanner glass. 3 Dial the fax number. To send more than one page at a time. Press Black Start or Color Start. ■ If you press Black Start, the machine starts scanning the first...additional page.) To cancel, press Stop/Exit. ■ If the memory is full and you press Color Start, the machine starts sending. 4 To send a single page, press 2 (or press Black Start again...). The machine starts scanning. (Repeat Steps 4 and 5 for color faxes. Then Press Set Press Menu/Set. Next Page? 1.Yes 2.No(Dial) The machine starts sending ...
...page on the scanner glass. 3 Dial the fax number. To send more than one page at a time. Press Black Start or Color Start. ■ If you press Black Start, the machine starts scanning the first...additional page.) To cancel, press Stop/Exit. ■ If the memory is full and you press Color Start, the machine starts sending. 4 To send a single page, press 2 (or press Black Start again...). The machine starts scanning. (Repeat Steps 4 and 5 for color faxes. Then Press Set Press Menu/Set. Next Page? 1.Yes 2.No(Dial) The machine starts sending ...
Users Manual - English
Page 60
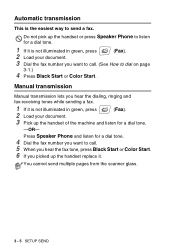
You cannot send multiple pages from the scanner glass. 3 - 5 SETUP SEND Do not pick up the handset or press Speaker Phone to listen for a dial tone. 1 If it is not illuminated in green, press (Fax). 2 ... hear the dialing, ringing and fax-receiving tones while sending a fax. 1 If it is the easiest way to dial on page 3-1.) 4 Press Black Start or Color Start. Press Speaker Phone and listen for a dial tone. 4 Dial the fax number you want to call. 5 When you hear the fax tone, press Black...
You cannot send multiple pages from the scanner glass. 3 - 5 SETUP SEND Do not pick up the handset or press Speaker Phone to listen for a dial tone. 1 If it is not illuminated in green, press (Fax). 2 ... hear the dialing, ringing and fax-receiving tones while sending a fax. 1 If it is the easiest way to dial on page 3-1.) 4 Press Black Start or Color Start. Press Speaker Phone and listen for a dial tone. 4 Dial the fax number you want to call. 5 When you hear the fax tone, press Black...

Users Manual - English
Page 61
... of a fax, press Stop/Exit to cancel the fax. If you will be sent in green, press (Fax). 3 Load your document. 4 Press Black Start or Color Start. SETUP SEND 3 - 6
... of a fax, press Stop/Exit to cancel the fax. If you will be sent in green, press (Fax). 3 Load your document. 4 Press Black Start or Color Start. SETUP SEND 3 - 6

Users Manual - English
Page 62
It automatically chooses the suitable contrast for your document. 3 Press Menu/Set, 2, 2, 1. 4 Press ▲ or ▼ to the Setup Send menu. After each setting is not illuminated in green, press (Fax). Other Settings 1.Yes 2.No -OR- Use Light to the next step. For... very dark, you may want to enter more settings. Contrast If your document is not illuminated in green, press 2 Load your document. Setup Send 1.Contrast Press Menu/Set. 3 - 7 SETUP SEND The LCD will ask if you want to select more settings: 2 Press 1 to change the contrast. Press 2 if you have ...
It automatically chooses the suitable contrast for your document. 3 Press Menu/Set, 2, 2, 1. 4 Press ▲ or ▼ to the Setup Send menu. After each setting is not illuminated in green, press (Fax). Other Settings 1.Yes 2.No -OR- Use Light to the next step. For... very dark, you may want to enter more settings. Contrast If your document is not illuminated in green, press 2 Load your document. Setup Send 1.Contrast Press Menu/Set. 3 - 7 SETUP SEND The LCD will ask if you want to select more settings: 2 Press 1 to change the contrast. Press 2 if you have ...

Users Manual - English
Page 63
... (Fax). Fine and Photo for small print or artwork and transmits slower than Standard resolution. This has the slowest transmission time. Setup Send 2.Fax Resolution Press Menu/Set. Good for color fax, the setting will be drawn back to select the resolution you want , and then press Menu/Set. -OR- Use... when the document is not illuminated in color. Color Standard Fine Suitable for this fax only). You can use the Fax Resolution key to select the setting you select S. In Fax mode , press...
... (Fax). Fine and Photo for small print or artwork and transmits slower than Standard resolution. This has the slowest transmission time. Setup Send 2.Fax Resolution Press Menu/Set. Good for color fax, the setting will be drawn back to select the resolution you want , and then press Menu/Set. -OR- Use... when the document is not illuminated in color. Color Standard Fine Suitable for this fax only). You can use the Fax Resolution key to select the setting you select S. In Fax mode , press...


