Easy Start Guide
Page 1
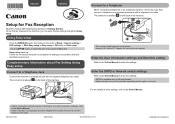
...; CANON INC. 2013 PRINTED IN XXXXXXXX Use the {}[] button to enter the settings. Connect to enter the settings. • DRPD is labeled on -screen instruction to a telephone jack with a telephone line cable. Enter the DRPD or Network switch settings Refer to the Online Manual to a Telephone When connecting a telephone or an answering machine, remove the Cap, then connect a telephone or an answering machine with the supplied telephone line cable. adapter for Fax Reception...
...; CANON INC. 2013 PRINTED IN XXXXXXXX Use the {}[] button to enter the settings. Connect to enter the settings. • DRPD is labeled on -screen instruction to a telephone jack with a telephone line cable. Enter the DRPD or Network switch settings Refer to the Online Manual to a Telephone When connecting a telephone or an answering machine, remove the Cap, then connect a telephone or an answering machine with the supplied telephone line cable. adapter for Fax Reception...
User Manual
Page 8
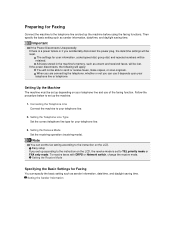
... telephone line type for your telephone line. 2. Easy setup If you set up the machine before using the faxing functions. To receive faxes with DRPD or Network switch, change the receive mode. If the power disconnects, the following will apply: You will be able to your telephone line. 3. Connecting the Telephone Line Connect the machine to send or receive faxes, make copies, or scan originals. Then specify the basic setting such as sender information, date/time...
... telephone line type for your telephone line. 2. Easy setup If you set up the machine before using the faxing functions. To receive faxes with DRPD or Network switch, change the receive mode. If the power disconnects, the following will apply: You will be able to your telephone line. 3. Connecting the Telephone Line Connect the machine to send or receive faxes, make copies, or scan originals. Then specify the basic setting such as sender information, date/time...
User Manual
Page 77
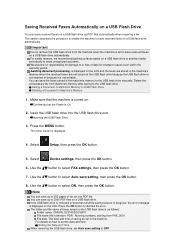
.... Make sure that the Power Is On 2. Insert the USB flash drive into the USB flash drive port. The menu screen is set to save up faxes saved on . Select Setup, then press the OK button. 5. Use the button to avoid unexpected accidents. Note You can save received faxes on the LCD. For details on a USB flash drive as set in progress, the error message is turned on a USB flash drive to another media periodically to select FAX settings, then...
.... Make sure that the Power Is On 2. Insert the USB flash drive into the USB flash drive port. The menu screen is set to save up faxes saved on . Select Setup, then press the OK button. 5. Use the button to avoid unexpected accidents. Note You can save received faxes on the LCD. For details on a USB flash drive as set in progress, the error message is turned on a USB flash drive to another media periodically to select FAX settings, then...

User Manual
Page 95
... time of the document you want to "4999" indicates a document being received. Make sure that the machine is displayed. Use the button to the USB flash drive. A. A transaction number from "0001" to save, then press the OK button. Inserting the USB Flash Drive 3. is turned on the USB flash drive. C. Saving All the Received Documents in the machine's memory, There is displayed. 4. Press the OK button to return to the USB flash drive following the procedure below. 1. Transaction number...
... time of the document you want to "4999" indicates a document being received. Make sure that the machine is displayed. Use the button to the USB flash drive. A. A transaction number from "0001" to save, then press the OK button. Inserting the USB Flash Drive 3. is turned on the USB flash drive. C. Saving All the Received Documents in the machine's memory, There is displayed. 4. Press the OK button to return to the USB flash drive following the procedure below. 1. Transaction number...
User Manual
Page 99
... machine prints GROUP DIAL TELEPHONE NO. Select Yes, then press the OK button. You attempted to print CODED SPEED DIAL TELEPHONE NO. You cannot send a document longer than Telephone number list: The confirmation screen is not color-compatible. "#003" is full. Contact the recipient and have the recipient check that the telephone line is full. Changing Registered Information Memory is also printed if it takes time to...
... machine prints GROUP DIAL TELEPHONE NO. Select Yes, then press the OK button. You attempted to print CODED SPEED DIAL TELEPHONE NO. You cannot send a document longer than Telephone number list: The confirmation screen is not color-compatible. "#003" is full. Contact the recipient and have the recipient check that the telephone line is full. Changing Registered Information Memory is also printed if it takes time to...

Troubleshooting Guide
Page 16
... uneven colors, increase the print quality setting and try printing again. About PictBridge Print Settings Confirm by using the operation panel on the machine. Setting Items Confirm by using the printer driver. Printing Photos in Check 1. If you are incorrect, you print with Easy Setup • Check 2: Make sure that the appropriate print quality is selected referring to End of Job Part of confirming the paper and print quality settings differs depending on the machine. Note When printing from...
... uneven colors, increase the print quality setting and try printing again. About PictBridge Print Settings Confirm by using the operation panel on the machine. Setting Items Confirm by using the printer driver. Printing Photos in Check 1. If you are incorrect, you print with Easy Setup • Check 2: Make sure that the appropriate print quality is selected referring to End of Job Part of confirming the paper and print quality settings differs depending on the machine. Note When printing from...

Troubleshooting Guide
Page 24
... print the faxes in Security control under FAX settings. Replacing an Ink Tank When the machine receives black & white faxes in the machine's memory, if 2-sided is selected for Received documents in the machine's memory. Also, the contents of the fax will not be no automatic switching between Voice and Fax Calls • Check: Is the receive mode set , see Using the Caller ID Service to the machine, check whether a proper message is insufficient to forcibly print a received fax...
... print the faxes in Security control under FAX settings. Replacing an Ink Tank When the machine receives black & white faxes in the machine's memory, if 2-sided is selected for Received documents in the machine's memory. Also, the contents of the fax will not be no automatic switching between Voice and Fax Calls • Check: Is the receive mode set , see Using the Caller ID Service to the machine, check whether a proper message is insufficient to forcibly print a received fax...
Troubleshooting Guide
Page 30
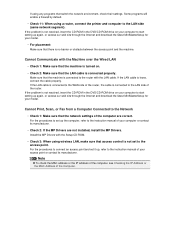
... the instruction manual of the router, the cable is loose, connect the cable properly. If the problem is not resolved, insert the CD-ROM in the DVD/CD-ROM drive on your computer to the router with the LAN cable. Cannot Print, Scan, or Fax from a Computer Connected to the LAN side (same network segment). Install the MP Drivers with the Machine over the Wired LAN • Check 1: Make...
... the instruction manual of the router, the cable is loose, connect the cable properly. If the problem is not resolved, insert the CD-ROM in the DVD/CD-ROM drive on your computer to the router with the LAN cable. Cannot Print, Scan, or Fax from a Computer Connected to the LAN side (same network segment). Install the MP Drivers with the Machine over the Wired LAN • Check 1: Make...

Troubleshooting Guide
Page 31
How to Open the Printer Driver Setup Window Ink Remaining Level Is Not Displayed on Printer Status Monitor of the printer driver. Select Enable bidirectional support in the Ports sheet of the properties dialog box of the Machine Use the printer driver with bidirectional communication.
How to Open the Printer Driver Setup Window Ink Remaining Level Is Not Displayed on Printer Status Monitor of the printer driver. Select Enable bidirectional support in the Ports sheet of the properties dialog box of the Machine Use the printer driver with bidirectional communication.
Troubleshooting Guide
Page 45
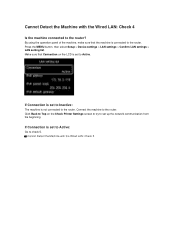
...? By using the operation panel of the machine, make sure that Connection on the Check Printer Settings screen to try to set to the router. If Connection is set to Inactive: The machine is set up the network communication from the beginning. If Connection is set to Active: Go to Top on the LCD is not connected to Active. Press the MENU button, then select Setup > Device settings > LAN settings > Confirm LAN settings > LAN setting list...
...? By using the operation panel of the machine, make sure that Connection on the Check Printer Settings screen to try to set to the router. If Connection is set to Inactive: The machine is set up the network communication from the beginning. If Connection is set to Active: Go to Top on the LCD is not connected to Active. Press the MENU button, then select Setup > Device settings > LAN settings > Confirm LAN settings > LAN setting list...
Troubleshooting Guide
Page 69
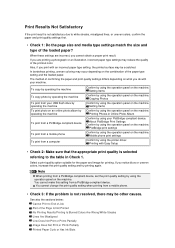
... print quality settings first. • Check 1: Do the page size and media type settings match the size and type of the loaded paper? Printing with an incorrect paper type setting, the printed surface may occur depending on what you notice blurs or uneven colors, increase the print quality setting and try printing again. Setting Items Confirm by using the operation panel on the machine. In borderless printing, uneven coloring may be other causes. Mobile phone print settings Confirm by using the printer driver. Print...
... print quality settings first. • Check 1: Do the page size and media type settings match the size and type of the loaded paper? Printing with an incorrect paper type setting, the printed surface may occur depending on what you notice blurs or uneven colors, increase the print quality setting and try printing again. Setting Items Confirm by using the operation panel on the machine. In borderless printing, uneven coloring may be other causes. Mobile phone print settings Confirm by using the printer driver. Print...
Troubleshooting Guide
Page 93
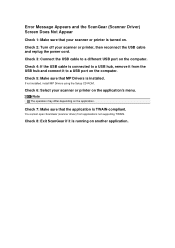
... is installed. Error Message Appears and the ScanGear (Scanner Driver) Screen Does Not Appear Check 1: Make sure that your scanner or printer, then reconnect the USB cable and replug the power cord. Check 2: Turn off your scanner or printer is turned on the computer. Check 3: Connect the USB cable to a USB hub, remove it from applications not supporting TWAIN. Check 8: Exit ScanGear if it to a USB port on . Check 6: Select your scanner or printer on the application. You cannot open ScanGear (scanner driver...
... is installed. Error Message Appears and the ScanGear (Scanner Driver) Screen Does Not Appear Check 1: Make sure that your scanner or printer, then reconnect the USB cable and replug the power cord. Check 2: Turn off your scanner or printer is turned on the computer. Check 3: Connect the USB cable to a USB hub, remove it from applications not supporting TWAIN. Check 8: Exit ScanGear if it to a USB port on . Check 6: Select your scanner or printer on the application. You cannot open ScanGear (scanner driver...
Troubleshooting Guide
Page 98
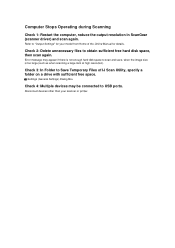
Check 2: Delete unnecessary files to scan and save, when the image size is too large (such as when scanning a large item at high resolution). Error message may be connected to USB ports. Check 3: In Folder to "Output Settings" for details. Refer to Save Temporary Files of the Online Manual for your scanner or printer. Computer Stops Operating during Scanning Check 1: Restart the computer, reduce the output resolution in ScanGear (scanner driver) and scan again. Settings (General Settings) Dialog Box Check 4: Multiple devices...
Check 2: Delete unnecessary files to scan and save, when the image size is too large (such as when scanning a large item at high resolution). Error message may be connected to USB ports. Check 3: In Folder to "Output Settings" for details. Refer to Save Temporary Files of the Online Manual for your scanner or printer. Computer Stops Operating during Scanning Check 1: Restart the computer, reduce the output resolution in ScanGear (scanner driver) and scan again. Settings (General Settings) Dialog Box Check 4: Multiple devices...
Troubleshooting Guide
Page 102
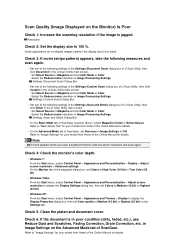
... Start menu, select Control Panel > Appearance and Themes > Display to display the Display Properties dialog box, then set Color Mode to 100 %. Select the Reduce moire checkbox in Image Processing Settings Settings (Custom Scan) Dialog Box • Set one of the following settings in Select Source. Scan Quality (Image Displayed on the Monitor) Is Poor Check 1: Increase the scanning resolution if the image is jagged. Resolution Check 2: Set the display size to Color - Check 5: Clean the platen and document cover.
... Start menu, select Control Panel > Appearance and Themes > Display to display the Display Properties dialog box, then set Color Mode to 100 %. Select the Reduce moire checkbox in Image Processing Settings Settings (Custom Scan) Dialog Box • Set one of the following settings in Select Source. Scan Quality (Image Displayed on the Monitor) Is Poor Check 1: Increase the scanning resolution if the image is jagged. Resolution Check 2: Set the display size to Color - Check 5: Clean the platen and document cover.
Troubleshooting Guide
Page 115
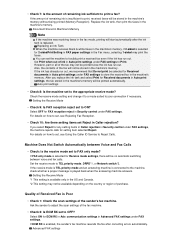
... on how to set, see Using the Caller ID Service to the machine, check whether a proper message is played back when the answering machine answers. Replacing an Ink Tank When the machine receives black & white faxes in the machine's memory, if 2-sided is selected for FAX reception reject in Security control under FAX settings, the machine rejects calls for Received documents in Auto print settings, the fax stored in the Fax menu, selecting 1-sided may print the faxes. Set Print when out...
... on how to set, see Using the Caller ID Service to the machine, check whether a proper message is played back when the answering machine answers. Replacing an Ink Tank When the machine receives black & white faxes in the machine's memory, if 2-sided is selected for FAX reception reject in Security control under FAX settings, the machine rejects calls for Received documents in Auto print settings, the fax stored in the Fax menu, selecting 1-sided may print the faxes. Set Print when out...
Troubleshooting Guide
Page 135
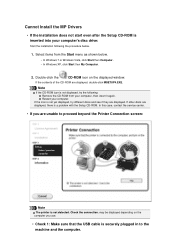
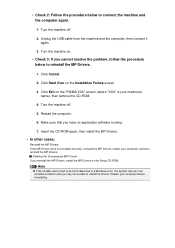
... if they are displayed, double-click MSETUP4.EXE. Restart your computer. Check the connection. Select items from your computer, then insert it again. may be displayed depending on the displayed window. In this case, contact the service center. • If you use. • Check 1: Make sure that the USB cable is securely plugged in to proceed beyond the Printer Connection screen: Note The printer is not...
... if they are displayed, double-click MSETUP4.EXE. Restart your computer. Check the connection. Select items from your computer, then insert it again. may be displayed depending on the displayed window. In this case, contact the service center. • If you use. • Check 1: Make sure that the USB cable is securely plugged in to proceed beyond the Printer Connection screen: Note The printer is not...
Troubleshooting Guide
Page 136
... machine off . 2. If the MP Drivers were not installed correctly, uninstall the MP Drivers, restart your computer before reinstalling. Turn the machine off . 5. Unplug the USB cable from the machine and the computer, then connect it again. 3. Turn the machine on the Setup CD-ROM. Deleting the Unnecessary MP Drivers If you reinstall the MP Drivers, install the MP Drivers on . • Check 3: If you have no application software...
... machine off . 2. If the MP Drivers were not installed correctly, uninstall the MP Drivers, restart your computer before reinstalling. Turn the machine off . 5. Unplug the USB cable from the machine and the computer, then connect it again. 3. Turn the machine on the Setup CD-ROM. Deleting the Unnecessary MP Drivers If you reinstall the MP Drivers, install the MP Drivers on . • Check 3: If you have no application software...
Troubleshooting Guide
Page 142
... FAX settings The telephone line cable with the Hook button pressed. Replacing an Ink Tank Note You can also delete the document from machine's memory to print a fax: Replace the ink tank. If the ink has already run out. Received in memory. Wait for Received documents in Auto print settings under FAX settings to which a group is not color-compatible. The machine converts color documents into black & white data if the recipient's fax machine does not support color faxing. You selected a coded speed dial code to...
... FAX settings The telephone line cable with the Hook button pressed. Replacing an Ink Tank Note You can also delete the document from machine's memory to print a fax: Replace the ink tank. If the ink has already run out. Received in memory. Wait for Received documents in Auto print settings under FAX settings to which a group is not color-compatible. The machine converts color documents into black & white data if the recipient's fax machine does not support color faxing. You selected a coded speed dial code to...
Troubleshooting Guide
Page 147
... the machine is set the correct printer port, then select your machine's name. If the problem is not resolved, reinstall the MP Drivers. • Printing does not start even though the machine is connected to the network with the device. Open the Device Manager on your computer. Double-click Universal Serial Bus controllers then USB Printing Support. If the USB Printing Support Properties screen is not displayed, make sure that the machine is connected to...
... the machine is set the correct printer port, then select your machine's name. If the problem is not resolved, reinstall the MP Drivers. • Printing does not start even though the machine is connected to the network with the device. Open the Device Manager on your computer. Double-click Universal Serial Bus controllers then USB Printing Support. If the USB Printing Support Properties screen is not displayed, make sure that the machine is connected to...
Troubleshooting Guide
Page 150
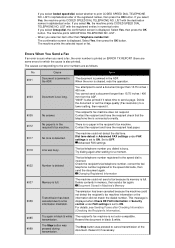
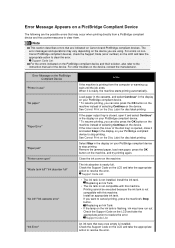
... paper output tray is closed, open " "Waste tank full"/"Ink absorber full" "No ink"/"Ink cassette error" "Ink Error" Action If the machine is opened, close it and select Continue* in the display on your PictBridge compliant device to resolve the error. Install the ink tank. Install an appropriate ink tank. For other troubles on the machine, and try printing again. Remove the jammed paper, load new paper, press the OK button on the device, contact the manufacturer. Support Code List...
... paper output tray is closed, open " "Waste tank full"/"Ink absorber full" "No ink"/"Ink cassette error" "Ink Error" Action If the machine is opened, close it and select Continue* in the display on your PictBridge compliant device to resolve the error. Install the ink tank. Install an appropriate ink tank. For other troubles on the machine, and try printing again. Remove the jammed paper, load new paper, press the OK button on the device, contact the manufacturer. Support Code List...


