Easy Start Guide
Page 1
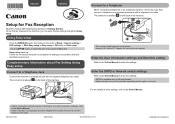
... Refer to the Online Manual to select the item, then press the OK button. QT5-6253-V01 XXXXXXXX © CANON INC. 2013 PRINTED IN XXXXXXXX Complementary Information about Fax Setting Using Easy setup Connect to a Telephone Jack Connect the machine to a Telephone When connecting a telephone or an ...The connector is labeled on the back of Getting Started. For the details of the machine. 1 2 • Do not use the fax features of Setup > Device settings > FAX settings > Start Easy setup or Easy setup > OK button or Start setup. For other settings, refer to the Online Manual. &#...
... Refer to the Online Manual to select the item, then press the OK button. QT5-6253-V01 XXXXXXXX © CANON INC. 2013 PRINTED IN XXXXXXXX Complementary Information about Fax Setting Using Easy setup Connect to a Telephone Jack Connect the machine to a Telephone When connecting a telephone or an ...The connector is labeled on the back of Getting Started. For the details of the machine. 1 2 • Do not use the fax features of Setup > Device settings > FAX settings > Start Easy setup or Easy setup > OK button or Start setup. For other settings, refer to the Online Manual. &#...
User Manual
Page 1
MX920 series Online Manual Faxing English
MX920 series Online Manual Faxing English
User Manual
Page 2
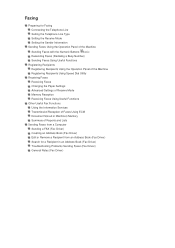
... Telephone Line Setting the Telephone Line Type Setting the Receive Mode Setting the Sender Information Sending Faxes Using the Operation Panel of the Machine Sending Faxes with the Numeric Buttons Basic Resending Faxes (Redialing a Busy Number) Sending Faxes Using Useful Functions Registering Recipients Registering Recipients Using the Operation Panel of the Machine Registering Recipients...
... Telephone Line Setting the Telephone Line Type Setting the Receive Mode Setting the Sender Information Sending Faxes Using the Operation Panel of the Machine Sending Faxes with the Numeric Buttons Basic Resending Faxes (Redialing a Busy Number) Sending Faxes Using Useful Functions Registering Recipients Registering Recipients Using the Operation Panel of the Machine Registering Recipients...

User Manual
Page 3
Sending Faxes Using the Operation Panel of the Machine Sending Faxes with the Numeric Buttons Basic Resending Faxes (Redialing a Busy Number) Sending Faxes Using Useful Functions
Sending Faxes Using the Operation Panel of the Machine Sending Faxes with the Numeric Buttons Basic Resending Faxes (Redialing a Busy Number) Sending Faxes Using Useful Functions

User Manual
Page 5
Receiving Faxes Receiving Faxes Changing the Paper Settings Advanced Settings of Receive Mode Memory Reception Receiving Faxes Using Useful Functions
Receiving Faxes Receiving Faxes Changing the Paper Settings Advanced Settings of Receive Mode Memory Reception Receiving Faxes Using Useful Functions

User Manual
Page 6
Other Useful Fax Functions Using the Information Services Transmission/Reception of Faxes Using ECM Document Stored in Machine's Memory Summary of Reports and Lists
Other Useful Fax Functions Using the Information Services Transmission/Reception of Faxes Using ECM Document Stored in Machine's Memory Summary of Reports and Lists

User Manual
Page 7
Sending Faxes from a Computer Sending a FAX (Fax Driver) Basic Creating an Address Book (Fax Driver) Edit or Remove a Recipient from an Address Book (Fax Driver) Search for a Recipient in an Address Book (Fax Driver) Troubleshooting Problems Sending Faxes (Fax Driver) General Notes (Fax Driver)
Sending Faxes from a Computer Sending a FAX (Fax Driver) Basic Creating an Address Book (Fax Driver) Edit or Remove a Recipient from an Address Book (Fax Driver) Search for a Recipient in an Address Book (Fax Driver) Troubleshooting Problems Sending Faxes (Fax Driver) General Notes (Fax Driver)
User Manual
Page 8
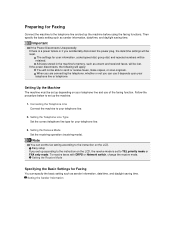
...dial, and rejected numbers will be set up the machine. 1. Connecting the Telephone Line Connect the machine to TEL priority mode or FAX only mode. Setting the Receive Mode Specifying the Basic Settings for your telephone line or telephone. Follow the procedure below to the instruction ...a power failure or if you can specify the basic setting such as sender information, date/time, and daylight saving time. To receive faxes with DRPD or Network switch, change the receive mode. When you are connecting the telephone, whether or not you accidentally disconnect the power ...
...dial, and rejected numbers will be set up the machine. 1. Connecting the Telephone Line Connect the machine to TEL priority mode or FAX only mode. Setting the Receive Mode Specifying the Basic Settings for your telephone line or telephone. Follow the procedure below to the instruction ...a power failure or if you can specify the basic setting such as sender information, date/time, and daylight saving time. To receive faxes with DRPD or Network switch, change the receive mode. When you are connecting the telephone, whether or not you accidentally disconnect the power ...
User Manual
Page 9
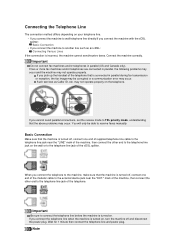
... jack near the "LINE" mark of the machine, then connect the other end to receive faxes manually. Important Do not connect fax machines and/or telephones in parallel during fax transmission or reception, the fax image may occur. may not operate properly. When you pick up the handset of the modular...end of the telephone. Wait for 1 minute then connect the telephone line and power plug. Connect the machine correctly. If two or more fax machines and/or telephones are connected in parallel, the following problems may occur and the machine may not operate properly on the telephone. If you...
... jack near the "LINE" mark of the machine, then connect the other end to receive faxes manually. Important Do not connect fax machines and/or telephones in parallel during fax transmission or reception, the fax image may occur. may not operate properly. When you pick up the handset of the modular...end of the telephone. Wait for 1 minute then connect the telephone line and power plug. Connect the machine correctly. If two or more fax machines and/or telephones are connected in parallel, the following problems may occur and the machine may not operate properly on the telephone. If you...

User Manual
Page 12
For xDSL or ISDN connections, contact the telephone company or service provider to select FAX settings, then press the OK button. Make sure that the Power Is On 2. Press the ...USER'S DATA LIST to select Telephone line type, then press the OK button. Press the FAX button to return to select FAX user settings, then press the OK button. Confirming that the machine is pulse dialing. button to the... Fax standby screen. button to select a telephone line type, then press the OK button. Use the...
For xDSL or ISDN connections, contact the telephone company or service provider to select FAX settings, then press the OK button. Make sure that the Power Is On 2. Press the ...USER'S DATA LIST to select Telephone line type, then press the OK button. Press the FAX button to return to select FAX user settings, then press the OK button. Confirming that the machine is pulse dialing. button to the... Fax standby screen. button to select a telephone line type, then press the OK button. Use the...
User Manual
Page 13
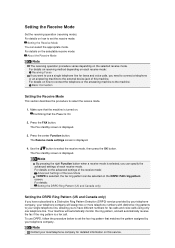
...Contact your single telephone line, allowing you can select the appropriate mode. Use the button to use DRPD, follow the procedure below to set the fax ring pattern that the Power Is On 2. Note By pressing the right Function button when a receive mode is selected, you to a Distinctive ... to the machine: Basic Connection Setting the Receive Mode This section describes the procedure to the external device jack of this service. The Fax standby screen is turned on how to set the receive mode: Setting the Receive Mode You can specify the advanced settings of Receive Mode...
...Contact your single telephone line, allowing you can select the appropriate mode. Use the button to use DRPD, follow the procedure below to set the fax ring pattern that the Power Is On 2. Note By pressing the right Function button when a receive mode is selected, you to a Distinctive ... to the machine: Basic Connection Setting the Receive Mode This section describes the procedure to the external device jack of this service. The Fax standby screen is turned on how to set the receive mode: Setting the Receive Mode You can specify the advanced settings of Receive Mode...
User Manual
Page 14
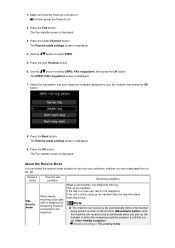
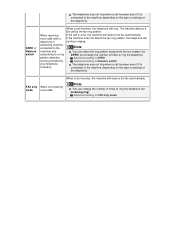
...whether you pick up when a call incomes (Manual/auto switch). Press the Back button. About the Receive Mode You can receive a fax automatically without the handset being picked up the handset or when the answering machine answers a call is displayed. 3. The Receive mode settings ...screen is displayed. Select the ring pattern that is a fax (User-friendly reception). The Fax standby screen is displayed. 4. If the call is turned on the telephone. Advanced setting in TEL priority mode Confirming that ...
...whether you pick up when a call incomes (Manual/auto switch). Press the Back button. About the Receive Mode You can receive a fax automatically without the handset being picked up the handset or when the answering machine answers a call is displayed. 3. The Receive mode settings ...screen is displayed. Select the ring pattern that is a fax (User-friendly reception). The Fax standby screen is displayed. 4. If the call is turned on the telephone. Advanced setting in TEL priority mode Confirming that ...
User Manual
Page 15
...receiving voice calls (with a telephone or answering machine connected to the machine) and subscribing to a ring pattern detection service provided by the fax ring pattern. The machine detects a fax call by your telephone company: When a call incomes, the telephone will continue ringing. If the machine does not detect the...times to ring the telephone (for DRPD) and change the number of times to ring the telephone. Advanced setting in DRPD Advanced setting in FAX only mode The telephone may not ring when a call incomes even if it is connected to the machine, depending on the type or ...
...receiving voice calls (with a telephone or answering machine connected to the machine) and subscribing to a ring pattern detection service provided by the fax ring pattern. The machine detects a fax call by your telephone company: When a call incomes, the telephone will continue ringing. If the machine does not detect the...times to ring the telephone (for DRPD) and change the number of times to ring the telephone. Advanced setting in DRPD Advanced setting in FAX only mode The telephone may not ring when a call incomes even if it is connected to the machine, depending on the type or ...
User Manual
Page 16
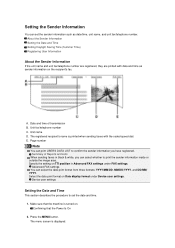
... such as sender information on TTI position in black & white, you have registered. Confirming that the machine is displayed. Summary of transmission B. Advanced FAX settings You can set the date and time. 1. Make sure that the Power Is On 2. A. Unit name D. Select the date print format... on . Press the MENU button. Date and time of Reports and Lists When sending faxes in Advanced FAX settings under Device user settings. Setting the Sender Information You can select the date print format from three formats: YYYY/MM/DD, MM...
... such as sender information on TTI position in black & white, you have registered. Confirming that the machine is displayed. Summary of transmission B. Advanced FAX settings You can set the date and time. 1. Make sure that the Power Is On 2. A. Unit name D. Select the date print format... on . Press the MENU button. Date and time of Reports and Lists When sending faxes in Advanced FAX settings under Device user settings. Setting the Sender Information You can select the date print format from three formats: YYYY/MM/DD, MM...

User Manual
Page 17
... at certain periods of the year. 8. Select Setup, then press the OK button. Use the button to the Fax standby screen. Enter only the last two digits of the year. Press the FAX button to return to select Date/time setting, then press the OK button. 7. Make sure that daylight saving time...
... at certain periods of the year. 8. Select Setup, then press the OK button. Use the button to the Fax standby screen. Enter only the last two digits of the year. Press the FAX button to return to select Date/time setting, then press the OK button. 7. Make sure that daylight saving time...
User Manual
Page 19
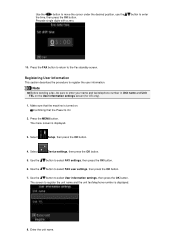
... settings, then press the OK button. 7. Registering User Information This section describes the procedure to select FAX settings, then press the OK button. 6. Use the button to register the user information. Enter the unit name. Use the button to enter 10. Confirming ... screen is turned on the User information settings screen (for US only). 1. Press the MENU button. Precede single digits with a zero. Note Before sending a fax, be sure to enter your name and fax/telephone number in Unit name and Unit TEL on . Select Device settings, then press the OK button. 5. Press the...
... settings, then press the OK button. 7. Registering User Information This section describes the procedure to select FAX settings, then press the OK button. 6. Use the button to register the user information. Enter the unit name. Use the button to enter 10. Confirming ... screen is turned on the User information settings screen (for US only). 1. Press the MENU button. Precede single digits with a zero. Note Before sending a fax, be sure to enter your name and fax/telephone number in Unit name and Unit TEL on . Select Device settings, then press the OK button. 5. Press the...
User Manual
Page 20
...or delete characters: Entering Numbers, Letters, and Symbols 10. 1. The screen to 24 characters, including spaces. Enter the unit fax/telephone number. 4. Press the left Function button. Note You can enter the fax/telephone number up to enter the number is displayed. 3. Note You can enter the name up to Unit TEL.... 2. Press the FAX button to return to finalize registration. 11. Use the button to move the cursor to 20 digits, including spaces. The screen to Unit name. 2. ...
...or delete characters: Entering Numbers, Letters, and Symbols 10. 1. The screen to 24 characters, including spaces. Enter the unit fax/telephone number. 4. Press the left Function button. Note You can enter the fax/telephone number up to enter the number is displayed. 3. Note You can enter the name up to Unit TEL.... 2. Press the FAX button to return to finalize registration. 11. Use the button to move the cursor to 20 digits, including spaces. The screen to Unit name. 2. ...

User Manual
Page 21
Sending Faxes Using the Operation Panel of the Machine Sending Faxes with the Numeric Buttons Basic Resending Faxes (Redialing a Busy Number) Sending Faxes Using Useful Functions
Sending Faxes Using the Operation Panel of the Machine Sending Faxes with the Numeric Buttons Basic Resending Faxes (Redialing a Busy Number) Sending Faxes Using Useful Functions
User Manual
Page 22
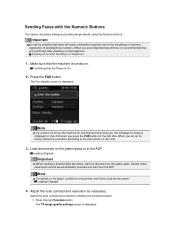
...recipients due to the misdialing or incorrect registration of document, and how to the instructions on the types, conditions of fax/telephone numbers. Press the FAX button. Load documents on the telephone. Press the right Function button. Confirming that the machine is displayed on the ...is displayed. Important It may be automatically scanned and sent from the ADF. Adjust the scan contrast and resolution as necessary. The Fax standby screen is displayed. Loading Originals Important When sending a double-sided document, load the document on the LCD when you send ...
...recipients due to the misdialing or incorrect registration of document, and how to the instructions on the types, conditions of fax/telephone numbers. Press the FAX button. Load documents on the telephone. Press the right Function button. Confirming that the machine is displayed on the ...is displayed. Important It may be automatically scanned and sent from the ADF. Adjust the scan contrast and resolution as necessary. The Fax standby screen is displayed. Loading Originals Important When sending a double-sided document, load the document on the LCD when you send ...
User Manual
Page 23
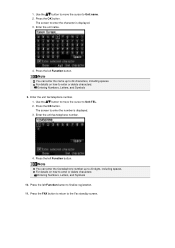
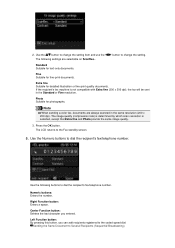
... (Sequential Broadcasting) Right Function button: Enters a space. 2. button to change the setting item and use the The following buttons to the Fax standby screen. 5. Photo Suitable for text-only documents. Press the OK button. Numeric buttons: Enters the number. Sending the Same Document to... button to the coded speed dial. Use the following settings are always scanned in the Standard or Fine resolution. If the recipient's fax machine is selected, except that Extra fine and Photo provide the same image quality. 3. Center Function button: Deletes the last character ...
... (Sequential Broadcasting) Right Function button: Enters a space. 2. button to change the setting item and use the The following buttons to the Fax standby screen. 5. Photo Suitable for text-only documents. Press the OK button. Numeric buttons: Enters the number. Sending the Same Document to... button to the coded speed dial. Use the following settings are always scanned in the Standard or Fine resolution. If the recipient's fax machine is selected, except that Extra fine and Photo provide the same image quality. 3. Center Function button: Deletes the last character ...


