Easy Start Guide
Page 1
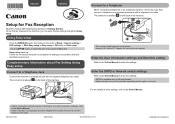
... duplexer. • Users in the order of the machine. The connector is shown in Europe: If you can enter the fax settings through the Easy setup. adapter for Fax Reception Read this figure. For the details of other connection methods, refer to the Online Manual. • Users in this manual after... settings in US and Canada. • Network switch may not be sure it is labeled on the region or country. QT5-6253-V01 XXXXXXXX © CANON INC. 2013 PRINTED IN XXXXXXXX
... duplexer. • Users in the order of the machine. The connector is shown in Europe: If you can enter the fax settings through the Easy setup. adapter for Fax Reception Read this figure. For the details of other connection methods, refer to the Online Manual. • Users in this manual after... settings in US and Canada. • Network switch may not be sure it is labeled on the region or country. QT5-6253-V01 XXXXXXXX © CANON INC. 2013 PRINTED IN XXXXXXXX
User Manual
Page 8
... retained. Important If the Power Disconnects Unexpectedly: If there is a power failure or if you set up the machine before using the faxing functions. Easy setup If you accidentally disconnect the power plug, the date/time settings will be set up depending on the LCD, the receive mode is set up...
... retained. Important If the Power Disconnects Unexpectedly: If there is a power failure or if you set up the machine before using the faxing functions. Easy setup If you accidentally disconnect the power plug, the date/time settings will be set up depending on the LCD, the receive mode is set up...

User Manual
Page 12
... your telephone line type is tone dialing. 9. For xDSL or ISDN connections, contact the telephone company or service provider to confirm your telephone line. Select Setup, then press the OK button. 4. Setting the Telephone Line Type Before using your machine, make sure you are unsure of Reports and Lists 1. If you...
... your telephone line type is tone dialing. 9. For xDSL or ISDN connections, contact the telephone company or service provider to confirm your telephone line. Select Setup, then press the OK button. 4. Setting the Telephone Line Type Before using your machine, make sure you are unsure of Reports and Lists 1. If you...

User Manual
Page 17
... available depending on . You need to change the time by default. Confirming that shifts the clock time forward at certain periods of the year. Select Setup, then press the OK button. 4. Press the OK button. 9. Setting Daylight Saving Time (Summer Time) Some countries adopt the daylight saving time (summer...and time. button to enter Enter the date and time in 24-hour format. Press the MENU button. Set the date and time. Select Setup, then press the OK button. Make sure that daylight saving time (summer time) begins and ends. The menu screen is turned on the ...
... available depending on . You need to change the time by default. Confirming that shifts the clock time forward at certain periods of the year. Select Setup, then press the OK button. 4. Press the OK button. 9. Setting Daylight Saving Time (Summer Time) Some countries adopt the daylight saving time (summer...and time. button to enter Enter the date and time in 24-hour format. Press the MENU button. Set the date and time. Select Setup, then press the OK button. Make sure that daylight saving time (summer time) begins and ends. The menu screen is turned on the ...
User Manual
Page 19
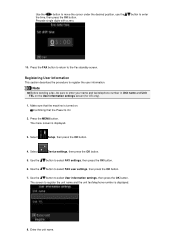
... button. 7. Registering User Information This section describes the procedure to enter your name and fax/telephone number in Unit name and Unit TEL on . Select Setup, then press the OK button. 4. Enter the unit name. Note Before sending a fax, be sure to register the user information. Precede single digits with a zero...
... button. 7. Registering User Information This section describes the procedure to enter your name and fax/telephone number in Unit name and Unit TEL on . Select Setup, then press the OK button. 4. Enter the unit name. Note Before sending a fax, be sure to register the user information. Precede single digits with a zero...
User Manual
Page 22
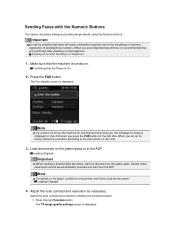
... the procedure below. 1. Press the right Function button. Note If you have not set up the machine for sending/receiving faxes yet, the message for setup is turned on the platen glass.
... the procedure below. 1. Press the right Function button. Note If you have not set up the machine for sending/receiving faxes yet, the message for setup is turned on the platen glass.
User Manual
Page 36
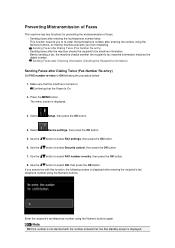
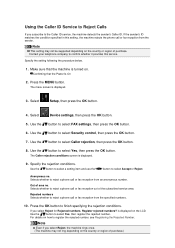
... buttons, so that the machine prevents you from misdialing. Note If the number is not identical with this function, the following the procedure below. 1. Select Setup, then press the OK button. 4. Use the button to select Security control, then press the OK button. 7. Confirming that the machine is turned on. Use...
... buttons, so that the machine prevents you from misdialing. Note If the number is not identical with this function, the following the procedure below. 1. Select Setup, then press the OK button. 4. Use the button to select Security control, then press the OK button. 7. Confirming that the machine is turned on. Use...

User Manual
Page 37
... OK button. 6. Sending Faxes after Speaking on . Select Device settings, then press the OK button. 5. Use the button to ON following the procedure below. Select Setup, then press the OK button. 4.
... OK button. 6. Sending Faxes after Speaking on . Select Device settings, then press the OK button. 5. Use the button to ON following the procedure below. Select Setup, then press the OK button. 4.
User Manual
Page 52
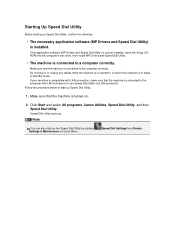
If the application software (MP Drivers and Speed Dial Utility) is not yet installed, insert the Setup CDROM into the computer's disc drive, then install MP Drivers and Speed Dial Utility. • The machine is connected to use Speed Dial Utility via ... not plug in or unplug any cables while the machine is in operation, or when the computer is installed. Click Start and select All programs, Canon Utilities, Speed Dial Utility, and then Speed Dial Utility. Speed Dial Utility starts up Speed Dial Utility. 1. Starting Up Speed Dial Utility Before starting up...
If the application software (MP Drivers and Speed Dial Utility) is not yet installed, insert the Setup CDROM into the computer's disc drive, then install MP Drivers and Speed Dial Utility. • The machine is connected to use Speed Dial Utility via ... not plug in or unplug any cables while the machine is in operation, or when the computer is installed. Click Start and select All programs, Canon Utilities, Speed Dial Utility, and then Speed Dial Utility. Speed Dial Utility starts up Speed Dial Utility. 1. Starting Up Speed Dial Utility Before starting up...
User Manual
Page 64
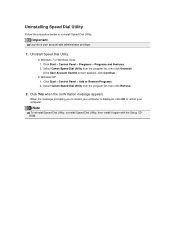
Click Yes when the confirmation message appears. When the message prompting you to restart your computer. Select Canon Speed Dial Utility from the program list, then click Uninstall. Important Log into a user account with the Setup CDROM. Uninstall Speed Dial Utility. • In Windows 7 or Windows Vista: 1. Uninstalling Speed Dial Utility Follow the...
Click Yes when the confirmation message appears. When the message prompting you to restart your computer. Select Canon Speed Dial Utility from the program list, then click Uninstall. Important Log into a user account with the Setup CDROM. Uninstall Speed Dial Utility. • In Windows 7 or Windows Vista: 1. Uninstalling Speed Dial Utility Follow the...
User Manual
Page 77
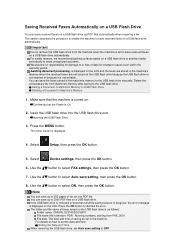
... for whatever reason even within the warranty period. The folder and file name of saving as one PDF file. Inserting the USB Flash Drive 3. Select Setup, then press the OK button. 5. Note You can save up faxes saved on a USB flash drive to another media periodically to save up to dismiss...
... for whatever reason even within the warranty period. The folder and file name of saving as one PDF file. Inserting the USB Flash Drive 3. Select Setup, then press the OK button. 5. Note You can save up faxes saved on a USB flash drive to another media periodically to save up to dismiss...
User Manual
Page 80
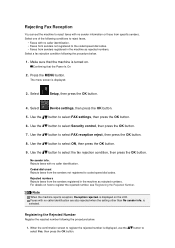
... press the OK button. Use the button to select Security control, then press the OK button. 7. Note When the machine rejects reception, Reception rejected. Select Setup, then press the OK button. 4. Use the button to select FAX settings, then press the OK button. 6. Use the button to is displayed. 3. Rejecting Fax...
... press the OK button. Use the button to select Security control, then press the OK button. 7. Note When the machine rejects reception, Reception rejected. Select Setup, then press the OK button. 4. Use the button to select FAX settings, then press the OK button. 6. Use the button to is displayed. 3. Rejecting Fax...
User Manual
Page 83
... rejects the phone call or fax reception out of purchase.) Confirming that the machine is displayed on the country or region of area no . Select Setup, then press the OK button. 4. Rejected numbers Selects whether to reject a phone call or fax reception from the specified numbers. 10. Anonymous no . Use the...
... rejects the phone call or fax reception out of purchase.) Confirming that the machine is displayed on the country or region of area no . Select Setup, then press the OK button. 4. Rejected numbers Selects whether to reject a phone call or fax reception from the specified numbers. 10. Anonymous no . Use the...
User Manual
Page 105
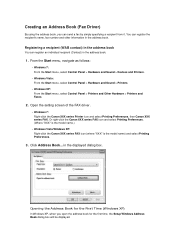
... series FAX icon and select Printing Preferences. (Where "XXX" is the model name.) • Windows Vista/Windows XP: Right-click the Canon XXX series FAX icon (where "XXX" is the model name) and select Printing Preferences. 3. Creating an Address Book (Fax Driver) By using the address book,... you open the address book for the first time, the Setup Windows Address Book dialog box will be displayed. in the address book. Opening the Address Book for the First Time (Windows XP) In Windows XP...
... series FAX icon and select Printing Preferences. (Where "XXX" is the model name.) • Windows Vista/Windows XP: Right-click the Canon XXX series FAX icon (where "XXX" is the model name) and select Printing Preferences. 3. Creating an Address Book (Fax Driver) By using the address book,... you open the address book for the first time, the Setup Windows Address Book dialog box will be displayed. in the address book. Opening the Address Book for the First Time (Windows XP) In Windows XP...
Troubleshooting Guide
Page 13
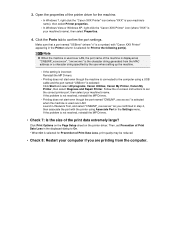
...On. * When On is your computer if you confirmed in step 4, then associate the port with "Canon XXX Printer" appearing in the Settings menu. Click Print Options on the Page Setup sheet on -screen instructions to set Prevention of Print Data Loss in the displayed dialog to the computer using... Associate Port in the Printer column is selected for the machine. • In Windows 7, right-click the "Canon XXX Printer" icon (where "XXX"...
...On. * When On is your computer if you confirmed in step 4, then associate the port with "Canon XXX Printer" appearing in the Settings menu. Click Print Options on the Page Setup sheet on -screen instructions to set Prevention of Print Data Loss in the displayed dialog to the computer using... Associate Port in the Printer column is selected for the machine. • In Windows 7, right-click the "Canon XXX Printer" icon (where "XXX"...
Troubleshooting Guide
Page 16
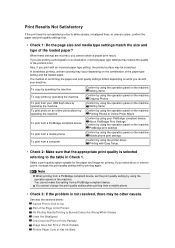
If you are incorrect, you print with Easy Setup • Check 2: Make sure that the appropriate print quality is selected referring to the table in Online Photo Album Confirm by using the operation panel ...
If you are incorrect, you print with Easy Setup • Check 2: Make sure that the appropriate print quality is selected referring to the table in Online Photo Album Confirm by using the operation panel ...
Troubleshooting Guide
Page 30
... the latest MiniMasterSetup for your access point or contact its manufacturer. • Check 2: If the MP Drivers are correct. Install the MP Drivers with the Setup CD-ROM. • Check 3: When using wireless LAN, make sure that the machine is not resolved, insert the CD-ROM in the DVD/CD-ROM...
... the latest MiniMasterSetup for your access point or contact its manufacturer. • Check 2: If the MP Drivers are correct. Install the MP Drivers with the Setup CD-ROM. • Check 3: When using wireless LAN, make sure that the machine is not resolved, insert the CD-ROM in the DVD/CD-ROM...

Troubleshooting Guide
Page 31
Ink Remaining Level Is Not Displayed on Printer Status Monitor of the printer driver. How to Open the Printer Driver Setup Window Select Enable bidirectional support in the Ports sheet of the properties dialog box of the Machine Use the printer driver with bidirectional communication.
Ink Remaining Level Is Not Displayed on Printer Status Monitor of the printer driver. How to Open the Printer Driver Setup Window Select Enable bidirectional support in the Ports sheet of the properties dialog box of the Machine Use the printer driver with bidirectional communication.
Troubleshooting Guide
Page 33
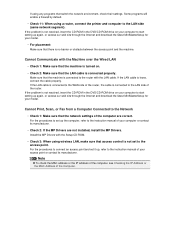
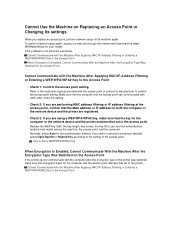
.../WPA2 key, make sure that encryption types for the computer and the access point matches that set to the access point. To perform network setup again, access our web site through the Internet and download the latest MiniMasterSetup for the authentication method. Make sure that the computer and the ... After Applying MAC/IP Address Filtering or Entering a WEP/WPA/WPA2 Key to the Access Point If you replace an access point, perform network setup of the machine again. Cannot Communicate with the Machine After Applying MAC/IP Address Filtering or Entering a WEP/WPA/WPA2 Key to use, and...
.../WPA2 key, make sure that encryption types for the computer and the access point matches that set to the access point. To perform network setup again, access our web site through the Internet and download the latest MiniMasterSetup for the authentication method. Make sure that the computer and the ... After Applying MAC/IP Address Filtering or Entering a WEP/WPA/WPA2 Key to the Access Point If you replace an access point, perform network setup of the machine again. Cannot Communicate with the Machine After Applying MAC/IP Address Filtering or Entering a WEP/WPA/WPA2 Key to use, and...
Troubleshooting Guide
Page 39
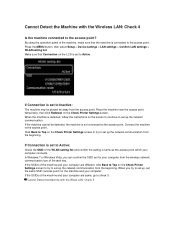
... access point. Cannot Detect the Machine with the Wireless LAN: Check 4 Is the machine connected to the access point. Press the MENU button, then select Setup > Device settings > LAN settings > Confirm LAN settings > WLAN setting list. If Connection is set the same SSID (access point) for your computer are same, go...
... access point. Cannot Detect the Machine with the Wireless LAN: Check 4 Is the machine connected to the access point. Press the MENU button, then select Setup > Device settings > LAN settings > Confirm LAN settings > WLAN setting list. If Connection is set the same SSID (access point) for your computer are same, go...


