User Manual
Page 64
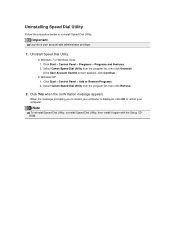
...Control Panel > Programs > Programs and Features. 2. Click Yes when the confirmation message appears. Select Canon Speed Dial Utility from the program list, then click Uninstall. Select Canon Speed Dial Utility from the program list, then click Remove. 2. Note To reinstall Speed Dial Utility...to uninstall Speed Dial Utility. If the User Account Control screen appears, click Continue. • In Windows XP: 1. Uninstall Speed Dial Utility. • In Windows 7 or Windows Vista: 1. Important Log into a user account with the Setup CDROM. Uninstalling Speed Dial Utility Follow ...
...Control Panel > Programs > Programs and Features. 2. Click Yes when the confirmation message appears. Select Canon Speed Dial Utility from the program list, then click Uninstall. Select Canon Speed Dial Utility from the program list, then click Remove. 2. Note To reinstall Speed Dial Utility...to uninstall Speed Dial Utility. If the User Account Control screen appears, click Continue. • In Windows XP: 1. Uninstall Speed Dial Utility. • In Windows 7 or Windows Vista: 1. Important Log into a user account with the Setup CDROM. Uninstalling Speed Dial Utility Follow ...
User Manual
Page 100
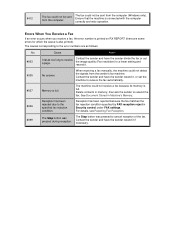
... button was pressed to the error numbers are some errors for which the cause is full. The fax could not be sent from the computer (Windows only). For details, see Rejecting Fax Reception. Contact the sender and have the sender divide the fax or set the machine to receive the fax...
... button was pressed to the error numbers are some errors for which the cause is full. The fax could not be sent from the computer (Windows only). For details, see Rejecting Fax Reception. Contact the sender and have the sender divide the fax or set the machine to receive the fax...
User Manual
Page 102
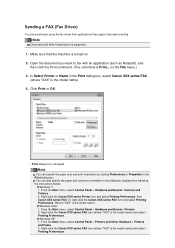
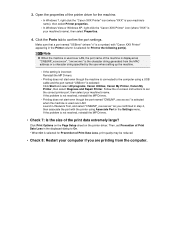
...From the Start menu, select Control Panel > Printers and Other Hardware > Printers and Faxes. 2. Right-click the Canon XXX series FAX icon (where "XXX" is the model name.) Windows Vista: 1. Click Print or OK. * Print dialog box in Notepad Note You can specify the paper size and ...print orientation by following the instructions below: Windows 7: 1. From the Start menu, select Control Panel > Hardware and Sound > Devices and Printers. 2. Make sure that support document printing. on . 2. Right-click the Canon XXX series FAX icon (where "XXX" is the model name)...
...From the Start menu, select Control Panel > Printers and Other Hardware > Printers and Faxes. 2. Right-click the Canon XXX series FAX icon (where "XXX" is the model name.) Windows Vista: 1. Click Print or OK. * Print dialog box in Notepad Note You can specify the paper size and ...print orientation by following the instructions below: Windows 7: 1. From the Start menu, select Control Panel > Hardware and Sound > Devices and Printers. 2. Make sure that support document printing. on . 2. Right-click the Canon XXX series FAX icon (where "XXX" is the model name)...
User Manual
Page 105
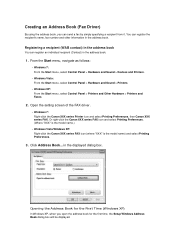
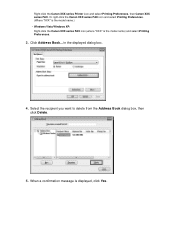
...the address book. Open the setting screen of the FAX driver. • Windows 7: Right-click the Canon XXX series Printer icon and select Printing Preferences, then Canon XXX series FAX. Opening the Address Book for the first time, the Setup Windows Address Book dialog box will be displayed. Or right-click the... series FAX icon and select Printing Preferences. (Where "XXX" is the model name.) • Windows Vista/Windows XP: Right-click the Canon XXX series FAX icon (where "XXX" is the model name) and select Printing Preferences. 3. You can register an individual recipient (Contact) in the...
...the address book. Open the setting screen of the FAX driver. • Windows 7: Right-click the Canon XXX series Printer icon and select Printing Preferences, then Canon XXX series FAX. Opening the Address Book for the first time, the Setup Windows Address Book dialog box will be displayed. Or right-click the... series FAX icon and select Printing Preferences. (Where "XXX" is the model name.) • Windows Vista/Windows XP: Right-click the Canon XXX series FAX icon (where "XXX" is the model name) and select Printing Preferences. 3. You can register an individual recipient (Contact) in the...
User Manual
Page 106
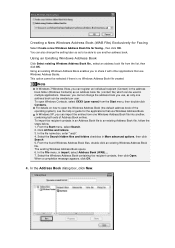
...the operating system), see the help or guide for faxing., then click OK. However, you cannot change the setting later so as only one Windows Address Book file into another address book. Click All files and folders. 3. Select the Search hidden files and folders checkbox in import, select Address... dialog box, click New. You can also change the address book you to an existing Address Book file, follow the steps below. 1. The existing Windows Address Book opens. 6. In the file name box, enter ".wab". 4. In the File menu, in More advanced options, then click Search. 5. To...
...the operating system), see the help or guide for faxing., then click OK. However, you cannot change the setting later so as only one Windows Address Book file into another address book. Click All files and folders. 3. Select the Search hidden files and folders checkbox in import, select Address... dialog box, click New. You can also change the address book you to an existing Address Book file, follow the steps below. 1. The existing Windows Address Book opens. 6. In the file name box, enter ".wab". 4. In the File menu, in More advanced options, then click Search. 5. To...

User Manual
Page 107
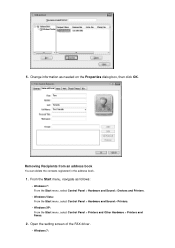
The recipient's name will be printed at the top of the contact in the Name and E-mail tab (Name tab when using Windows XP) on the Send FAX dialog box after entering the recipient. button on the Properties dialog box. Enter the First, Middle, and Last of the ...
The recipient's name will be printed at the top of the contact in the Name and E-mail tab (Name tab when using Windows XP) on the Send FAX dialog box after entering the recipient. button on the Properties dialog box. Enter the First, Middle, and Last of the ...

User Manual
Page 108
... line access number is "0" and the fax number is "XXX-XXXX", enter "0XXX-XXXX".) Related Topic Edit or Remove a Recipient from Windows XP to Windows Vista, the address book you upgrade from an Address Book (Fax Driver) Search for a Recipient in an Address Book (Fax Driver) Double...-click the ".wab" file. The address book will be reflected in Windows Vista. From the Start menu, select XXXX (user name), then double-click AppData > Roaming > Canon > MP5 to a new address book. 1. From the Start menu, select Control Panel > Appearance and Personalization ...
... line access number is "0" and the fax number is "XXX-XXXX", enter "0XXX-XXXX".) Related Topic Edit or Remove a Recipient from Windows XP to Windows Vista, the address book you upgrade from an Address Book (Fax Driver) Search for a Recipient in an Address Book (Fax Driver) Double...-click the ".wab" file. The address book will be reflected in Windows Vista. From the Start menu, select XXXX (user name), then double-click AppData > Roaming > Canon > MP5 to a new address book. 1. From the Start menu, select Control Panel > Appearance and Personalization ...
User Manual
Page 109
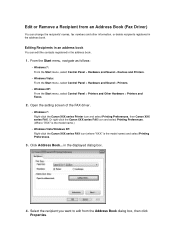
... delete recipients registered in the displayed dialog box. 4. Or right-click the Canon XXX series FAX icon and select Printing Preferences. (Where "XXX" is the model name.) • Windows Vista/Windows XP: Right-click the Canon XXX series FAX icon (where "XXX" is the model name) and select...Click Address Book... in the address book. Open the setting screen of the FAX driver. • Windows 7: Right-click the Canon XXX series Printer icon and select Printing Preferences, then Canon XXX series FAX. Edit or Remove a Recipient from the Address Book dialog box, then click Properties.
... delete recipients registered in the displayed dialog box. 4. Or right-click the Canon XXX series FAX icon and select Printing Preferences. (Where "XXX" is the model name.) • Windows Vista/Windows XP: Right-click the Canon XXX series FAX icon (where "XXX" is the model name) and select...Click Address Book... in the address book. Open the setting screen of the FAX driver. • Windows 7: Right-click the Canon XXX series Printer icon and select Printing Preferences, then Canon XXX series FAX. Edit or Remove a Recipient from the Address Book dialog box, then click Properties.
User Manual
Page 110
... the Start menu, select Control Panel > Hardware and Sound > Devices and Printers. • Windows Vista: From the Start menu, select Control Panel > Hardware and Sound > Printers. • Windows XP: From the Start menu, select Control Panel > Printers and Other Hardware > Printers and Faxes. 2. Open the setting... screen of the FAX driver. • Windows 7: From the Start menu, navigate as needed on the Properties dialog box, then click OK. Removing Recipients from an address book You can...
... the Start menu, select Control Panel > Hardware and Sound > Devices and Printers. • Windows Vista: From the Start menu, select Control Panel > Hardware and Sound > Printers. • Windows XP: From the Start menu, select Control Panel > Printers and Other Hardware > Printers and Faxes. 2. Open the setting... screen of the FAX driver. • Windows 7: From the Start menu, navigate as needed on the Properties dialog box, then click OK. Removing Recipients from an address book You can...
User Manual
Page 111
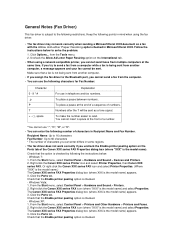
in the displayed dialog box. 4. Or right-click the Canon XXX series FAX icon and select Printing Preferences. (Where "XXX" is the model name.) • Windows Vista/Windows XP: Right-click the Canon XXX series FAX icon (where "XXX" is displayed, click Yes. When a confirmation message is the model name) and select Printing Preferences. 3. Click Address Book... Right-click the Canon XXX series Printer icon and select Printing Preferences, then Canon XXX series FAX. Select the recipient you want to delete from the Address Book dialog box, then click Delete. 5.
in the displayed dialog box. 4. Or right-click the Canon XXX series FAX icon and select Printing Preferences. (Where "XXX" is the model name.) • Windows Vista/Windows XP: Right-click the Canon XXX series FAX icon (where "XXX" is displayed, click Yes. When a confirmation message is the model name) and select Printing Preferences. 3. Click Address Book... Right-click the Canon XXX series Printer icon and select Printing Preferences, then Canon XXX series FAX. Select the recipient you want to delete from the Address Book dialog box, then click Delete. 5.
User Manual
Page 116
...Recipient Name: Up to 16 characters Fax Number: Up to 60 characters * The number of numbers. Windows 7: 1. From the Start menu, select Control Panel > Hardware and Sound > Printers. 2. Right-click the Canon XXX series FAX icon (where "XXX" is the model name) and select Properties. Click the Ports... tab. Right-click the Canon XXX series FAX icon (where "XXX" is the model name) and select Properties. If you cannot send faxes from the Tools menu. 2. Click the Ports tab. Windows Vista: 1. Click the Ports tab. You cannot insert a ...
...Recipient Name: Up to 16 characters Fax Number: Up to 60 characters * The number of numbers. Windows 7: 1. From the Start menu, select Control Panel > Hardware and Sound > Printers. 2. Right-click the Canon XXX series FAX icon (where "XXX" is the model name) and select Properties. Click the Ports... tab. Right-click the Canon XXX series FAX icon (where "XXX" is the model name) and select Properties. If you cannot send faxes from the Tools menu. 2. Click the Ports tab. Windows Vista: 1. Click the Ports tab. You cannot insert a ...
Troubleshooting Guide
Page 12
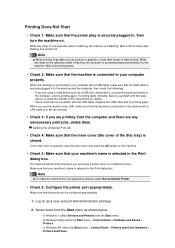
... To make sure that the USB cable is initializing. Select items from the Start menu. • In Windows Vista, select the Start menu > Control Panel > Hardware and Sound > Printers. • In Windows XP, select the Start menu > Control Panel > Printers and Other Hardware > Printers and Faxes. The ... properly if you use the machine over LAN, make the machine the one selected by default, select Set as shown below. • In Windows 7, select Devices and Printers from the Start menu as Default Printer. • Check 6: Configure the printer port appropriately. Make sure that your...
... To make sure that the USB cable is initializing. Select items from the Start menu. • In Windows Vista, select the Start menu > Control Panel > Hardware and Sound > Printers. • In Windows XP, select the Start menu > Control Panel > Printers and Other Hardware > Printers and Faxes. The ... properly if you use the machine over LAN, make the machine the one selected by default, select Set as shown below. • In Windows 7, select Devices and Printers from the Start menu as Default Printer. • Check 6: Configure the printer port appropriately. Make sure that your...
Troubleshooting Guide
Page 13
...is a number) with the printer using a USB cable and the port named "USBnnn" is selected: Click Start and select All programs, Canon Utilities, Canon My Printer, Canon My Printer, then select Diagnose and Repair Printer. Click the Ports tab to On. * When On is your machine's name), then ...properties of the printer driver for the machine. • In Windows 7, right-click the "Canon XXX Printer" icon (where "XXX" is your machine's name), then select Printer properties. • In Windows Vista or Windows XP, right-click the "Canon XXX Printer" icon (where "XXX" is selected for Print ...
...is a number) with the printer using a USB cable and the port named "USBnnn" is selected: Click Start and select All programs, Canon Utilities, Canon My Printer, Canon My Printer, then select Diagnose and Repair Printer. Click the Ports tab to On. * When On is your machine's name), then ...properties of the printer driver for the machine. • In Windows 7, right-click the "Canon XXX Printer" icon (where "XXX" is your machine's name), then select Printer properties. • In Windows Vista or Windows XP, right-click the "Canon XXX Printer" icon (where "XXX" is selected for Print ...

Troubleshooting Guide
Page 31
How to Open the Printer Driver Setup Window Select Enable bidirectional support in the Ports sheet of the properties dialog box of the Machine Use the printer driver with bidirectional communication. Ink Remaining Level Is Not Displayed on Printer Status Monitor of the printer driver.
How to Open the Printer Driver Setup Window Select Enable bidirectional support in the Ports sheet of the properties dialog box of the Machine Use the printer driver with bidirectional communication. Ink Remaining Level Is Not Displayed on Printer Status Monitor of the printer driver.
Troubleshooting Guide
Page 39
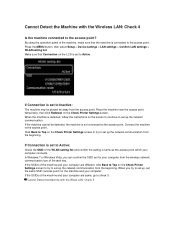
... of the machine and your computer. If Connection is set up the network communication from the wireless network communication icon of the task tray. In Windows 7 or Windows Vista, you try to set to Inactive: The machine may be detected, the machine is connected to check 5. Cannot Detect the Machine with the...
... of the machine and your computer. If Connection is set up the network communication from the wireless network communication icon of the task tray. In Windows 7 or Windows Vista, you try to set to Inactive: The machine may be detected, the machine is connected to check 5. Cannot Detect the Machine with the...

Troubleshooting Guide
Page 59
...Check 3: If you use the machine over LAN, make the machine the one selected by default, select Set as shown below. • In Windows 7, select Devices and Printers from the Start menu as Default Printer. • Check 6: Configure the printer port appropriately. Replace the USB cable and... properly. Make sure that the machine is initializing. Select items from the Start menu. • In Windows Vista, select the Start menu > Control Panel > Hardware and Sound > Printers. • In Windows XP, select the Start menu > Control Panel > Printers and Other Hardware > Printers and Faxes. Note...
...Check 3: If you use the machine over LAN, make the machine the one selected by default, select Set as shown below. • In Windows 7, select Devices and Printers from the Start menu as Default Printer. • Check 6: Configure the printer port appropriately. Replace the USB cable and... properly. Make sure that the machine is initializing. Select items from the Start menu. • In Windows Vista, select the Start menu > Control Panel > Hardware and Sound > Printers. • In Windows XP, select the Start menu > Control Panel > Printers and Other Hardware > Printers and Faxes. Note...

Troubleshooting Guide
Page 60
...where "n" is selected: Click Start and select All programs, Canon Utilities, Canon My Printer, Canon My Printer, then select Diagnose and Repair Printer. Open the properties of the printer driver for the machine. • In Windows 7, right-click the "Canon XXX Printer" icon (where "XXX" is your machine's ...name), then select Printer properties. • In Windows Vista or Windows XP, right-click the "Canon XXX Printer" icon (where "XXX" is not resolved, ...
...where "n" is selected: Click Start and select All programs, Canon Utilities, Canon My Printer, Canon My Printer, then select Diagnose and Repair Printer. Open the properties of the printer driver for the machine. • In Windows 7, right-click the "Canon XXX Printer" icon (where "XXX" is your machine's ...name), then select Printer properties. • In Windows Vista or Windows XP, right-click the "Canon XXX Printer" icon (where "XXX" is not resolved, ...
Troubleshooting Guide
Page 65
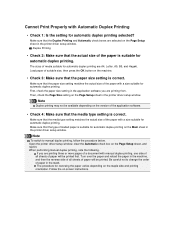
...To switch to change the order of paper will be available depending on the Page Setup sheet, and reprint. Open the printer driver setup window, clear the Automatic check box on the version of the paper with Automatic Duplex Printing • Check 1: Is the setting for automatic duplex...suitable for automatic duplex printing. The sizes of paper will be printed first. First, check the paper size setting in the printer driver setup window. Note Duplex printing may not be printed. When performing manual duplex printing, note the following. Follow the on the Main sheet in the ...
...To switch to change the order of paper will be available depending on the Page Setup sheet, and reprint. Open the printer driver setup window, clear the Automatic check box on the version of the paper with Automatic Duplex Printing • Check 1: Is the setting for automatic duplex...suitable for automatic duplex printing. The sizes of paper will be printed first. First, check the paper size setting in the printer driver setup window. Note Duplex printing may not be printed. When performing manual duplex printing, note the following. Follow the on the Main sheet in the ...
Troubleshooting Guide
Page 72
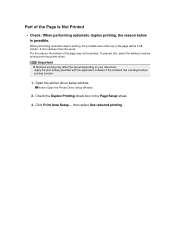
...Printed • Check: When performing automatic duplex printing, the reason below is possible. Part of the page will be printed. Open the printer driver setup window. Check the Duplex Printing check box in the Page Setup sheet. 3. Important Reduced printing may not be 0.08 inches / 2 mm narrower than the ...usual. For this , select the setting to Open the Printer Driver Setup Window 2. Click Print Area Setup..., then select Use reduced printing. How to reduce printing from the printer driver.
...Printed • Check: When performing automatic duplex printing, the reason below is possible. Part of the page will be printed. Open the printer driver setup window. Check the Duplex Printing check box in the Page Setup sheet. 3. Important Reduced printing may not be 0.08 inches / 2 mm narrower than the ...usual. For this , select the setting to Open the Printer Driver Setup Window 2. Click Print Area Setup..., then select Use reduced printing. How to reduce printing from the printer driver.
Troubleshooting Guide
Page 81
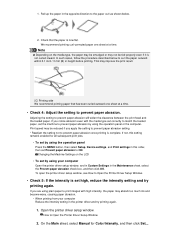
... and try printing again. 1. If you apply the setting to prevent paper abrasion setting. * Readjust the setting not to Open the Printer Driver Setup Window. • Check 5: If the intensity is complete. On the Main sheet, select Manual for all subsequent print jobs. • To set by... outward within 0.1 inch / 3 mm (B) in this setting remains enabled for Color/Intensity, and then click Set.... Open the printer driver setup window. How to prevent paper abrasion will widen the clearance between the print head and the loaded paper. In such cases, follow the procedure described below...
... and try printing again. 1. If you apply the setting to prevent paper abrasion setting. * Readjust the setting not to Open the Printer Driver Setup Window. • Check 5: If the intensity is complete. On the Main sheet, select Manual for all subsequent print jobs. • To set by... outward within 0.1 inch / 3 mm (B) in this setting remains enabled for Color/Intensity, and then click Set.... Open the printer driver setup window. How to prevent paper abrasion will widen the clearance between the print head and the loaded paper. In such cases, follow the procedure described below...


