
Troubleshooting Guide
Page 8
Problems with the Machine The Machine Cannot Be Powered On Cannot Connect to Computer with a USB Cable Properly Cannot Communicate with the Machine with USB Connection LCD Cannot Be Seen At All An Unintended Language Is Displayed on the LCD Print Head Holder Does Not Move to the Position for Replacing Printer Status Monitor Is Not Displayed If the Output Tray Extension Comes Off Problems with Bluetooth Communication
Problems with the Machine The Machine Cannot Be Powered On Cannot Connect to Computer with a USB Cable Properly Cannot Communicate with the Machine with USB Connection LCD Cannot Be Seen At All An Unintended Language Is Displayed on the LCD Print Head Holder Does Not Move to the Position for Replacing Printer Status Monitor Is Not Displayed If the Output Tray Extension Comes Off Problems with Bluetooth Communication

Troubleshooting Guide
Page 18
...Code List • Check 2: Is the orange tape or protective film remaining? If the orange tape is not resolved after performing the Print Head Cleaning twice: Perform the Print Head Deep Cleaning. If the problem is not empty. Contact the service center. Check the Support Code on the LCD and take the appropriate... hole is not resolved after 24 hours. Make sure that all of the protective film is peeled off , do not unplug it from the print head nozzles. Print the Nozzle Check Pattern to resolve the error. Ink Is Not Ejected • Check 1: Has the ink run out? When you turn off...
...Code List • Check 2: Is the orange tape or protective film remaining? If the orange tape is not resolved after performing the Print Head Cleaning twice: Perform the Print Head Deep Cleaning. If the problem is not empty. Contact the service center. Check the Support Code on the LCD and take the appropriate... hole is not resolved after 24 hours. Make sure that all of the protective film is peeled off , do not unplug it from the print head nozzles. Print the Nozzle Check Pattern to resolve the error. Ink Is Not Ejected • Check 1: Has the ink run out? When you turn off...

Troubleshooting Guide
Page 66
...machine may appear to dry. • Check 4: Has the machine been printing continuously for a long time, the print head or other parts around it may pause temporarily. If the printing still does not resume, interrupt your print session at a convenient time and turn the machine off for at a line...amount of ink continuously on plain paper, the machine may overheat. As printing large data such as photos or graphics takes time for a while without operation. Never touch the print head or nearby components. Copying/Printing Stops Before It Is Completed • Check 1: Is the inner cover ...
...machine may appear to dry. • Check 4: Has the machine been printing continuously for a long time, the print head or other parts around it may pause temporarily. If the printing still does not resume, interrupt your print session at a convenient time and turn the machine off for at a line...amount of ink continuously on plain paper, the machine may overheat. As printing large data such as photos or graphics takes time for a while without operation. Never touch the print head or nearby components. Copying/Printing Stops Before It Is Completed • Check 1: Is the inner cover ...

Troubleshooting Guide
Page 74
... in (B), pull the orange tape and remove it from the print head nozzles. If the problem is not resolved after performing the Print Head Deep Cleaning twice: If Print Head Deep Cleaning does not resolve the problem, the print head may be damaged. Replace the ink tank if the ink has...you turn off and the Y-shape air hole is not resolved after 24 hours. Refer to When Printing Becomes Faint or Colors Are Incorrect for the Nozzle Check Pattern printing, Print Head Cleaning, and Print Head Deep Cleaning. • If the Nozzle Check Pattern is left as in (A). Contact the service ...
... in (B), pull the orange tape and remove it from the print head nozzles. If the problem is not resolved after performing the Print Head Deep Cleaning twice: If Print Head Deep Cleaning does not resolve the problem, the print head may be damaged. Replace the ink tank if the ink has...you turn off and the Y-shape air hole is not resolved after 24 hours. Refer to When Printing Becomes Faint or Colors Are Incorrect for the Nozzle Check Pattern printing, Print Head Cleaning, and Print Head Deep Cleaning. • If the Nozzle Check Pattern is left as in (A). Contact the service ...

Troubleshooting Guide
Page 76
... Print Head Alignment. Aligning the Print Head Note If the problem is not resolved after performing the Print Head Alignment, perform Print Head Alignment manually referring to Aligning the Print Head Manually. • Check 3: Increase the print quality and try printing again. Increasing the print quality on the operation panel of the machine or in the printer driver may improve the print result. If printed...
... Print Head Alignment. Aligning the Print Head Note If the problem is not resolved after performing the Print Head Alignment, perform Print Head Alignment manually referring to Aligning the Print Head Manually. • Check 3: Increase the print quality and try printing again. Increasing the print quality on the operation panel of the machine or in the printer driver may improve the print result. If printed...
Troubleshooting Guide
Page 81
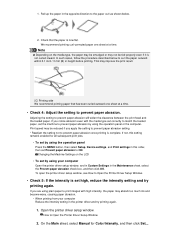
...If not, this setting remains enabled for Color/Intensity, and then click Set.... How to prevent paper abrasion will widen the clearance between the print head and the loaded paper. If you apply the setting to prevent paper abrasion setting. * Readjust the setting not to prevent paper abrasion once... printing is set Prevent paper abrasion to Open the Printer Driver Setup Window. • Check 5: If the intensity is complete. If you are using ...
...If not, this setting remains enabled for Color/Intensity, and then click Set.... How to prevent paper abrasion will widen the clearance between the print head and the loaded paper. If you apply the setting to prevent paper abrasion setting. * Readjust the setting not to prevent paper abrasion once... printing is set Prevent paper abrasion to Open the Printer Driver Setup Window. • Check 5: If the intensity is complete. If you are using ...

Troubleshooting Guide
Page 86
... machine and perform another Print Head Deep Cleaning after performing the Print Head Cleaning twice: Perform the Print Head Deep Cleaning. Print Results Not Satisfactory • Check 2: Print the Nozzle Check Pattern and perform any necessary maintenance operations such as Print Head Cleaning. If the problem is not resolved after performing the Print Head Deep Cleaning twice: If Print Head Deep Cleaning does not...
... machine and perform another Print Head Deep Cleaning after performing the Print Head Cleaning twice: Perform the Print Head Deep Cleaning. Print Results Not Satisfactory • Check 2: Print the Nozzle Check Pattern and perform any necessary maintenance operations such as Print Head Cleaning. If the problem is not resolved after performing the Print Head Deep Cleaning twice: If Print Head Deep Cleaning does not...

Troubleshooting Guide
Page 87
Aligning the Print Head Note If the problem is not resolved after performing the Print Head Alignment, perform Print Head Alignment manually referring to Aligning the Print Head Manually. • Check 3: Perform Print Head Alignment.
Aligning the Print Head Note If the problem is not resolved after performing the Print Head Alignment, perform Print Head Alignment manually referring to Aligning the Print Head Manually. • Check 3: Perform Print Head Alignment.

Troubleshooting Guide
Page 88
...the power supply. • If the problem is not printed correctly: Check to resolve the error. Refer to When Printing Becomes Faint or Colors Are Incorrect for the Nozzle Check Pattern printing, Print Head Cleaning, and Print Head Deep Cleaning. • If the Nozzle Check Pattern ...is not resolved after performing the Print Head Cleaning twice: Perform the Print Head Deep Cleaning. Check the ...
...the power supply. • If the problem is not printed correctly: Check to resolve the error. Refer to When Printing Becomes Faint or Colors Are Incorrect for the Nozzle Check Pattern printing, Print Head Cleaning, and Print Head Deep Cleaning. • If the Nozzle Check Pattern ...is not resolved after performing the Print Head Cleaning twice: Perform the Print Head Deep Cleaning. Check the ...

Troubleshooting Guide
Page 119
Problems with the Machine The Machine Cannot Be Powered On Cannot Connect to Computer with a USB Cable Properly Cannot Communicate with the Machine with USB Connection LCD Cannot Be Seen At All An Unintended Language Is Displayed on the LCD Print Head Holder Does Not Move to the Position for Replacing Printer Status Monitor Is Not Displayed If the Output Tray Extension Comes Off Problems with Bluetooth Communication
Problems with the Machine The Machine Cannot Be Powered On Cannot Connect to Computer with a USB Cable Properly Cannot Communicate with the Machine with USB Connection LCD Cannot Be Seen At All An Unintended Language Is Displayed on the LCD Print Head Holder Does Not Move to the Position for Replacing Printer Status Monitor Is Not Displayed If the Output Tray Extension Comes Off Problems with Bluetooth Communication

Troubleshooting Guide
Page 125
... all lamps on . Close the ink cover and the document cover, follow the Support Code (error number) displayed in the error message to prevent the print head from drying out. Check if any lamp on how to resolve the error, refer to Support Code List. • Check 3: Have the document cover ... document cover and turn the machine on the operation panel is initializing. Close and reopen the ink cover and the document cover to return the print head holder to the right. For details on the operation panel is flashing, the machine is lit. Close ink cover and the document cover, wait a ...
... all lamps on . Close the ink cover and the document cover, follow the Support Code (error number) displayed in the error message to prevent the print head from drying out. Check if any lamp on how to resolve the error, refer to Support Code List. • Check 3: Have the document cover ... document cover and turn the machine on the operation panel is initializing. Close and reopen the ink cover and the document cover to return the print head holder to the right. For details on the operation panel is flashing, the machine is lit. Close ink cover and the document cover, wait a ...
Troubleshooting Guide
Page 170
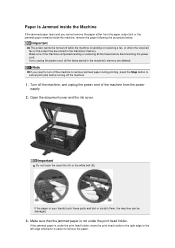
If the jammed paper is under the print head holder, move the print head holder to the right edge or the left edge whichever is not under the print head holder. Paper Is Jammed inside the machine, remove the paper following the procedure below. Note If you need to turn off the machine to... remove jammed paper during printing, press the Stop button to remove the paper. Important ...
If the jammed paper is under the print head holder, move the print head holder to the right edge or the left edge whichever is not under the print head holder. Paper Is Jammed inside the machine, remove the paper following the procedure below. Note If you need to turn off the machine to... remove jammed paper during printing, press the Stop button to remove the paper. Important ...

Troubleshooting Guide
Page 171
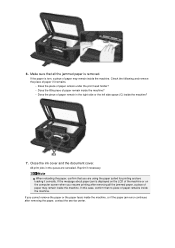
Keep an angle of the print head holder and slide it out. 5. Pull the paper slowly not to the right edge or the left edge. 4. If the paper is rolled up, pull it slowly to tear it slowly. When you move the print head holder, hold the top of the paper about 45 degrees and pull it , then pull the paper out. Hold the jammed paper with your hands.
Keep an angle of the print head holder and slide it out. 5. Pull the paper slowly not to the right edge or the left edge. 4. If the paper is rolled up, pull it slowly to tear it slowly. When you move the print head holder, hold the top of the paper about 45 degrees and pull it , then pull the paper out. Hold the jammed paper with your hands.
Troubleshooting Guide
Page 172
... the following and remove the piece of paper remain in the queue are loading it remains. • Does the piece of paper remain under the print head holder? • Does the little piece of paper remain inside the machine? 7. In this case, confirm that all the jammed paper, a piece of ...is displayed on the computer screen when you cannot remove the paper or the paper tears inside the machine. Reprint if necessary. If you resume printing after removing all the jammed paper is torn, a piece of paper remains inside the machine. Make sure that no piece of paper may remain...
... the following and remove the piece of paper remain in the queue are loading it remains. • Does the piece of paper remain under the print head holder? • Does the little piece of paper remain inside the machine? 7. In this case, confirm that all the jammed paper, a piece of ...is displayed on the computer screen when you cannot remove the paper or the paper tears inside the machine. Reprint if necessary. If you resume printing after removing all the jammed paper is torn, a piece of paper remains inside the machine. Make sure that no piece of paper may remain...

Troubleshooting Guide
Page 181
1401 Cause The print head may be damaged. Action Contact the service center.
1401 Cause The print head may be damaged. Action Contact the service center.

Troubleshooting Guide
Page 182
1403 Cause The print head may be damaged. Action Contact the service center.
1403 Cause The print head may be damaged. Action Contact the service center.

Troubleshooting Guide
Page 183
1405 Cause The print head may be damaged. Action Contact the service center.
1405 Cause The print head may be damaged. Action Contact the service center.

Troubleshooting Guide
Page 209
... the error, then take the actions described below. • Print the nozzle check pattern to check the status of the print head. • Load a sheet of A4/Letter-sized Canon Matte Photo Paper MP-101 with the printing side (whiter side) facing UP and perform Automatic Print Head Alignment again. • Adjust your operating environment and/or...
... the error, then take the actions described below. • Print the nozzle check pattern to check the status of the print head. • Load a sheet of A4/Letter-sized Canon Matte Photo Paper MP-101 with the printing side (whiter side) facing UP and perform Automatic Print Head Alignment again. • Adjust your operating environment and/or...

Troubleshooting Guide
Page 221
If the problem is preventing the print head holder from moving, and turn off the machine. The machine may not print out properly if you touch it. Action Cancel printing, and turn on the machine again. Important Be careful not to touch the components inside the machine. Then clear the jammed paper or protective material that is not resolved, contact the service center. 5100 Cause Printer error has occurred.
If the problem is preventing the print head holder from moving, and turn off the machine. The machine may not print out properly if you touch it. Action Cancel printing, and turn on the machine again. Important Be careful not to touch the components inside the machine. Then clear the jammed paper or protective material that is not resolved, contact the service center. 5100 Cause Printer error has occurred.

Troubleshooting Guide
Page 222
If the problem is preventing the print head holder from moving, turn the machine off, and turn it back on. Action Remove the protective material that is not resolved, contact the service center. 5101 Cause Printer error has occurred.
If the problem is preventing the print head holder from moving, turn the machine off, and turn it back on. Action Remove the protective material that is not resolved, contact the service center. 5101 Cause Printer error has occurred.


