User Manual
Page 53
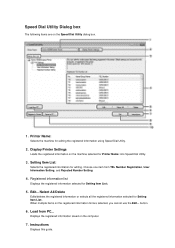
...item from PC... Load from TEL Number Registration, User Information Setting, and Rejected Number Setting. 4. Instructions Displays this guide. Printer Name: Selects the machine for Setting Item List:. Edit.../Select All/Delete Edits/deletes the registered information or selects all the registered... registered information using Speed Dial Utility. 2. Displays the registered information saved on the Speed Dial Utility dialog box. 1. Display Printer Settings Loads the registered information on the machine selected for editing. Setting Item List: Selects the registered information for...
...item from PC... Load from TEL Number Registration, User Information Setting, and Rejected Number Setting. 4. Instructions Displays this guide. Printer Name: Selects the machine for Setting Item List:. Edit.../Select All/Delete Edits/deletes the registered information or selects all the registered... registered information using Speed Dial Utility. 2. Displays the registered information saved on the Speed Dial Utility dialog box. 1. Display Printer Settings Loads the registered information on the machine selected for editing. Setting Item List: Selects the registered information for...

User Manual
Page 54
Information registered or edited using Speed Dial Utility on the machine. 9. Saves information edited using Speed Dial Utility is neither saved on the computer nor registered on the computer. 10. Register to Printer Registers information edited using Speed Dial Utility to PC... Save to the machine. Exit Quits Speed Dial Utility. 8.
Information registered or edited using Speed Dial Utility on the machine. 9. Saves information edited using Speed Dial Utility is neither saved on the computer nor registered on the computer. 10. Register to Printer Registers information edited using Speed Dial Utility to PC... Save to the machine. Exit Quits Speed Dial Utility. 8.
User Manual
Page 55
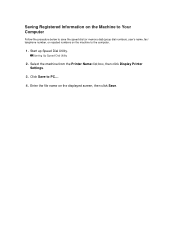
Starting Up Speed Dial Utility 2. Click Save to PC.... 4. Select the machine from the Printer Name: list box, then click Display Printer Settings. 3. Start up Speed Dial Utility. Enter the file name on the machine to the computer. 1. Saving Registered Information on the Machine to Your Computer Follow the procedure below to save the speed dial (or memory dial)/group dial numbers, user's name, fax/ telephone number, or rejected numbers on the displayed screen, then click Save.
Starting Up Speed Dial Utility 2. Click Save to PC.... 4. Select the machine from the Printer Name: list box, then click Display Printer Settings. 3. Start up Speed Dial Utility. Enter the file name on the machine to the computer. 1. Saving Registered Information on the Machine to Your Computer Follow the procedure below to save the speed dial (or memory dial)/group dial numbers, user's name, fax/ telephone number, or rejected numbers on the displayed screen, then click Save.
User Manual
Page 56
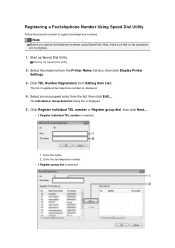
... fax/telephone numbers using Speed Dial Utility, make sure that no fax operations are in progress. 1. Click TEL Number Registration from the Printer Name: list box, then click Display Printer Settings. 3. Enter the name. 2. Select an unoccupied code from the list, then click Edit.... Click Register individual TEL number or Register group...
... fax/telephone numbers using Speed Dial Utility, make sure that no fax operations are in progress. 1. Click TEL Number Registration from the Printer Name: list box, then click Display Printer Settings. 3. Enter the name. 2. Select an unoccupied code from the list, then click Edit.... Click Register individual TEL number or Register group...
User Manual
Page 57
Select the code you want to add to Printer. 2. Note You can only enter numbers that have already been registered. 6. Click OK. Enter the file name on the display, then click OK. Click Register ...
Select the code you want to add to Printer. 2. Note You can only enter numbers that have already been registered. 6. Click OK. Enter the file name on the display, then click OK. Click Register ...
User Manual
Page 58
... are in progress. 1. Enter the new fax/telephone number. • If a group dial is displayed. 4. Add or delete a member to/from the Printer Name: list box, then click Display Printer Settings. 3. The list of registered fax/telephone numbers is selected: 1. Enter the new group name. 2. Note Before you change fax/telephone numbers...
... are in progress. 1. Enter the new fax/telephone number. • If a group dial is displayed. 4. Add or delete a member to/from the Printer Name: list box, then click Display Printer Settings. 3. The list of registered fax/telephone numbers is selected: 1. Enter the new group name. 2. Note Before you change fax/telephone numbers...

User Manual
Page 59
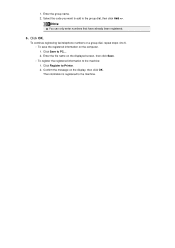
To add a member: Select the code to add to delete from the group dial, then click To delete a member: Select the code to the group dial, then click Add >>.
To add a member: Select the code to add to delete from the group dial, then click To delete a member: Select the code to the group dial, then click Add >>.
User Manual
Page 60
... the file name on the displayed screen, then click Save. • To register the edited information to Printer. 2. Start up Speed Dial Utility. Click TEL Number Registration from the Printer Name: list box, then click Display Printer Settings. 3. The selected fax/telephone number is displayed. 4. The information is registered to delete from the...
... the file name on the displayed screen, then click Save. • To register the edited information to Printer. 2. Start up Speed Dial Utility. Click TEL Number Registration from the Printer Name: list box, then click Display Printer Settings. 3. The selected fax/telephone number is displayed. 4. The information is registered to delete from the...
User Manual
Page 61
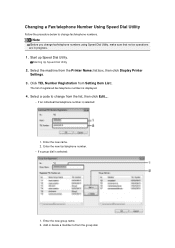
Click User Information Setting from the Printer Name: list box, then click Display Printer Settings. 3. Select an item to the machine. The information is registered to change the user's name or fax/telephone number. 1. Start up ... displayed screen, then click Save. • To register the edited information to PC.... 2. Changing Sender Information Using Speed Dial Utility Follow the procedure below to Printer. 2. The User Information dialog box is displayed. 4. Confirm the message on the computer: 1. The user's information is displayed. 5. Starting Up Speed Dial ...
Click User Information Setting from the Printer Name: list box, then click Display Printer Settings. 3. Select an item to the machine. The information is registered to change the user's name or fax/telephone number. 1. Start up ... displayed screen, then click Save. • To register the edited information to PC.... 2. Changing Sender Information Using Speed Dial Utility Follow the procedure below to Printer. 2. The User Information dialog box is displayed. 4. Confirm the message on the computer: 1. The user's information is displayed. 5. Starting Up Speed Dial ...
User Manual
Page 62
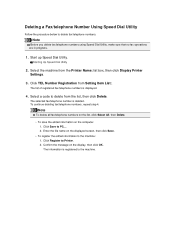
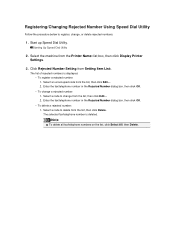
... the machine from the list, then click Delete. Select a code to change , or delete rejected numbers. 1. Select a code to delete from the Printer Name: list box, then click Display Printer Settings. 3. Select an unoccupied code from Setting Item List:. The selected fax/telephone number is displayed. • To register a rejected number: 1. Note...
... the machine from the list, then click Delete. Select a code to change , or delete rejected numbers. 1. Select a code to delete from the Printer Name: list box, then click Display Printer Settings. 3. Select an unoccupied code from Setting Item List:. The selected fax/telephone number is displayed. • To register a rejected number: 1. Note...
User Manual
Page 63
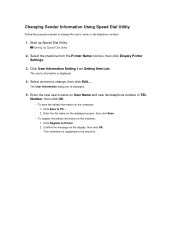
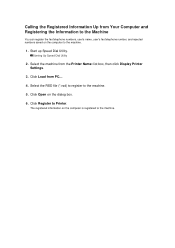
Starting Up Speed Dial Utility 2. Click Register to the machine. 1. Click Load from the Printer Name: list box, then click Display Printer Settings. 3. Select the machine from PC.... 4. Start up Speed Dial Utility. The registered information on the dialog box. 6. Click Open on the computer is registered ... Information to the Machine You can register the fax/telephone numbers, user's name, user's fax/telephone number, and rejected numbers saved on the computer to Printer. Select the RSD file (*.rsd) to register to the machine.
Starting Up Speed Dial Utility 2. Click Register to the machine. 1. Click Load from the Printer Name: list box, then click Display Printer Settings. 3. Select the machine from PC.... 4. Start up Speed Dial Utility. The registered information on the dialog box. 6. Click Open on the computer is registered ... Information to the Machine You can register the fax/telephone numbers, user's name, user's fax/telephone number, and rejected numbers saved on the computer to Printer. Select the RSD file (*.rsd) to register to the machine.
User Manual
Page 102
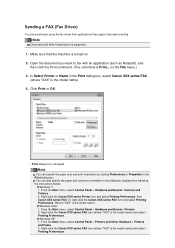
... orientation in the dialog box displayed by clicking Preferences or Properties in the Print dialog box. Right-click the Canon XXX series Printer icon and select Printing Preferences, then Canon XXX series FAX. Note Only black and white transmission is the model name.) Windows Vista: 1. In Select... Windows 7: 1. From the Start menu, select Control Panel > Hardware and Sound > Printers. 2. Windows XP: 1. Right-click the Canon XXX series FAX icon (where "XXX" is the model name). 4. on . 2. Right-click the Canon XXX series FAX icon (where "XXX" is Print... Open the document you want to...
... orientation in the dialog box displayed by clicking Preferences or Properties in the Print dialog box. Right-click the Canon XXX series Printer icon and select Printing Preferences, then Canon XXX series FAX. Note Only black and white transmission is the model name.) Windows Vista: 1. In Select... Windows 7: 1. From the Start menu, select Control Panel > Hardware and Sound > Printers. 2. Windows XP: 1. Right-click the Canon XXX series FAX icon (where "XXX" is the model name). 4. on . 2. Right-click the Canon XXX series FAX icon (where "XXX" is Print... Open the document you want to...
User Manual
Page 104
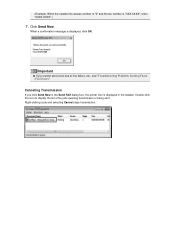
Double-click this icon to line failure, etc., see "Troubleshooting Problems Sending Faxes (Fax Driver)." Right-clicking a job and selecting Cancel stops transmission. (Example: When the outside line access number is "0" and the fax number is displayed in the Send FAX dialog box, the printer icon is "XXX-XXXX", enter "0XXX-XXXX".) 7. Important If you click Send Now in the taskbar. Canceling Transmission If you cannot send a fax due to display the list of fax jobs awaiting transmission or being sent. When a confirmation message is displayed, click OK. Click Send Now.
Double-click this icon to line failure, etc., see "Troubleshooting Problems Sending Faxes (Fax Driver)." Right-clicking a job and selecting Cancel stops transmission. (Example: When the outside line access number is "0" and the fax number is displayed in the Send FAX dialog box, the printer icon is "XXX-XXXX", enter "0XXX-XXXX".) 7. Important If you click Send Now in the taskbar. Canceling Transmission If you cannot send a fax due to display the list of fax jobs awaiting transmission or being sent. When a confirmation message is displayed, click OK. Click Send Now.
User Manual
Page 105
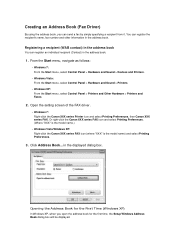
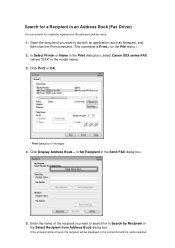
... (WAB contact) in the address book. 1. Open the setting screen of the FAX driver. • Windows 7: Right-click the Canon XXX series Printer icon and select Printing Preferences, then Canon XXX series FAX. in the address book. Creating an Address Book (Fax Driver) By using the address book, you open the address... be displayed. You can register the recipient's name, fax number and other information in the displayed dialog box. Or right-click the Canon XXX series FAX icon and select Printing Preferences. (Where "XXX" is the model name.) • Windows Vista/Windows XP: Right-click the...
... (WAB contact) in the address book. 1. Open the setting screen of the FAX driver. • Windows 7: Right-click the Canon XXX series Printer icon and select Printing Preferences, then Canon XXX series FAX. in the address book. Creating an Address Book (Fax Driver) By using the address book, you open the address... be displayed. You can register the recipient's name, fax number and other information in the displayed dialog box. Or right-click the Canon XXX series FAX icon and select Printing Preferences. (Where "XXX" is the model name.) • Windows Vista/Windows XP: Right-click the...
User Manual
Page 109
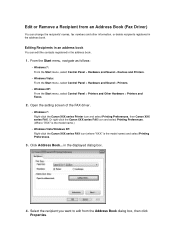
... and other information, or delete recipients registered in the displayed dialog box. 4. in the address book. Or right-click the Canon XXX series FAX icon and select Printing Preferences. (Where "XXX" is the model name.) • Windows Vista/Windows XP: Right-click the... Canon XXX series FAX icon (where "XXX" is the model name) and select Printing Preferences. 3. Open the setting screen of the FAX driver. • Windows 7: Right-click the Canon XXX series Printer icon and select Printing Preferences, then Canon XXX series FAX. Click Address Book......
... and other information, or delete recipients registered in the displayed dialog box. 4. in the address book. Or right-click the Canon XXX series FAX icon and select Printing Preferences. (Where "XXX" is the model name.) • Windows Vista/Windows XP: Right-click the... Canon XXX series FAX icon (where "XXX" is the model name) and select Printing Preferences. 3. Open the setting screen of the FAX driver. • Windows 7: Right-click the Canon XXX series Printer icon and select Printing Preferences, then Canon XXX series FAX. Click Address Book......
User Manual
Page 110
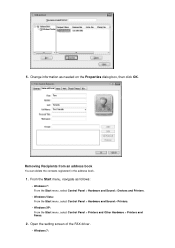
... 7: From the Start menu, select Control Panel > Hardware and Sound > Devices and Printers. • Windows Vista: From the Start menu, select Control Panel > Hardware and Sound > Printers. • Windows XP: From the Start menu, select Control Panel > Printers and Other Hardware > Printers and Faxes. 2. From the Start menu, navigate as needed on the Properties...
... 7: From the Start menu, select Control Panel > Hardware and Sound > Devices and Printers. • Windows Vista: From the Start menu, select Control Panel > Hardware and Sound > Printers. • Windows XP: From the Start menu, select Control Panel > Printers and Other Hardware > Printers and Faxes. 2. From the Start menu, navigate as needed on the Properties...
User Manual
Page 111
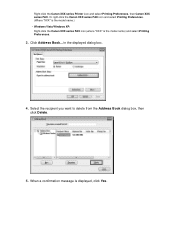
When a confirmation message is the model name) and select Printing Preferences. 3. Click Address Book... in the displayed dialog box. 4. Right-click the Canon XXX series Printer icon and select Printing Preferences, then Canon XXX series FAX. Select the recipient you want to delete from the Address Book dialog box, then click Delete. 5. Or right-click the Canon XXX series FAX icon and select Printing Preferences. (Where "XXX" is the model name.) • Windows Vista/Windows XP: Right-click the Canon XXX series FAX icon (where "XXX" is displayed, click Yes.
When a confirmation message is the model name) and select Printing Preferences. 3. Click Address Book... in the displayed dialog box. 4. Right-click the Canon XXX series Printer icon and select Printing Preferences, then Canon XXX series FAX. Select the recipient you want to delete from the Address Book dialog box, then click Delete. 5. Or right-click the Canon XXX series FAX icon and select Printing Preferences. (Where "XXX" is the model name.) • Windows Vista/Windows XP: Right-click the Canon XXX series FAX icon (where "XXX" is displayed, click Yes.
User Manual
Page 112
... Print... Click Display Address Book... Enter the name of the recipient you want to fax with its name selected. In Select Printer or Name in the Print dialog box, select Canon XXX series FAX (where "XXX" is found, the recipient will be displayed in Search by name. 1. If the entered name is...
... Print... Click Display Address Book... Enter the name of the recipient you want to fax with its name selected. In Select Printer or Name in the Print dialog box, select Canon XXX series FAX (where "XXX" is found, the recipient will be displayed in Search by name. 1. If the entered name is...
User Manual
Page 114
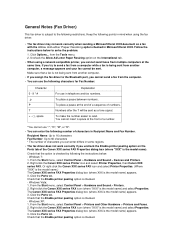
... you disconnected the power cord after pressing the ON button to turn off before unplugging the power cord, then unplug the power cord. Check 7: Does a printer error occur?
... you disconnected the power cord after pressing the ON button to turn off before unplugging the power cord, then unplug the power cord. Check 7: Does a printer error occur?
User Manual
Page 116
...computers at the same time. Right-click the Canon XXX series Printer icon and select Printer Properties, then Canon XXX series FAX. Or right-click the Canon XXX series FAX icon and select Printer Properties. (Where "XXX" is the model name.) The Canon XXX series FAX Properties dialog box (where XXX... Numbers after the T will be sent. From the Start menu, select Control Panel > Printers and Other Hardware > Printers and Faxes. 2. You cannot insert a space at the end of a sequence of the Canon XXX series FAX Properties dialog box (where "XXX" is the model name) and select Properties...
...computers at the same time. Right-click the Canon XXX series Printer icon and select Printer Properties, then Canon XXX series FAX. Or right-click the Canon XXX series FAX icon and select Printer Properties. (Where "XXX" is the model name.) The Canon XXX series FAX Properties dialog box (where XXX... Numbers after the T will be sent. From the Start menu, select Control Panel > Printers and Other Hardware > Printers and Faxes. 2. You cannot insert a space at the end of a sequence of the Canon XXX series FAX Properties dialog box (where "XXX" is the model name) and select Properties...


