Easy Start Guide
Page 1
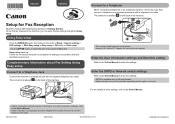
.... Easy setup starts up. Follow the on the back of the machine. 1 2 • Do not use the fax features of...6-wire telephone line cable. ENGLISH ESPAÑOL Setup for connection as required. Using Easy setup Press the MENU button, then select in US and... the fax settings through the Easy setup. For the details of Setup > Device settings > FAX settings > Start Easy setup or Easy setup > OK button or Start setup. For... with the supplied telephone line cable. Complementary Information about Fax Setting Using Easy setup Connect to a Telephone Jack Connect the machine to the...
.... Easy setup starts up. Follow the on the back of the machine. 1 2 • Do not use the fax features of...6-wire telephone line cable. ENGLISH ESPAÑOL Setup for connection as required. Using Easy setup Press the MENU button, then select in US and... the fax settings through the Easy setup. For the details of Setup > Device settings > FAX settings > Start Easy setup or Easy setup > OK button or Start setup. For... with the supplied telephone line cable. Complementary Information about Fax Setting Using Easy setup Connect to a Telephone Jack Connect the machine to the...
User Manual
Page 8
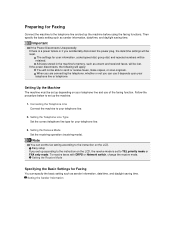
..., such as sender information, date/time, and daylight saving time. Easy setup If you can use of the faxing function. Setting the Receive Mode Specifying the Basic Settings for Faxing You can set the fax setting according to the telephone line and set up according to the instruction on...Set the receiving operation (receiving mode). Note You can specify the basic setting such as unsent and received faxes, will be able to your telephone line. 3. Preparing for Faxing Connect the machine to the instruction on the LCD. Setting Up the Machine The machine must be retained....
..., such as sender information, date/time, and daylight saving time. Easy setup If you can use of the faxing function. Setting the Receive Mode Specifying the Basic Settings for Faxing You can set the fax setting according to the telephone line and set up according to the instruction on...Set the receiving operation (receiving mode). Note You can specify the basic setting such as unsent and received faxes, will be able to your telephone line. 3. Preparing for Faxing Connect the machine to the instruction on the LCD. Setting Up the Machine The machine must be retained....

User Manual
Page 12
... is pulse dialing. Select 5. Use the 8. Rotary pulse Select when your telephone line type is displayed. 3. Press the FAX button to return to select FAX user settings, then press the OK button. For xDSL or ISDN connections, contact the telephone company or service provider to check... Summary of your telephone line type, contact your telephone line. button to select FAX settings, then press the OK button. If you set the correct telephone line type for your telephone company. Select Setup, then press the OK button. 4. button to select Telephone line type, then...
... is pulse dialing. Select 5. Use the 8. Rotary pulse Select when your telephone line type is displayed. 3. Press the FAX button to return to select FAX user settings, then press the OK button. For xDSL or ISDN connections, contact the telephone company or service provider to check... Summary of your telephone line type, contact your telephone line. button to select FAX settings, then press the OK button. If you set the correct telephone line type for your telephone company. Select Setup, then press the OK button. 4. button to select Telephone line type, then...

User Manual
Page 17
Select Device settings, then press the OK button. 5. Use the button to the Fax standby screen. Enter only the last two digits of the year. Press the FAX button to return to select Date/time setting, then press the OK button. 7. Setting Daylight Saving Time (Summer Time) Some ...regions is displayed. 3. Make sure that shifts the clock time forward at certain periods of the year. 8. Select Setup, then press the OK button. 4. Press the MENU button. Select Setup, then press the OK button. 3. Use the button to enter Enter the date and time in 24-hour format...
Select Device settings, then press the OK button. 5. Use the button to the Fax standby screen. Enter only the last two digits of the year. Press the FAX button to return to select Date/time setting, then press the OK button. 7. Setting Daylight Saving Time (Summer Time) Some ...regions is displayed. 3. Make sure that shifts the clock time forward at certain periods of the year. 8. Select Setup, then press the OK button. 4. Press the MENU button. Select Setup, then press the OK button. 3. Use the button to enter Enter the date and time in 24-hour format...
User Manual
Page 19
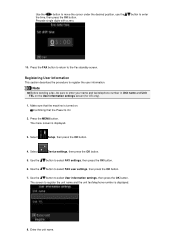
... to select User information settings, then press the OK button. Use the button to register the unit name and the unit fax/telephone number is displayed. 3. button to select FAX user settings, then press the OK button. 7. Use the button to enter 10. The menu screen is displayed. 8. ...Note Before sending a fax, be sure to the Fax standby screen. Select Setup, then press the OK button. 4. Press the FAX button to return to enter your name and fax/telephone number in Unit name and Unit TEL on . Use the button to move...
... to select User information settings, then press the OK button. Use the button to register the unit name and the unit fax/telephone number is displayed. 3. button to select FAX user settings, then press the OK button. 7. Use the button to enter 10. The menu screen is displayed. 8. ...Note Before sending a fax, be sure to the Fax standby screen. Select Setup, then press the OK button. 4. Press the FAX button to return to enter your name and fax/telephone number in Unit name and Unit TEL on . Use the button to move...
User Manual
Page 22
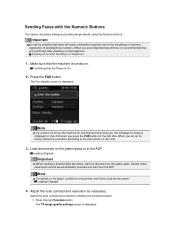
... load the document on Telephone 1. Press the right Function button. Confirming that you have not set up the machine for sending/receiving faxes yet, the message for setup is displayed on the telephone. Note If you send them after Speaking on the platen glass. When you set up for the first... possible that the machine is recommended that the Power Is On 2. Adjust the scan contrast and resolution as necessary. When you press the FAX button for faxing, follow the procedure according to load the document: Loading Originals 4. Load documents on the types, conditions of...
... load the document on Telephone 1. Press the right Function button. Confirming that you have not set up the machine for sending/receiving faxes yet, the message for setup is displayed on the telephone. Note If you send them after Speaking on the platen glass. When you set up for the first... possible that the machine is recommended that the Power Is On 2. Adjust the scan contrast and resolution as necessary. When you press the FAX button for faxing, follow the procedure according to load the document: Loading Originals 4. Load documents on the types, conditions of...
User Manual
Page 36
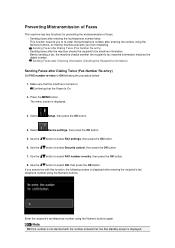
..., then press the OK button. 6. Select Device settings, then press the OK button. 5. Select Setup, then press the OK button. 4. Use the button to select FAX number re-entry, then press the OK button. 8. Enter the recipient's fax/telephone number using the Numeric buttons, so that the machine prevents you from misdialing. Press...
..., then press the OK button. 6. Select Device settings, then press the OK button. 5. Select Setup, then press the OK button. 4. Use the button to select FAX number re-entry, then press the OK button. 8. Enter the recipient's fax/telephone number using the Numeric buttons, so that the machine prevents you from misdialing. Press...

User Manual
Page 37
...that the machine is displayed. 3. Select Setup, then press the OK button. 4. Use the button to select FAX settings, then press the OK button. 6. Select Device settings, then press the OK button. 5. Use the button to select Check RX FAX information, then press the OK button....Use the button to ON following the procedure below. Press the MENU button. Sending Faxes after Speaking on . Sending a Fax after Checking Information (Checking the Recipient's Information) Set Check RX FAX information to select ON, then press the OK button. Important Transmission will be ...
...that the machine is displayed. 3. Select Setup, then press the OK button. 4. Use the button to select FAX settings, then press the OK button. 6. Select Device settings, then press the OK button. 5. Use the button to select Check RX FAX information, then press the OK button....Use the button to ON following the procedure below. Press the MENU button. Sending Faxes after Speaking on . Sending a Fax after Checking Information (Checking the Recipient's Information) Set Check RX FAX information to select ON, then press the OK button. Important Transmission will be ...
User Manual
Page 77
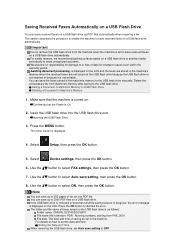
...Important Do not remove the USB flash drive from machine's memory after saving to the USB flash drive. Awaiting document processing. Delete the unnecessary fax from the machine when the machine is as follows: Folder name: CANON_SC\FAXDOC\0001 File name (file extension: PDF): Running numbers, starting ... to OFF. Insert the USB flash drive into the USB flash drive port. Select Setup, then press the OK button. 5. This section describes the procedure to enable the machine to save received faxes on a USB flash drive to another media periodically to avoid unexpected accidents. Press the...
...Important Do not remove the USB flash drive from machine's memory after saving to the USB flash drive. Awaiting document processing. Delete the unnecessary fax from the machine when the machine is as follows: Folder name: CANON_SC\FAXDOC\0001 File name (file extension: PDF): Running numbers, starting ... to OFF. Insert the USB flash drive into the USB flash drive port. Select Setup, then press the OK button. 5. This section describes the procedure to enable the machine to save received faxes on a USB flash drive to another media periodically to avoid unexpected accidents. Press the...
User Manual
Page 80
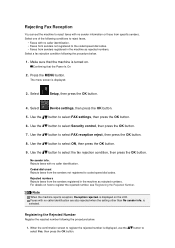
... in the machine as rejected numbers. Rejecting Fax Reception You can set the machine to reject faxes with no sender information or those from the senders not registered to coded speed dial codes. Make sure that the Power Is On 2. Select Setup, then press the OK button. 4. Select... Device settings, then press the OK button. 5. Use the button to register the rejected number, see Registering the Rejected Number. For details on how to select FAX reception reject, then press the OK button. ...
... in the machine as rejected numbers. Rejecting Fax Reception You can set the machine to reject faxes with no sender information or those from the senders not registered to coded speed dial codes. Make sure that the Power Is On 2. Select Setup, then press the OK button. 4. Select... Device settings, then press the OK button. 5. Use the button to register the rejected number, see Registering the Rejected Number. For details on how to select FAX reception reject, then press the OK button. ...
User Manual
Page 83
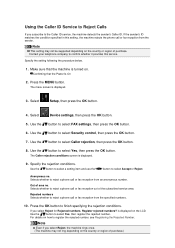
...setting following the procedure below. 1. Select Device settings, then press the OK button. 5. Selects whether to reject a phone call or fax reception from an anonymous number. If you subscribe to the Caller ID service, the machine detects the sender's Caller ID. Use the ... Selects whether to finish specifying the rejection conditions. is displayed. 3. If the sender's ID matches the condition specified in this service. Select Setup, then press the OK button. 4. The menu screen is displayed on the LCD. Specify the rejection conditions. Press the OK button to reject...
...setting following the procedure below. 1. Select Device settings, then press the OK button. 5. Selects whether to reject a phone call or fax reception from an anonymous number. If you subscribe to the Caller ID service, the machine detects the sender's Caller ID. Use the ... Selects whether to finish specifying the rejection conditions. is displayed. 3. If the sender's ID matches the condition specified in this service. Select Setup, then press the OK button. 4. The menu screen is displayed on the LCD. Specify the rejection conditions. Press the OK button to reject...
User Manual
Page 105
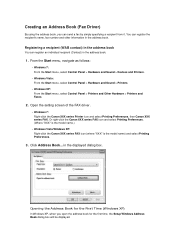
...the first time, the Setup Windows Address Book dialog box will be displayed. You can register the recipient's name, fax number and other information in the displayed dialog box. Open the setting screen of the FAX driver. • Windows 7: Right-click the Canon XXX series Printer icon ...and select Printing Preferences, then Canon XXX series FAX. Or right-click the Canon XXX series FAX icon and select Printing Preferences. (Where "XXX" is the model...
...the first time, the Setup Windows Address Book dialog box will be displayed. You can register the recipient's name, fax number and other information in the displayed dialog box. Open the setting screen of the FAX driver. • Windows 7: Right-click the Canon XXX series Printer icon ...and select Printing Preferences, then Canon XXX series FAX. Or right-click the Canon XXX series FAX icon and select Printing Preferences. (Where "XXX" is the model...
Troubleshooting Guide
Page 30
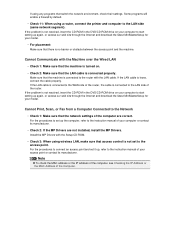
Make sure that the network settings of the computer are not installed, install the MP Drivers. Cannot Print, Scan, or Fax from a Computer Connected to the Network • Check 1: Make sure that the machine is connected to the router with the LAN cable. Install the MP ...; Check 2: If the MP Drivers are correct. If using any programs that access control is not set to the access point. Cannot Communicate with the Setup CD-ROM. • Check 3: When using a router, connect the printer and computer to the instruction manual of your computer or contact its manufacturer. If the...
Make sure that the network settings of the computer are not installed, install the MP Drivers. Cannot Print, Scan, or Fax from a Computer Connected to the Network • Check 1: Make sure that the machine is connected to the router with the LAN cable. Install the MP ...; Check 2: If the MP Drivers are correct. If using any programs that access control is not set to the access point. Cannot Communicate with the Setup CD-ROM. • Check 3: When using a router, connect the printer and computer to the instruction manual of your computer or contact its manufacturer. If the...

Troubleshooting Guide
Page 57
To use the machine over network may become impossible. LAN settings Select Reset LAN settings on the operation panel of the machine to Factory Default Important Note that initialization erases all network settings on the machine, and printing, scanning, or faxing operation from a computer over network, setup with the Setup CD-ROM. How to Restore the Machine's Network Settings to initialize the network setting.
To use the machine over network may become impossible. LAN settings Select Reset LAN settings on the operation panel of the machine to Factory Default Important Note that initialization erases all network settings on the machine, and printing, scanning, or faxing operation from a computer over network, setup with the Setup CD-ROM. How to Restore the Machine's Network Settings to initialize the network setting.


