Network Users Manual - English
Page 50
...your network with your access point/router. 1 Click the button and then Network. 2 Click Add a wireless device. 3 3 Choose your printer and click Next. 4 Input the PIN which the LCD shows in a wireless network. Try starting from step c again. (Windows®...correct PIN and try again. (For resetting, see Wireless configuration for Windows® using the Brother installer application (For MFC-8890DW) in Chapter 4 and Wireless configuration for Macintosh using the Brother installer application (For MFC-8890DW) in advance. Using the Brother installer application on the CD-ROM to ...
...your network with your access point/router. 1 Click the button and then Network. 2 Click Add a wireless device. 3 3 Choose your printer and click Next. 4 Input the PIN which the LCD shows in a wireless network. Try starting from step c again. (Windows®...correct PIN and try again. (For resetting, see Wireless configuration for Windows® using the Brother installer application (For MFC-8890DW) in Chapter 4 and Wireless configuration for Macintosh using the Brother installer application (For MFC-8890DW) in advance. Using the Brother installer application on the CD-ROM to ...

Network Users Manual - English
Page 157
... Chapter 1 in the printer driver is checked. Setting up public mode 11 You can set on the control panel for Secure Function Lock is available as a CSV file. „ Last Counter Record 11 The machine retains the page count after the counter has been reset. „ Counter Auto Reset Settigs You can set... group. • If you want to CSV file You can export the current page counter including ID Number / Name information as a download from http://solutions.brother.com/.
... Chapter 1 in the printer driver is checked. Setting up public mode 11 You can set on the control panel for Secure Function Lock is available as a CSV file. „ Last Counter Record 11 The machine retains the page count after the counter has been reset. „ Counter Auto Reset Settigs You can set... group. • If you want to CSV file You can export the current page counter including ID Number / Name information as a download from http://solutions.brother.com/.
Network Users Manual - English
Page 183
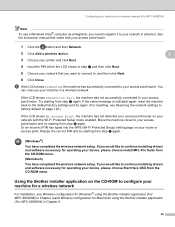
... want to keep the same certificate and the private key after resetting the print server, export them before using. • This print server stores only one . • When you reset the print server back to use SSL/TLS communication, we recommend...one pair of a certificate and a private key that is 14 the printer's IP address or the node name.) „ For example: http://192.168.1.2/ 173 This print server supports two certification methods. Security features Creating and installing a certificate 14 The Brother print server allows you contact your system administrator before resetting...
... want to keep the same certificate and the private key after resetting the print server, export them before using. • This print server stores only one . • When you reset the print server back to use SSL/TLS communication, we recommend...one pair of a certificate and a private key that is 14 the printer's IP address or the node name.) „ For example: http://192.168.1.2/ 173 This print server supports two certification methods. Security features Creating and installing a certificate 14 The Brother print server allows you contact your system administrator before resetting...
Network Users Manual - English
Page 205
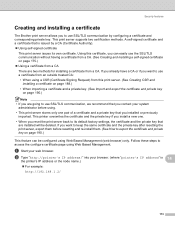
...132; Windows® 1 Try pinging the print server from the host operating system command prompt with a large amount of graphics at high resolution), the printer is unable to accept your print job exceeds a certain limit, a time out situation occurs, which causes the error message. d If you try ... the Utilities folder. 3 Double click the Terminal icon. 4 Try pinging the print server from the initial setup again. (For information how to reset to the default factory settings, see Restoring the network settings to factory default on page 123.) Error during printing 15 If you have tried step...
...132; Windows® 1 Try pinging the print server from the host operating system command prompt with a large amount of graphics at high resolution), the printer is unable to accept your print job exceeds a certain limit, a time out situation occurs, which causes the error message. d If you try ... the Utilities folder. 3 Double click the Terminal icon. 4 Try pinging the print server from the initial setup again. (For information how to reset to the default factory settings, see Restoring the network settings to factory default on page 123.) Error during printing 15 If you have tried step...

Software Users Manual - English
Page 16
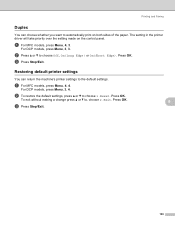
... 4, 3. a For MFC models, press Menu, 4, 4. For DCP models, press Menu, 3, 4. Press OK. To exit without making a change press a or b to choose 1.Reset. c Press Stop/Exit. 8 For DCP models, press Menu, 3, 3. Printing Duplex 1 You can return the machine's printer settings to the factory settings. Restoring default printer settings 1 You can...a or b to , choose 2.Exit. b Press a or b to automatically print on the control panel. c Press Stop/Exit. The setting in the printer 1 driver will take priority over the setting made on both sides of the paper. Press OK. Press OK.
... 4, 3. a For MFC models, press Menu, 4, 4. For DCP models, press Menu, 3, 4. Press OK. To exit without making a change press a or b to choose 1.Reset. c Press Stop/Exit. 8 For DCP models, press Menu, 3, 3. Printing Duplex 1 You can return the machine's printer settings to the factory settings. Restoring default printer settings 1 You can...a or b to , choose 2.Exit. b Press a or b to automatically print on the control panel. c Press Stop/Exit. The setting in the printer 1 driver will take priority over the setting made on both sides of the paper. Press OK. Press OK.
Software Users Manual - English
Page 138
...change press a or b to choose 1.Reset. c Press Stop/Exit. For DCP models, press Menu, 3, 4. b To restore the default settings, press a or b to , choose 2.Exit. c Press Stop/Exit. 8 8 130 b Press a or b to the default settings. Restoring default printer settings You can choose whether you want ... on the control panel. Press OK. For DCP models, press Menu, 3, 3. a For MFC models, press Menu, 4, 3. a For MFC models, press Menu, 4, 4. Printing and Faxing Duplex 8 You can return the machine's printer settings to choose Off, On(Long Edge) or On(Short Edge). Press OK.
...change press a or b to choose 1.Reset. c Press Stop/Exit. For DCP models, press Menu, 3, 4. b To restore the default settings, press a or b to , choose 2.Exit. c Press Stop/Exit. 8 8 130 b Press a or b to the default settings. Restoring default printer settings You can choose whether you want ... on the control panel. Press OK. For DCP models, press Menu, 3, 3. a For MFC models, press Menu, 4, 3. a For MFC models, press Menu, 4, 4. Printing and Faxing Duplex 8 You can return the machine's printer settings to choose Off, On(Long Edge) or On(Short Edge). Press OK.
Users Manual - English
Page 195
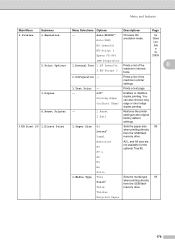
...Reset Printer - 1.Reset 2.Exit Restores the printer settings to the original factory default settings. 5.USB Direct I/F 1.Direct Print 1.Paper Size A4 Letter* Legal Sets the paper size 95 when printing directly from the USB flash memory drive. Prints a list of the D 2.BR-Script 3 machine's internal... fonts. 2.Configuration - IBM Proprinter 2.Print Options 1.Internal Font 1.HP LaserJet Prints a list of the machine's printer settings. 3.Test Print - Prints a test page. 3.Duplex - Menu and ...
...Reset Printer - 1.Reset 2.Exit Restores the printer settings to the original factory default settings. 5.USB Direct I/F 1.Direct Print 1.Paper Size A4 Letter* Legal Sets the paper size 95 when printing directly from the USB flash memory drive. Prints a list of the D 2.BR-Script 3 machine's internal... fonts. 2.Configuration - IBM Proprinter 2.Print Options 1.Internal Font 1.HP LaserJet Prints a list of the machine's printer settings. 3.Test Print - Prints a test page. 3.Duplex - Menu and ...
Quick Setup Guide - English
Page 43
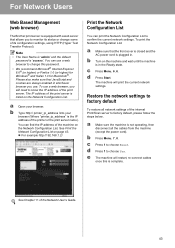
...174;. a Make sure the machine is not operating, then disconnect all network settings of the printer or the print server name). e The machine will print the current network settings. Please also...Hyper Text Transfer Protocol). You can use . For Network Users Web Based Management (web browser) The Brother print server is equipped with a web server that allows you to choose Yes. b Type http:// ... and wait until the machine is in whichever browser you use a web browser to choose Reset. Restore the network settings to factory default To restore all the cables from the machine ...
...174;. a Make sure the machine is not operating, then disconnect all network settings of the printer or the print server name). e The machine will print the current network settings. Please also...Hyper Text Transfer Protocol). You can use . For Network Users Web Based Management (web browser) The Brother print server is equipped with a web server that allows you to choose Yes. b Type http:// ... and wait until the machine is in whichever browser you use a web browser to choose Reset. Restore the network settings to factory default To restore all the cables from the machine ...
Service Manual
Page 61
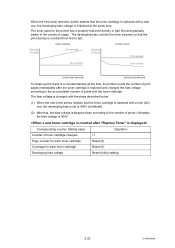
... +1 Reset (0) Reset (0) Reset (Initial setting) 2-23 Confidential Toner property Actual control [Density] [Voltage] Print density [Density] [Voltage] Print density Bias voltage Bias voltage [Used toner amount] [Used toner amount] To obtain a print result of a constant density all the time, the printer counts...the steps described below: (1) When the new toner sensor detects that the toner cartridge is replaced with a new (full) one , the developing bias voltage is constant from first to last. Corresponding counter, Setting value Counter of prints. Ultimately, the bias...
... +1 Reset (0) Reset (0) Reset (Initial setting) 2-23 Confidential Toner property Actual control [Density] [Voltage] Print density [Density] [Voltage] Print density Bias voltage Bias voltage [Used toner amount] [Used toner amount] To obtain a print result of a constant density all the time, the printer counts...the steps described below: (1) When the new toner sensor detects that the toner cartridge is replaced with a new (full) one , the developing bias voltage is constant from first to last. Corresponding counter, Setting value Counter of prints. Ultimately, the bias...
Service Manual
Page 106
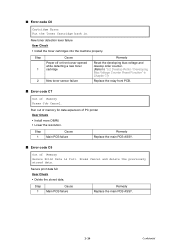
Step 1 Cause Main PCB failure Remedy Replace the main PCB ASSY. ■ Error code C8 Out of PC printer User Check • Install more DIMM. • Lower the resolution. Press Cancel and delete the previously stored data. Run out of memory for...Cause Power off or front cover opened while detecting a new toner cartridge 2 New toner sensor failure Remedy Reset the developing bias voltage and develop roller counter. (Refer to "5.2 Develop Roller / Developing Bias Voltage Counter Reset Function" in . ■ Error code C0 Cartridge Error Put the Toner Cartridge back in Chapter 7.) ...
Step 1 Cause Main PCB failure Remedy Replace the main PCB ASSY. ■ Error code C8 Out of PC printer User Check • Install more DIMM. • Lower the resolution. Press Cancel and delete the previously stored data. Run out of memory for...Cause Power off or front cover opened while detecting a new toner cartridge 2 New toner sensor failure Remedy Reset the developing bias voltage and develop roller counter. (Refer to "5.2 Develop Roller / Developing Bias Voltage Counter Reset Function" in . ■ Error code C0 Cartridge Error Put the Toner Cartridge back in Chapter 7.) ...
Service Manual
Page 119
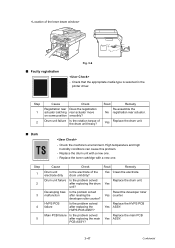
... roller counter? Yes Clean the electrode. Developing bias Is the problem solved Reset the developer roller malfunciton after replacing the main PCB ASSY? High temperature and high humidity conditions can cause this problem. - Replace the drum unit with a new one . - Step 1 2 3 4 5 Cause Check Result Remedy Drum unit electrode dirty Is the electrode... actuator catching rear actuator move on some position smoothly? Replace the HVPS PCB Yes ASSY. Check that the appropriate media type is selected in the printer driver. ■ Faulty registration Fig. 3-6 -
... roller counter? Yes Clean the electrode. Developing bias Is the problem solved Reset the developer roller malfunciton after replacing the main PCB ASSY? High temperature and high humidity conditions can cause this problem. - Replace the drum unit with a new one . - Step 1 2 3 4 5 Cause Check Result Remedy Drum unit electrode dirty Is the electrode... actuator catching rear actuator move on some position smoothly? Replace the HVPS PCB Yes ASSY. Check that the appropriate media type is selected in the printer driver. ■ Faulty registration Fig. 3-6 -

Service Manual
Page 132
... cable and the network cable is selected if you have an interface switching device. - Machine connection For Macintosh, has the product ID been verified? Try resetting the factory settings. (Refer to Users guide.) Step 1 2 3 Cause Check Result Remedy Failure inside the machine Does the machine print...
... cable and the network cable is selected if you have an interface switching device. - Machine connection For Macintosh, has the product ID been verified? Try resetting the factory settings. (Refer to Users guide.) Step 1 2 3 Cause Check Result Remedy Failure inside the machine Does the machine print...
Service Manual
Page 157
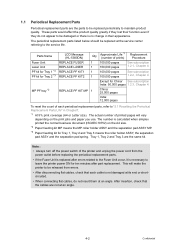
...Tray 1, Tray 2 and Tray 3 are the same kit. These parts would affect the product quality greatly if they lost their appearance. Parts Name Fuser Unit Laser Unit PF kit for Tray 1 *3 PF kit for Tray 2 *3 MP PF tray *2 LCD Message (HL-5380DN) REPLACE FUSER REPLACE... See subscription 1.2.2, Chapter 4 Except for China/ See subscription India: 50,000 pages 1.2.3, Chapter 4 China: 25,000 pages India: 12,000 pages To reset the count of the printer and unplug the power cord from errors. • After disconnecting flat cables, check that the cables are not at an angle. Note : •...
...Tray 1, Tray 2 and Tray 3 are the same kit. These parts would affect the product quality greatly if they lost their appearance. Parts Name Fuser Unit Laser Unit PF kit for Tray 1 *3 PF kit for Tray 2 *3 MP PF tray *2 LCD Message (HL-5380DN) REPLACE FUSER REPLACE... See subscription 1.2.2, Chapter 4 Except for China/ See subscription India: 50,000 pages 1.2.3, Chapter 4 China: 25,000 pages India: 12,000 pages To reset the count of the printer and unplug the power cord from errors. • After disconnecting flat cables, check that the cables are not at an angle. Note : •...

Service Manual
Page 184
(30) Catch the Pins of the Outer chute onto the Back cover, and close the Back cover. 30b Pin Back cover Pin Outer chute ASSY 30a Back cover Fig. 4-44 Set the following parts after assembling. • Set the DX feed ASSY or DX blank cover. • Install the Drum/toner ASSY into the Printer. • Put the Paper into the Paper tray. • Reset the count of the Fuser unit and Laser unit after part replacement. (Refer to "5.1 Resetting the Periodical Replacement Parts Life" in Chapter7.) 4-29 Confidential
(30) Catch the Pins of the Outer chute onto the Back cover, and close the Back cover. 30b Pin Back cover Pin Outer chute ASSY 30a Back cover Fig. 4-44 Set the following parts after assembling. • Set the DX feed ASSY or DX blank cover. • Install the Drum/toner ASSY into the Printer. • Put the Paper into the Paper tray. • Reset the count of the Fuser unit and Laser unit after part replacement. (Refer to "5.1 Resetting the Periodical Replacement Parts Life" in Chapter7.) 4-29 Confidential

Service Manual
Page 190
Hooks Separation pad spring Hook 6b Separation pad ASSY 6b Hook 6a 6c Fig. 4-50 (7) Put the Paper tray into the Paper tray. Paper tray 4-35 Confidential Note : • Check that the Separation pad spring is assembled correctly. (5) Set the Separation pad spring. (6) Put the Hooks of the Separation pad ASSY into the Paper tray, and turn the Separation pad ASSY to the direction of the arrow 6c to catch the Hooks into the Printer. * Reset the count of the PF Kit after part replacement.
Hooks Separation pad spring Hook 6b Separation pad ASSY 6b Hook 6a 6c Fig. 4-50 (7) Put the Paper tray into the Paper tray. Paper tray 4-35 Confidential Note : • Check that the Separation pad spring is assembled correctly. (5) Set the Separation pad spring. (6) Put the Hooks of the Separation pad ASSY into the Paper tray, and turn the Separation pad ASSY to the direction of the arrow 6c to catch the Hooks into the Printer. * Reset the count of the PF Kit after part replacement.

Service Manual
Page 195
(3) Put the Holder bearing MP into the Printer. (6) Close the Front cover. * Reset the count of the arrow 3c to the direction of the PF Kit MP after part replacement. 4-40 Confidential MP feed frame cover MP feed frame MP feed frame Front cover Fig. 4-58 (5) Install the Drum/toner ASSY into the MP feed frame and turn the Holder bearing MP to lock. Holder bearing MP Hook 3a 3c 3b Fig. 4-57 (4) Close the MP feed frame cover.
(3) Put the Holder bearing MP into the Printer. (6) Close the Front cover. * Reset the count of the arrow 3c to the direction of the PF Kit MP after part replacement. 4-40 Confidential MP feed frame cover MP feed frame MP feed frame Front cover Fig. 4-58 (5) Install the Drum/toner ASSY into the MP feed frame and turn the Holder bearing MP to lock. Holder bearing MP Hook 3a 3c 3b Fig. 4-57 (4) Close the MP feed frame cover.


