Software Users Manual - English
Page 22
... Properties dialog box in the printer driver. 2 From the General tab, click the Printing Preferences icon. 3 From the Duplex/Booklet dropdown list in the paper tray or MP tray. The printer will print on both sides of the paper automatically. (BR-Script printer driver) 1 Open the Properties dialog box in the printer driver...
... Properties dialog box in the printer driver. 2 From the General tab, click the Printing Preferences icon. 3 From the Duplex/Booklet dropdown list in the paper tray or MP tray. The printer will print on both sides of the paper automatically. (BR-Script printer driver) 1 Open the Properties dialog box in the printer driver...

Software Users Manual - English
Page 24
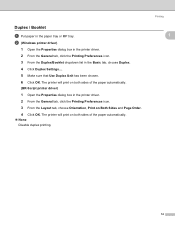
... automatically. • Manual Duplex In this mode, the printer prints all the even numbered pages first. Paper Source 1 You can choose Auto Select, Tray1, Tray2 1, MP Tray or Manual and specify separate trays for printing the first page and for printing from the second page onwards. 1 Available if the optional...
... automatically. • Manual Duplex In this mode, the printer prints all the even numbered pages first. Paper Source 1 You can choose Auto Select, Tray1, Tray2 1, MP Tray or Manual and specify separate trays for printing the first page and for printing from the second page onwards. 1 Available if the optional...

Software Users Manual - English
Page 37
...8226; Tray1 This setting will pull paper from Tray1. • Tray2 This setting will pull paper from Tray2. (Available if the optional tray is installed.) • MP Tray This setting will be printed. The paper size needs to Front prints the document so that page 1 is installed. • Automatically ...Paper/Quality tab Choose the Paper Source. • Paper Source You can choose Automatically Select, Auto Select, Tray1, Tray2 1, MP Tray or Manual Feed. 1 Available if the optional tray is on 1 the bottom of the stack. • Pages Per Sheet Choose how many pages will appear on top of ...
...8226; Tray1 This setting will pull paper from Tray1. • Tray2 This setting will pull paper from Tray2. (Available if the optional tray is installed.) • MP Tray This setting will be printed. The paper size needs to Front prints the document so that page 1 is installed. • Automatically ...Paper/Quality tab Choose the Paper Source. • Paper Source You can choose Automatically Select, Auto Select, Tray1, Tray2 1, MP Tray or Manual Feed. 1 Available if the optional tray is on 1 the bottom of the stack. • Pages Per Sheet Choose how many pages will appear on top of ...
Software Users Manual - English
Page 143
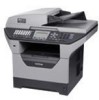
..., enter text in the Billing Info box. Cover Page (Mac OS X 10.4.x or greater) You can choose Auto Select, Tray1, Tray2 1, MP Tray or Manual, and specify separate trays for printing the first page and for the cover page. „ Billing Info If you want to add a cover page to your document..., use this function. „ Cover Page Type Choose a template for printing from the second page onwards. 1 Available if the optional tray is installed. 135
..., enter text in the Billing Info box. Cover Page (Mac OS X 10.4.x or greater) You can choose Auto Select, Tray1, Tray2 1, MP Tray or Manual, and specify separate trays for printing the first page and for the cover page. „ Billing Info If you want to add a cover page to your document..., use this function. „ Cover Page Type Choose a template for printing from the second page onwards. 1 Available if the optional tray is installed. 135
Users Manual - English
Page 9
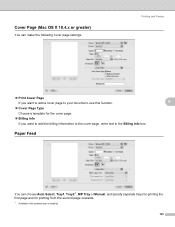
...User's Guide 3 Viewing documentation 3 Accessing Brother support (Windows 5 Control panel overview 6 Status LED indications 9 2 Loading paper and documents 10 Loading paper and print media 10 Loading paper in the standard paper tray 10 Loading paper in the multi-purpose tray (MP tray 12 Unprintable area 13 Acceptable paper and ...21 3 General Setup 22 Mode Timer...22 Paper settings...22 Paper Type ...22 Paper Size ...23 Tray Use in copy mode 23 Tray Use in fax mode 24 Tray Use in print mode 25 Volume settings 25 Ring volume 25 Beeper volume 25 Speaker volume 26 Automatic...
...User's Guide 3 Viewing documentation 3 Accessing Brother support (Windows 5 Control panel overview 6 Status LED indications 9 2 Loading paper and documents 10 Loading paper and print media 10 Loading paper in the standard paper tray 10 Loading paper in the multi-purpose tray (MP tray 12 Unprintable area 13 Acceptable paper and ...21 3 General Setup 22 Mode Timer...22 Paper settings...22 Paper Type ...22 Paper Size ...23 Tray Use in copy mode 23 Tray Use in fax mode 24 Tray Use in print mode 25 Volume settings 25 Ring volume 25 Beeper volume 25 Speaker volume 26 Automatic...
Users Manual - English
Page 28
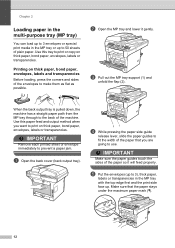
... the envelopes to make them as flat as possible. IMPORTANT Remove each printed sheet or envelope immediately to 3), thick paper, labels or transparencies in the MP tray or up . IMPORTANT Make sure the paper guides touch the sides of the paper so it gently. Chapter 2 Loading paper in the multi-purpose... tray (MP tray) 2 You can load up to 3 envelopes or special print media in the MP tray with the top edge first and the print side face up to 50 sheets of plain paper. Use this...
... the envelopes to make them as flat as possible. IMPORTANT Remove each printed sheet or envelope immediately to 3), thick paper, labels or transparencies in the MP tray or up . IMPORTANT Make sure the paper guides touch the sides of the paper so it gently. Chapter 2 Loading paper in the multi-purpose... tray (MP tray) 2 You can load up to 3 envelopes or special print media in the MP tray with the top edge first and the print side face up to 50 sheets of plain paper. Use this...
Users Manual - English
Page 31
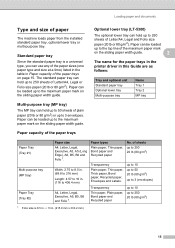
Paper can use any of the paper sizes (one paper type and size at a time) listed in the table in . (116 to the maximum paper mark on the sliding paper width ...trays 2 Paper Tray (Tray #1) Multi-purpose tray (MP tray) Paper Tray (Tray #2) Paper size A4, Letter, Legal, Executive, A5, A5 (Long Edge), A6, B5, B6 and Folio 1. Standard paper tray 2 Since the standard paper tray is 8.5 in. × 13 in this Guide are as follows: 2 Tray and optional unit Standard paper tray Optional lower tray Multi-purpose tray Name Tray 1 Tray 2 MP tray Multi-purpose tray (MP tray) 2 The MP tray...
Paper can use any of the paper sizes (one paper type and size at a time) listed in the table in . (116 to the maximum paper mark on the sliding paper width ...trays 2 Paper Tray (Tray #1) Multi-purpose tray (MP tray) Paper Tray (Tray #2) Paper size A4, Letter, Legal, Executive, A5, A5 (Long Edge), A6, B5, B6 and Folio 1. Standard paper tray 2 Since the standard paper tray is 8.5 in. × 13 in this Guide are as follows: 2 Tray and optional unit Standard paper tray Optional lower tray Multi-purpose tray Name Tray 1 Tray 2 MP tray Multi-purpose tray (MP tray) 2 The MP tray...
Users Manual - English
Page 33
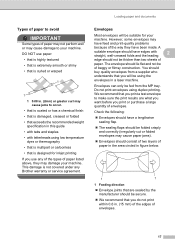
...inkjet printing If you print or purchase a large quantity of paper. Do not print envelopes using the envelopes in a laser machine. DO NOT use any Brother warranty or service agreement. This damage is not covered under any of the types of paper listed above, they have ...been made. Envelopes 2 Most envelopes will be fed from a supplier who understands that you will be of envelopes. 17 The envelope should buy quality envelopes from the MP tray...
...inkjet printing If you print or purchase a large quantity of paper. Do not print envelopes using the envelopes in a laser machine. DO NOT use any Brother warranty or service agreement. This damage is not covered under any of the types of paper listed above, they have ...been made. Envelopes 2 Most envelopes will be fed from a supplier who understands that you will be of envelopes. 17 The envelope should buy quality envelopes from the MP tray...

Users Manual - English
Page 35
... exceed the paper weight specifications described in this machine must be fed from the MP Tray. Label sheets should have an adhesive that they cover the entire length and width of 0.1 seconds. Labels should be damaged. Using labels with a laser machine. Loading paper and documents 2 19 Labels 2 The machine will be exposed between...
... exceed the paper weight specifications described in this machine must be fed from the MP Tray. Label sheets should have an adhesive that they cover the entire length and width of 0.1 seconds. Labels should be damaged. Using labels with a laser machine. Loading paper and documents 2 19 Labels 2 The machine will be exposed between...
Users Manual - English
Page 38
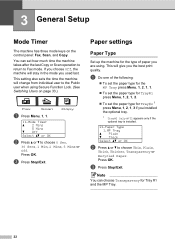
... Stop/Exit. This setting also sets the time the machine will stay in the mode you installed the optional tray. 1 Tray#2 Only or T2 appears only if the optional tray is installed. 21.Paper Type 1.MP Tray a Plain b Thick Select ab or OK b Press a or b to choose 0 Sec, 30 Secs, 1 Min, 2 Mins, 5 ... 3 Set up the machine for the type of the following: „ To set the paper type for the MP Tray press Menu, 1, 2, 1, 1. „ To set the paper type for Tray #1 and the MP Tray. 22 a Do one of paper you the best print quality. 3 General Setup 3 Mode Timer 3 The machine has three mode keys...
... Stop/Exit. This setting also sets the time the machine will stay in the mode you installed the optional tray. 1 Tray#2 Only or T2 appears only if the optional tray is installed. 21.Paper Type 1.MP Tray a Plain b Thick Select ab or OK b Press a or b to choose 0 Sec, 30 Secs, 1 Min, 2 Mins, 5 ... 3 Set up the machine for the type of the following: „ To set the paper type for the MP Tray press Menu, 1, 2, 1, 1. „ To set the paper type for Tray #1 and the MP Tray. 22 a Do one of paper you the best print quality. 3 General Setup 3 Mode Timer 3 The machine has three mode keys...
Users Manual - English
Page 39
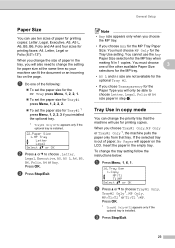
... can fit the document or an incoming fax on the LCD. a Do one of the other available Paper Size 3 selections for the MP tray. • A5 L and A6 size are not available for the optional Tray #2. • If you chose Transparency for Tray#2 1 press Menu, 1, 2, 2, 3 if you will use for printing ...When you will appear on the page. When you choose Any for the MP Tray Paper Size: You must choose one of the following: „ To set the paper size for the MP Tray press Menu, 1, 2, 2, 1. „ To set the paper size for Tray#1 press Menu, 1, 2, 2, 2. „ To set the paper size...
... can fit the document or an incoming fax on the LCD. a Do one of the other available Paper Size 3 selections for the MP tray. • A5 L and A6 size are not available for the optional Tray #2. • If you chose Transparency for Tray#2 1 press Menu, 1, 2, 2, 3 if you will use for printing ...When you will appear on the page. When you choose Any for the MP Tray Paper Size: You must choose one of the following: „ To set the paper size for the MP Tray press Menu, 1, 2, 2, 1. „ To set the paper size for Tray#1 press Menu, 1, 2, 2, 2. „ To set the paper size...
Users Manual - English
Page 40
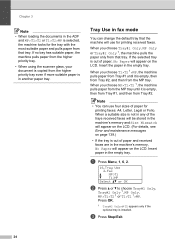
...No Paper will appear on the LCD. When you choose MP>T1>T2 1, the machine pulls paper from the MP tray until it is empty, then from Tray #1, and then from the MP tray. When a suitable size is not in any of the trays received faxes will be stored in the machine's memory and...You can change the default tray that tray. a Press Menu, 1, 6, 2. 16.Tray Use 2.Fax a MP>T1 b T1>MP Select ab or OK b Press a or b to choose Tray#1 Only, Tray#2 Only 1, MP Only, MP>T1>T2 1 or T1>T2 1>MP. Insert paper in the empty tray. If the selected tray is out of paper for the tray with the most suitable ...
...No Paper will appear on the LCD. When you choose MP>T1>T2 1, the machine pulls paper from the MP tray until it is empty, then from Tray #1, and then from the MP tray. When a suitable size is not in any of the trays received faxes will be stored in the machine's memory and...You can change the default tray that tray. a Press Menu, 1, 6, 2. 16.Tray Use 2.Fax a MP>T1 b T1>MP Select ab or OK b Press a or b to choose Tray#1 Only, Tray#2 Only 1, MP Only, MP>T1>T2 1 or T1>T2 1>MP. Insert paper in the empty tray. If the selected tray is out of paper for the tray with the most suitable ...

Users Manual - English
Page 144
... difficulties Difficulties Suggestions Cannot print over and put it back into the paper tray. „ If there is a paper jam. Printouts are smeared. Print the Network Configuration list to see your application's manual for laser machines. (For details, see Paper jams on page 147.) Print quality difficulties...and in the Page Setup or Document Setup menu of the machine will be green. 128 The machine does not feed paper from the MP tray. If possible, try again. „ Check that the cable and network connections are made for more information. Sometimes it is on ...
... difficulties Difficulties Suggestions Cannot print over and put it back into the paper tray. „ If there is a paper jam. Printouts are smeared. Print the Network Configuration list to see your application's manual for laser machines. (For details, see Paper jams on page 147.) Print quality difficulties...and in the Page Setup or Document Setup menu of the machine will be green. 128 The machine does not feed paper from the MP tray. If possible, try again. „ Check that the cable and network connections are made for more information. Sometimes it is on ...
Users Manual - English
Page 148
... Type menu setting. (See Acceptable paper and other print media on page 14 and Basic tab in the input tray. 132 Call Brother Customer Service at 1-877-BROTHER (1-877-276-8437) (in USA) or 1-877-BROTHER (in Canada). „ Check the paper type and quality. (See Acceptable paper and other print media on page.... „ Check the paper type and quality. (See Acceptable paper and other print media on page 14.) „ Make sure that you are using the MP tray, see Loading paper in a new drum unit. (See Replacing the drum unit on page 163.) „ The fuser unit may be contaminated. Examples of poor...
... Type menu setting. (See Acceptable paper and other print media on page 14 and Basic tab in the input tray. 132 Call Brother Customer Service at 1-877-BROTHER (1-877-276-8437) (in USA) or 1-877-BROTHER (in Canada). „ Check the paper type and quality. (See Acceptable paper and other print media on page.... „ Check the paper type and quality. (See Acceptable paper and other print media on page 14.) „ Make sure that you are using the MP tray, see Loading paper in a new drum unit. (See Replacing the drum unit on page 163.) „ The fuser unit may be contaminated. Examples of poor...
Users Manual - English
Page 156
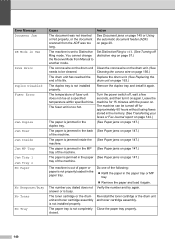
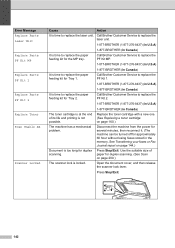
... and then turn it on again. Do one of fuser unit does not rise at a specified temperature within specified time. Error Message Document Jam DR Mode in Use Drum Error Duplex Disabled Fuser Error Jam Duplex Jam Rear Jam Inside Jam MP Tray Jam Tray 1 Jam Tray 2 No Paper No Response/Busy No Toner... No Tray Cause Action The document was too long. The machine is busy. The temperature of the following: „ Refill...
... and then turn it on again. Do one of fuser unit does not rise at a specified temperature within specified time. Error Message Document Jam DR Mode in Use Drum Error Duplex Disabled Fuser Error Jam Duplex Jam Rear Jam Inside Jam MP Tray Jam Tray 1 Jam Tray 2 No Paper No Response/Busy No Toner... No Tray Cause Action The document was too long. The machine is busy. The temperature of the following: „ Refill...
Users Manual - English
Page 158
...for duplex scanning. Call Brother Customer Service to replace the PF Kit MP. 1-877-BROTHER (1-877-276-8437) (in U.S.A) 1-877-BROTHER (in Canada) It is time to replace the laser unit. Call Brother Customer Service to replace the paper feeding kit for the MP tray. Press Stop/Exit....possible. Call Brother Customer Service to replace the laser unit. 1-877-BROTHER (1-877-276-8437) (in U.S.A) 1-877-BROTHER (in Canada) It is time to replace the PF Kit 2. 1-877-BROTHER (1-877-276-8437) (in U.S.A) 1-877-BROTHER (in the memory. Replace the toner cartridge with a new one. (See ...
...for duplex scanning. Call Brother Customer Service to replace the PF Kit MP. 1-877-BROTHER (1-877-276-8437) (in U.S.A) 1-877-BROTHER (in Canada) It is time to replace the laser unit. Call Brother Customer Service to replace the paper feeding kit for the MP tray. Press Stop/Exit....possible. Call Brother Customer Service to replace the laser unit. 1-877-BROTHER (1-877-276-8437) (in U.S.A) 1-877-BROTHER (in Canada) It is time to replace the PF Kit 2. 1-877-BROTHER (1-877-276-8437) (in U.S.A) 1-877-BROTHER (in the memory. Replace the toner cartridge with a new one. (See ...
Users Manual - English
Page 163
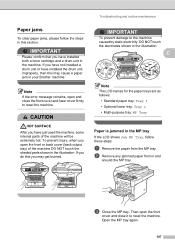
... jammed paper from the MP tray. IMPORTANT Please confirm that you have just used the machine, some internal parts of the machine DO NOT touch the shaded parts shown in the machine. Then open and close it to reset the machine. Open the MP tray again. 147 If you...The LCD names for the paper trays are as follows: • Standard paper tray: Tray 1 • Optional lower tray: Tray 2 • Multi-purpose tray: MP Tray Paper is jammed in the MP tray C If the LCD shows Jam MP Tray, follow the steps in this you may cause a paper jam in your Brother machine. Note If the error...
... jammed paper from the MP tray. IMPORTANT Please confirm that you have just used the machine, some internal parts of the machine DO NOT touch the shaded parts shown in the machine. Then open and close it to reset the machine. Open the MP tray again. 147 If you...The LCD names for the paper trays are as follows: • Standard paper tray: Tray 1 • Optional lower tray: Tray 2 • Multi-purpose tray: MP Tray Paper is jammed in the MP tray C If the LCD shows Jam MP Tray, follow the steps in this you may cause a paper jam in your Brother machine. Note If the error...
Users Manual - English
Page 164
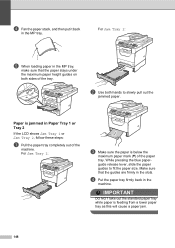
...Use both sides of the paper tray. For Jam Tray 1: c Make sure the paper is below the maximum paper mark (b) of the tray. IMPORTANT DO NOT take out the standard paper tray while paper is jammed in the MP tray, make sure that the guides are firmly in the MP tray. Paper is feeding from a ...lower paper tray as this will cause a paper jam. 148 Make ...
...Use both sides of the paper tray. For Jam Tray 1: c Make sure the paper is below the maximum paper mark (b) of the tray. IMPORTANT DO NOT take out the standard paper tray while paper is jammed in the MP tray, make sure that the guides are firmly in the MP tray. Paper is feeding from a ...lower paper tray as this will cause a paper jam. 148 Make ...
Users Manual - English
Page 181
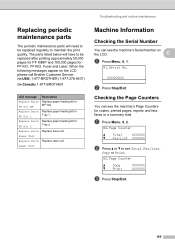
... 165 Replace paper feeding kit for Tray 2. Laser Unit Machine Information C Checking the Serial Number C You can see the machine's Serial Number on the LCD please call Brother Customer Service: (in USA) 1-877-BROTHER (1-877-276-8437) (in Canada) 1-877-BROTHER C LCD message Replace Parts PF Kit MP Replace Parts PF Kit 1 Replace ...The parts listed below will need to be replaced after printing approximately 50,000 pages for PF KitMP and 100,000 pages for MP tray. Fuser Unit Replace Parts Replace laser unit. Replace paper feeding kit for Tray 1. XXXXXXXXX b Press Stop/Exit.
... 165 Replace paper feeding kit for Tray 2. Laser Unit Machine Information C Checking the Serial Number C You can see the machine's Serial Number on the LCD please call Brother Customer Service: (in USA) 1-877-BROTHER (1-877-276-8437) (in Canada) 1-877-BROTHER C LCD message Replace Parts PF Kit MP Replace Parts PF Kit 1 Replace ...The parts listed below will need to be replaced after printing approximately 50,000 pages for PF KitMP and 100,000 pages for MP tray. Fuser Unit Replace Parts Replace laser unit. Replace paper feeding kit for Tray 1. XXXXXXXXX b Press Stop/Exit.

Users Manual - English
Page 187
... 22 33 Sets the type of 22 (This menu Plain* only appears if you have the Thick paper in the paper tray. Menu table The factory settings are shown in the MP tray. Choose & OK Choose & OK Menu and features D to accept to exit D Main Menu Submenu Menu Selections 1.General Setup ...1.Mode Timer - - 2.Paper 1.Paper Type 1.MP Tray Options 0 Sec 30 Secs 1 Min 2 Mins* 5 Mins Off Thin Plain* Descriptions Sets the time to return to Fax mode and the time the machine ...
... 22 33 Sets the type of 22 (This menu Plain* only appears if you have the Thick paper in the paper tray. Menu table The factory settings are shown in the MP tray. Choose & OK Choose & OK Menu and features D to accept to exit D Main Menu Submenu Menu Selections 1.General Setup ...1.Mode Timer - - 2.Paper 1.Paper Type 1.MP Tray Options 0 Sec 30 Secs 1 Min 2 Mins* 5 Mins Off Thin Plain* Descriptions Sets the time to return to Fax mode and the time the machine ...


