Users Manual - English
Page 6
...was purchased within the United States (and does not include shipping outside , the United States, this Product; 2 Damage caused by improper installation, improper or abnormal use of shipping, packing product, and insurance (if you desire). Brother® One-Year Limited Warranty and Replacement Service (USA Only)... within the U.S. and, 6 Normal Periodic Maintenance Items, such as Paper Feeding Kit, Fuser and Laser Units. You are responsible for the cost of non Brother®-brand parts and Consumable and Accessory Items); 4 Consumable and Accessory Items that expired in any way...
...was purchased within the United States (and does not include shipping outside , the United States, this Product; 2 Damage caused by improper installation, improper or abnormal use of shipping, packing product, and insurance (if you desire). Brother® One-Year Limited Warranty and Replacement Service (USA Only)... within the U.S. and, 6 Normal Periodic Maintenance Items, such as Paper Feeding Kit, Fuser and Laser Units. You are responsible for the cost of non Brother®-brand parts and Consumable and Accessory Items); 4 Consumable and Accessory Items that expired in any way...
Users Manual - English
Page 8
... WARRANTY (Canada only) Pursuant to the limited warranty of 1 year from the date of purchase for labour and parts, Brother International Corporation (Canada) Ltd. ("Brother"), or its Authorized Service Centres, Distributors, Dealers, Agents or employees, shall create another warranty or modify this warranty. vi...of such damages. For Laser units: Failure to remove the Toner Cartridge (and Toner Drum Unit, waste toner packs or oil bottles on applicable models) during shipping and will void your Inkjet MFC/Fax machine remove the ink cartridges and replace them with the Serial ...
... WARRANTY (Canada only) Pursuant to the limited warranty of 1 year from the date of purchase for labour and parts, Brother International Corporation (Canada) Ltd. ("Brother"), or its Authorized Service Centres, Distributors, Dealers, Agents or employees, shall create another warranty or modify this warranty. vi...of such damages. For Laser units: Failure to remove the Toner Cartridge (and Toner Drum Unit, waste toner packs or oil bottles on applicable models) during shipping and will void your Inkjet MFC/Fax machine remove the ink cartridges and replace them with the Serial ...
Users Manual - English
Page 158
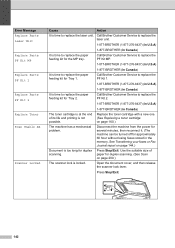
... kit for the MP tray. Replace the toner cartridge with a new one. (See Replacing a toner cartridge on page 144.) Document is locked. Call Brother Customer Service to replace the PF Kit 2. 1-877-BROTHER (1-877-276-8437) (in U.S.A) 1-877-BROTHER (in Canada) It is time to replace the laser unit. 1-877-BROTHER (1-877-276-8437) (in U.S.A) 1-877-BROTHER (in Canada) The toner cartridge...
... kit for the MP tray. Replace the toner cartridge with a new one. (See Replacing a toner cartridge on page 144.) Document is locked. Call Brother Customer Service to replace the PF Kit 2. 1-877-BROTHER (1-877-276-8437) (in U.S.A) 1-877-BROTHER (in Canada) It is time to replace the laser unit. 1-877-BROTHER (1-877-276-8437) (in U.S.A) 1-877-BROTHER (in Canada) The toner cartridge...
Users Manual - English
Page 181
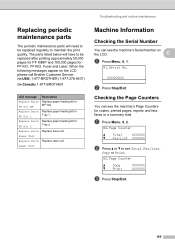
...call Brother Customer Service: (in USA) 1-877-BROTHER (1-877-276-8437) (in Canada) 1-877-BROTHER C LCD message Replace Parts PF Kit MP Replace Parts PF Kit 1 Replace Parts PF Kit 2 Replace Parts Description Replace paper feeding kit for Tray 2. XXXXXXXXX b Press Stop/Exit. Laser Unit Machine ... and 100,000 pages for PF Kit1, PF Kit2, Fuser and Laser. Replace fuser unit. C a Press Menu, 8, 1. 81.Serial No. Fuser Unit Replace Parts Replace laser unit. Troubleshooting and routine maintenance Replacing periodic maintenance parts C The periodic maintenance parts will have to see ...
...call Brother Customer Service: (in USA) 1-877-BROTHER (1-877-276-8437) (in Canada) 1-877-BROTHER C LCD message Replace Parts PF Kit MP Replace Parts PF Kit 1 Replace Parts PF Kit 2 Replace Parts Description Replace paper feeding kit for Tray 2. XXXXXXXXX b Press Stop/Exit. Laser Unit Machine ... and 100,000 pages for PF Kit1, PF Kit2, Fuser and Laser. Replace fuser unit. C a Press Menu, 8, 1. 81.Serial No. Fuser Unit Replace Parts Replace laser unit. Troubleshooting and routine maintenance Replacing periodic maintenance parts C The periodic maintenance parts will have to see ...

Service Manual
Page 9
...) CAUTION: When the machine during servicing is attached on the printer. Since the beam is invisible, the following caution label is operated with the laser unit, replace the laser unit itself. Das Gehäuse der Lasereinheit darf nicht geöffnet werden, da sonst Laserstrahlen austreten können. ■ ADDITIONAL INFORMATION Additional Information When...
...) CAUTION: When the machine during servicing is attached on the printer. Since the beam is invisible, the following caution label is operated with the laser unit, replace the laser unit itself. Das Gehäuse der Lasereinheit darf nicht geöffnet werden, da sonst Laserstrahlen austreten können. ■ ADDITIONAL INFORMATION Additional Information When...

Service Manual
Page 21
Machine life: 200,000 pages MTBF (Meantime between failure): Up to 4000 hours MTTR (Meantime to repair): Average 0.5 hours Monthly volume: 30,000 pages Periodical replacement parts: Parts Approximate Life (pages) Fuser unit 100,000 Laser unit 100,000 PF kit China MP: 25,000 Tray 1/2: 100,000 India MP: 12,000 Tray 1/2: 80,000 Others MP: 50,000 Tray 1/2: 100,000 * As for periodical replacement parts, refer to maintain the product. 2.5 Service Information These are key service information to CHAPTER 4 in the Service Manual. 1-8 Confidential
Machine life: 200,000 pages MTBF (Meantime between failure): Up to 4000 hours MTTR (Meantime to repair): Average 0.5 hours Monthly volume: 30,000 pages Periodical replacement parts: Parts Approximate Life (pages) Fuser unit 100,000 Laser unit 100,000 PF kit China MP: 25,000 Tray 1/2: 100,000 India MP: 12,000 Tray 1/2: 80,000 Others MP: 50,000 Tray 1/2: 100,000 * As for periodical replacement parts, refer to maintain the product. 2.5 Service Information These are key service information to CHAPTER 4 in the Service Manual. 1-8 Confidential
Service Manual
Page 77
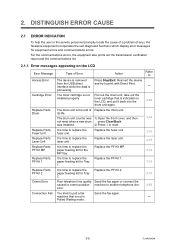
... 2. interface while the data is not installed properly. The toner cartridge is - Replace the laser unit. 3-15 It is the end of Replace the drum unit. Polled Waiting mode. 3-5 Confidential its life. Replace the PF Kit 2. 3-15 Poor telephone line quality Send the fax again or...not in - machine that is indicated on the LCD Error Message Access Error Cartridge Error Replace Parts Drum Replace Parts Fuser Unit Replace Parts Laser Unit Replace Parts PF Kit MP Replace Parts PF Kit 1 Replace Parts PF Kit 2 Comm.Error Connection Fail Type of a problem (if any), the...
... 2. interface while the data is not installed properly. The toner cartridge is - Replace the laser unit. 3-15 It is the end of Replace the drum unit. Polled Waiting mode. 3-5 Confidential its life. Replace the PF Kit 2. 3-15 Poor telephone line quality Send the fax again or...not in - machine that is indicated on the LCD Error Message Access Error Cartridge Error Replace Parts Drum Replace Parts Fuser Unit Replace Parts Laser Unit Replace Parts PF Kit MP Replace Parts PF Kit 1 Replace Parts PF Kit 2 Comm.Error Connection Fail Type of a problem (if any), the...

Service Manual
Page 81
... the end user to quickly find out the problem. 3.1 Error Indication Error codes Problem 1E Replacement time of the drum unit 1F Two or more optional trays are installed 24 Internal temperature sensor failure 35 EEPROM of main PCB failure 36 HVPS PCB during standby failure Main PCB... 44 No toner cartridge Replacement time of the drum 50 unit 51 Replacement time of the paper feed kit MP 52 Replacement time of the paper feed kit T1 53 Replacement time of the paper feed kit T2 Replacement time of the fuser 54 unit 55 Replacement time of the laser unit 56 Back cover opened ...
... the end user to quickly find out the problem. 3.1 Error Indication Error codes Problem 1E Replacement time of the drum unit 1F Two or more optional trays are installed 24 Internal temperature sensor failure 35 EEPROM of main PCB failure 36 HVPS PCB during standby failure Main PCB... 44 No toner cartridge Replacement time of the drum 50 unit 51 Replacement time of the paper feed kit MP 52 Replacement time of the paper feed kit T1 53 Replacement time of the paper feed kit T2 Replacement time of the fuser 54 unit 55 Replacement time of the laser unit 56 Back cover opened ...

Service Manual
Page 87
... T2. ■ Error code 54 Replace Parts Fuser Unit Replacement time of the paper feed kit T1 User Check • Replace the paper feed kit T1 with a new one . Step 1 Cause Remedy Replacement time of the fuser unit Replace the fuser unit. ■ Error code 55 Replace Parts Laser Unit Replacement time of the laser unit Step Cause Remedy 1 Replacement time of the paper feed kit...
... T2. ■ Error code 54 Replace Parts Fuser Unit Replacement time of the paper feed kit T1 User Check • Replace the paper feed kit T1 with a new one . Step 1 Cause Remedy Replacement time of the fuser unit Replace the fuser unit. ■ Error code 55 Replace Parts Laser Unit Replacement time of the laser unit Step Cause Remedy 1 Replacement time of the paper feed kit...

Service Manual
Page 92
... detected higher than constant temperature User Check • Lower the inside temperature. Replace the main PCB ASSY. 3-20 Confidential Replace the main PCB ASSY. ■ Error code 71 Print Unable 71 Turn the power off and then back on again. Laser unit polygon mirror failure Error code 72 Print Unable 72 Turn the power...
... detected higher than constant temperature User Check • Lower the inside temperature. Replace the main PCB ASSY. 3-20 Confidential Replace the main PCB ASSY. ■ Error code 71 Print Unable 71 Turn the power off and then back on again. Laser unit polygon mirror failure Error code 72 Print Unable 72 Turn the power...
Service Manual
Page 109
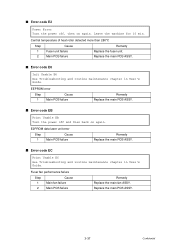
...■ Error code E6 Init Unable E6 See Troubleshooting and routine maintenance chapter in User's Guide. E2PROM data laser unit error Step 1 Cause Main PCB failure Remedy Replace the main PCB ASSY. ■ Error code EC Print Unable EC See Troubleshooting and routine maintenance chapter in User.... Central temperature of heat roller detected more than 280°C Step 1 2 Cause Fuser unit failure Main PCB failure Remedy Replace the fuser unit. EEPROM error Step 1 Cause Main PCB failure Remedy Replace the main PCB ASSY. ■ Error code EB Print Unable EB Turn the power off...
...■ Error code E6 Init Unable E6 See Troubleshooting and routine maintenance chapter in User's Guide. E2PROM data laser unit error Step 1 Cause Main PCB failure Remedy Replace the main PCB ASSY. ■ Error code EC Print Unable EC See Troubleshooting and routine maintenance chapter in User.... Central temperature of heat roller detected more than 280°C Step 1 2 Cause Fuser unit failure Main PCB failure Remedy Replace the fuser unit. EEPROM error Step 1 Cause Main PCB failure Remedy Replace the main PCB ASSY. ■ Error code EB Print Unable EB Turn the power off...
Service Manual
Page 118
... harness Yes connection of Yes the HVPS PCB ASSY and main PCB ASSY. Replace the HVPS PCB Yes ASSY. Laser unit failure Is the problem solved after removing the toner cartridge from the drum unit? Replace the toner cartridge or drum unit with a new one . Wipe the dirt off with a soft, Yes clean, lint free cloth. (Refer...
... harness Yes connection of Yes the HVPS PCB ASSY and main PCB ASSY. Replace the HVPS PCB Yes ASSY. Laser unit failure Is the problem solved after removing the toner cartridge from the drum unit? Replace the toner cartridge or drum unit with a new one . Wipe the dirt off with a soft, Yes clean, lint free cloth. (Refer...
Service Manual
Page 121
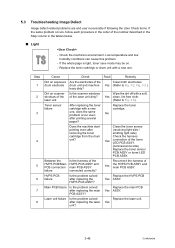
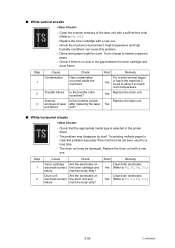
...? Result Remedy Clean both electrodes. Replace the laser unit. Main PCB failure Is the problem solved after replacing the laser unit? ■ Completely blank - HVPS PCB failure Is the problem solved after replacing the main PCB ASSY? Replace the toner cartridge with a new one . Yes Replace the main PCB Yes ASSY. 3-49 Confidential Replace the laser unit. Yes Replace the HVPS PCB Yes ASSY...
...? Result Remedy Clean both electrodes. Replace the laser unit. Main PCB failure Is the problem solved after replacing the laser unit? ■ Completely blank - HVPS PCB failure Is the problem solved after replacing the main PCB ASSY? Replace the toner cartridge with a new one . Yes Replace the main PCB Yes ASSY. 3-49 Confidential Replace the laser unit. Yes Replace the HVPS PCB Yes ASSY...
Service Manual
Page 122
... ASSY securely. HVPS PCB failure Is the problem solved after replacing the laser unit? Scanner harness of the laser unit connection failure Is the scanner harness of the laser unit. Replace the HVPS PCB Yes ASSY. Yes Replace the drum unit. Laser unit failure Is the problem solved after replacing the HVPS PCB ASSY? Replace the main PCB Yes ASSY. Yes 3-50 Confidential Main...
... ASSY securely. HVPS PCB failure Is the problem solved after replacing the laser unit? Scanner harness of the laser unit connection failure Is the scanner harness of the laser unit. Replace the HVPS PCB Yes ASSY. Yes Replace the drum unit. Laser unit failure Is the problem solved after replacing the HVPS PCB ASSY? Replace the main PCB Yes ASSY. Yes 3-50 Confidential Main...
Service Manual
Page 125
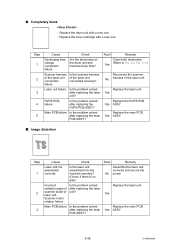
... the machine 2 hours to allow it to Fig. 3-2, Fig. 3-3.) 3-53 Confidential Check the machine's environment. Replace the toner cartridge with a new one . - Replace the laser unit. The drum unit may disappear by itself. Result Remedy Clean both electrodes. Yes Replace the drum unit. The problem may be used for a long time. - Step 1 2 Cause Check Toner cartridge Are the...
... the machine 2 hours to allow it to Fig. 3-2, Fig. 3-3.) 3-53 Confidential Check the machine's environment. Replace the toner cartridge with a new one . - Replace the laser unit. The drum unit may disappear by itself. Result Remedy Clean both electrodes. Yes Replace the drum unit. The problem may be used for a long time. - Step 1 2 Cause Check Toner cartridge Are the...
Service Manual
Page 126
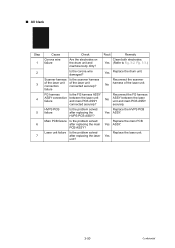
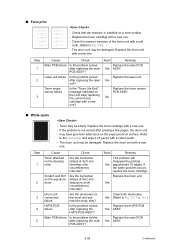
... Is the problem solved after replacing the laser unit? Laser unit failure Is the problem solved after replacing the main PCB ASSY? Result Remedy This problem will disappear by printing Yes approximate 10 pages. If the same problem occurs, replace the toner cartridge. Yes (Refer to Fig. 3-6.) - Replace the toner cartridge with a new one. Yes Replace the toner sensor PCB...
... Is the problem solved after replacing the laser unit? Laser unit failure Is the problem solved after replacing the main PCB ASSY? Result Remedy This problem will disappear by printing Yes approximate 10 pages. If the same problem occurs, replace the toner cartridge. Yes (Refer to Fig. 3-6.) - Replace the toner cartridge with a new one. Yes Replace the toner sensor PCB...
Service Manual
Page 129
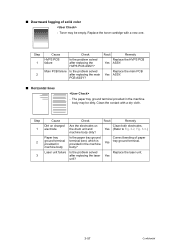
... a new one. Correct bending of solid color - Step 1 2 Cause Check HVPS PCB failure Is the problem solved after replacing the main PCB ASSY? Result Remedy Replace the HVPS PCB Yes ASSY. Main PCB failure Is the problem solved after replacing the HVPS PCB ASSY? Replace the main ... terminal provided in machine body Is the paper tray ground terminal bent, which is provided in the machine body may be dirty. Replace the laser unit. The paper tray ground terminal provided in the machine body? Step 1 2 3 Cause Check Result Remedy Dirt on charged electrode ...
... a new one. Correct bending of solid color - Step 1 2 Cause Check HVPS PCB failure Is the problem solved after replacing the main PCB ASSY? Result Remedy Replace the HVPS PCB Yes ASSY. Main PCB failure Is the problem solved after replacing the HVPS PCB ASSY? Replace the main ... terminal provided in machine body Is the paper tray ground terminal bent, which is provided in the machine body may be dirty. Replace the laser unit. The paper tray ground terminal provided in the machine body? Step 1 2 3 Cause Check Result Remedy Dirt on charged electrode ...

Service Manual
Page 155
PERIODIC MAINTENANCE PARTS 4-1 1.1 Periodical Replacement Parts 4-2 1.2 Procedures to Replace Periodical Replacement Parts 4-3 1.2.1 Fuser unit and laser unit 4-3 1.2.2 Paper feeding kit for tray 1, 2 4-30 1.2.3 Paper feeding kit for MP tray 4-36 Confidential CHAPTER 4 PERIODIC MAINTENANCE CONTENTS 1.
PERIODIC MAINTENANCE PARTS 4-1 1.1 Periodical Replacement Parts 4-2 1.2 Procedures to Replace Periodical Replacement Parts 4-3 1.2.1 Fuser unit and laser unit 4-3 1.2.2 Paper feeding kit for tray 1, 2 4-30 1.2.3 Paper feeding kit for MP tray 4-36 Confidential CHAPTER 4 PERIODIC MAINTENANCE CONTENTS 1.
Service Manual
Page 157
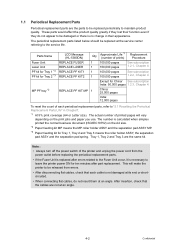
... flat cables, do not insert them at an angle. Parts Name Fuser Unit Laser Unit PF kit for Tray 1 *3 PF kit for Tray 2 *3 MP PF tray *2 LCD Message (HL-5380DN) REPLACE FUSER REPLACE LASER REPLACE PF KIT1 REPLACE PF KIT2 Qty 1 1 1 1 REPLACE PF KIT MP 1 Approximate Life *1 Replacement (number of the printer and unplug the power cord from errors. •...
... flat cables, do not insert them at an angle. Parts Name Fuser Unit Laser Unit PF kit for Tray 1 *3 PF kit for Tray 2 *3 MP PF tray *2 LCD Message (HL-5380DN) REPLACE FUSER REPLACE LASER REPLACE PF KIT1 REPLACE PF KIT2 Qty 1 1 1 1 REPLACE PF KIT MP 1 Approximate Life *1 Replacement (number of the printer and unplug the power cord from errors. •...
Service Manual
Page 158
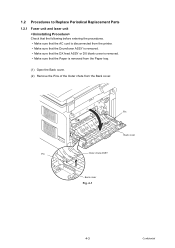
1.2 Procedures to Replace Periodical Replacement Parts 1.2.1 Fuser unit and laser unit Check that the following before entering the procedures. • Make sure that the AC cord is disconnected from the printer. • Make sure that the Drum/toner ASSY is removed. • Make sure that the DX feed ASSY or DX blank cover is removed. • Make sure that the Paper is removed from the Paper tray. (1) Open the Back cover. (2) Remove the Pins of the Outer chute from the Back cover. Pin Back cover Pin Outer chute ASSY Back cover Fig. 4-1 4-3 Confidential
1.2 Procedures to Replace Periodical Replacement Parts 1.2.1 Fuser unit and laser unit Check that the following before entering the procedures. • Make sure that the AC cord is disconnected from the printer. • Make sure that the Drum/toner ASSY is removed. • Make sure that the DX feed ASSY or DX blank cover is removed. • Make sure that the Paper is removed from the Paper tray. (1) Open the Back cover. (2) Remove the Pins of the Outer chute from the Back cover. Pin Back cover Pin Outer chute ASSY Back cover Fig. 4-1 4-3 Confidential


