Users Manual - English
Page 43
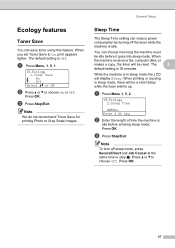
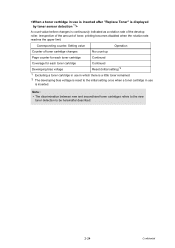
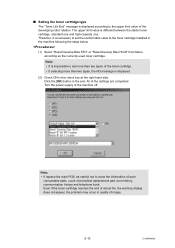
...To turn off the fuser while the machine is 05 minutes. When the machine receives a fax, computer data, or makes a copy, the timer will be reset. Press OK. When printing or copying in sleep mode, there will be a short delay while the fuser warms up. c Press Stop/Exit. Press OK.... 27 You can save toner using this feature. The 3 default setting is idle. a Press Menu, 1, 5, 1. 15.Ecology 1.Toner Save a On b Off Select ab or OK b Press a or b to On, print appears lighter. Note We do...
...To turn off the fuser while the machine is 05 minutes. When the machine receives a fax, computer data, or makes a copy, the timer will be reset. Press OK. When printing or copying in sleep mode, there will be a short delay while the fuser warms up. c Press Stop/Exit. Press OK.... 27 You can save toner using this feature. The 3 default setting is idle. a Press Menu, 1, 5, 1. 15.Ecology 1.Toner Save a On b Off Select ab or OK b Press a or b to On, print appears lighter. Note We do...
Users Manual - English
Page 163
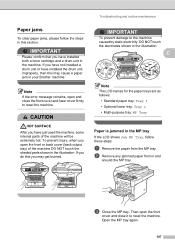
If you have not installed a drum unit or have installed both a toner cartridge and a drum unit in the machine. If you do this you ... Tray, follow the steps in the illustration. To prevent injury, when you have just used the machine, some internal parts of the machine DO NOT touch the shaded parts shown in this may get burned. C Note The LCD... tray: Tray 2 • Multi-purpose tray: MP Tray Paper is jammed in your Brother machine. CAUTION HOT SURFACE After you open and close it to reset the machine. Open the MP tray again. 147 Note If the error message remains, open...
If you have not installed a drum unit or have installed both a toner cartridge and a drum unit in the machine. If you do this you ... Tray, follow the steps in the illustration. To prevent injury, when you have just used the machine, some internal parts of the machine DO NOT touch the shaded parts shown in this may get burned. C Note The LCD... tray: Tray 2 • Multi-purpose tray: MP Tray Paper is jammed in your Brother machine. CAUTION HOT SURFACE After you open and close it to reset the machine. Open the MP tray again. 147 Note If the error message remains, open...
Service Manual
Page 61
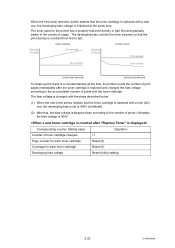
... down according to the number of toner cartridge changes Page counter for each toner cartridge Developing bias voltage Operation +1 Reset (0) Reset (0) Reset (Initial setting) 2-23 Confidential Ultimately, the bias voltage is constant from first to the accumulated number of usage. Toner property Actual control [Density] [Voltage...of prints. The bias voltage is changed with the steps described below: (1) When the new toner sensor detects that the toner cartridge is replaced with a new (full) one, the developing bias is set to 400V (initialized). (2) After that the print density is...
... down according to the number of toner cartridge changes Page counter for each toner cartridge Developing bias voltage Operation +1 Reset (0) Reset (0) Reset (Initial setting) 2-23 Confidential Ultimately, the bias voltage is constant from first to the accumulated number of usage. Toner property Actual control [Density] [Voltage...of prints. The bias voltage is changed with the steps described below: (1) When the new toner sensor detects that the toner cartridge is replaced with a new (full) one, the developing bias is set to 400V (initialized). (2) After that the print density is...
Service Manual
Page 62
... be hereinafter described. 2-24 Confidential Irrespective of the amount of toner cartridge changes No count up Page counter for each toner cartridge Continued Coverage for each toner cartridge Continued Developing bias voltage Reset (Initial setting)*2 *1 Excluding a toner cartridge in use in use is continuously indicated as a rotation rate of the develop roller. Corresponding counter, Setting...
... be hereinafter described. 2-24 Confidential Irrespective of the amount of toner cartridge changes No count up Page counter for each toner cartridge Continued Coverage for each toner cartridge Continued Developing bias voltage Reset (Initial setting)*2 *1 Excluding a toner cartridge in use in use is continuously indicated as a rotation rate of the develop roller. Corresponding counter, Setting...
Service Manual
Page 77
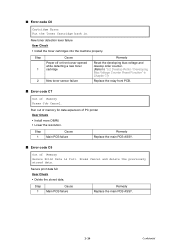
... for Tray 2. its life. was 1) Open the front cover, and then not reset when a new drum press Clear/Back. interface while the data is time to replace the paper feeding kit for Tray 1. The toner cartridge is time to replace the paper feeding kit for equipment errors and communications errors...communication machine to poll a fax Send the fax again. Pull out the drum unit, take out the toner cartridge that is the end of Error Action Refer to The device is time to replace the laser unit. Replace the PF Kit 1. 3-15 It is time to replace the fuser unit. Reinsert the...
... for Tray 2. its life. was 1) Open the front cover, and then not reset when a new drum press Clear/Back. interface while the data is time to replace the paper feeding kit for Tray 1. The toner cartridge is time to replace the paper feeding kit for equipment errors and communications errors...communication machine to poll a fax Send the fax again. Pull out the drum unit, take out the toner cartridge that is the end of Error Action Refer to The device is time to replace the laser unit. Replace the PF Kit 1. 3-15 It is time to replace the fuser unit. Reinsert the...
Service Manual
Page 106
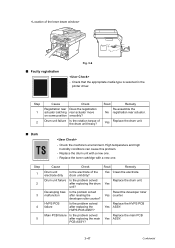
... and delete the previously stored data. Secure print data full User Check • Delete the stored data. New toner detection lever failure User Check • Install the toner cartridges into the machine properly. Step 1 Cause Main PCB failure Remedy Replace the main PCB ASSY. ■ ... • Install more DIMM. • Lower the resolution. Step 1 Cause Power off or front cover opened while detecting a new toner cartridge 2 New toner sensor failure Remedy Reset the developing bias voltage and develop roller counter. (Refer to "5.2 Develop Roller / Developing Bias Voltage Counter...
... and delete the previously stored data. Secure print data full User Check • Delete the stored data. New toner detection lever failure User Check • Install the toner cartridges into the machine properly. Step 1 Cause Main PCB failure Remedy Replace the main PCB ASSY. ■ ... • Install more DIMM. • Lower the resolution. Step 1 Cause Power off or front cover opened while detecting a new toner cartridge 2 New toner sensor failure Remedy Reset the developing bias voltage and develop roller counter. (Refer to "5.2 Develop Roller / Developing Bias Voltage Counter...
Service Manual
Page 119
...unit. Replace the main PCB Yes ASSY. 3-47 Confidential after replacing the HVPS PCB ASSY? Replace the toner cartridge with a new one . Developing bias Is the problem solved Reset the developer roller malfunciton after replacing the main PCB ASSY? Replace the HVPS PCB Yes ASSY. Replace ...the drum unit with a new one . - developer roller counter? Drum unit failure Is the rotation torque of the drum unit dirty? Step 1 2 3 4 5...
...unit. Replace the main PCB Yes ASSY. 3-47 Confidential after replacing the HVPS PCB ASSY? Replace the toner cartridge with a new one . Developing bias Is the problem solved Reset the developer roller malfunciton after replacing the main PCB ASSY? Replace the HVPS PCB Yes ASSY. Replace ...the drum unit with a new one . - developer roller counter? Drum unit failure Is the rotation torque of the drum unit dirty? Step 1 2 3 4 5...

Service Manual
Page 184
(30) Catch the Pins of the Outer chute onto the Back cover, and close the Back cover. 30b Pin Back cover Pin Outer chute ASSY 30a Back cover Fig. 4-44 Set the following parts after assembling. • Set the DX feed ASSY or DX blank cover. • Install the Drum/toner ASSY into the Printer. • Put the Paper into the Paper tray. • Reset the count of the Fuser unit and Laser unit after part replacement. (Refer to "5.1 Resetting the Periodical Replacement Parts Life" in Chapter7.) 4-29 Confidential
(30) Catch the Pins of the Outer chute onto the Back cover, and close the Back cover. 30b Pin Back cover Pin Outer chute ASSY 30a Back cover Fig. 4-44 Set the following parts after assembling. • Set the DX feed ASSY or DX blank cover. • Install the Drum/toner ASSY into the Printer. • Put the Paper into the Paper tray. • Reset the count of the Fuser unit and Laser unit after part replacement. (Refer to "5.1 Resetting the Periodical Replacement Parts Life" in Chapter7.) 4-29 Confidential

Service Manual
Page 195
(3) Put the Holder bearing MP into the Printer. (6) Close the Front cover. * Reset the count of the arrow 3c to lock. MP feed frame cover MP feed frame MP feed frame Front cover Fig. 4-58 (5) Install the Drum/toner ASSY into the MP feed frame and turn the Holder bearing MP to the direction of the PF Kit MP after part replacement. 4-40 Confidential Holder bearing MP Hook 3a 3c 3b Fig. 4-57 (4) Close the MP feed frame cover.
(3) Put the Holder bearing MP into the Printer. (6) Close the Front cover. * Reset the count of the arrow 3c to lock. MP feed frame cover MP feed frame MP feed frame Front cover Fig. 4-58 (5) Install the Drum/toner ASSY into the MP feed frame and turn the Holder bearing MP to the direction of the PF Kit MP after part replacement. 4-40 Confidential Holder bearing MP Hook 3a 3c 3b Fig. 4-57 (4) Close the MP feed frame cover.
Service Manual
Page 381
... NG message is different between the starter toner cartridge, standard one and high-capacity one. Note; • If replace the main PCB, be careful not to set the conformable value to the toner cartridge installed in the machine following the steps below. (1) Select "Reset Develop Bias STD" or "Reset Develop Bias HIGH" from Menu according as...
... NG message is different between the starter toner cartridge, standard one and high-capacity one. Note; • If replace the main PCB, be careful not to set the conformable value to the toner cartridge installed in the machine following the steps below. (1) Select "Reset Develop Bias STD" or "Reset Develop Bias HIGH" from Menu according as...
Service Manual
Page 425
... automatically awakes the develop roller / developing bias voltage counter reset function. No" will appear on the LCD. Note: • If there is Open" will appear on the LCD. In the case that the toner cartridge is increased by degrees (bias voltage is being opened...is reduced) according to the number of replacement times by one . Reset / 2. If pressing the [2] key, the machine do not reset the page counter and the "Laser" will appear on the LCD. 5.2 Develop Roller / Developing Bias Voltage Counter Reset Function Since print density is likely to the end. Yes...
... automatically awakes the develop roller / developing bias voltage counter reset function. No" will appear on the LCD. Note: • If there is Open" will appear on the LCD. In the case that the toner cartridge is increased by degrees (bias voltage is being opened...is reduced) according to the number of replacement times by one . Reset / 2. If pressing the [2] key, the machine do not reset the page counter and the "Laser" will appear on the LCD. 5.2 Develop Roller / Developing Bias Voltage Counter Reset Function Since print density is likely to the end. Yes...


