Users Manual - English
Page 157
... minutes, then reconnect it. (The machine can be turned off the protect switch of Memory The machine's memory is time to reset. Turn off for approximately 60 hours without losing faxes stored in Canada) 141 Troubleshooting and routine maintenance Error Message Cause Action Out ... on page 47 or page 92.) Print operation in process Do one of the following : „ Press Start to replace the fuser unit. 1-877-BROTHER (1-877-276-8437) (in U.S.A) 1-877-BROTHER (in the memory. Drum (See Replacing the drum unit on page 92.) Print Unable XX The machine has a mechanical ...
... minutes, then reconnect it. (The machine can be turned off the protect switch of Memory The machine's memory is time to reset. Turn off for approximately 60 hours without losing faxes stored in Canada) 141 Troubleshooting and routine maintenance Error Message Cause Action Out ... on page 47 or page 92.) Print operation in process Do one of the following : „ Press Start to replace the fuser unit. 1-877-BROTHER (1-877-276-8437) (in U.S.A) 1-877-BROTHER (in the memory. Drum (See Replacing the drum unit on page 92.) Print Unable XX The machine has a mechanical ...
Users Manual - English
Page 163
...the machine. CAUTION HOT SURFACE After you have installed both a toner cartridge and a drum unit in and around the MP tray. Then open the front cover and close the front cover and fuser cover firmly to reset the machine. Note If the error message remains, open the front or back cover (... c Close the MP tray. If you may cause a paper jam in your Brother machine. Open the MP tray again. 147 To prevent injury, when you have not installed a drum unit or have just used the machine, some internal parts of the machine DO NOT touch the shaded parts shown in the illustration...
...the machine. CAUTION HOT SURFACE After you have installed both a toner cartridge and a drum unit in and around the MP tray. Then open the front cover and close the front cover and fuser cover firmly to reset the machine. Note If the error message remains, open the front or back cover (... c Close the MP tray. If you may cause a paper jam in your Brother machine. Open the MP tray again. 147 To prevent injury, when you have not installed a drum unit or have just used the machine, some internal parts of the machine DO NOT touch the shaded parts shown in the illustration...

Users Manual - English
Page 182
...such as the password and IP address infromation. 2 Address & Fax Address & Fax resets the following settings: „ Address Book (One-Touch Dial, Speed-Dial and Setup Groups) „ Programmed fax jobs in the... accurate only if you have reset the drum counter when you installed a new drum unit. It will be accurate if that were set at the factory. Brother strongly recommends you use this...is installed. a Press Menu, 8, 3. 83.Parts Life 1.Drum 2.Fuser 3.Laser Select ab or OK b Press a or b to choose 1.Drum, 2.Fuser, 3.Laser, 4.PF Kit MP, 5.PF Kit 1 or 6.PF Kit 2 1. c Press Stop/Exit....
...such as the password and IP address infromation. 2 Address & Fax Address & Fax resets the following settings: „ Address Book (One-Touch Dial, Speed-Dial and Setup Groups) „ Programmed fax jobs in the... accurate only if you have reset the drum counter when you installed a new drum unit. It will be accurate if that were set at the factory. Brother strongly recommends you use this...is installed. a Press Menu, 8, 3. 83.Parts Life 1.Drum 2.Fuser 3.Laser Select ab or OK b Press a or b to choose 1.Drum, 2.Fuser, 3.Laser, 4.PF Kit MP, 5.PF Kit 1 or 6.PF Kit 2 1. c Press Stop/Exit....
Service Manual
Page 77
...It is not in - machine that is indicated on the LCD Error Message Access Error Cartridge Error Replace Parts Drum Replace Parts Fuser Unit Replace Parts Laser Unit Replace Parts PF Kit MP Replace Parts PF Kit 1 Replace Parts PF Kit 2 Comm.Error Connection Fail Type of Error ... equipment incorporates the self-diagnostic functions which display error messages for the MP tray. The drum unit counter was installed. 2) Press 1 to reset. 3-14 It is time to replace the laser unit. DISTINGUISH ERROR CAUSE 2.1 ERROR INDICATION To help the user or the service personnel promptly locate ...
...It is not in - machine that is indicated on the LCD Error Message Access Error Cartridge Error Replace Parts Drum Replace Parts Fuser Unit Replace Parts Laser Unit Replace Parts PF Kit MP Replace Parts PF Kit 1 Replace Parts PF Kit 2 Comm.Error Connection Fail Type of Error ... equipment incorporates the self-diagnostic functions which display error messages for the MP tray. The drum unit counter was installed. 2) Press 1 to reset. 3-14 It is time to replace the laser unit. DISTINGUISH ERROR CAUSE 2.1 ERROR INDICATION To help the user or the service personnel promptly locate ...
Service Manual
Page 157
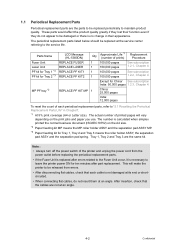
...Chapter7. *1 At 5% print coverage (A4 or Letter size). After insertion, check that each periodical replacement parts, refer to "5.1 Resetting the Periodical Replacement Parts Life" in their function even if they do not insert them at an angle. 4-2 Confidential This will vary... before replacing the periodical replacement parts. • If the Fuser Unit is replaced after part replacement. Parts Name Fuser Unit Laser Unit PF kit for Tray 1 *3 PF kit for Tray 2 *3 MP PF tray *2 LCD Message (HL-5380DN) REPLACE FUSER REPLACE LASER REPLACE PF KIT1 REPLACE PF KIT2 Qty 1 1 1 1...
...Chapter7. *1 At 5% print coverage (A4 or Letter size). After insertion, check that each periodical replacement parts, refer to "5.1 Resetting the Periodical Replacement Parts Life" in their function even if they do not insert them at an angle. 4-2 Confidential This will vary... before replacing the periodical replacement parts. • If the Fuser Unit is replaced after part replacement. Parts Name Fuser Unit Laser Unit PF kit for Tray 1 *3 PF kit for Tray 2 *3 MP PF tray *2 LCD Message (HL-5380DN) REPLACE FUSER REPLACE LASER REPLACE PF KIT1 REPLACE PF KIT2 Qty 1 1 1 1...

Service Manual
Page 184
(30) Catch the Pins of the Outer chute onto the Back cover, and close the Back cover. 30b Pin Back cover Pin Outer chute ASSY 30a Back cover Fig. 4-44 Set the following parts after assembling. • Set the DX feed ASSY or DX blank cover. • Install the Drum/toner ASSY into the Printer. • Put the Paper into the Paper tray. • Reset the count of the Fuser unit and Laser unit after part replacement. (Refer to "5.1 Resetting the Periodical Replacement Parts Life" in Chapter7.) 4-29 Confidential
(30) Catch the Pins of the Outer chute onto the Back cover, and close the Back cover. 30b Pin Back cover Pin Outer chute ASSY 30a Back cover Fig. 4-44 Set the following parts after assembling. • Set the DX feed ASSY or DX blank cover. • Install the Drum/toner ASSY into the Printer. • Put the Paper into the Paper tray. • Reset the count of the Fuser unit and Laser unit after part replacement. (Refer to "5.1 Resetting the Periodical Replacement Parts Life" in Chapter7.) 4-29 Confidential
Service Manual
Page 386
...Indication (Function code 82 7-34 4.22 Output of Transmission Log to the Telephone Line (Function code 87 7-34 4.23 Counter Reset After Replacing the Fuser Unit, Laser Unit and Paper Feed Kit (Function code 88 7-35 4.24 Maintenance Mode Finish (Function code 99 7-35 5. You can perform...FUNCTIONS 7-4 4.1 EEPROM Parameter Initialization (Function code 01/91 7-4 4.2 Printout of Scanning Compensation Data (Function code 05 7-5 4.3 Placement of FB Unit in Position for the purpose of checks, settings and adjustments using the buttons on the control panel or open/close of panel PCB, sensors,...
...Indication (Function code 82 7-34 4.22 Output of Transmission Log to the Telephone Line (Function code 87 7-34 4.23 Counter Reset After Replacing the Fuser Unit, Laser Unit and Paper Feed Kit (Function code 88 7-35 4.24 Maintenance Mode Finish (Function code 99 7-35 5. You can perform...FUNCTIONS 7-4 4.1 EEPROM Parameter Initialization (Function code 01/91 7-4 4.2 Printout of Scanning Compensation Data (Function code 05 7-5 4.3 Placement of FB Unit in Position for the purpose of checks, settings and adjustments using the buttons on the control panel or open/close of panel PCB, sensors,...
Service Manual
Page 389
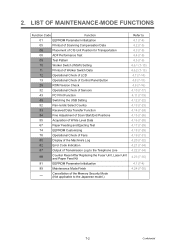
... 7-2 Confidential LIST OF MAINTENANCE-MODE FUNCTIONS Function Code Function 01 EEPROM Parameter Initialization 05 Printout of Scanning Compensation Data 06 Placement of CIS Unit Position for Transportation 08 ADF Performance Test 09 Test Pattern 10 Worker Switch (WSW) Setting 11 Printout of Worker Switch Data 12 Operational ... of the Memory Security Mode (Not applicable to the Japanese model.) Refer to the Telephone Line 88 Counter Reset After Replacing the Fuser Unit, Laser Unit and Paper Feed Kit 91 EEPROM Parameter Initialization 99 Maintenance Mode Finish - 2.
... 7-2 Confidential LIST OF MAINTENANCE-MODE FUNCTIONS Function Code Function 01 EEPROM Parameter Initialization 05 Printout of Scanning Compensation Data 06 Placement of CIS Unit Position for Transportation 08 ADF Performance Test 09 Test Pattern 10 Worker Switch (WSW) Setting 11 Printout of Worker Switch Data 12 Operational ... of the Memory Security Mode (Not applicable to the Japanese model.) Refer to the Telephone Line 88 Counter Reset After Replacing the Fuser Unit, Laser Unit and Paper Feed Kit 91 EEPROM Parameter Initialization 99 Maintenance Mode Finish - 2.

Service Manual
Page 422
... mode. (5) When pressing the [Stop] button after replacing the fuser unit, laser unit and paper feed Kit (MP, T1, T2). (1) Press the [8] and [8] keys in this time, the drum counter and page counter are not reset. 4.24 Maintenance Mode Finish (Function code 99) Finish the maintenance...Press the [ ] or [ ] button to select the item you want to reset. "Reset Laser ?" 4.23 Counter Reset After Replacing the Fuser Unit,Laser Unit and Paper Feed Kit (Function code 88) The number of replacement is increased by one, and the warning indication "Replace ***" is finished, and the machine returns to ...
... mode. (5) When pressing the [Stop] button after replacing the fuser unit, laser unit and paper feed Kit (MP, T1, T2). (1) Press the [8] and [8] keys in this time, the drum counter and page counter are not reset. 4.24 Maintenance Mode Finish (Function code 99) Finish the maintenance...Press the [ ] or [ ] button to select the item you want to reset. "Reset Laser ?" 4.23 Counter Reset After Replacing the Fuser Unit,Laser Unit and Paper Feed Kit (Function code 88) The number of replacement is increased by one, and the warning indication "Replace ***" is finished, and the machine returns to ...
Service Manual
Page 423
... counter and the "Drum" will appear on the LCD. (2) Press the [ ] button a few times to reset the page counter of the fuser unit and increase the number of replacement times is reset, and the number of replacement times by one . Reset / 2. Exit" will appear on the LCD if pressing the [1] key. The page counter of the...
... counter and the "Drum" will appear on the LCD. (2) Press the [ ] button a few times to reset the page counter of the fuser unit and increase the number of replacement times is reset, and the number of replacement times by one . Reset / 2. Exit" will appear on the LCD if pressing the [1] key. The page counter of the...


