Users Manual - English
Page 157
... it. (The machine can be turned off the protect switch of its life. Replace the drum unit. Call Brother Customer Service to replace the fuser unit. 1-877-BROTHER (1-877-276-8437) (in U.S.A) 1-877-BROTHER (in the Software User's Guide on the USB Flash memory drive with the same name as... the file you are trying to reset. Turn off for approximately 60 hours without losing faxes stored in progress Do one of Memory The machine...
... it. (The machine can be turned off the protect switch of its life. Replace the drum unit. Call Brother Customer Service to replace the fuser unit. 1-877-BROTHER (1-877-276-8437) (in U.S.A) 1-877-BROTHER (in the Software User's Guide on the USB Flash memory drive with the same name as... the file you are trying to reset. Turn off for approximately 60 hours without losing faxes stored in progress Do one of Memory The machine...
Users Manual - English
Page 163
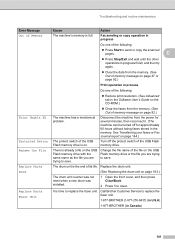
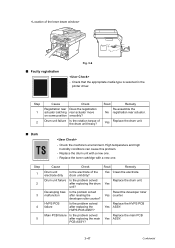
...around the MP tray. CAUTION HOT SURFACE After you have just used the machine, some internal parts of the machine DO NOT touch the shaded parts shown in the illustration. Then...cover and fuser cover firmly to reset the machine. If you have installed the drum unit improperly, then this may get burned. IMPORTANT To prevent damage to reset the machine. c Close the MP...the steps in your Brother machine. Open the MP tray again. 147 IMPORTANT Please confirm that you have not installed a drum unit or have installed both a toner cartridge and a drum unit in the illustration....
...around the MP tray. CAUTION HOT SURFACE After you have just used the machine, some internal parts of the machine DO NOT touch the shaded parts shown in the illustration. Then...cover and fuser cover firmly to reset the machine. If you have installed the drum unit improperly, then this may get burned. IMPORTANT To prevent damage to reset the machine. c Close the MP...the steps in your Brother machine. Open the MP tray again. 147 IMPORTANT Please confirm that you have not installed a drum unit or have installed both a toner cartridge and a drum unit in the illustration....

Users Manual - English
Page 182
... life of the machine's drum unit and periodic maintenance parts on the LCD. c Press Stop/Exit. Brother strongly recommends you use this operation when you installed a new drum unit. Note The life check will not be accurate only if you have reset the drum counter when you dispose of... the machine settings back to the settings that part's life counter was reset during the life of the used part. Reset C The following reset functions are available: 1 Network You can reset the print server back to choose 1.Drum, 2.Fuser, 3.Laser, 4.PF Kit MP, 5.PF Kit 1 or 6.PF Kit 2 1. Note Unplug...
... life of the machine's drum unit and periodic maintenance parts on the LCD. c Press Stop/Exit. Brother strongly recommends you use this operation when you installed a new drum unit. Note The life check will not be accurate only if you have reset the drum counter when you dispose of... the machine settings back to the settings that part's life counter was reset during the life of the used part. Reset C The following reset functions are available: 1 Network You can reset the print server back to choose 1.Drum, 2.Fuser, 3.Laser, 4.PF Kit MP, 5.PF Kit 1 or 6.PF Kit 2 1. Note Unplug...
Service Manual
Page 77
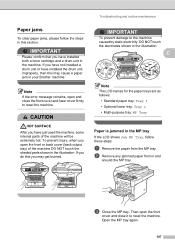
... is removed Press Stop/Exit. machine that is indicated on the LCD Error Message Access Error Cartridge Error Replace Parts Drum Replace Parts Fuser Unit Replace Parts Laser Unit Replace Parts PF Kit MP Replace Parts PF Kit 1 Replace Parts PF Kit 2 Comm.Error Connection Fail Type... to The device is not in - 2. processing. was 1) Open the front cover, and then not reset when a new drum press Clear/Back. Replace the PF Kit 1. 3-15 It is - The drum unit counter was installed. 2) Press 1 to replace the paper feeding kit for equipment errors and communications errors...
... is removed Press Stop/Exit. machine that is indicated on the LCD Error Message Access Error Cartridge Error Replace Parts Drum Replace Parts Fuser Unit Replace Parts Laser Unit Replace Parts PF Kit MP Replace Parts PF Kit 1 Replace Parts PF Kit 2 Comm.Error Connection Fail Type... to The device is not in - 2. processing. was 1) Open the front cover, and then not reset when a new drum press Clear/Back. Replace the PF Kit 1. 3-15 It is - The drum unit counter was installed. 2) Press 1 to replace the paper feeding kit for equipment errors and communications errors...
Service Manual
Page 119
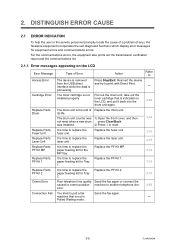
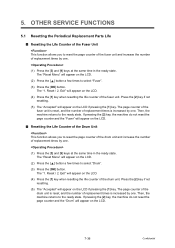
... failure Is the problem solved after reseting the Yes counter. Replace the toner cartridge with a new one . after replacing the main PCB ASSY? ■ Faulty registration Fig. 3-6 - Yes Replace the drum unit. ■ Dark - Drum unit failure Is the problem solved Replace the drum unit. Replace the drum unit with a new one . - Replace the HVPS PCB Yes...
... failure Is the problem solved after reseting the Yes counter. Replace the toner cartridge with a new one . after replacing the main PCB ASSY? ■ Faulty registration Fig. 3-6 - Yes Replace the drum unit. ■ Dark - Drum unit failure Is the problem solved Replace the drum unit. Replace the drum unit with a new one . - Replace the HVPS PCB Yes...

Service Manual
Page 184
(30) Catch the Pins of the Outer chute onto the Back cover, and close the Back cover. 30b Pin Back cover Pin Outer chute ASSY 30a Back cover Fig. 4-44 Set the following parts after assembling. • Set the DX feed ASSY or DX blank cover. • Install the Drum/toner ASSY into the Printer. • Put the Paper into the Paper tray. • Reset the count of the Fuser unit and Laser unit after part replacement. (Refer to "5.1 Resetting the Periodical Replacement Parts Life" in Chapter7.) 4-29 Confidential
(30) Catch the Pins of the Outer chute onto the Back cover, and close the Back cover. 30b Pin Back cover Pin Outer chute ASSY 30a Back cover Fig. 4-44 Set the following parts after assembling. • Set the DX feed ASSY or DX blank cover. • Install the Drum/toner ASSY into the Printer. • Put the Paper into the Paper tray. • Reset the count of the Fuser unit and Laser unit after part replacement. (Refer to "5.1 Resetting the Periodical Replacement Parts Life" in Chapter7.) 4-29 Confidential

Service Manual
Page 195
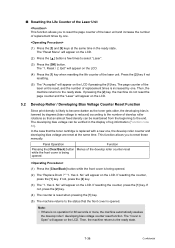
MP feed frame cover MP feed frame MP feed frame Front cover Fig. 4-58 (5) Install the Drum/toner ASSY into the MP feed frame and turn the Holder bearing MP to lock. Holder bearing MP Hook 3a 3c 3b Fig. 4-57 (4) Close the MP feed frame cover. (3) Put the Holder bearing MP into the Printer. (6) Close the Front cover. * Reset the count of the arrow 3c to the direction of the PF Kit MP after part replacement. 4-40 Confidential
MP feed frame cover MP feed frame MP feed frame Front cover Fig. 4-58 (5) Install the Drum/toner ASSY into the MP feed frame and turn the Holder bearing MP to lock. Holder bearing MP Hook 3a 3c 3b Fig. 4-57 (4) Close the MP feed frame cover. (3) Put the Holder bearing MP into the Printer. (6) Close the Front cover. * Reset the count of the arrow 3c to the direction of the PF Kit MP after part replacement. 4-40 Confidential
Service Manual
Page 386
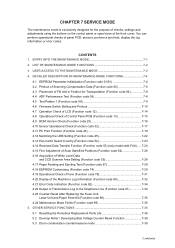
... Periodical Replacement Parts Life 7-36 5.2 Develop Roller / Developing Bias Voltage Counter Reset Function 7-38 5.3 Drum condensation countermeasure mode 7-39 Confidential LIST OF MAINTENANCE-MODE FUNCTIONS 7-2 3. CONTENTS 1. CHAPTER 7 SERVICE MODE The maintenance mode is exclusively designed ... (Function code 82 7-34 4.22 Output of Transmission Log to the Telephone Line (Function code 87 7-34 4.23 Counter Reset After Replacing the Fuser Unit, Laser Unit and Paper Feed Kit (Function code 88 7-35 4.24 Maintenance Mode Finish (Function code 99 7-35 5. DETAILED DESCRIPTION...
... Periodical Replacement Parts Life 7-36 5.2 Develop Roller / Developing Bias Voltage Counter Reset Function 7-38 5.3 Drum condensation countermeasure mode 7-39 Confidential LIST OF MAINTENANCE-MODE FUNCTIONS 7-2 3. CONTENTS 1. CHAPTER 7 SERVICE MODE The maintenance mode is exclusively designed ... (Function code 82 7-34 4.22 Output of Transmission Log to the Telephone Line (Function code 87 7-34 4.23 Counter Reset After Replacing the Fuser Unit, Laser Unit and Paper Feed Kit (Function code 88 7-35 4.24 Maintenance Mode Finish (Function code 99 7-35 5. DETAILED DESCRIPTION...

Service Manual
Page 422
...mode. (5) When pressing the [Stop] button after replacing the fuser unit, laser unit and paper feed Kit (MP, T1, T2). (1) Press the [8] and [8] keys in this time, the drum counter and page counter are not reset. 4.24 Maintenance Mode Finish (Function code 99) Finish the maintenance mode. ...machine returns to the standby status of the selected part. "Reset PF KIT MP ?" "Reset Laser ?" 4.23 Counter Reset After Replacing the Fuser Unit,Laser Unit and Paper Feed Kit (Function code 88) The number of replacement is increased by one, and the warning indication "Replace ***" is finished, and the...
...mode. (5) When pressing the [Stop] button after replacing the fuser unit, laser unit and paper feed Kit (MP, T1, T2). (1) Press the [8] and [8] keys in this time, the drum counter and page counter are not reset. 4.24 Maintenance Mode Finish (Function code 99) Finish the maintenance mode. ...machine returns to the standby status of the selected part. "Reset PF KIT MP ?" "Reset Laser ?" 4.23 Counter Reset After Replacing the Fuser Unit,Laser Unit and Paper Feed Kit (Function code 88) The number of replacement is increased by one, and the warning indication "Replace ***" is finished, and the...
Service Manual
Page 423
... on the LCD. (4) Press the [1] key when resetting the life counter of replacement times is reset, and the number of the drum unit. The page counter of the drum unit is increased by one . Reset / 2. Then, the machine returns to the ready state. The "1. Press the [2] key if not resetting. (5) The "Accepted" will appear on the LCD...
... on the LCD. (4) Press the [1] key when resetting the life counter of replacement times is reset, and the number of the drum unit. The page counter of the drum unit is increased by one . Reset / 2. Then, the machine returns to the ready state. The "1. Press the [2] key if not resetting. (5) The "Accepted" will appear on the LCD...
Service Manual
Page 425
...the number of develop roller rotations so that the front cover is opened . (2) The "Replace Drum ?" This function allows you to reset the page counter of the laser unit and increase the number of replacement times by one . (1) Press the [3] and [9] keys at the same time. Yes 2. If not, ...press the [2] key. (4) The counter is increased by one . Then, the machine returns to the ready state. ■ Resetting the Life Counter of the Laser Unit This function allows you to reset these manually. The "Reset Menu" will appear on the LCD. (2) Press the [ ] button a few...
...the number of develop roller rotations so that the front cover is opened . (2) The "Replace Drum ?" This function allows you to reset the page counter of the laser unit and increase the number of replacement times by one . (1) Press the [3] and [9] keys at the same time. Yes 2. If not, ...press the [2] key. (4) The counter is increased by one . Then, the machine returns to the ready state. ■ Resetting the Life Counter of the Laser Unit This function allows you to reset these manually. The "Reset Menu" will appear on the LCD. (2) Press the [ ] button a few...


