Users Manual - English
Page 43
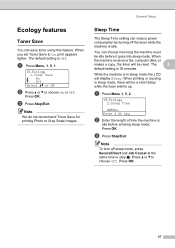
... up. c Press Stop/Exit. When printing or copying in sleep mode, there will be idle before entering sleep mode. Note To turn off the fuser while the machine is 05 minutes. a Press Menu, 1, 5, 1. 15.Ecology 1.Toner Save a On b Off Select ab or OK b Press a or b to choose Off. ... reduce power consumption by turning off sleep mode, press Secure/Direct and Job Cancel at the same time in sleep mode the LCD will be reset. Sleep Time 3 The Sleep Time setting can save toner using this feature. The 3 default setting is idle. a Press Menu 1, 5, 2. 15.Ecology 2.Sleep...
... up. c Press Stop/Exit. When printing or copying in sleep mode, there will be idle before entering sleep mode. Note To turn off the fuser while the machine is 05 minutes. a Press Menu, 1, 5, 1. 15.Ecology 1.Toner Save a On b Off Select ab or OK b Press a or b to choose Off. ... reduce power consumption by turning off sleep mode, press Secure/Direct and Job Cancel at the same time in sleep mode the LCD will be reset. Sleep Time 3 The Sleep Time setting can save toner using this feature. The 3 default setting is idle. a Press Menu 1, 5, 2. 15.Ecology 2.Sleep...
Users Manual - English
Page 157
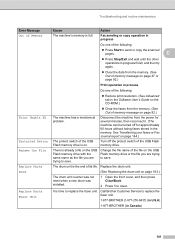
... file name of the file on the USB Flash memory drive or the file you are trying to replace the fuser unit. 1-877-BROTHER (1-877-276-8437) (in U.S.A) 1-877-BROTHER (in the Software User's Guide on page 47 or page 92.) Print operation in the memory. Fax sending ...or copy operation in progress Do one of the following : „ Press Start to save . Troubleshooting and routine maintenance Error Message Cause Action Out of Memory The machine's memory is time to reset...
... file name of the file on the USB Flash memory drive or the file you are trying to replace the fuser unit. 1-877-BROTHER (1-877-276-8437) (in U.S.A) 1-877-BROTHER (in the Software User's Guide on page 47 or page 92.) Print operation in the memory. Fax sending ...or copy operation in progress Do one of the following : „ Press Start to save . Troubleshooting and routine maintenance Error Message Cause Action Out of Memory The machine's memory is time to reset...
Users Manual - English
Page 163
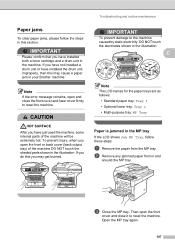
... machine, some internal parts of the machine DO NOT touch the shaded parts shown in the illustration. Then open the front cover and close the front cover and fuser cover firmly to reset the machine. ... both a toner cartridge and a drum unit in the illustration. If you open and close it to reset the machine. If you do this you have installed the drum unit improperly, then this section. c Close...MP tray. IMPORTANT Please confirm that you may cause a paper jam in your Brother machine. IMPORTANT To prevent damage to the machine caused by static electricity, DO NOT touch the electrodes shown...
... machine, some internal parts of the machine DO NOT touch the shaded parts shown in the illustration. Then open the front cover and close the front cover and fuser cover firmly to reset the machine. ... both a toner cartridge and a drum unit in the illustration. If you open and close it to reset the machine. If you do this you have installed the drum unit improperly, then this section. c Close...MP tray. IMPORTANT Please confirm that you may cause a paper jam in your Brother machine. IMPORTANT To prevent damage to the machine caused by static electricity, DO NOT touch the electrodes shown...

Users Manual - English
Page 182
Note The life check will not be accurate only if you have reset the drum counter when you installed a new drum unit. Brother strongly recommends you use this operation when you choose Network or All Settings. 166 Press OK. 83.Parts Life 1.Drum Remaining: ..., 2.Fuser, 3.Laser, 4.PF Kit MP, 5.PF Kit 1 or 6.PF Kit 2 1. Reset C The following reset functions are available: 1 Network You can reset the print server back to its default factory settings such as the password and IP address infromation. 2 Address & Fax Address & Fax resets the following settings: „ Address Book (One-Touch ...
Note The life check will not be accurate only if you have reset the drum counter when you installed a new drum unit. Brother strongly recommends you use this operation when you choose Network or All Settings. 166 Press OK. 83.Parts Life 1.Drum Remaining: ..., 2.Fuser, 3.Laser, 4.PF Kit MP, 5.PF Kit 1 or 6.PF Kit 2 1. Reset C The following reset functions are available: 1 Network You can reset the print server back to its default factory settings such as the password and IP address infromation. 2 Address & Fax Address & Fax resets the following settings: „ Address Book (One-Touch ...
Service Manual
Page 77
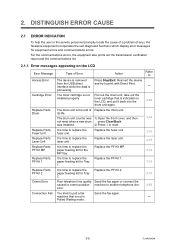
... 3-15 It is not in - machine that is indicated on the LCD Error Message Access Error Cartridge Error Replace Parts Drum Replace Parts Fuser Unit Replace Parts Laser Unit Replace Parts PF Kit MP Replace Parts PF Kit 1 Replace Parts PF Kit 2 Comm.Error Connection Fail Type of Error Action Refer... to replace the paper feeding kit for the MP tray. The drum unit counter was installed. 2) Press 1 to reset. 3-14 It is time to replace the fuser ...
... 3-15 It is not in - machine that is indicated on the LCD Error Message Access Error Cartridge Error Replace Parts Drum Replace Parts Fuser Unit Replace Parts Laser Unit Replace Parts PF Kit MP Replace Parts PF Kit 1 Replace Parts PF Kit 2 Comm.Error Connection Fail Type of Error Action Refer... to replace the paper feeding kit for the MP tray. The drum unit counter was installed. 2) Press 1 to reset. 3-14 It is time to replace the fuser ...
Service Manual
Page 157
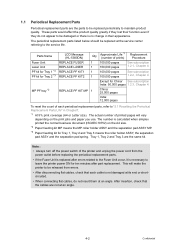
... means the roller holder ASSY, the separation pad ASSY and the separation pad spring. Parts Name Fuser Unit Laser Unit PF kit for Tray 1 *3 PF kit for Tray 2 *3 MP PF tray *2 LCD Message (HL-5380DN) REPLACE FUSER REPLACE LASER REPLACE PF KIT1 REPLACE PF KIT2 Qty 1 1 1 1 REPLACE PF KIT MP 1 Approximate ... 1.2.2, Chapter 4 Except for China/ See subscription India: 50,000 pages 1.2.3, Chapter 4 China: 25,000 pages India: 12,000 pages To reset the count of each cable is calculated when simplex printed the normal business document (ISO/IEC19752) on the print jobs and paper you use. This...
... means the roller holder ASSY, the separation pad ASSY and the separation pad spring. Parts Name Fuser Unit Laser Unit PF kit for Tray 1 *3 PF kit for Tray 2 *3 MP PF tray *2 LCD Message (HL-5380DN) REPLACE FUSER REPLACE LASER REPLACE PF KIT1 REPLACE PF KIT2 Qty 1 1 1 1 REPLACE PF KIT MP 1 Approximate ... 1.2.2, Chapter 4 Except for China/ See subscription India: 50,000 pages 1.2.3, Chapter 4 China: 25,000 pages India: 12,000 pages To reset the count of each cable is calculated when simplex printed the normal business document (ISO/IEC19752) on the print jobs and paper you use. This...

Service Manual
Page 184
(30) Catch the Pins of the Outer chute onto the Back cover, and close the Back cover. 30b Pin Back cover Pin Outer chute ASSY 30a Back cover Fig. 4-44 Set the following parts after assembling. • Set the DX feed ASSY or DX blank cover. • Install the Drum/toner ASSY into the Printer. • Put the Paper into the Paper tray. • Reset the count of the Fuser unit and Laser unit after part replacement. (Refer to "5.1 Resetting the Periodical Replacement Parts Life" in Chapter7.) 4-29 Confidential
(30) Catch the Pins of the Outer chute onto the Back cover, and close the Back cover. 30b Pin Back cover Pin Outer chute ASSY 30a Back cover Fig. 4-44 Set the following parts after assembling. • Set the DX feed ASSY or DX blank cover. • Install the Drum/toner ASSY into the Printer. • Put the Paper into the Paper tray. • Reset the count of the Fuser unit and Laser unit after part replacement. (Refer to "5.1 Resetting the Periodical Replacement Parts Life" in Chapter7.) 4-29 Confidential
Service Manual
Page 386
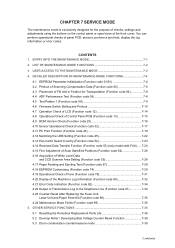
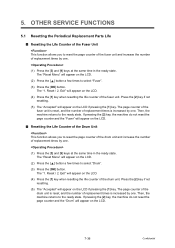
.../close of the front cover. ENTRY INTO THE MAINTENANCE MODE 7-1 2. OTHER SERVICE FUNCTIONS 7-36 5.1 Resetting the Periodical Replacement Parts Life 7-36 5.2 Develop Roller / Developing Bias Voltage Counter Reset Function 7-38 5.3 Drum condensation countermeasure mode 7-39 Confidential LIST OF MAINTENANCE-MODE FUNCTIONS 7-2 3. CHAPTER ... 7-34 4.22 Output of Transmission Log to the Telephone Line (Function code 87 7-34 4.23 Counter Reset After Replacing the Fuser Unit, Laser Unit and Paper Feed Kit (Function code 88 7-35 4.24 Maintenance Mode Finish (Function code 99 7-35 5.
.../close of the front cover. ENTRY INTO THE MAINTENANCE MODE 7-1 2. OTHER SERVICE FUNCTIONS 7-36 5.1 Resetting the Periodical Replacement Parts Life 7-36 5.2 Develop Roller / Developing Bias Voltage Counter Reset Function 7-38 5.3 Drum condensation countermeasure mode 7-39 Confidential LIST OF MAINTENANCE-MODE FUNCTIONS 7-2 3. CHAPTER ... 7-34 4.22 Output of Transmission Log to the Telephone Line (Function code 87 7-34 4.23 Counter Reset After Replacing the Fuser Unit, Laser Unit and Paper Feed Kit (Function code 88 7-35 4.24 Maintenance Mode Finish (Function code 99 7-35 5.
Service Manual
Page 389
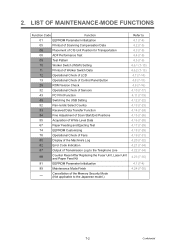
...'s Log 82 Error Code Indication 87 Output of the Memory Security Mode (Not applicable to the Japanese model.) Refer to the Telephone Line 88 Counter Reset After Replacing the Fuser Unit, Laser Unit and Paper Feed Kit 91 EEPROM Parameter Initialization 99 Maintenance Mode Finish -
...'s Log 82 Error Code Indication 87 Output of the Memory Security Mode (Not applicable to the Japanese model.) Refer to the Telephone Line 88 Counter Reset After Replacing the Fuser Unit, Laser Unit and Paper Feed Kit 91 EEPROM Parameter Initialization 99 Maintenance Mode Finish -

Service Manual
Page 422
... maintenance mode. (5) When pressing the [Stop] button after replacing the fuser unit, laser unit and paper feed Kit (MP, T1, T2). (1) Press the [8] and [8] keys in this time, the drum counter and page counter are not reset. 4.24 Maintenance Mode Finish (Function code 99) Finish the maintenance mode... to the standby status of the maintenance mode. The LCD shows. 4.23 Counter Reset After Replacing the Fuser Unit,Laser Unit and Paper Feed Kit (Function code 88) The number of replacement is increased by one, and the warning indication "Replace ***" is finished, and the machine returns to ...
... maintenance mode. (5) When pressing the [Stop] button after replacing the fuser unit, laser unit and paper feed Kit (MP, T1, T2). (1) Press the [8] and [8] keys in this time, the drum counter and page counter are not reset. 4.24 Maintenance Mode Finish (Function code 99) Finish the maintenance mode... to the standby status of the maintenance mode. The LCD shows. 4.23 Counter Reset After Replacing the Fuser Unit,Laser Unit and Paper Feed Kit (Function code 88) The number of replacement is increased by one, and the warning indication "Replace ***" is finished, and the machine returns to ...
Service Manual
Page 423
... Press the [OK] button. If pressing the [2] key, the machine do not reset the page counter and the "Fuser" will appear on the LCD. ■ Resetting the Life Counter of replacement times by one . Press the [2] key if not resetting. (5) The "Accepted" will appear on the LCD if pressing the [1] key.... the [1] key. The page counter of the fuser unit is reset, and the number of replacement times by one . The "Reset Menu" will appear on the LCD. (2) Press the [ ] button a few times to reset the page counter of the fuser unit and increase the number of replacement times is...
... Press the [OK] button. If pressing the [2] key, the machine do not reset the page counter and the "Fuser" will appear on the LCD. ■ Resetting the Life Counter of replacement times by one . Press the [2] key if not resetting. (5) The "Accepted" will appear on the LCD if pressing the [1] key.... the [1] key. The page counter of the fuser unit is reset, and the number of replacement times by one . The "Reset Menu" will appear on the LCD. (2) Press the [ ] button a few times to reset the page counter of the fuser unit and increase the number of replacement times is...


