Users Manual - English
Page 4
...brother.ca/ Description Toner Cartridge Standard Toner Cartridge High Yield Drum Unit Telephone Line Cord User's Guide Quick Setup Guide Item TN-620 (Approx. 3,000 pages) 1 TN-650 (Approx. 8,000 pages) 1 DR-620 (Approx. 25,000 pages) 2 LG3077001 LX2016001 (English for USA and Canada) LS7438002 (French for Canada) (MFC-8480DN, MFC...-8680DN) LX2021001 (English for USA and Canada) (MFC-8890DW) LS7450001 (English for USA and Canada) (MFC-8480DN) LS7493002 (French for Canada) (MFC-8890DW) LS7450002 (French for a complete selection of use only genuine Brother accessories, ...
...brother.ca/ Description Toner Cartridge Standard Toner Cartridge High Yield Drum Unit Telephone Line Cord User's Guide Quick Setup Guide Item TN-620 (Approx. 3,000 pages) 1 TN-650 (Approx. 8,000 pages) 1 DR-620 (Approx. 25,000 pages) 2 LG3077001 LX2016001 (English for USA and Canada) LS7438002 (French for Canada) (MFC-8480DN, MFC...-8680DN) LX2021001 (English for USA and Canada) (MFC-8890DW) LS7450001 (English for USA and Canada) (MFC-8480DN) LS7493002 (French for Canada) (MFC-8890DW) LS7450002 (French for a complete selection of use only genuine Brother accessories, ...
Users Manual - English
Page 8
... at Brother's sole discretion) this MFC/Fax machine free of charge if defective in excess of the specifications or with your warranty. vi For Laser units: Failure to remove the Toner Cartridge (and Toner Drum Unit, waste toner packs ...MFC/Fax machine in material or workmanship. Internet support: support@brother.ca or browse Brother's Web Site www.brother.ca. BROTHER MULTIFUNCTION CENTER / FAX MACHINE LIMITED WARRANTY (Canada only) Pursuant to the limited warranty of 1 year from the date of purchase for labour and parts, Brother International Corporation (Canada) Ltd. ("Brother...
... at Brother's sole discretion) this MFC/Fax machine free of charge if defective in excess of the specifications or with your warranty. vi For Laser units: Failure to remove the Toner Cartridge (and Toner Drum Unit, waste toner packs ...MFC/Fax machine in material or workmanship. Internet support: support@brother.ca or browse Brother's Web Site www.brother.ca. BROTHER MULTIFUNCTION CENTER / FAX MACHINE LIMITED WARRANTY (Canada only) Pursuant to the limited warranty of 1 year from the date of purchase for labour and parts, Brother International Corporation (Canada) Ltd. ("Brother...
Users Manual - English
Page 14
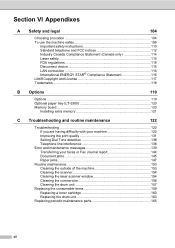
...instructions 110 Standard telephone and FCC notices 112 Industry Canada Compliance Statement (Canada only 114 Laser safety 114 FDA regulations 115 Disconnect device 115 LAN connection 116 International ENERGY STAR® Compliance Statement 116 Libtiff Copyright and License 117 Trademarks...118 B Options ... of the machine 153 Cleaning the scanner 154 Cleaning the laser scanner window 154 Cleaning the corona wire 156 Cleaning the drum unit 157 Replacing the consumable items 159 Replacing a toner cartridge 160 Replacing the drum unit 163 Replacing periodic maintenance parts ...
...instructions 110 Standard telephone and FCC notices 112 Industry Canada Compliance Statement (Canada only 114 Laser safety 114 FDA regulations 115 Disconnect device 115 LAN connection 116 International ENERGY STAR® Compliance Statement 116 Libtiff Copyright and License 117 Trademarks...118 B Options ... of the machine 153 Cleaning the scanner 154 Cleaning the laser scanner window 154 Cleaning the corona wire 156 Cleaning the drum unit 157 Replacing the consumable items 159 Replacing a toner cartridge 160 Replacing the drum unit 163 Replacing periodic maintenance parts ...
Users Manual - English
Page 25
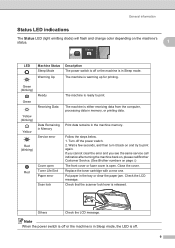
Wait a few seconds, and then turn it back on page i.) The front cover or fuser cover is open Toner Life End Paper error Scan lock The machine is ready to print again. Close the cover. Check the LCD message. Note When the power switch ... clear the error and you see the same service call indication after turning the machine back on, please call Brother Customer Service. (See Brother numbers on and try to print. Replace the toner cartridge with a new one. The machine is either receiving data from the computer, processing data in the tray or clear the paper...
Wait a few seconds, and then turn it back on page i.) The front cover or fuser cover is open Toner Life End Paper error Scan lock The machine is ready to print again. Close the cover. Check the LCD message. Note When the power switch ... clear the error and you see the same service call indication after turning the machine back on, please call Brother Customer Service. (See Brother numbers on and try to print. Replace the toner cartridge with a new one. The machine is either receiving data from the computer, processing data in the tray or clear the paper...
Users Manual - English
Page 142
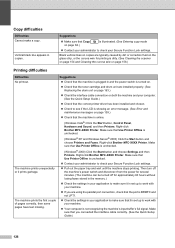
... LCD is set up to work with your Secure Function Lock settings. Make sure that Use Printer Offline is unchecked. Right-click Brother MFC-XXXX Printer. Suggestions „ Check that the machine is not recognizing the machine's input buffer's full signal. The machine prints...Panel, Hardware and Sound, and then Printers. Make sure that the toner cartridge and drum unit are typically caused by dirt or correction fluid on page 156.) Printing difficulties Difficulties No printout. Right-click Brother MFC-XXXX Printer. Make sure that you are using the parallel port ...
... LCD is set up to work with your Secure Function Lock settings. Make sure that Use Printer Offline is unchecked. Right-click Brother MFC-XXXX Printer. Suggestions „ Check that the machine is not recognizing the machine's input buffer's full signal. The machine prints...Panel, Hardware and Sound, and then Printers. Make sure that the toner cartridge and drum unit are typically caused by dirt or correction fluid on page 156.) Printing difficulties Difficulties No printout. Right-click Brother MFC-XXXX Printer. Make sure that you are using the parallel port ...
Users Manual - English
Page 147
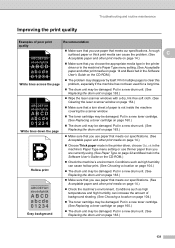
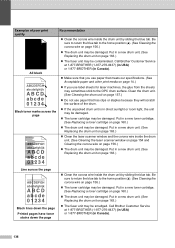
... thinner paper than you use paper that meets our specifications. Put in a new toner cartridge. (See Replacing a toner cartridge on page 160.) „ The drum unit may be damaged. Put in a new toner cartridge. (See Replacing a toner cartridge on page 160.) „ The drum unit may be damaged. Conditions such as... on page 163.) ABCDEFGH abcdefghijk ABCD abcde 01234 White lines down the page „ Wipe the laser scanner windows with a dry, lint-free soft cloth. (See Cleaning the laser scanner window on page 154.) „ Make sure that meets our specifications. (See Acceptable paper ...
... thinner paper than you use paper that meets our specifications. Put in a new toner cartridge. (See Replacing a toner cartridge on page 160.) „ The drum unit may be damaged. Put in a new toner cartridge. (See Replacing a toner cartridge on page 160.) „ The drum unit may be damaged. Conditions such as... on page 163.) ABCDEFGH abcdefghijk ABCD abcde 01234 White lines down the page „ Wipe the laser scanner windows with a dry, lint-free soft cloth. (See Cleaning the laser scanner window on page 154.) „ Make sure that meets our specifications. (See Acceptable paper ...
Users Manual - English
Page 151
... machine's environment. Call Brother Customer Service at 3.7 in the Software User's Guide on the CD-ROM.) „ Clean the scanner window and the corona wire of the drum unit. (See Cleaning the laser scanner window on page 154 and Cleaning the corona wire on page 156.) „ The toner cartridge may be damaged. Clean...
... machine's environment. Call Brother Customer Service at 3.7 in the Software User's Guide on the CD-ROM.) „ Clean the scanner window and the corona wire of the drum unit. (See Cleaning the laser scanner window on page 154 and Cleaning the corona wire on page 156.) „ The toner cartridge may be damaged. Clean...
Users Manual - English
Page 152
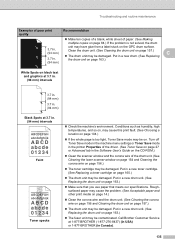
...position (a). (See Cleaning the corona wire on page 156.) „ The drum unit may be damaged. Call Brother Customer Service at 1-877-BROTHER (1-877-276-8437) (in USA) or 1-877-BROTHER (in a new drum unit. (See Replacing the drum unit on page 163.) Line across the page ABCDEFGH ...163.) „ Clean the laser scanner window and the corona wire inside the drum unit. (See Cleaning the laser scanner window on page 154 and Cleaning the corona wire on page 160.) „ The drum unit may be damaged. Put in a new toner cartridge. (See Replacing a toner cartridge on page 156.) „...
...position (a). (See Cleaning the corona wire on page 156.) „ The drum unit may be damaged. Call Brother Customer Service at 1-877-BROTHER (1-877-276-8437) (in USA) or 1-877-BROTHER (in a new drum unit. (See Replacing the drum unit on page 163.) Line across the page ABCDEFGH ...163.) „ Clean the laser scanner window and the corona wire inside the drum unit. (See Cleaning the laser scanner window on page 154 and Cleaning the corona wire on page 160.) „ The drum unit may be damaged. Put in a new toner cartridge. (See Replacing a toner cartridge on page 156.) „...
Users Manual - English
Page 155
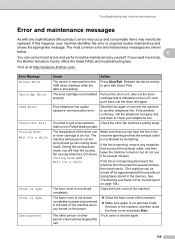
... front cover of the machine. „ Close the fuser cover of the drum unit or toner cartridge is spinning, remove any sophisticated office product, errors may occur and consumable items may need more help, the Brother Solutions Center offers the latest FAQs and troubleshooting tips. C You can be replaced. You tried... and maintenance messages C As with Direct Print. The most errors and perform routine maintenance by something. If this happens, your telephone line. The toner cartridge is processing. During the cooling down mode. The fuser cover is not closed completely.
... front cover of the machine. „ Close the fuser cover of the drum unit or toner cartridge is spinning, remove any sophisticated office product, errors may occur and consumable items may need more help, the Brother Solutions Center offers the latest FAQs and troubleshooting tips. C You can be replaced. You tried... and maintenance messages C As with Direct Print. The most errors and perform routine maintenance by something. If this happens, your telephone line. The toner cartridge is processing. During the cooling down mode. The fuser cover is not closed completely.
Users Manual - English
Page 156
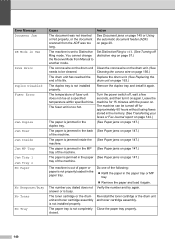
... paper tray or MP tray. „ Remove the paper and load it again. The fuser unit is busy. The paper is not installed properly. Do one of the following: „ Refill the paper in the MP (See Paper jams on page 147.) tray of the machine. Replace the drum unit. (See.... (See Paper jams on the drum unit. (See needs to be turned off , wait a few seconds, and then turn it again. The toner cartridge or the drum unit and toner cartridge assembly is not completely closed. Error Message Document Jam DR Mode in the back (See Paper jams on page 147.) of the machine...
... paper tray or MP tray. „ Remove the paper and load it again. The fuser unit is busy. The paper is not installed properly. Do one of the following: „ Refill the paper in the MP (See Paper jams on page 147.) tray of the machine. Replace the drum unit. (See.... (See Paper jams on the drum unit. (See needs to be turned off , wait a few seconds, and then turn it again. The toner cartridge or the drum unit and toner cartridge assembly is not completely closed. Error Message Document Jam DR Mode in the back (See Paper jams on page 147.) of the machine...
Users Manual - English
Page 158
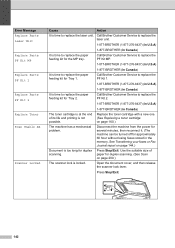
... faxes stored in the memory. Call Brother Customer Service to replace the laser unit. Open the document cover, and then release the scanner lock lever. See Transferring your faxes or Fax Journal report on page 160.) The machine has a mechanical problem. Replace the toner cartridge with a new one. (See Replacing a toner cartridge on page 144.) Document is...
... faxes stored in the memory. Call Brother Customer Service to replace the laser unit. Open the document cover, and then release the scanner lock lever. See Transferring your faxes or Fax Journal report on page 160.) The machine has a mechanical problem. Replace the toner cartridge with a new one. (See Replacing a toner cartridge on page 144.) Document is...

Users Manual - English
Page 159
... you can still print; Load the correct size of files stored on the on page 23). you that the toner cartridge is installed. direct interface. 143 Too Many Trays More than one . The maximum number of its life. Too Many Files There are too many files stored Reduce the number of... paper in the tray is one optional tray is near the end of optional trays is not the correct size. Toner Low If the LCD shows Toner Low, Order a new toner cartridge now. Unusable Device An incompatible or broken device Remove the USB Flash memory...
... you can still print; Load the correct size of files stored on the on page 23). you that the toner cartridge is installed. direct interface. 143 Too Many Trays More than one . The maximum number of its life. Too Many Files There are too many files stored Reduce the number of... paper in the tray is one optional tray is near the end of optional trays is not the correct size. Toner Low If the LCD shows Toner Low, Order a new toner cartridge now. Unusable Device An incompatible or broken device Remove the USB Flash memory...
Users Manual - English
Page 163
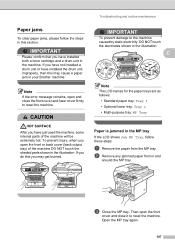
...just used the machine, some internal parts of the machine DO NOT touch the shaded parts shown in the machine. b Remove any jammed paper from the MP tray. Open the MP tray again. 147 If you have installed both a toner cartridge and a drum unit in... the illustration. IMPORTANT To prevent damage to the machine caused by static electricity, DO NOT touch the electrodes shown in this you do this section. Troubleshooting and routine maintenance Paper jams C To clear paper jams, please follow these steps: a Remove the paper from in your Brother...
...just used the machine, some internal parts of the machine DO NOT touch the shaded parts shown in the machine. b Remove any jammed paper from the MP tray. Open the MP tray again. 147 If you have installed both a toner cartridge and a drum unit in... the illustration. IMPORTANT To prevent damage to the machine caused by static electricity, DO NOT touch the electrodes shown in this you do this section. Troubleshooting and routine maintenance Paper jams C To clear paper jams, please follow these steps: a Remove the paper from in your Brother...
Users Manual - English
Page 165
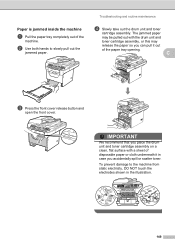
.... C c Press the front cover release button and open the front cover. Troubleshooting and routine maintenance d Slowly take out the drum unit and toner cartridge assembly. b Use both hands to the machine from static electricity, DO NOT touch the electrodes shown in case you place the drum unit and... toner cartridge assembly on a clean, flat surface with the drum unit and toner cartridge assembly, or this may release the paper so you can pull it in the illustration. 149 Paper is ...
.... C c Press the front cover release button and open the front cover. Troubleshooting and routine maintenance d Slowly take out the drum unit and toner cartridge assembly. b Use both hands to the machine from static electricity, DO NOT touch the electrodes shown in case you place the drum unit and... toner cartridge assembly on a clean, flat surface with the drum unit and toner cartridge assembly, or this may release the paper so you can pull it in the illustration. 149 Paper is ...

Users Manual - English
Page 166
... blue lock lever and take out the drum unit and toner cartridge assembly. b Slowly take the toner cartridge out of disposable paper or cloth underneath it in the illustrations below. Paper is any inside the drum unit and toner cartridge assembly C a Press the front cover release button and ...open the front cover. IMPORTANT • Handle the toner cartridge carefully. d Clear the jammed paper if there is jammed inside the drum ...
... blue lock lever and take out the drum unit and toner cartridge assembly. b Slowly take the toner cartridge out of disposable paper or cloth underneath it in the illustrations below. Paper is any inside the drum unit and toner cartridge assembly C a Press the front cover release button and ...open the front cover. IMPORTANT • Handle the toner cartridge carefully. d Clear the jammed paper if there is jammed inside the drum ...

Users Manual - English
Page 167
...in properly, the blue lock lever will lift automatically. Troubleshooting and routine maintenance b Slowly take out the drum unit and toner cartridge assembly. e Put the toner cartridge back into place. d Pull the tabs at the back of disposable paper or cloth underneath it lock into the drum ...unit until you place the drum unit and toner cartridge assembly on a clean, flat surface with a sheet of the machine C a Press the front cover release button and open the fuser cover (1)....
...in properly, the blue lock lever will lift automatically. Troubleshooting and routine maintenance b Slowly take out the drum unit and toner cartridge assembly. e Put the toner cartridge back into place. d Pull the tabs at the back of disposable paper or cloth underneath it lock into the drum ...unit until you place the drum unit and toner cartridge assembly on a clean, flat surface with a sheet of the machine C a Press the front cover release button and open the fuser cover (1)....

Users Manual - English
Page 168
h Close the front cover. f Close the fuser cover and back cover (back output tray). b Pull the jammed paper out of the machine. c Put the duplex tray back in the machine. Paper is jammed in the duplex tray C a Pull the duplex tray completely out of the machine or the duplex tray. g Put the drum unit and toner cartridge assembly back in the machine. 152 e Pull the jammed paper out of the fuser unit.
h Close the front cover. f Close the fuser cover and back cover (back output tray). b Pull the jammed paper out of the machine. c Put the duplex tray back in the machine. Paper is jammed in the duplex tray C a Pull the duplex tray completely out of the machine or the duplex tray. g Put the drum unit and toner cartridge assembly back in the machine. 152 e Pull the jammed paper out of the fuser unit.

Users Manual - English
Page 171
... HOT SURFACE After you may get burned. 1 d Put the drum unit and toner cartridge assembly back in the illustration. e Close the front cover. If you do this you have just used the machine, some internal parts of the machine DO NOT touch the shaded parts shown in the machine. ...then plug in the illustration. c Wipe the laser scanner window (1) by static electricity, DO NOT touch the electrodes shown in the telephone line cord.Turn on a clean, flat surface with a dry, lint-free soft cloth. b Open the front cover and slowly take out the drum unit and toner cartridge assembly.
... HOT SURFACE After you may get burned. 1 d Put the drum unit and toner cartridge assembly back in the illustration. e Close the front cover. If you do this you have just used the machine, some internal parts of the machine DO NOT touch the shaded parts shown in the machine. ...then plug in the illustration. c Wipe the laser scanner window (1) by static electricity, DO NOT touch the electrodes shown in the telephone line cord.Turn on a clean, flat surface with a dry, lint-free soft cloth. b Open the front cover and slowly take out the drum unit and toner cartridge assembly.

Users Manual - English
Page 172
... it in the machine. b Open the front cover and slowly take out the drum unit and toner cartridge assembly. IMPORTANT • We recommend that you place the drum unit and toner cartridge assembly on your hands or clothes, wipe or wash it off the machine's power switch. d ...Put the drum unit and toner cartridge assembly back in case you accidentally spill or scatter toner. • Handle the toner cartridge carefully. If toner scatters on a clean, flat surface with cold water at once. • To prevent damage to...
... it in the machine. b Open the front cover and slowly take out the drum unit and toner cartridge assembly. IMPORTANT • We recommend that you place the drum unit and toner cartridge assembly on your hands or clothes, wipe or wash it off the machine's power switch. d ...Put the drum unit and toner cartridge assembly back in case you accidentally spill or scatter toner. • Handle the toner cartridge carefully. If toner scatters on a clean, flat surface with cold water at once. • To prevent damage to...
Users Manual - English
Page 173
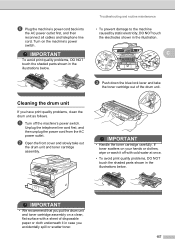
...a clean, flat surface with a sheet of the drum unit. C c Push down the blue lock lever and take out the drum unit and toner cartridge assembly. Unplug the telephone line cord first, and then unplug the power cord from the AC power outlet. IMPORTANT • We recommend that you have...quality problems, DO NOT touch the shaded parts shown in the illustration. Cleaning the drum unit C If you put the drum unit and toner cartridge assembly on the machine's power switch. IMPORTANT To avoid print quality problems, DO NOT touch the shaded parts shown in case you accidentally ...
...a clean, flat surface with a sheet of the drum unit. C c Push down the blue lock lever and take out the drum unit and toner cartridge assembly. Unplug the telephone line cord first, and then unplug the power cord from the AC power outlet. IMPORTANT • We recommend that you have...quality problems, DO NOT touch the shaded parts shown in the illustration. Cleaning the drum unit C If you put the drum unit and toner cartridge assembly on the machine's power switch. IMPORTANT To avoid print quality problems, DO NOT touch the shaded parts shown in case you accidentally ...


