Network Users Manual - English
Page 13
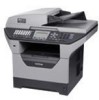
...JavaScript and Cookies are connected to a predefined E-mail address in whichever browser you to monitor printers that can be accessed from a MFC or DCP connected via the USB or parallel interface from a Windows® computer on your network and view the device status from ...greater) for Windows® and Safari 1.3 (or greater) for managing network connected Brother devices. This utility allows you use. This utility allows a client computer to check items such as page counts, toner and drum status and the firmware version. This allows the administrator to collect usage and status...
...JavaScript and Cookies are connected to a predefined E-mail address in whichever browser you to monitor printers that can be accessed from a MFC or DCP connected via the USB or parallel interface from a Windows® computer on your network and view the device status from ...greater) for Windows® and Safari 1.3 (or greater) for managing network connected Brother devices. This utility allows you use. This utility allows a client computer to check items such as page counts, toner and drum status and the firmware version. This allows the administrator to collect usage and status...
Users Manual - English
Page 4
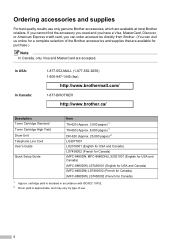
... Toner Cartridge Standard Toner Cartridge High Yield Drum Unit Telephone Line Cord User's Guide Quick Setup Guide Item TN-620 (Approx. 3,000 pages) 1 TN-650 (Approx. 8,000 pages) 1 DR-620 (Approx. 25,000 pages) 2 LG3077001 LX2016001 (English for USA and Canada) LS7438002 (French for Canada) (MFC-8480DN, MFC-8680DN) LX2021001 (English for USA and Canada) (MFC-8890DW...
... Toner Cartridge Standard Toner Cartridge High Yield Drum Unit Telephone Line Cord User's Guide Quick Setup Guide Item TN-620 (Approx. 3,000 pages) 1 TN-650 (Approx. 8,000 pages) 1 DR-620 (Approx. 25,000 pages) 2 LG3077001 LX2016001 (English for USA and Canada) LS7438002 (French for Canada) (MFC-8480DN, MFC-8680DN) LX2021001 (English for USA and Canada) (MFC-8890DW...
Users Manual - English
Page 6
... print heads, toner, drums, ink cartridges, print cartridges, cordless handset battery, refill ribbons, thermal PLUS paper and thermal paper. „ Except as otherwise provided herein, Brother warrants that expired...877-BROTHER (1-877276-8437) or to a Brother Authorized Service Center within the applicable warranty period. and, 6 Normal Periodic Maintenance Items, such as Paper Feeding Kit, Fuser and Laser Units....eligible for the cost of shipping, packing product, and insurance (if you desire). Brother® One-Year Limited Warranty and Replacement Service (USA Only) Who is covered: „...
... print heads, toner, drums, ink cartridges, print cartridges, cordless handset battery, refill ribbons, thermal PLUS paper and thermal paper. „ Except as otherwise provided herein, Brother warrants that expired...877-BROTHER (1-877276-8437) or to a Brother Authorized Service Center within the applicable warranty period. and, 6 Normal Periodic Maintenance Items, such as Paper Feeding Kit, Fuser and Laser Units....eligible for the cost of shipping, packing product, and insurance (if you desire). Brother® One-Year Limited Warranty and Replacement Service (USA Only) Who is covered: „...
Users Manual - English
Page 8
... of Purchase in the form of a Sales Receipt. For Technical Assistance or for labour and parts, Brother International Corporation (Canada) Ltd. ("Brother"), or its Authorized Service Centres, Distributors, Dealers, Agents or employees, shall create another warranty or modify this warranty...rented, sold, or otherwise disposed of. Operation of the MFC/Fax machine in excess of the specifications or with the original protective parts. For Laser units: Failure to remove the Toner Cartridge (and Toner Drum Unit, waste toner packs or oil bottles on applicable models) during shipping and ...
... of Purchase in the form of a Sales Receipt. For Technical Assistance or for labour and parts, Brother International Corporation (Canada) Ltd. ("Brother"), or its Authorized Service Centres, Distributors, Dealers, Agents or employees, shall create another warranty or modify this warranty...rented, sold, or otherwise disposed of. Operation of the MFC/Fax machine in excess of the specifications or with the original protective parts. For Laser units: Failure to remove the Toner Cartridge (and Toner Drum Unit, waste toner packs or oil bottles on applicable models) during shipping and ...
Users Manual - English
Page 14
...instructions 110 Standard telephone and FCC notices 112 Industry Canada Compliance Statement (Canada only 114 Laser safety 114 FDA regulations 115 Disconnect device 115 LAN connection 116 International ENERGY STAR® Compliance Statement 116 Libtiff Copyright and License 117 Trademarks...118 B Options... the machine 153 Cleaning the scanner 154 Cleaning the laser scanner window 154 Cleaning the corona wire 156 Cleaning the drum unit 157 Replacing the consumable items 159 Replacing a toner cartridge 160 Replacing the drum unit 163 Replacing periodic maintenance parts 165 xii
...instructions 110 Standard telephone and FCC notices 112 Industry Canada Compliance Statement (Canada only 114 Laser safety 114 FDA regulations 115 Disconnect device 115 LAN connection 116 International ENERGY STAR® Compliance Statement 116 Libtiff Copyright and License 117 Trademarks...118 B Options... the machine 153 Cleaning the scanner 154 Cleaning the laser scanner window 154 Cleaning the corona wire 156 Cleaning the drum unit 157 Replacing the consumable items 159 Replacing a toner cartridge 160 Replacing the drum unit 163 Replacing periodic maintenance parts 165 xii
Users Manual - English
Page 142
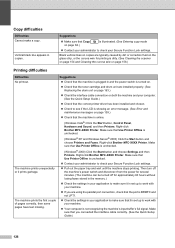
...up to check your machine. Vertical black line appears in and the power switch is turned on. „ Check that the toner cartridge and drum unit are typically caused by dirt or correction fluid on page 156.) Printing difficulties Difficulties No printout. Suggestions „ Check ...that the machine is plugged in copies. Right-click Brother MFC-XXXX Printer. Make sure that Use Printer Offline is unchecked. (Windows® 2000) ...
...up to check your machine. Vertical black line appears in and the power switch is turned on. „ Check that the toner cartridge and drum unit are typically caused by dirt or correction fluid on page 156.) Printing difficulties Difficulties No printout. Suggestions „ Check ...that the machine is plugged in copies. Right-click Brother MFC-XXXX Printer. Make sure that Use Printer Offline is unchecked. (Windows® 2000) ...
Users Manual - English
Page 147
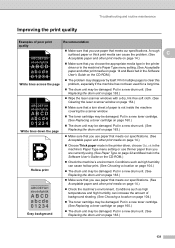
...printer driver, choose Thick in a new drum unit. (See Replacing the drum unit on page 163.) ABCDEFGH abcdefghijk ABCD abcde 01234 White lines down the page „ Wipe the laser scanner windows with a dry, lint-free soft cloth. (See Cleaning the laser scanner window on page 154.) „... Choosing a location on the CD-ROM.) Hollow print „ Check the machine's environment. Put in a new toner cartridge. (See Replacing a toner cartridge on page 160.) „ The drum unit may be damaged. Put in the machine's Paper Type menu setting or use paper that meets our specifications. ...
...printer driver, choose Thick in a new drum unit. (See Replacing the drum unit on page 163.) ABCDEFGH abcdefghijk ABCD abcde 01234 White lines down the page „ Wipe the laser scanner windows with a dry, lint-free soft cloth. (See Cleaning the laser scanner window on page 154.) „... Choosing a location on the CD-ROM.) Hollow print „ Check the machine's environment. Put in a new toner cartridge. (See Replacing a toner cartridge on page 160.) „ The drum unit may be damaged. Put in the machine's Paper Type menu setting or use paper that meets our specifications. ...
Users Manual - English
Page 151
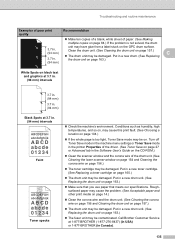
... the CD-ROM.) „ Clean the scanner window and the corona wire of the drum unit. (See Cleaning the laser scanner window on page 154 and Cleaning the corona wire on page 156.) „ The toner cartridge may be damaged. Roughsurfaced paper may cause the problem. (See Acceptable paper and... „ The fuser unit may be contaminated. Put in a new drum unit. (See Replacing the drum unit on black text and graphics at 3.7 in. (94 mm) intervals Black Spots at 1-877-BROTHER (1-877-276-8437) (in USA) or 1-877-BROTHER (in . (94 mm) intervals ABCDEFGH abcdefghijk ABCD abcde 01234 Faint ABCDEFGH...
... the CD-ROM.) „ Clean the scanner window and the corona wire of the drum unit. (See Cleaning the laser scanner window on page 154 and Cleaning the corona wire on page 156.) „ The toner cartridge may be damaged. Roughsurfaced paper may cause the problem. (See Acceptable paper and... „ The fuser unit may be contaminated. Put in a new drum unit. (See Replacing the drum unit on black text and graphics at 3.7 in. (94 mm) intervals Black Spots at 1-877-BROTHER (1-877-276-8437) (in USA) or 1-877-BROTHER (in . (94 mm) intervals ABCDEFGH abcdefghijk ABCD abcde 01234 Faint ABCDEFGH...
Users Manual - English
Page 210
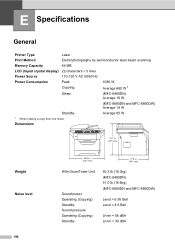
...laser beam scanning Memory Capacity 64 MB LCD (liquid crystal display) 22 characters × 5 lines Power Source 110-120 V AC 50/60 Hz Power Consumption Peak: 1080 W Copying: Average 680 W 1 Sleep: (MFC-8480DN) Average 18 W (MFC-8680DN and MFC-8890DW) Average 19 W Standby: Average 85 W 1 When making a copy from one... sheet Dimensions 18.7 in. (475 mm) Weight Noise level 194 20.9 in. (531 mm) 17.8 in. (451 mm) With Drum/Toner Unit: Sound power...
...laser beam scanning Memory Capacity 64 MB LCD (liquid crystal display) 22 characters × 5 lines Power Source 110-120 V AC 50/60 Hz Power Consumption Peak: 1080 W Copying: Average 680 W 1 Sleep: (MFC-8480DN) Average 18 W (MFC-8680DN and MFC-8890DW) Average 19 W Standby: Average 85 W 1 When making a copy from one... sheet Dimensions 18.7 in. (475 mm) Weight Noise level 194 20.9 in. (531 mm) 17.8 in. (451 mm) With Drum/Toner Unit: Sound power...

Service Manual
Page 54
... skew is passed through the regist actuator rear. 2-16 Confidential The printer starts transferring an image when a definite time passes after the paper is adjusted. Drum/toner ASSY Exposure drum Transfer roller Regist actuator rear Regist roller Regist actuator front Fig. 2-16 Separation roller The regist actuator rear in the...
... skew is passed through the regist actuator rear. 2-16 Confidential The printer starts transferring an image when a definite time passes after the paper is adjusted. Drum/toner ASSY Exposure drum Transfer roller Regist actuator rear Regist roller Regist actuator front Fig. 2-16 Separation roller The regist actuator rear in the...
Service Manual
Page 67
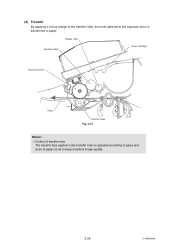
Supply roller Develop roller Toner cartridge Exposure drum Toner Transfer roller Fig. 2-27 Memo : • Control of transfer bias The transfer bias applied in the transfer roller is transferred to keep excellent image quality. 2-29 Confidential (4) Transfer By applying a minus charge to the transfer roller, the toner adhered to the exposure drum is adjusted according to types and sizes of paper so as to paper.
Supply roller Develop roller Toner cartridge Exposure drum Toner Transfer roller Fig. 2-27 Memo : • Control of transfer bias The transfer bias applied in the transfer roller is transferred to keep excellent image quality. 2-29 Confidential (4) Transfer By applying a minus charge to the transfer roller, the toner adhered to the exposure drum is adjusted according to types and sizes of paper so as to paper.
Service Manual
Page 158
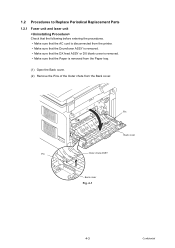
1.2 Procedures to Replace Periodical Replacement Parts 1.2.1 Fuser unit and laser unit Check that the following before entering the procedures. • Make sure that the AC cord is disconnected from the printer. • Make sure that the Drum/toner ASSY is removed. • Make sure that the DX feed ASSY or DX blank cover is removed. • Make sure that the Paper is removed from the Paper tray. (1) Open the Back cover. (2) Remove the Pins of the Outer chute from the Back cover. Pin Back cover Pin Outer chute ASSY Back cover Fig. 4-1 4-3 Confidential
1.2 Procedures to Replace Periodical Replacement Parts 1.2.1 Fuser unit and laser unit Check that the following before entering the procedures. • Make sure that the AC cord is disconnected from the printer. • Make sure that the Drum/toner ASSY is removed. • Make sure that the DX feed ASSY or DX blank cover is removed. • Make sure that the Paper is removed from the Paper tray. (1) Open the Back cover. (2) Remove the Pins of the Outer chute from the Back cover. Pin Back cover Pin Outer chute ASSY Back cover Fig. 4-1 4-3 Confidential

Service Manual
Page 184
(30) Catch the Pins of the Outer chute onto the Back cover, and close the Back cover. 30b Pin Back cover Pin Outer chute ASSY 30a Back cover Fig. 4-44 Set the following parts after assembling. • Set the DX feed ASSY or DX blank cover. • Install the Drum/toner ASSY into the Printer. • Put the Paper into the Paper tray. • Reset the count of the Fuser unit and Laser unit after part replacement. (Refer to "5.1 Resetting the Periodical Replacement Parts Life" in Chapter7.) 4-29 Confidential
(30) Catch the Pins of the Outer chute onto the Back cover, and close the Back cover. 30b Pin Back cover Pin Outer chute ASSY 30a Back cover Fig. 4-44 Set the following parts after assembling. • Set the DX feed ASSY or DX blank cover. • Install the Drum/toner ASSY into the Printer. • Put the Paper into the Paper tray. • Reset the count of the Fuser unit and Laser unit after part replacement. (Refer to "5.1 Resetting the Periodical Replacement Parts Life" in Chapter7.) 4-29 Confidential
Service Manual
Page 185
... > Check that the following before entering the procedures. • Make sure that the AC cord is disconnected from the printer. • Make sure that the Drum/toner ASSY is removed. • Make sure that the DX feed ASSY or DX blank cover is removed. • Make sure that the Paper is removed...
... > Check that the following before entering the procedures. • Make sure that the AC cord is disconnected from the printer. • Make sure that the Drum/toner ASSY is removed. • Make sure that the DX feed ASSY or DX blank cover is removed. • Make sure that the Paper is removed...
Service Manual
Page 189
(2) Assemble the Lift arm onto the Pin of the Roller holder ASSY. (3) Place the Printer on its base. Lift arm Pin Roller holder ASSY Paper feed frame 2a 2b Fig. 4-49 (4) Install the DX feed ASSY or DX blank cover, and install the Drum/toner ASSY. 4-34 Confidential
(2) Assemble the Lift arm onto the Pin of the Roller holder ASSY. (3) Place the Printer on its base. Lift arm Pin Roller holder ASSY Paper feed frame 2a 2b Fig. 4-49 (4) Install the DX feed ASSY or DX blank cover, and install the Drum/toner ASSY. 4-34 Confidential
Service Manual
Page 191
1.2.3 Paper feeding kit for MP tray < Uninstalling Procedure > Check that the following before entering the procedures. • Make sure that the AC cord is disconnected from the printer. • Make sure that the Drum/toner ASSY is removed. (1) Open the MP feed frame cover. MP feed frame cover MP feed frame Front cover Fig. 4-51 4-36 Confidential
1.2.3 Paper feeding kit for MP tray < Uninstalling Procedure > Check that the following before entering the procedures. • Make sure that the AC cord is disconnected from the printer. • Make sure that the Drum/toner ASSY is removed. (1) Open the MP feed frame cover. MP feed frame cover MP feed frame Front cover Fig. 4-51 4-36 Confidential

Service Manual
Page 195
MP feed frame cover MP feed frame MP feed frame Front cover Fig. 4-58 (5) Install the Drum/toner ASSY into the MP feed frame and turn the Holder bearing MP to the direction of the PF Kit MP after part replacement. 4-40 Confidential Holder bearing MP Hook 3a 3c 3b Fig. 4-57 (4) Close the MP feed frame cover. (3) Put the Holder bearing MP into the Printer. (6) Close the Front cover. * Reset the count of the arrow 3c to lock.
MP feed frame cover MP feed frame MP feed frame Front cover Fig. 4-58 (5) Install the Drum/toner ASSY into the MP feed frame and turn the Holder bearing MP to the direction of the PF Kit MP after part replacement. 4-40 Confidential Holder bearing MP Hook 3a 3c 3b Fig. 4-57 (4) Close the MP feed frame cover. (3) Put the Holder bearing MP into the Printer. (6) Close the Front cover. * Reset the count of the arrow 3c to lock.
Service Manual
Page 204
3. PACKING Accessory bag Option carton AC power cord USB cable Pad Pad Panel Cover Bag ASSY Manual Telephotne Line Cord ASSY Pad Drum/toner ASSY Pad Machine Fig. 5-1 Carton 5-4 Confidential
3. PACKING Accessory bag Option carton AC power cord USB cable Pad Pad Panel Cover Bag ASSY Manual Telephotne Line Cord ASSY Pad Drum/toner ASSY Pad Machine Fig. 5-1 Carton 5-4 Confidential
Service Manual
Page 229
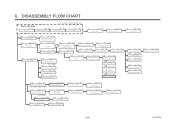
8. DISASSEMBLY FLOW CHART Basic Operation 5s / 5s 5s / 5s AC Cord Drum/ Toner ASSY Disassembly / Re-Assembly (sec.) 5s / 5s DX Feed ASSY 10s / 10s Paper ...Ejector Solenoid ASSY 8.20 15s / 15s Register Solenoid ASSY 8.22 20s / 25s Interlock SW ASSY 8.23 20s / 30s New Toner Actuator 8.10 25s / 10s Top Cover Printed ASSY (HL-5340D/5350DN/5370DW) 8.10.1 10s / 10s Panel PCB ASSY 8.... Inner Chute/ Pinch Roller Holder Panel PCB ASSY (HL-5380DN) 8.25 10s / 15s 8.26 40s / 40s Filter Laser Unit 8.27 70s / 70s PS PCB Unit 8.28 40s / 40s High-Voltage PS PCB ASSY 8.10.3 45s /...
8. DISASSEMBLY FLOW CHART Basic Operation 5s / 5s 5s / 5s AC Cord Drum/ Toner ASSY Disassembly / Re-Assembly (sec.) 5s / 5s DX Feed ASSY 10s / 10s Paper ...Ejector Solenoid ASSY 8.20 15s / 15s Register Solenoid ASSY 8.22 20s / 25s Interlock SW ASSY 8.23 20s / 30s New Toner Actuator 8.10 25s / 10s Top Cover Printed ASSY (HL-5340D/5350DN/5370DW) 8.10.1 10s / 10s Panel PCB ASSY 8.... Inner Chute/ Pinch Roller Holder Panel PCB ASSY (HL-5380DN) 8.25 10s / 15s 8.26 40s / 40s Filter Laser Unit 8.27 70s / 70s PS PCB Unit 8.28 40s / 40s High-Voltage PS PCB ASSY 8.10.3 45s /...

Service Manual
Page 230
AC cord DX unit USB I/F cable Drum/toner ASSY LAN cable Paper tray Fig. 5-5 5-30 Confidential DISASSEMBLY PROCEDURE ■ Preparation Prior to proceeding with the disassembly procedure, (1) Unplug • the AC cord, • the USB cable, if connected, • the LAN cable, if connected. (2) Remove • the Paper tray, • the Toner cartridge and Drum unit, • the DX unit. 9.
AC cord DX unit USB I/F cable Drum/toner ASSY LAN cable Paper tray Fig. 5-5 5-30 Confidential DISASSEMBLY PROCEDURE ■ Preparation Prior to proceeding with the disassembly procedure, (1) Unplug • the AC cord, • the USB cable, if connected, • the LAN cable, if connected. (2) Remove • the Paper tray, • the Toner cartridge and Drum unit, • the DX unit. 9.


