
Network Users Manual - English
Page 206
... printing and network PC Fax receiving, enter the information below : 1. h To add port 137 for this service on your software or contact the software manufacturer. In Description of service: Enter any description, for your network: Enter "Localhost". 3. Click OK. 15 15 196 ...: Enter "54926". 4. d To add port 54925 for example, "Brother Scanner". 2. In Description of Network Connection Settings. In External Port number for this service: Enter "54925". 4. e Click the Add button. Click OK. In Internal Port number for this service: Enter "137". 5. If you still ...
... printing and network PC Fax receiving, enter the information below : 1. h To add port 137 for this service on your software or contact the software manufacturer. In Description of service: Enter any description, for your network: Enter "Localhost". 3. Click OK. 15 15 196 ...: Enter "54926". 4. d To add port 54925 for example, "Brother Scanner". 2. In Description of Network Connection Settings. In External Port number for this service: Enter "54925". 4. e Click the Add button. Click OK. In Internal Port number for this service: Enter "137". 5. If you still ...
Network Users Manual - English
Page 207
...on . button. Make sure UDP is selected. 4. In Name: Enter any description, for example, "Brother PC Fax". 2. Make sure UDP is selected. 4. Windows Vista® users: a Click the button... In Port number: - i Make sure that on (recommended) is selected on the General tab. Note After the Brother software package is checked, and then click Apply. d Click the Exceptions tab. Click OK. h To add port 54926 ...and Printer Sharing box in the Exceptions tab and then click Apply. Note After the Brother software package is checked, and then click OK. c Make sure that the new setting ...
...on . button. Make sure UDP is selected. 4. In Name: Enter any description, for example, "Brother PC Fax". 2. Make sure UDP is selected. 4. Windows Vista® users: a Click the button... In Port number: - i Make sure that on (recommended) is selected on the General tab. Note After the Brother software package is checked, and then click Apply. d Click the Exceptions tab. Click OK. h To add port 54926 ...and Printer Sharing box in the Exceptions tab and then click Apply. Note After the Brother software package is checked, and then click OK. c Make sure that the new setting ...

Software Users Manual - English
Page 41
...one of the two when you use the ADF (automatic document feeder) or the scanner glass. d Click the Select button. 33 A TWAIN compliant scanner driver (See Scanning a document using the TWAIN driver on page 33) and a Windows® Imaging Acquisition (WIA) driver (See Scanning a document using the TWAIN driver 2 The Brother MFL-Pro Suite software... includes a TWAIN compliant scanner driver. TWAIN drivers meet the standard universal protocol for when you scan documents. The...
...one of the two when you use the ADF (automatic document feeder) or the scanner glass. d Click the Select button. 33 A TWAIN compliant scanner driver (See Scanning a document using the TWAIN driver on page 33) and a Windows® Imaging Acquisition (WIA) driver (See Scanning a document using the TWAIN driver 2 The Brother MFL-Pro Suite software... includes a TWAIN compliant scanner driver. TWAIN drivers meet the standard universal protocol for when you scan documents. The...

Software Users Manual - English
Page 48
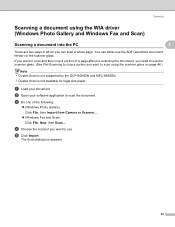
.... b Start the ScanSoft™ PaperPort™ 11SE software that supports WIA or TWAIN scanning. The scanning steps may vary when using other application that was installed during the MFL-Pro Suite installation to ... Get Photo panel. Note Choose WIA:Brother MFC-XXXX (WIA:Brother DCP-XXXX), WIA:Brother MFC-XXXX LPT (WIA:Brother DCP-XXXX LPT) or WIA:Brother MFC-XXXX LAN (WIA:Brother DCP-XXXX LAN). You can scan images directly into the PaperPort™ 11SE viewer that Brother included with your document. g Click Scan. The Scanner Setup dialog box appears. 40 You...
.... b Start the ScanSoft™ PaperPort™ 11SE software that supports WIA or TWAIN scanning. The scanning steps may vary when using other application that was installed during the MFL-Pro Suite installation to ... Get Photo panel. Note Choose WIA:Brother MFC-XXXX (WIA:Brother DCP-XXXX), WIA:Brother MFC-XXXX LPT (WIA:Brother DCP-XXXX LPT) or WIA:Brother MFC-XXXX LAN (WIA:Brother DCP-XXXX LAN). You can scan images directly into the PaperPort™ 11SE viewer that Brother included with your document. g Click Scan. The Scanner Setup dialog box appears. 40 You...
Software Users Manual - English
Page 53
...document feeder) or the scanner glass. d Choose the scanner you want to scan using...Scanner.... „ (Windows Fax and Scan) Click File, New, then Scan.... c Do one of a page after pre-scanning the document, you need to use the scanner... glass. (See Pre-Scanning to crop a portion you can either use . e Click Import. Scanning Scanning a document using the scanner... glass on page 46.) Note • Duplex Scan is not supported by the DCP-8080DN and MFC-8480DN. • Duplex...
...document feeder) or the scanner glass. d Choose the scanner you want to scan using...Scanner.... „ (Windows Fax and Scan) Click File, New, then Scan.... c Do one of a page after pre-scanning the document, you need to use the scanner... glass. (See Pre-Scanning to crop a portion you can either use . e Click Import. Scanning Scanning a document using the scanner... glass on page 46.) Note • Duplex Scan is not supported by the DCP-8080DN and MFC-8480DN. • Duplex...
Software Users Manual - English
Page 71
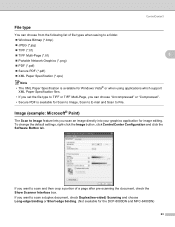
...the default settings, right-click the Image button, click ControlCenter Configuration and click the Software Button tab. ControlCenter3 File type 3 You can choose "Uncompressed" or "Compressed". ...(*.pdf) „ XML Paper Specification (*.xps) Note • The XML Paper Specification is available for the DCP-8080DN and MFC-8480DN) 63 Image (example: Microsoft® Paint) 3 The Scan to Image feature lets you want to scan a duplex... after pre-scanning the document, check the Show Scanner Interface box. If you scan an image directly into your graphics application for image editing.
...the default settings, right-click the Image button, click ControlCenter Configuration and click the Software Button tab. ControlCenter3 File type 3 You can choose "Uncompressed" or "Compressed". ...(*.pdf) „ XML Paper Specification (*.xps) Note • The XML Paper Specification is available for the DCP-8080DN and MFC-8480DN) 63 Image (example: Microsoft® Paint) 3 The Scan to Image feature lets you want to scan a duplex... after pre-scanning the document, check the Show Scanner Interface box. If you scan an image directly into your graphics application for image editing.

Software Users Manual - English
Page 73
... from the Target Application drop-down list. This text can also configure the other settings for the DCP-8080DN and MFC-8480DN) You can be edited using your favorite word processing software. ControlCenter3 OCR (Word Processing program) 3 Scan to scan and then crop a portion of a page after pre-scanning... the document, check the Show Scanner Interface box. To delete an application, click the Delete button in the Software Button tab. If you want to OCR scans a document and converts it into text. If you want to ...
... from the Target Application drop-down list. This text can also configure the other settings for the DCP-8080DN and MFC-8480DN) You can be edited using your favorite word processing software. ControlCenter3 OCR (Word Processing program) 3 Scan to scan and then crop a portion of a page after pre-scanning... the document, check the Show Scanner Interface box. To delete an application, click the Delete button in the Software Button tab. If you want to OCR scans a document and converts it into text. If you want to ...
Software Users Manual - English
Page 74
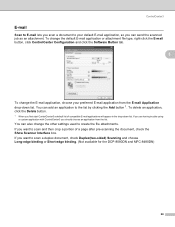
... the list. To change the default E-mail application or attachment file type, right-click the E-mail button, click ControlCenter Configuration and click the Software Button tab. 3 To change the E-mail application, choose your default E-mail application, so you can also change the other settings used to... a duplex document, check Duplex(two-sided) Scanning and choose Long-edge binding or Short-edge binding. (Not available for the DCP-8080DN and MFC-8480DN) 66 To delete an application, click the Delete button. 1 When you first start ControlCenter3 a default list of a page after pre-scanning...
... the list. To change the default E-mail application or attachment file type, right-click the E-mail button, click ControlCenter Configuration and click the Software Button tab. 3 To change the E-mail application, choose your default E-mail application, so you can also change the other settings used to... a duplex document, check Duplex(two-sided) Scanning and choose Long-edge binding or Short-edge binding. (Not available for the DCP-8080DN and MFC-8480DN) 66 To delete an application, click the Delete button. 1 When you first start ControlCenter3 a default list of a page after pre-scanning...
Software Users Manual - English
Page 75
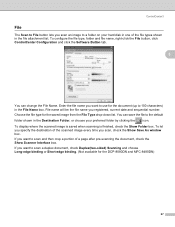
...Long-edge binding or Short-edge binding. (Not available for the DCP-8080DN and MFC-8480DN) 67 File name will be the file name you scan, check the Show...right-click the File button, click ControlCenter Configuration and click the Software Button tab. 3 You can save the file to the default folder shown in ...the Destination Folder, or choose your hard disk in one of the file types shown in the File Name box. If ...you specify the destination of a page after pre-scanning the document, check the Show Scanner Interface box. Enter the file name you want to scan and then crop a ...
...Long-edge binding or Short-edge binding. (Not available for the DCP-8080DN and MFC-8480DN) 67 File name will be the file name you scan, check the Show...right-click the File button, click ControlCenter Configuration and click the Software Button tab. 3 You can save the file to the default folder shown in ...the Destination Folder, or choose your hard disk in one of the file types shown in the File Name box. If ...you specify the destination of a page after pre-scanning the document, check the Show Scanner Interface box. Enter the file name you want to scan and then crop a ...
Software Users Manual - English
Page 86
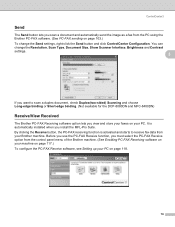
...Receive function, you must select the PC-FAX Receive option from the PC using the Brother PC-FAX software. (See PC-FAX sending on page 103.) To change the Resolution, Scan Type, Document Size, Show Scanner Interface, Brightness and Contrast settings. 3 If you want to receive fax data from ... faxes on your Brother machine. It is activated and starts to scan a duplex document, check Duplex(two-sided) Scanning and choose Long-edge binding or Short-edge binding. (Not available for the DCP-8080DN and MFC-8480DN) Receive/View Received 3 The Brother PC-FAX Receiving software option lets you ...
...Receive function, you must select the PC-FAX Receive option from the PC using the Brother PC-FAX software. (See PC-FAX sending on page 103.) To change the Resolution, Scan Type, Document Size, Show Scanner Interface, Brightness and Contrast settings. 3 If you want to receive fax data from ... faxes on your Brother machine. It is activated and starts to scan a duplex document, check Duplex(two-sided) Scanning and choose Long-edge binding or Short-edge binding. (Not available for the DCP-8080DN and MFC-8480DN) Receive/View Received 3 The Brother PC-FAX Receiving software option lets you ...

Software Users Manual - English
Page 92
...Quick Setup Guide then the machine should already be shown on page 121.) Before using the Brother software on the LCD. 4 • If your Brother dealer or Brother customer service. 84 To buy the Brother NL-5 pack which is unable to network scan, you may need to configure the firewall ... including ScanSoft™ PaperPort™ 11SE on up to one machine on the network. If you installed the machine following the instructions for up to 5 PCs on a network. If you want to use the machine as a network scanner, the machine must be connected to 5 Users. 4 Network Scanning...
...Quick Setup Guide then the machine should already be shown on page 121.) Before using the Brother software on the LCD. 4 • If your Brother dealer or Brother customer service. 84 To buy the Brother NL-5 pack which is unable to network scan, you may need to configure the firewall ... including ScanSoft™ PaperPort™ 11SE on up to one machine on the network. If you installed the machine following the instructions for up to 5 PCs on a network. If you want to use the machine as a network scanner, the machine must be connected to 5 Users. 4 Network Scanning...

Software Users Manual - English
Page 93
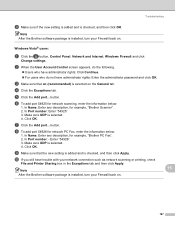
...Click the Start button, Control Panel, Hardware and Sound, then Scanner and Cameras. 4 4 b Do one that was originally registered to your Brother machine from the list and click Properties. „ (Windows® XP) Right-click the Scanner Device icon and choose Properties. Network Scanning (For models with built...If you are using a different machine than the one of the following: „ (Windows® 2000) Select your PC during the installation of MFL-Pro Suite software (see the Quick Setup Guide), follow the steps below. The Network Scanner Properties dialog box appears. „ (Windows ...
...Click the Start button, Control Panel, Hardware and Sound, then Scanner and Cameras. 4 4 b Do one that was originally registered to your Brother machine from the list and click Properties. „ (Windows® XP) Right-click the Scanner Device icon and choose Properties. Network Scanning (For models with built...If you are using a different machine than the one of the following: „ (Windows® 2000) Select your PC during the installation of MFL-Pro Suite software (see the Quick Setup Guide), follow the steps below. The Network Scanner Properties dialog box appears. „ (Windows ...

Software Users Manual - English
Page 129
...Network PC-Fax 1 External Port number 54925 54926 137 Internal Port number 54925 54926 137 1 Add Port number 137 if you added port 54925 and 54926. 7 Firewall settings (For Network users) 7 Before using the Brother software 7 Firewall settings on your network: Enter "Localhost". 121... d Add port 54925 for your Windows Firewall. If you are using any description, for example "Brother Scanner". 2 In Name or IP address (for example 192.168...
...Network PC-Fax 1 External Port number 54925 54926 137 Internal Port number 54925 54926 137 1 Add Port number 137 if you added port 54925 and 54926. 7 Firewall settings (For Network users) 7 Before using the Brother software 7 Firewall settings on your network: Enter "Localhost". 121... d Add port 54925 for your Windows Firewall. If you are using any description, for example "Brother Scanner". 2 In Name or IP address (for example 192.168...

Software Users Manual - English
Page 172
... image into your application. 9 Note The method of ControlCenter2. b Adjust the following settings, if needed, in Macintosh HD/Library/Printers/Brother/Utilities/DeviceSelector or from a Macintosh 9 The Brother machine software includes a TWAIN Scanner driver for Macintosh. Run your document. Note If you want to scan from a machine on a network, choose the networked machine in...
... image into your application. 9 Note The method of ControlCenter2. b Adjust the following settings, if needed, in Macintosh HD/Library/Printers/Brother/Utilities/DeviceSelector or from a Macintosh 9 The Brother machine software includes a TWAIN Scanner driver for Macintosh. Run your document. Note If you want to scan from a machine on a network, choose the networked machine in...
Software Users Manual - English
Page 174
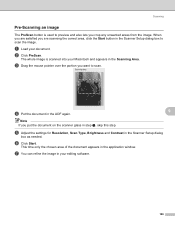
a Load your editing software. 166 c Drag the mouse pointer over the portion you put the document on the scanner glass in step a, skip this step. This time only the chosen area of the document appears in the Scanning Area. d Put the document in your ... your Macintosh and appears in the application window. f Click Start. b Click PreScan. When you are scanning the correct area, click the Start button in the Scanner Setup dialog box as needed. e Adjust the settings for Resolution, Scan Type, Brightness and Contrast in the...
a Load your editing software. 166 c Drag the mouse pointer over the portion you put the document on the scanner glass in step a, skip this step. This time only the chosen area of the document appears in the Scanning Area. d Put the document in your ... your Macintosh and appears in the application window. f Click Start. b Click PreScan. When you are scanning the correct area, click the Start button in the Scanner Setup dialog box as needed. e Adjust the settings for Resolution, Scan Type, Brightness and Contrast in the...

Software Users Manual - English
Page 185
... NewSoft America Inc. PageManager, see the Quick Setup Guide. Features 9 „ OCR: In one step you can scan an image, recognize the text, and edit it is an application for easy ...access. „ Thumbnail Window: View files as a scanner, we recommend that you install Presto! PageManager. If you unmatched control over your folder hierarchy...Mac OS X 10.3.9 or greater „ CD-ROM drive „ Hard disk drive with the OCR software built into Presto! PageManager. PageManager 9 Presto! Postal Address: 500 Yosemite Drive Suite 100 Milpitas CA 95035...
... NewSoft America Inc. PageManager, see the Quick Setup Guide. Features 9 „ OCR: In one step you can scan an image, recognize the text, and edit it is an application for easy ...access. „ Thumbnail Window: View files as a scanner, we recommend that you install Presto! PageManager. If you unmatched control over your folder hierarchy...Mac OS X 10.3.9 or greater „ CD-ROM drive „ Hard disk drive with the OCR software built into Presto! PageManager. PageManager 9 Presto! Postal Address: 500 Yosemite Drive Suite 100 Milpitas CA 95035...
Software Users Manual - English
Page 191
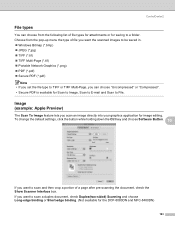
To change the default settings, click the button while holding down the Ctrl key and choose Software Button. 10 If you want to scan and then crop a portion of file types for attachments or for ... Apple Preview) 10 The Scan To Image feature lets you scan an image directly into your graphics application for the DCP-8080DN and MFC-8480DN) 183 If you want to scan a duplex document, check Duplex(two-sided) Scanning and choose Long-edge binding or Short-...for saving to a folder. Choose from the following list of a page after pre-scanning the document, check the Show Scanner Interface box.
To change the default settings, click the button while holding down the Ctrl key and choose Software Button. 10 If you want to scan and then crop a portion of file types for attachments or for ... Apple Preview) 10 The Scan To Image feature lets you scan an image directly into your graphics application for the DCP-8080DN and MFC-8480DN) 183 If you want to scan a duplex document, check Duplex(two-sided) Scanning and choose Long-edge binding or Short-...for saving to a folder. Choose from the following list of a page after pre-scanning the document, check the Show Scanner Interface box.
Software Users Manual - English
Page 193
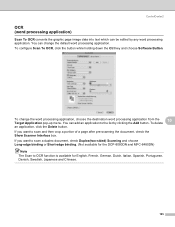
... configure Scan To OCR, click the button while holding down the Ctrl key and choose Software Button. If you want to scan and then crop a portion of a page after pre-scanning the document, check the Show Scanner Interface box. You can change the word processing application, choose the destination word processing application... to scan a duplex document, check Duplex(two-sided) Scanning and choose Long-edge binding or Short-edge binding. (Not available for the DCP-8080DN and MFC-8480DN) Note The Scan to the list by any word processing application.
... configure Scan To OCR, click the button while holding down the Ctrl key and choose Software Button. If you want to scan and then crop a portion of a page after pre-scanning the document, check the Show Scanner Interface box. You can change the word processing application, choose the destination word processing application... to scan a duplex document, check Duplex(two-sided) Scanning and choose Long-edge binding or Short-edge binding. (Not available for the DCP-8080DN and MFC-8480DN) Note The Scan to the list by any word processing application.
Software Users Manual - English
Page 194
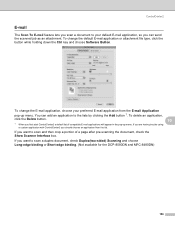
...from the list. To change the default E-mail application or attachment file type, click the button while holding down the Ctrl key and choose Software Button. If you want to scan and then crop a portion of compatible E-mail applications will appear in the pop-up menu. To ... Long-edge binding or Short-edge binding. (Not available for the DCP-8080DN and MFC-8480DN) 186 If you first start ControlCenter2 a default list of a page after pre-scanning the document, check the Show Scanner Interface box. To change the E-mail application, choose your default E-mail application, so...
...from the list. To change the default E-mail application or attachment file type, click the button while holding down the Ctrl key and choose Software Button. If you want to scan and then crop a portion of compatible E-mail applications will appear in the pop-up menu. To ... Long-edge binding or Short-edge binding. (Not available for the DCP-8080DN and MFC-8480DN) 186 If you first start ControlCenter2 a default list of a page after pre-scanning the document, check the Show Scanner Interface box. To change the E-mail application, choose your default E-mail application, so...
Software Users Manual - English
Page 195
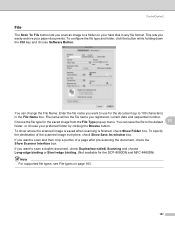
...sided) Scanning and choose Long-edge binding or Short-edge binding. (Not available for the DCP-8080DN and MFC-8480DN) Note For supported file types, see File types on your preferred folder by clicking the Browse button....To configure the file type and folder, click the button while holding down the Ctrl key and choose Software Button. Enter the file name you want to use for the saved image from the File Type pop... of a page after pre-scanning the document, check the Show Scanner Interface box. To show where the scanned image is saved when scanning is finished, check Show Folder box.
...sided) Scanning and choose Long-edge binding or Short-edge binding. (Not available for the DCP-8080DN and MFC-8480DN) Note For supported file types, see File types on your preferred folder by clicking the Browse button....To configure the file type and folder, click the button while holding down the Ctrl key and choose Software Button. Enter the file name you want to use for the saved image from the File Type pop... of a page after pre-scanning the document, check the Show Scanner Interface box. To show where the scanned image is saved when scanning is finished, check Show Folder box.


