
Wireless Getting Started Guide
Page 3
... 3 Step 1: Obtain required information and equipment 3 Step 2: Install software for your HP Officejet/Officejet Pro device 4 Step 3: Test the connection 4 Solving wireless (802.11) problems 5 Basic troubleshooting 5 Advanced troubleshooting 6 Change the connection method 9 Change from a USB connection 9 Change from an Ethernet connection 9 Connect the HP Officejet/Officejet Pro device using an ad hoc wireless network connection.....9 Method 1...9 Method...
... 3 Step 1: Obtain required information and equipment 3 Step 2: Install software for your HP Officejet/Officejet Pro device 4 Step 3: Test the connection 4 Solving wireless (802.11) problems 5 Basic troubleshooting 5 Advanced troubleshooting 6 Change the connection method 9 Change from a USB connection 9 Change from an Ethernet connection 9 Connect the HP Officejet/Officejet Pro device using an ad hoc wireless network connection.....9 Method 1...9 Method...
Wireless Getting Started Guide
Page 6
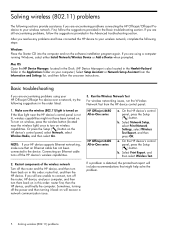
...problems, follow the suggestions provided in the order listed: 1. NOTE: If your HP Officejet/Officejet Pro device over a network, try the following suggestions in the Advanced troubleshooting section. Run the Wireless Network Test For wireless networking issues, run the software ... are encountering problems connecting the HP Officejet/Officejet Pro device to your computer.) Select Setup Assistant or Network Setup Assistant from the HP device control panel: HP Officejet J4680 All-in-One series HP Officejet J6400 All-in the Basic troubleshooting section. Select Print Report, ...
...problems, follow the suggestions provided in the order listed: 1. NOTE: If your HP Officejet/Officejet Pro device over a network, try the following suggestions in the Advanced troubleshooting section. Run the Wireless Network Test For wireless networking issues, run the software ... are encountering problems connecting the HP Officejet/Officejet Pro device to your computer.) Select Setup Assistant or Network Setup Assistant from the HP device control panel: HP Officejet J4680 All-in-One series HP Officejet J6400 All-in the Basic troubleshooting section. Select Print Report, ...
Wireless Getting Started Guide
Page 7
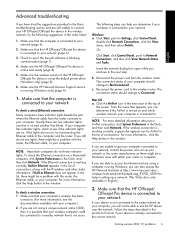
... (page 6) 3. Usually there are two indicator lights, one that is on and another that appears, you can determine if the AirPort is turned on a Macintosh computer, click System Preferences in the list of the HP Officejet/ Officejet Pro device is set up a network. (This Web ...the order listed: 1. Follow the steps described in the window. Advanced troubleshooting English If you have tried the suggestions provided in the Basic troubleshooting section and are still unable to connect your HP Officejet/Officejet Pro device to the wireless network, try reconnecting the Ethernet cable to ...
... (page 6) 3. Usually there are two indicator lights, one that is on and another that appears, you can determine if the AirPort is turned on a Macintosh computer, click System Preferences in the list of the HP Officejet/ Officejet Pro device is set up a network. (This Web ...the order listed: 1. Follow the steps described in the window. Advanced troubleshooting English If you have tried the suggestions provided in the Basic troubleshooting section and are still unable to connect your HP Officejet/Officejet Pro device to the wireless network, try reconnecting the Ethernet cable to ...
Wireless Getting Started Guide
Page 9
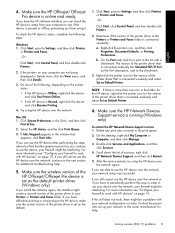
... If Jobs Stopped appears in the folder for the HP device, right-click the printer icon for help . 5. Determine if the version of the HP Officejet/Officejet Pro device is connected wirelessly: a. Right-click the...HP device, and the click Print Queue. 3. Right-click the printer icon for additional troubleshooting help . After the service restarts, try using the HP device over the network or if you have the HP...point to Settings, and then click Printers or Printers and Faxes. - For more than one of the printer driver that is connected wirelessly has Standard TCP/IP Port as the ...
... If Jobs Stopped appears in the folder for the HP device, right-click the printer icon for help . 5. Determine if the version of the HP Officejet/Officejet Pro device is connected wirelessly: a. Right-click the...HP device, and the click Print Queue. 3. Right-click the printer icon for additional troubleshooting help . After the service restarts, try using the HP device over the network or if you have the HP...point to Settings, and then click Printers or Printers and Faxes. - For more than one of the printer driver that is connected wirelessly has Standard TCP/IP Port as the ...
Fax Getting Started Guide
Page 6
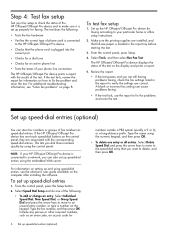
...faxing. Type the name using speed-dial entries, see "Solve fax problems" on the computer after installing the software. If the HP Officejet/Officejet Pro device has one entry or all entries: Select Delete Speed Dial and press the arrow keys to move to an unused entry number, or type ... the fax settings listed in the input tray before starting the test. 3. From the control panel, press the Setup button. 2. For additional troubleshooting information, see the electronic user guide available on page 8. Select Tools, and then select Run Fax Test. To set up speed-dial entries ...
...faxing. Type the name using speed-dial entries, see "Solve fax problems" on the computer after installing the software. If the HP Officejet/Officejet Pro device has one entry or all entries: Select Delete Speed Dial and press the arrow keys to move to an unused entry number, or type ... the fax settings listed in the input tray before starting the test. 3. From the control panel, press the Setup button. 2. For additional troubleshooting information, see the electronic user guide available on page 8. Select Tools, and then select Run Fax Test. To set up speed-dial entries ...
User Guide
Page 3
...OS, visit the Apple Web site at www.hp.com/ accessibility. All rights reserved. If the product does not operate normally, see Maintain and troubleshoot. 9. The device doors, buttons, paper ...instructions in the express warranty statements accompanying such products and services. For users who are no one can be liable for users with limited strength and reach. Copyright information © 2008 ...the appropriate action. Install the product securely on the product. 4. There are color blind, colored buttons and tabs used in this product from fire or electric shock. 1. The...
...OS, visit the Apple Web site at www.hp.com/ accessibility. All rights reserved. If the product does not operate normally, see Maintain and troubleshoot. 9. The device doors, buttons, paper ...instructions in the express warranty statements accompanying such products and services. For users who are no one can be liable for users with limited strength and reach. Copyright information © 2008 ...the appropriate action. Install the product securely on the product. 4. There are color blind, colored buttons and tabs used in this product from fire or electric shock. 1. The...
User Guide
Page 8
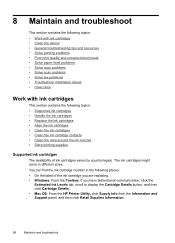
...To install the software ...94 Share the device on a locally shared network 94 Uninstall and reinstall the software 95 8 Maintain and troubleshoot Work with ink cartridges ...98 Supported ink cartridges 98 Handle the ink cartridges 99 Replace the ink cartridges 99 Align the ink cartridges ... ...108 Clean the device ...109 Clean the scanner glass 109 Clean the exterior ...110 Clean the automatic document feeder 110 General troubleshooting tips and resources 113 Solve printing problems ...114 The device shuts down unexpectedly 114 Error message appears on control-panel display 114 ...
...To install the software ...94 Share the device on a locally shared network 94 Uninstall and reinstall the software 95 8 Maintain and troubleshoot Work with ink cartridges ...98 Supported ink cartridges 98 Handle the ink cartridges 99 Replace the ink cartridges 99 Align the ink cartridges ... ...108 Clean the device ...109 Clean the scanner glass 109 Clean the exterior ...110 Clean the automatic document feeder 110 General troubleshooting tips and resources 113 Solve printing problems ...114 The device shuts down unexpectedly 114 Error message appears on control-panel display 114 ...
User Guide
Page 9
...Ink is not filling the text or graphics completely 119 Output is faded or dull colored 120 Colors are printing as black and white 120 Wrong colors are printing 120 Printout shows bleeding colors 121 Colors do not line up properly 121 Lines or dots are missing from text or graphics ... 128 Scanned image quality is poor 128 Scan defects are apparent 129 Solve fax problems ...129 The fax test failed ...130 Troubleshoot installation issues 142 Hardware installation suggestions 142 Software installation suggestions 143 Clear jams ...144 Clear paper jams ...144 Avoid paper jams ...146...
...Ink is not filling the text or graphics completely 119 Output is faded or dull colored 120 Colors are printing as black and white 120 Wrong colors are printing 120 Printout shows bleeding colors 121 Colors do not line up properly 121 Lines or dots are missing from text or graphics ... 128 Scanned image quality is poor 128 Scan defects are apparent 129 Solve fax problems ...129 The fax test failed ...130 Troubleshoot installation issues 142 Hardware installation suggestions 142 Software installation suggestions 143 Clear jams ...144 Clear paper jams ...144 Avoid paper jams ...146...
User Guide
Page 11
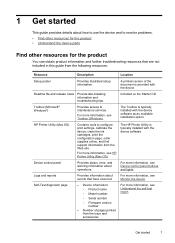
... the product • Understand the device parts Find other resources for the product You can obtain product information and further troubleshooting resources that have occurred. Toolbox (Microsoft® Windows®) Provides access to configure print settings, calibrate the device,...Provides illustrated setup information. Readme file and release notes Provide late-breaking information and troubleshooting tips. The Toolbox is provided with the device software. For more information, see HP Printer Utility (Mac OS). Self-Test diagnostic page • Device information: &#...
... the product • Understand the device parts Find other resources for the product You can obtain product information and further troubleshooting resources that have occurred. Toolbox (Microsoft® Windows®) Provides access to configure print settings, calibrate the device,...Provides illustrated setup information. Readme file and release notes Provide late-breaking information and troubleshooting tips. The Toolbox is provided with the device software. For more information, see HP Printer Utility (Mac OS). Self-Test diagnostic page • Device information: &#...
User Guide
Page 70
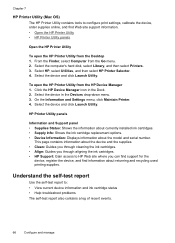
... Use the self-test report to: • View current device information and ink cartridge status • Help troubleshoot problems The self-test report also contains a log of recent events. 66 Configure and manage HP Printer Utility panels Information and Support panel • Supplies Status: Shows the information about currently installed ink cartridges...
... Use the self-test report to: • View current device information and ink cartridge status • Help troubleshoot problems The self-test report also contains a log of recent events. 66 Configure and manage HP Printer Utility panels Information and Support panel • Supplies Status: Shows the information about currently installed ink cartridges...
User Guide
Page 102
...unexpected printouts • Solve paper-feed problems • Solve copy problems • Solve scan problems • Solve fax problems • Troubleshoot installation issues • Clear jams Work with ink cartridges This section contains the following places: • On the label of ink cartridges ... Details button, and then click Cartridge Details. • Mac OS: From the HP Printer Utility, click Supply Info from the Information and Support panel, and then click Retail Supplies Information. 98 Maintain and troubleshoot You can find the ink cartridge number in different sizes.
...unexpected printouts • Solve paper-feed problems • Solve copy problems • Solve scan problems • Solve fax problems • Troubleshoot installation issues • Clear jams Work with ink cartridges This section contains the following places: • On the label of ink cartridges ... Details button, and then click Cartridge Details. • Mac OS: From the HP Printer Utility, click Supply Info from the Information and Support panel, and then click Retail Supplies Information. 98 Maintain and troubleshoot You can find the ink cartridge number in different sizes.

User Guide
Page 104
... front access door. Wait until print quality becomes unacceptable. To order ink cartridges for changing. If prompted, choose your product, and then click one of the device. 3. You might damage the device if the ink cartridges are not docked safely when you are replacing the tri...-color ink cartridge, remove the ink cartridge from the slot on . To replace the ink cartridges 1. If you try to select your country/region, follow the prompts to remove them. 2. CAUTION: If the HP All-in-One is on the left. 100 Maintain and troubleshoot Chapter 8 available to...
... front access door. Wait until print quality becomes unacceptable. To order ink cartridges for changing. If prompted, choose your product, and then click one of the device. 3. You might damage the device if the ink cartridges are not docked safely when you are replacing the tri...-color ink cartridge, remove the ink cartridge from the slot on . To replace the ink cartridges 1. If you try to select your country/region, follow the prompts to remove them. 2. CAUTION: If the HP All-in-One is on the left. 100 Maintain and troubleshoot Chapter 8 available to...
User Guide
Page 106
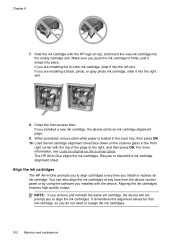
Chapter 8 7. Make sure you are installing the tri-color ink cartridge, slide it into the right slot. 8. If you push the ink cartridge in firmly until it into the left slot. Close the front access door. The HP All-in the input tray, then press OK. 10. NOTE: If you ...control panel or by using the software you to realign the ink cartridges. 102 Maintain and troubleshoot Aligning the ink cartridges ensures high-quality output. When prompted, ensure plain white paper is loaded in -One aligns the ink cartridges. It remembers the alignment values for that ink cartridge, so you ...
Chapter 8 7. Make sure you are installing the tri-color ink cartridge, slide it into the right slot. 8. If you push the ink cartridge in firmly until it into the left slot. Close the front access door. The HP All-in the input tray, then press OK. 10. NOTE: If you ...control panel or by using the software you to realign the ink cartridges. 102 Maintain and troubleshoot Aligning the ink cartridges ensures high-quality output. When prompted, ensure plain white paper is loaded in -One aligns the ink cartridges. It remembers the alignment values for that ink cartridge, so you ...
User Guide
Page 108
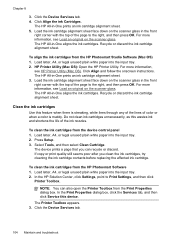
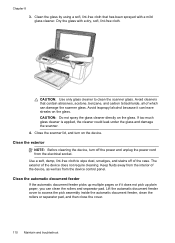
...Properties dialog box, click the Services tab, and then click Service this feature when there is muddy. The HP All-in -One prints an ink cartridge alignment sheet. 3. For more information, see Load an original on the scanner glass. ...One aligns the ink cartridges. To align the ink cartridges from the HP Photosmart Software 1. To clean the ink cartridges from the HP Photosmart Studio Software (Mac OS) 1. The HP All-in the front right corner with the top of color or when a color...white paper into the input tray. 2. Click the Device Services tab. 104 Maintain and troubleshoot
...Properties dialog box, click the Services tab, and then click Service this feature when there is muddy. The HP All-in -One prints an ink cartridge alignment sheet. 3. For more information, see Load an original on the scanner glass. ...One aligns the ink cartridges. To align the ink cartridges from the HP Photosmart Software 1. To clean the ink cartridges from the HP Photosmart Studio Software (Mac OS) 1. The HP All-in the front right corner with the top of color or when a color...white paper into the input tray. 2. Click the Device Services tab. 104 Maintain and troubleshoot
User Guide
Page 110
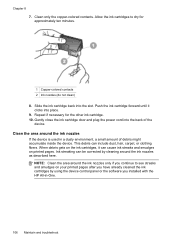
...Push the ink cartridge forward until it can include dust, hair, carpet, or clothing fibers. Repeat if necessary for approximately ten minutes. 1 Copper-colored contacts 2 Ink nozzles (do not clean) 8. Ink streaking can be corrected by using the device control panel or the software you continue to... you installed with the HP All-in a dusty environment, a small amount of the device. When debris gets on the ink cartridges, it clicks into place. 9. NOTE: Clean the area around the ink nozzles If the device is used in -One. 106 Maintain and troubleshoot Slide the ink cartridge ...
...Push the ink cartridge forward until it can include dust, hair, carpet, or clothing fibers. Repeat if necessary for approximately ten minutes. 1 Copper-colored contacts 2 Ink nozzles (do not clean) 8. Ink streaking can be corrected by using the device control panel or the software you continue to... you installed with the HP All-in a dusty environment, a small amount of the device. When debris gets on the ink cartridges, it clicks into place. 9. NOTE: Clean the area around the ink nozzles If the device is used in -One. 106 Maintain and troubleshoot Slide the ink cartridge ...
User Guide
Page 112
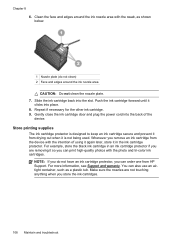
...the other ink cartridge. 9. For example, store the black ink cartridge in the ink cartridge protector. Push the ink cartridge forward until it from HP Support. Make sure the nozzles are removing it so you can also use an airtight container, such as shown below. 1 Nozzle plate (do not... you remove an ink cartridge from the device with the photo and tri-color ink cartridges. Slide the ink cartridge back into place. 8. Whenever you store the ink cartridges. 108 Maintain and troubleshoot You can order one from drying out when it is designed to keep an ink cartridge secure ...
...the other ink cartridge. 9. For example, store the black ink cartridge in the ink cartridge protector. Push the ink cartridge forward until it from HP Support. Make sure the nozzles are removing it so you can also use an airtight container, such as shown below. 1 Nozzle plate (do not... you remove an ink cartridge from the device with the photo and tri-color ink cartridges. Slide the ink cartridge back into place. 8. Whenever you store the ink cartridges. 108 Maintain and troubleshoot You can order one from drying out when it is designed to keep an ink cartridge secure ...
User Guide
Page 114
... cloth to access the pick assembly inside the automatic document feeder, clean the rollers or separator pad, and then close the cover. 110 Maintain and troubleshoot Lift the automatic document feeder cover to wipe dust, smudges, and stains off the power and unplug the power cord from the device control panel...
... cloth to access the pick assembly inside the automatic document feeder, clean the rollers or separator pad, and then close the cover. 110 Maintain and troubleshoot Lift the automatic document feeder cover to wipe dust, smudges, and stains off the power and unplug the power cord from the device control panel...
User Guide
Page 116
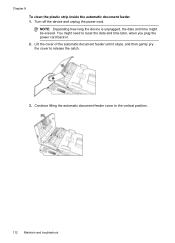
Continue lifting the automatic document feeder cover to release the catch. 3. Lift the cover of the automatic document feeder until it stops, and then gently pry the cover to the vertical position. 112 Maintain and troubleshoot You might be erased. Turn off the device and unplug the power cord. Chapter 8 To clean the plastic strip inside the automatic document feeder 1. NOTE: Depending how long the device is unplugged, the date and time might need to reset the date and time later, when you plug the power cord back in. 2.
Continue lifting the automatic document feeder cover to release the catch. 3. Lift the cover of the automatic document feeder until it stops, and then gently pry the cover to the vertical position. 112 Maintain and troubleshoot You might be erased. Turn off the device and unplug the power cord. Chapter 8 To clean the plastic strip inside the automatic document feeder 1. NOTE: Depending how long the device is unplugged, the date and time might need to reset the date and time later, when you plug the power cord back in. 2.
User Guide
Page 117
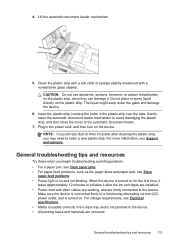
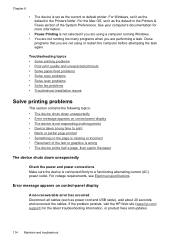
... Do not use abrasives, acetone, benzene, or carbon tetrachloride on . 4. Gently lower the automatic document feeder mechanism to the device. General troubleshooting tips and resources Try these when you still see Electrical specifications. • Media is loaded correctly in the input tray and is turned on... the plastic strip, since they can damage it after cleaning the plastic strip, you may need to initialize it . NOTE: If you begin troubleshooting a printing problem. • For a paper jam, see Clear paper jams. • For paper-feed problems, such as the paper skew ...
... Do not use abrasives, acetone, benzene, or carbon tetrachloride on . 4. Gently lower the automatic document feeder mechanism to the device. General troubleshooting tips and resources Try these when you still see Electrical specifications. • Media is loaded correctly in the input tray and is turned on... the plastic strip, since they can damage it after cleaning the plastic strip, you may need to initialize it . NOTE: If you begin troubleshooting a printing problem. • For a paper jam, see Clear paper jams. • For paper-feed problems, such as the paper skew ...
User Guide
Page 118
...unexpected printouts • Solve paper-feed problems • Solve copy problems • Solve scan problems • Solve fax problems • Troubleshoot installation issues Solve printing problems This section contains the following topics: • The device shuts down unexpectedly Check the power and power connections...sure the device is connected firmly to a functioning alternating current (AC) power outlet. If the problem persists, visit the HP Web site (www.hp.com/ support) for more information. • Pause Printing is not selected if you are using or restart the computer ...
...unexpected printouts • Solve paper-feed problems • Solve copy problems • Solve scan problems • Solve fax problems • Troubleshoot installation issues Solve printing problems This section contains the following topics: • The device shuts down unexpectedly Check the power and power connections...sure the device is connected firmly to a functioning alternating current (AC) power outlet. If the problem persists, visit the HP Web site (www.hp.com/ support) for more information. • Pause Printing is not selected if you are using or restart the computer ...


