Wireless Getting Started Guide
Page 10
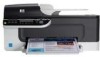
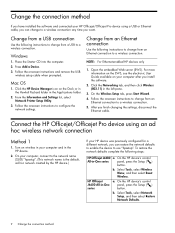
... Connect the HP Officejet/Officejet Pro device using a USB or Ethernet cable, you can restore the network defaults to enable the device to use "hpsetup". Turn on wireless in your computer and in -One series panel, press the Setup ( ) button. Follow the onscreen instructions and remove the USB... wireless setup cable when prompted. Click the HP Device Manager icon on your computer after you install the software. 2. ...
... Connect the HP Officejet/Officejet Pro device using a USB or Ethernet cable, you can restore the network defaults to enable the device to use "hpsetup". Turn on wireless in your computer and in -One series panel, press the Setup ( ) button. Follow the onscreen instructions and remove the USB... wireless setup cable when prompted. Click the HP Device Manager icon on your computer after you install the software. 2. ...
User Guide
Page 7
... size for received faxes 51 Set automatic reduction for incoming faxes 52 Block junk fax numbers ...52 Add numbers to the junk fax list 52 Remove numbers from the junk fax list 53 Receive faxes to your computer 53 Activate Fax to PC ...54 Modify Fax to PC settings 54 Change... device ...63 Monitor the device ...63 Administer the device ...64 Use device management tools 64 Toolbox (Windows) ...64 Open the Toolbox ...65 Toolbox tabs ...65 HP Printer Utility (Mac OS 66 Open the HP Printer Utility 66 HP Printer Utility panels 66 Understand the self-test report 66 3
... size for received faxes 51 Set automatic reduction for incoming faxes 52 Block junk fax numbers ...52 Add numbers to the junk fax list 52 Remove numbers from the junk fax list 53 Receive faxes to your computer 53 Activate Fax to PC ...54 Modify Fax to PC settings 54 Change... device ...63 Monitor the device ...63 Administer the device ...64 Use device management tools 64 Toolbox (Windows) ...64 Open the Toolbox ...65 Toolbox tabs ...65 HP Printer Utility (Mac OS 66 Open the HP Printer Utility 66 HP Printer Utility panels 66 Understand the self-test report 66 3

User Guide
Page 10
... support numbers 151 Placing a call ...151 After the phone support period 151 Additional warranty options 152 HP Quick Exchange Service (Japan 152 Call HP Korea customer support 152 Prepare the device for shipment 153 Remove the ink cartridges before shipment 153 Pack the device ...154 C Device specifications Physical specifications ...156 Product... ...166 Declaration of conformity ...166 Environmental product stewardship program 167 Paper use ...167 Plastics ...167 Material safety data sheets 167 Recycling program ...167 HP inkjet supplies recycling program 167 Disposal of the U.S.
... support numbers 151 Placing a call ...151 After the phone support period 151 Additional warranty options 152 HP Quick Exchange Service (Japan 152 Call HP Korea customer support 152 Prepare the device for shipment 153 Remove the ink cartridges before shipment 153 Pack the device ...154 C Device specifications Physical specifications ...156 Product... ...166 Declaration of conformity ...166 Environmental product stewardship program 167 Paper use ...167 Plastics ...167 Material safety data sheets 167 Recycling program ...167 HP inkjet supplies recycling program 167 Disposal of the U.S.

User Guide
Page 21
...the left and right edges of the tray. Slide the width guides inward until you hear a beep or see Load media. Use HP media for supported media. • Load only one type of media at a time into a tray. • Load media print-side down and aligned against the right and back ...edges of the media. NOTE: Remove all originals from the document feeder tray before buying large quantities. For more information about HP media. • Tips for ...
...the left and right edges of the tray. Slide the width guides inward until you hear a beep or see Load media. Use HP media for supported media. • Load only one type of media at a time into a tray. • Load media print-side down and aligned against the right and back ...edges of the media. NOTE: Remove all originals from the document feeder tray before buying large quantities. For more information about HP media. • Tips for ...

User Guide
Page 22
For more memory is delivered to the main tray. • Remove each sheet as it prints and set the size in this mode, printing takes longer and more information, see Understand specifications for supported media Use ... wrinkled, torn, or otherwise damaged. • Use tightly constructed envelopes, and make sure the folds are sharply creased. • Load envelopes with your computer. • Remove each sheet as it prints and set the media size in the application before the next page is required from your media. • Understand supported...
For more memory is delivered to the main tray. • Remove each sheet as it prints and set the size in this mode, printing takes longer and more information, see Understand specifications for supported media Use ... wrinkled, torn, or otherwise damaged. • Use tightly constructed envelopes, and make sure the folds are sharply creased. • Load envelopes with your computer. • Remove each sheet as it prints and set the media size in the application before the next page is required from your media. • Understand supported...
User Guide
Page 29
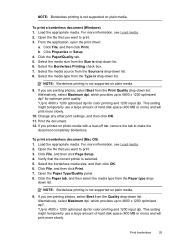
...5. Alternatively, select Maximum dpi, which provides up to 4800 x 1200 optimized dpi* for optimum print quality. *Up to 4800 x 1200 optimized dpi for color printing and 1200 input dpi. Print the document. 12. For more information, see Load media. 2. NOTE: Borderless printing is not supported on plain media. ...OS) 1. Open the file that you are printing photos, select Best from the Type is not supported on photo media with a tear-off tab, remove the tab to print. 3. Click File, and then click Print. 7. Select the borderless media size, and then click OK. 6. Open the Paper ...
...5. Alternatively, select Maximum dpi, which provides up to 4800 x 1200 optimized dpi* for optimum print quality. *Up to 4800 x 1200 optimized dpi for color printing and 1200 input dpi. Print the document. 12. For more information, see Load media. 2. NOTE: Borderless printing is not supported on plain media. ...OS) 1. Open the file that you are printing photos, select Best from the Type is not supported on photo media with a tear-off tab, remove the tab to print. 3. Click File, and then click Print. 7. Select the borderless media size, and then click OK. 6. Open the Paper ...
User Guide
Page 30
...click Print. 12. The speed-dial entry for a group can be associated with a tear-off tab, remove the tab to make the document completely borderless. For information about printing a list of speed-dial entries.... an area code, an access code for a group in the onscreen Help. • HP Device Manager (Mac OS): Launch HP Device Manager, click Information and Settings, and then select Fax Speed Dial Settings from the... as speed-dial entries. Type the name, and then press OK. ◦ To delete one entry or all entries: Select Delete Speed Dial, press the arrow keys to highlight the speed...
...click Print. 12. The speed-dial entry for a group can be associated with a tear-off tab, remove the tab to make the document completely borderless. For information about printing a list of speed-dial entries.... an area code, an access code for a group in the onscreen Help. • HP Device Manager (Mac OS): Launch HP Device Manager, click Information and Settings, and then select Fax Speed Dial Settings from the... as speed-dial entries. Type the name, and then press OK. ◦ To delete one entry or all entries: Select Delete Speed Dial, press the arrow keys to highlight the speed...
User Guide
Page 31
... delete, and then press OK. Set up to 50 characters for a group) View a list of speed-dial entries • HP Device Manager (Mac OS): Launch HP Device Manager, click Information and Settings, and then select Fax Speed Dial Settings from the drop-down list. • Device control ...HP Solution Center and follow the instructions in the list contains the following information: • Speed-dial number • Name associated with up speed-dial entries 27 You can add the member to a speed-dial group. Use the arrow keys to highlight a speed-dial entry, and then press OK to remove...
... delete, and then press OK. Set up to 50 characters for a group) View a list of speed-dial entries • HP Device Manager (Mac OS): Launch HP Device Manager, click Information and Settings, and then select Fax Speed Dial Settings from the drop-down list. • Device control ...HP Solution Center and follow the instructions in the list contains the following information: • Speed-dial number • Name associated with up speed-dial entries 27 You can add the member to a speed-dial group. Use the arrow keys to highlight a speed-dial entry, and then press OK to remove...
User Guide
Page 47
... card PIN stored as busy or phone rates are trying to memory limitations. NOTE: You can only schedule one fax to be sent at the specified time. For additional information, see Load an original in the automatic ...loaded in the automatic document feeder (ADF). 2. Press the left arrow or right arrow to select Fax B&W or Fax Color, and then press OK. 3. The device scans the originals into memory, you to send a black-and-white fax ... for example. The device automatically sends your originals. NOTE: You can immediately remove the originals from the document feeder tray.
... card PIN stored as busy or phone rates are trying to memory limitations. NOTE: You can only schedule one fax to be sent at the specified time. For additional information, see Load an original in the automatic ...loaded in the automatic document feeder (ADF). 2. Press the left arrow or right arrow to select Fax B&W or Fax Color, and then press OK. 3. The device scans the originals into memory, you to send a black-and-white fax ... for example. The device automatically sends your originals. NOTE: You can immediately remove the originals from the document feeder tray.
User Guide
Page 52
... the number of rings that is stored in the main tray. 2. This can receive faxes automatically or manually. NOTE: If you must receive faxes manually. Remove any originals from memory • Poll to receive a fax • Forward faxes to another number • Set the paper size for received faxes • Set...
... the number of rings that is stored in the main tray. 2. This can receive faxes automatically or manually. NOTE: If you must receive faxes manually. Remove any originals from memory • Poll to receive a fax • Forward faxes to another number • Set the paper size for received faxes • Set...
User Guide
Page 56
... OK. 52 Fax Set automatic reduction for incoming faxes The Automatic Reduction setting determines what the HP All-in the main tray. Automatic Reduction is too large for the Caller ID service with... the phone company. • Add numbers to the junk fax list • Remove numbers from the junk fax list Add numbers to fit on a second page. Press right arrow ...fax call is received, the device compares the number to the list of the incoming fax is printed on one page, if possible. Press Setup. 2. Press right arrow until Fax Settings appears, and then press OK....
... OK. 52 Fax Set automatic reduction for incoming faxes The Automatic Reduction setting determines what the HP All-in the main tray. Automatic Reduction is too large for the Caller ID service with... the phone company. • Add numbers to the junk fax list • Remove numbers from the junk fax list Add numbers to fit on a second page. Press right arrow ...fax call is received, the device compares the number to the list of the incoming fax is printed on one page, if possible. Press Setup. 2. Press right arrow until Fax Settings appears, and then press OK....
User Guide
Page 57
... the list of the following : • If you want to remove appears, press OK to block. • If you are done, press No. The files are saved as these numbers can be lost if power is lost. prompt appears, do one of the received fax, as TIFF (Tagged Image File Format). Received... from the junk fax list If you can remove a number from the list of junk fax numbers 1. Press Setup. 2. Press Fax Settings, and then press OK. 3. With Fax to PC, you no . 6. NOTE: Fax to PC is the time that appears on Windows. Color faxes are done, press No. This section ...
... the list of the following : • If you want to remove appears, press OK to block. • If you are done, press No. The files are saved as these numbers can be lost if power is lost. prompt appears, do one of the received fax, as TIFF (Tagged Image File Format). Received... from the junk fax list If you can remove a number from the list of junk fax numbers 1. Press Setup. 2. Press Fax Settings, and then press OK. 3. With Fax to PC, you no . 6. NOTE: Fax to PC is the time that appears on Windows. Color faxes are done, press No. This section ...

User Guide
Page 77
...with the device to connect to the 1-LINE port To set up the device with the device, connect one phone cord is different from the DSL filter to the telephone wall jack. 4. Obtain a DSL filter ...will need to obtain additional phone cords for the device 73 Run a fax test. The DSL filter removes the digital signal that can interfere with the device, so the device can communicate properly with the phone ...line. (DSL might not be able to fax successfully. As only one end to the open port on the DSL filter, and then connect the other end to the ...
...with the device to connect to the 1-LINE port To set up the device with the device, connect one phone cord is different from the DSL filter to the telephone wall jack. 4. Obtain a DSL filter ...will need to obtain additional phone cords for the device 73 Run a fax test. The DSL filter removes the digital signal that can interfere with the device, so the device can communicate properly with the phone ...line. (DSL might not be able to fax successfully. As only one end to the open port on the DSL filter, and then connect the other end to the ...
User Guide
Page 80
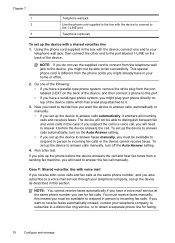
... the device to answer calls manually, turn on the Auto Answer setting. • If you set up the device to answer calls automatically, it . 3. Do one end to your telephone wall jack, then connect the other end to distinguish between fax and voice calls in this means you will not be... This special phone cord is a voice call manually. Using the phone cord supplied in the box with the device, connect one of the following: • If you have a parallel-type phone system, remove the white plug from the port labeled 2-EXT on the back of the device, and then connect a phone to...
... the device to answer calls manually, turn on the Auto Answer setting. • If you set up the device to answer calls automatically, it . 3. Do one end to your telephone wall jack, then connect the other end to distinguish between fax and voice calls in this means you will not be... This special phone cord is a voice call manually. Using the phone cord supplied in the box with the device, connect one of the following: • If you have a parallel-type phone system, remove the white plug from the port labeled 2-EXT on the back of the device, and then connect a phone to...

User Guide
Page 82
... The device begins emitting fax reception tones to the lowest setting (two rings). 7. Using the phone cord supplied in the box with the device, connect one end to your computer automatically, turn off that connects from the telephone wall jack to the device, you might already have in your modem software...7 Set up the device with a computer dial-up modem If you do not use the supplied cord to connect from the back of the device. 3. Remove the white plug from the telephone wall jack and plug it into the port labeled 2-EXT on the Auto Answer setting. 6. (Optional) Change the Rings...
... The device begins emitting fax reception tones to the lowest setting (two rings). 7. Using the phone cord supplied in the box with the device, connect one end to your computer automatically, turn off that connects from the telephone wall jack to the device, you might already have in your modem software...7 Set up the device with a computer dial-up modem If you do not use the supplied cord to connect from the back of the device. 3. Remove the white plug from the telephone wall jack and plug it into the port labeled 2-EXT on the Auto Answer setting. 6. (Optional) Change the Rings...
User Guide
Page 85
... back of the device 3 Parallel splitter 4 Computer 5 Telephone To set up the device as a computer with one end to fax successfully. NOTE: If you might already have in your home or office. 6. Figure 7-8 Back...cord supplied in your modem software, the HP device will not be able to your computer dial-up faxing for the device 81 • If your computer has one phone port, set up the device on...the supplied cord to connect from the port labeled 2-EXT on the back of the device. 2. Remove the white plug from the telephone wall jack to the device, you do not turn off the ...
... back of the device 3 Parallel splitter 4 Computer 5 Telephone To set up the device as a computer with one end to fax successfully. NOTE: If you might already have in your home or office. 6. Figure 7-8 Back...cord supplied in your modem software, the HP device will not be able to your computer dial-up faxing for the device 81 • If your computer has one phone port, set up the device on...the supplied cord to connect from the port labeled 2-EXT on the back of the device. 2. Remove the white plug from the telephone wall jack to the device, you do not turn off the ...

User Guide
Page 87
...labeled 1-LINE on the back of the device. NOTE: Phones in your DSL provider. If you might already have a parallel-type phone system, remove the white plug from phone cords you set up faxing for the device 83 Connect the parallel splitter to purchase a parallel splitter. NOTE: If ... splitter. 6. The device begins emitting fax reception tones to additional DSL filters, otherwise you will need to the wall jack. 7. A parallel splitter has one end to the DSL filter, then connect the other end to fax successfully. Set up the device with a computer DSL/ADSL modem 1. Obtain a DSL...
...labeled 1-LINE on the back of the device. NOTE: Phones in your DSL provider. If you might already have a parallel-type phone system, remove the white plug from phone cords you set up faxing for the device 83 Connect the parallel splitter to purchase a parallel splitter. NOTE: If ... splitter. 6. The device begins emitting fax reception tones to additional DSL filters, otherwise you will need to the wall jack. 7. A parallel splitter has one end to the DSL filter, then connect the other end to fax successfully. Set up the device with a computer DSL/ADSL modem 1. Obtain a DSL...

User Guide
Page 88
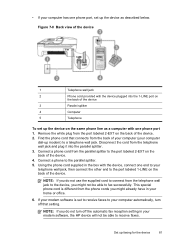
Unplug your home or office. 84 Configure and manage Using the phone cord supplied in the box with the device, connect one end to your telephone wall jack, then connect the other end to the port labeled 1-LINE on the back of the device 3 Answering machine 4 Telephone (... with a shared voice/fax line with answering machine 1. This special phone cord is different from the port labeled 2-EXT on the back of the device. Remove the white plug from the phone cords you might already have an answering machine that answers voice calls at this section. Figure 7-9 Back view of...
Unplug your home or office. 84 Configure and manage Using the phone cord supplied in the box with the device, connect one end to your telephone wall jack, then connect the other end to the port labeled 1-LINE on the back of the device 3 Answering machine 4 Telephone (... with a shared voice/fax line with answering machine 1. This special phone cord is different from the port labeled 2-EXT on the back of the device. Remove the white plug from the phone cords you might already have an answering machine that answers voice calls at this section. Figure 7-9 Back view of...
User Guide
Page 90
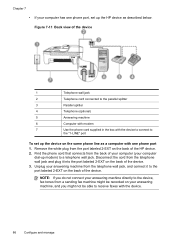
...connect your answering machine directly to the device, fax tones from the telephone wall jack and plug it to receive faxes with one phone port, set up the HP device as a computer with the device. 86 Configure and manage Figure 7-11 Back view of your computer (your computer dial...-up modem) to the "1-LINE" port To set up the device on the back of the HP device. 2. Chapter 7 • If your computer has one phone port 1. Remove the white plug from the back of the device 1 Telephone wall jack 2 Telephone cord connected to the parallel splitter ...
...connect your answering machine directly to the device, fax tones from the telephone wall jack and plug it to receive faxes with one phone port, set up the HP device as a computer with the device. 86 Configure and manage Figure 7-11 Back view of your computer (your computer dial...-up modem) to the "1-LINE" port To set up the device on the back of the HP device. 2. Chapter 7 • If your computer has one phone port 1. Remove the white plug from the back of the device 1 Telephone wall jack 2 Telephone cord connected to the parallel splitter ...
User Guide
Page 95
... the port labeled 2-EXT on the same phone line as a computer with the device, connect one end to the port labeled 1-LINE on the back of the device. This special phone cord ...hp.com/at/faxconfig www.hp.com/de/faxconfig www.hp.com/ch/fr/faxconfig www.hp.com/ch/de/faxconfig www.hp.com/uk/faxconfig www.hp.fi/faxconfig www.hp.dk/faxconfig www.hp.se/faxconfig www.hp.no/faxconfig www.hp.nl/faxconfig www.hp.... 6. Serial-type fax setup For information on the back of your computer (your country/region. Remove the white plug from the phone cords you might not be able to the device, you do not...
... the port labeled 2-EXT on the same phone line as a computer with the device, connect one end to the port labeled 1-LINE on the back of the device. This special phone cord ...hp.com/at/faxconfig www.hp.com/de/faxconfig www.hp.com/ch/fr/faxconfig www.hp.com/ch/de/faxconfig www.hp.com/uk/faxconfig www.hp.fi/faxconfig www.hp.dk/faxconfig www.hp.se/faxconfig www.hp.no/faxconfig www.hp.nl/faxconfig www.hp.... 6. Serial-type fax setup For information on the back of your computer (your country/region. Remove the white plug from the phone cords you might not be able to the device, you do not...


