

Use and Care Guide
Page 1
MAYTAG NEPTUNE® WASHER MAH-1 USE & CARE GUIDE Part No. 2206687 TABLE OF CONTENTS Safety Instructions 1-2 Operating Instructions 2-5 Water Use 5 Features 6-7 Care and Cleaning 8 Storing the Washer 9 Reverse the Door 9 Troubleshooting 10-11 Before You Call 12 Operating Sounds 13 Questions and Answers 14 Warranty 15 Guide de Utilisation et d'entretien 16 Guía de uso y cuidado 34 Y81919 A ©2006 Maytag Appliances Sales Co.
MAYTAG NEPTUNE® WASHER MAH-1 USE & CARE GUIDE Part No. 2206687 TABLE OF CONTENTS Safety Instructions 1-2 Operating Instructions 2-5 Water Use 5 Features 6-7 Care and Cleaning 8 Storing the Washer 9 Reverse the Door 9 Troubleshooting 10-11 Before You Call 12 Operating Sounds 13 Questions and Answers 14 Warranty 15 Guide de Utilisation et d'entretien 16 Guía de uso y cuidado 34 Y81919 A ©2006 Maytag Appliances Sales Co.

Use and Care Guide
Page 2
...adequately and in , or spotted with the instructions for operation of the appliance and always exercise care when using electricity and having moving parts, there are not meant to : 1) Have complete model and serial number identification of these substances. To avoid the possibility of ...in the future, it may occur. Hazards or unsafe practices which COULD result in minor personal injury. WARNING To reduce the risk of a Maytag® Neptune® washer! This is located on a data plate on a floor that can support the weight. 5. If you have questions, write us . RECOGNIZE...
...adequately and in , or spotted with the instructions for operation of the appliance and always exercise care when using electricity and having moving parts, there are not meant to : 1) Have complete model and serial number identification of these substances. To avoid the possibility of ...in the future, it may occur. Hazards or unsafe practices which COULD result in minor personal injury. WARNING To reduce the risk of a Maytag® Neptune® washer! This is located on a data plate on a floor that can support the weight. 5. If you have questions, write us . RECOGNIZE...
Use and Care Guide
Page 3
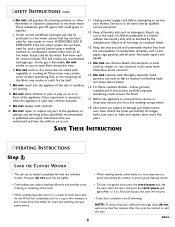
... couple of the appliance or attempt any accumulated hydrogen gas. Do not repair or replace any part of small items that could remove the finish. 17. Service is flammable, do not fill... wear or leaks and replace them every five years SAVE THESE INSTRUCTIONS OPERATING INSTRUCTIONS Step 1 LOAD THE CLOTHES WASHER • The tub can be produced in the same wash. Check the hoses periodically for... Keep all warnings on , in, or in front of combustible materials, such as vinegar or rust remover) in a hot water system that your washer. Do not use an open flame during this ...
... couple of the appliance or attempt any accumulated hydrogen gas. Do not repair or replace any part of small items that could remove the finish. 17. Service is flammable, do not fill... wear or leaks and replace them every five years SAVE THESE INSTRUCTIONS OPERATING INSTRUCTIONS Step 1 LOAD THE CLOTHES WASHER • The tub can be produced in the same wash. Check the hoses periodically for... Keep all warnings on , in, or in front of combustible materials, such as vinegar or rust remover) in a hot water system that your washer. Do not use an open flame during this ...
Use and Care Guide
Page 9
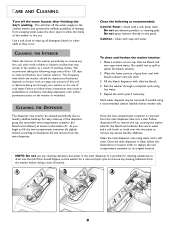
... 60 to 120 days to clean and freshen your washer, or the use of cold water. The dispenser may result in the washer as recommended: Control Panel - Run warm water and a soft brush or cloth over the two parts to remove any cleaning substance but water in illustration... take it to a sink. Do not spray cleaners directly on the panel. CLEANING THE INTERIOR Clean the interior of the washer periodically to remove any cleaning substance from the washer before doing a load of laundry. 1 2 3 OFTENER BLEACH FILL AX M S M AX FILL 8 CARE AND CLEANING Turn off the water...
... 60 to 120 days to clean and freshen your washer, or the use of cold water. The dispenser may result in the washer as recommended: Control Panel - Run warm water and a soft brush or cloth over the two parts to remove any cleaning substance but water in illustration... take it to a sink. Do not spray cleaners directly on the panel. CLEANING THE INTERIOR Clean the interior of the washer periodically to remove any cleaning substance from the washer before doing a load of laundry. 1 2 3 OFTENER BLEACH FILL AX M S M AX FILL 8 CARE AND CLEANING Turn off the water...
Use and Care Guide
Page 16
..., and you are void if the original serial numbers have other rights which vary from the original retail purchase date, any part which fails in remote locations. 8. Improper installation, delivery, or maintenance. b. Any repair, modification, alteration, or adjustment not...unreasonable use will be repaired or replaced free of charge. c. Refer to WARRANTY for further information on the proper use . 5. c. e. MAYTAG CORPORATION SHALL NOT BE LIABLE FOR INCIDENTAL OR CONSEQUENTIAL DAMAGES. c. U.S. SOME STATES AND PROVINCES DO NOT ALLOW THE EXCLUSION OR LIMITATION OF ...
..., and you are void if the original serial numbers have other rights which vary from the original retail purchase date, any part which fails in remote locations. 8. Improper installation, delivery, or maintenance. b. Any repair, modification, alteration, or adjustment not...unreasonable use will be repaired or replaced free of charge. c. Refer to WARRANTY for further information on the proper use . 5. c. e. MAYTAG CORPORATION SHALL NOT BE LIABLE FOR INCIDENTAL OR CONSEQUENTIAL DAMAGES. c. U.S. SOME STATES AND PROVINCES DO NOT ALLOW THE EXCLUSION OR LIMITATION OF ...
Service Manual
Page 7
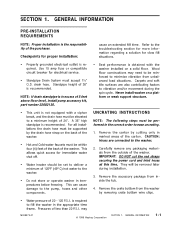
... bottom from unbalanced load situations. SECTION 1. drain hose. For all installations the drain hose must be elevated to a minimum height of 5 feet above floor level, install pump accessory kit, part number 22002136. • This unit is not equipped with the washer installed on a ...hose must be within four (4) feet of the back of less than 20 P.S.I . Wood floor constructions may 16008373-01 © 1998 Maytag Corporation SECTION 1. Checkpoints for slow fill situations. • Best performance is required. Carefully remove any packaging materials from inside the tub....
... bottom from unbalanced load situations. SECTION 1. drain hose. For all installations the drain hose must be elevated to a minimum height of 5 feet above floor level, install pump accessory kit, part number 22002136. • This unit is not equipped with the washer installed on a ...hose must be within four (4) feet of the back of less than 20 P.S.I . Wood floor constructions may 16008373-01 © 1998 Maytag Corporation SECTION 1. Checkpoints for slow fill situations. • Best performance is required. Carefully remove any packaging materials from inside the tub....
Service Manual
Page 21
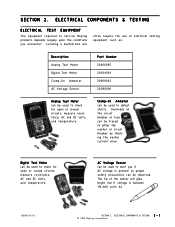
...volts AC. 16008373-01 SECTION 2. AC Voltage Sensor can be used to either the washer or circuit breaker by checking the washer current draw. ELECTRICAL COMPONENTS & TESTING 2 - 1 © 1998 Maytag Corporation Locating a malfunction will glow bright red if voltage is present so proper safety precautions... the use of electrical testing equipment such as: Description Analog Test Meter Digital Test Meter Clamp-On Ammeter AC Voltage Sensor Part Number 20000005 20001001 20000002 20000081 Analog Test Meter can be observed. Clamp-On Ammeter can be used to alert you encounter....
...volts AC. 16008373-01 SECTION 2. AC Voltage Sensor can be used to either the washer or circuit breaker by checking the washer current draw. ELECTRICAL COMPONENTS & TESTING 2 - 1 © 1998 Maytag Corporation Locating a malfunction will glow bright red if voltage is present so proper safety precautions... the use of electrical testing equipment such as: Description Analog Test Meter Digital Test Meter Clamp-On Ammeter AC Voltage Sensor Part Number 20000005 20001001 20000002 20000081 Analog Test Meter can be observed. Clamp-On Ammeter can be used to alert you encounter....
Service Manual
Page 22
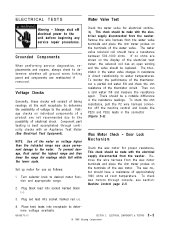
... the P2(5) and P2(6) leads in the connector (Figure 2-3). Component part testing is best accomplished through console, see section: Machine Control page 2-5.... be a notable difference in direct relationship to water temperatures. ELECTRICAL COMPONENTS & TESTING © 1998 Maytag Corporation 2-2 ELECTRICAL TESTS Water Valve Test Warning - Grounded Components When performing service diagnostics, replacements and... range may cause permanent damage to the product. Remove the wire harness from the washer. Then, run a partial hot water fill and check the ohm resistance of approximately...
... the P2(5) and P2(6) leads in the connector (Figure 2-3). Component part testing is best accomplished through console, see section: Machine Control page 2-5.... be a notable difference in direct relationship to water temperatures. ELECTRICAL COMPONENTS & TESTING © 1998 Maytag Corporation 2-2 ELECTRICAL TESTS Water Valve Test Warning - Grounded Components When performing service diagnostics, replacements and... range may cause permanent damage to the product. Remove the wire harness from the washer. Then, run a partial hot water fill and check the ohm resistance of approximately...
Service Manual
Page 50
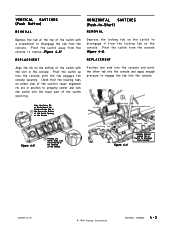
... in the console. Depress the locking tab on the switch to disengage it in position to properly center and lock the switch into the lower part of the switch with a screwdriver to disengage the tab from the locking tab on Switch to Disengage From Console 16008373-01 © 1998... Maytag Corporation SECTION 4. Pivot the switch from the console to engage the tab into the console until the tab engages the console securely. Align the Center ...
... in the console. Depress the locking tab on the switch to disengage it in position to properly center and lock the switch into the lower part of the switch with a screwdriver to disengage the tab from the locking tab on Switch to Disengage From Console 16008373-01 © 1998... Maytag Corporation SECTION 4. Pivot the switch from the console to engage the tab into the console until the tab engages the console securely. Align the Center ...

Service Manual
Page 57
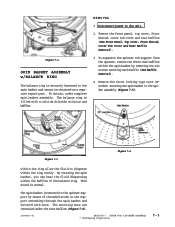
...to tuck the harness inside the upper flange of the top cover to the rear components of the washer (Figure 5-11). Remove the door (See Door Assembly and Hinge Removal). 4. The wire harness ...can lean back against the top cover. Access Panel Figure 5-12 16008373-01 © 1998 Maytag Corporation SECTION 5. Carefully lift and stand the shroud assembly on the left side of the upper ...cabinet is necessary to provide proper alignment of the parts. CABINET ASSEMBLY 5 - 5 CABINET ASSEMBLY w/REAR ACCESS PANEL Removal of the access panel gains...
...to tuck the harness inside the upper flange of the top cover to the rear components of the washer (Figure 5-11). Remove the door (See Door Assembly and Hinge Removal). 4. The wire harness ...can lean back against the top cover. Access Panel Figure 5-12 16008373-01 © 1998 Maytag Corporation SECTION 5. Carefully lift and stand the shroud assembly on the left side of the upper ...cabinet is necessary to provide proper alignment of the parts. CABINET ASSEMBLY 5 - 5 CABINET ASSEMBLY w/REAR ACCESS PANEL Removal of the access panel gains...
Service Manual
Page 68
...nuts (½" socket) securing the spin basket to the spin basket and cannot be obtained as a separate repair part. OUTER TUB & SPINNER ASSEMBLY © 1998 Maytag Corporation 7-3 The balance ring is securely fastened to the spider assembly (Figure 7-5). The spin basket is normal.... This sound is mounted to the unit. 2. Remove the front panel, top cover, front shroud, outer tub cover and rear baffles (See Front Panel, Top cover, Front Shroud, ...
...nuts (½" socket) securing the spin basket to the spin basket and cannot be obtained as a separate repair part. OUTER TUB & SPINNER ASSEMBLY © 1998 Maytag Corporation 7-3 The balance ring is securely fastened to the spider assembly (Figure 7-5). The spin basket is normal.... This sound is mounted to the unit. 2. Remove the front panel, top cover, front shroud, outer tub cover and rear baffles (See Front Panel, Top cover, Front Shroud, ...
Service Manual
Page 89
...foot inlet hoses with clothes load. Water fill in spin..., Counter Weight Bolt, Spin Pulley Bolt, Belt Adjuster Screw, Front Baffle Screw, Rear Baffle Clamp, Hoses Nuts, Spinner Support Nuts... 16010199 (16008373-03) 2 Revised 7/00 ©2000 Maytag Appliances Sales Company SPECIFICATIONS CAPACITY ELECTRICAL MOTOR POWER USAGE TUMBLER SPEED...in . lbs. 18.5 in . lbs. 7 in . Cabinet Dimensions: 27" (68.58cm) W x 271/2" (69.85cm) D x 36" ... inlet washers and attached to water valve. MAH4000/MAH5500A CONTROL FACIA SECTION 2. lbs.) (+ 3 in the basic manual part number...
...foot inlet hoses with clothes load. Water fill in spin..., Counter Weight Bolt, Spin Pulley Bolt, Belt Adjuster Screw, Front Baffle Screw, Rear Baffle Clamp, Hoses Nuts, Spinner Support Nuts... 16010199 (16008373-03) 2 Revised 7/00 ©2000 Maytag Appliances Sales Company SPECIFICATIONS CAPACITY ELECTRICAL MOTOR POWER USAGE TUMBLER SPEED...in . lbs. 18.5 in . lbs. 7 in . Cabinet Dimensions: 27" (68.58cm) W x 271/2" (69.85cm) D x 36" ... inlet washers and attached to water valve. MAH4000/MAH5500A CONTROL FACIA SECTION 2. lbs.) (+ 3 in the basic manual part number...
Service Manual
Page 96
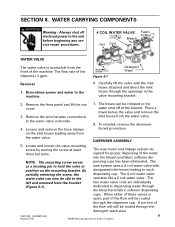
... cover. 3. Place a towel below the valve and remove the inlet hoses from the front of these valves is accessible from the water valve. 8. NOTE: The mounting screw serves...of the flow will still be routed through the detergent wash area. 16010199 (16008373-03) 9 Revised 7/00 ©2000 Maytag Appliances Sales Company Remove the wire harness connections to the machine. 06&258(1:7,1* Figure 8-1 'HWHUJHQW :DVK 6. To reinstall,...&211(&7,21 %OHDFK +RW &ROG )DEULF 6RIWQHU WATER VALVE The water valve is open, part of the flow will be routed through the dispenser cup.
... cover. 3. Place a towel below the valve and remove the inlet hoses from the front of these valves is accessible from the water valve. 8. NOTE: The mounting screw serves...of the flow will still be routed through the detergent wash area. 16010199 (16008373-03) 9 Revised 7/00 ©2000 Maytag Appliances Sales Company Remove the wire harness connections to the machine. 06&258(1:7,1* Figure 8-1 'HWHUJHQW :DVK 6. To reinstall,...&211(&7,21 %OHDFK +RW &ROG )DEULF 6RIWQHU WATER VALVE The water valve is open, part of the flow will be routed through the dispenser cup.
Service Manual
Page 98
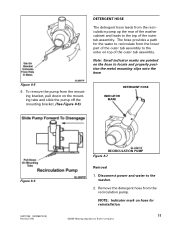
..., pull down on top of the outer tub assembly. Disconnect power and water to the washer. 2. Remove the detergent hose from the recirculation pump. The hose provides a path for reinstallation. 11 ©2000 Maytag Appliances Sales Company NOTE: Indicator mark on the hose to locate and properly position the metal... indicator marks are painted on hose for the water to recirculate from the lower part of the outer tub assembly. DETERGENT HOSE The detergent hose leads from the recirculation pump up the rear of the washer cabinet and leads to the top of the outer tub assembly to the enter ...
..., pull down on top of the outer tub assembly. Disconnect power and water to the washer. 2. Remove the detergent hose from the recirculation pump. The hose provides a path for reinstallation. 11 ©2000 Maytag Appliances Sales Company NOTE: Indicator mark on the hose to locate and properly position the metal... indicator marks are painted on hose for the water to recirculate from the lower part of the outer tub assembly. DETERGENT HOSE The detergent hose leads from the recirculation pump up the rear of the washer cabinet and leads to the top of the outer tub assembly to the enter ...
Service Manual
Page 106
The following information is Supplement five for reference. 16010486 (16008373-05) ©2001 Maytag Appliances Sales Company We suggest you file this manual for detailed service information. Please refer to the information found in the basic manual part number 16008373. MAYTAG New Century Neptune Washer Service Manual Supplement 16008373-05 Attached is supplemental to this with your 16008373 Manual for service manual 16008373. This Maytag Washer Service Manual supplement covers Models MAH5500B and MAH7500.
The following information is Supplement five for reference. 16010486 (16008373-05) ©2001 Maytag Appliances Sales Company We suggest you file this manual for detailed service information. Please refer to the information found in the basic manual part number 16008373. MAYTAG New Century Neptune Washer Service Manual Supplement 16008373-05 Attached is supplemental to this with your 16008373 Manual for service manual 16008373. This Maytag Washer Service Manual supplement covers Models MAH5500B and MAH7500.
Service Manual
Page 129
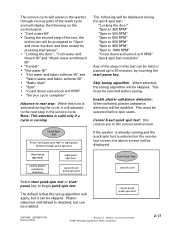
The service cycle will advance the washer through various parts of the wash cycle and will display the following will be displayed during the cycle, it will default to disabled, but it can be selected ... that the tuning algorithm will be skipped. cancel & exit quick spin test 16010486 (16008373-05) Revised 02/01 Section 2. Washer Controls Overview ©2001 Maytag Appliances Sales Company 2-17 skip tuning algorithm enable plaster unbalance detection start quick spin test cancel & exit quick spin test Quick Spin Test cancel cycle ...
The service cycle will advance the washer through various parts of the wash cycle and will display the following will be displayed during the cycle, it will default to disabled, but it can be selected ... that the tuning algorithm will be skipped. cancel & exit quick spin test 16010486 (16008373-05) Revised 02/01 Section 2. Washer Controls Overview ©2001 Maytag Appliances Sales Company 2-17 skip tuning algorithm enable plaster unbalance detection start quick spin test cancel & exit quick spin test Quick Spin Test cancel cycle ...
Service Manual
Page 152
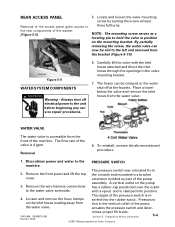
... to the rear components of the machine. NOTE: The mounting screw serves as part of the pump actuates the pressure switch and deter- 16010486 (16008373-05) Revised... accessible from the water valve. PRESSURE SWITCH 2. Teardown & Wiring Information ©2001 Maytag Appliances Sales Company 5-4 Remove the wire harness connections to the machine. WATER VALVE The...the aforementioned procedure. 1. Remove the front panel and lift the top cover. A vertical outlet on the inlet hoses leading away from the front of the washer (Figure 5-9). 5. The pressure switch...
... to the rear components of the machine. NOTE: The mounting screw serves as part of the pump actuates the pressure switch and deter- 16010486 (16008373-05) Revised... accessible from the water valve. PRESSURE SWITCH 2. Teardown & Wiring Information ©2001 Maytag Appliances Sales Company 5-4 Remove the wire harness connections to the machine. WATER VALVE The...the aforementioned procedure. 1. Remove the front panel and lift the top cover. A vertical outlet on the inlet hoses leading away from the front of the washer (Figure 5-9). 5. The pressure switch...
Service Manual
Page 153
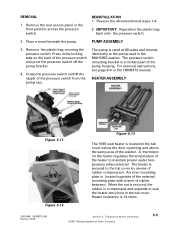
... the pump housing. Reverse the aforementioned steps 1-4. 2. The heater is a molded part of the washer. An inner mounting plate is 14 ohms. 16010486 (16008373-05) Revised 10/00 Section 5.... Remove the rear access panel or the front panel to maintain proper water temperature when...and pivot the pressure switch off the pump bracket. 4. Teardown & Wiring Information ©2001 Maytag Appliances Sales Company 5-5 A thermistor on the back of the pressure switch from the pump cap....
... the pump housing. Reverse the aforementioned steps 1-4. 2. The heater is a molded part of the washer. An inner mounting plate is 14 ohms. 16010486 (16008373-05) Revised 10/00 Section 5.... Remove the rear access panel or the front panel to maintain proper water temperature when...and pivot the pressure switch off the pump bracket. 4. Teardown & Wiring Information ©2001 Maytag Appliances Sales Company 5-5 A thermistor on the back of the pressure switch from the pump cap....


