
Use and Care Guide
Page 3
...or pets to play on all other flammable or explosive substances to assure good cleaning results. • To load a forgotten item, press the start/pause pad, add the item, close the door and press the start/pause pad again. Keep all warnings on container labels. 13. Do not use ... items or a couple of children, preferably in front of the appliance. b. If the hot water system has not been used for bulges, kinks, cuts, wear or leaks and replace them every five years SAVE THESE INSTRUCTIONS OPERATING INSTRUCTIONS Step 1 LOAD THE CLOTHES WASHER • The tub can be produced in the...
...or pets to play on all other flammable or explosive substances to assure good cleaning results. • To load a forgotten item, press the start/pause pad, add the item, close the door and press the start/pause pad again. Keep all warnings on container labels. 13. Do not use ... items or a couple of children, preferably in front of the appliance. b. If the hot water system has not been used for bulges, kinks, cuts, wear or leaks and replace them every five years SAVE THESE INSTRUCTIONS OPERATING INSTRUCTIONS Step 1 LOAD THE CLOTHES WASHER • The tub can be produced in the...
Use and Care Guide
Page 11
...front load washers. Stops • Plug cord into live electrical outlet. • Check fuse or reset circuit breaker. • Close door and push the start/pause pad to spin.The door...YOU CALL CHECK THESE POINTS IF YOUR MAYTAG® NEPTUNE® WASHER... It should be warm. Hose ...Load is correct. • Make sure hoses are selected. Leaks Water • Make sure door is firmly closed . • After pressing the start . • Check screens on fully. • Make sure temperature selection is too small.Very small loads (one or two items) may change as the washer...
...front load washers. Stops • Plug cord into live electrical outlet. • Check fuse or reset circuit breaker. • Close door and push the start/pause pad to spin.The door...YOU CALL CHECK THESE POINTS IF YOUR MAYTAG® NEPTUNE® WASHER... It should be warm. Hose ...Load is correct. • Make sure hoses are selected. Leaks Water • Make sure door is firmly closed . • After pressing the start . • Check screens on fully. • Make sure temperature selection is too small.Very small loads (one or two items) may change as the washer...
Service Manual
Page 37
...: The noise could be from loose lower front weight mounting bolts or a loose bolt securing the driven pulley. Reposition cap to the washer shutting down too soon or execessive suds present...The wax motors are loose. 16008373-01 © 1998 Maytag Corporation SECTION 3. The technician should fully seat the door into the shroud and the technician fully tightens the top hinge...seconds prior to tightening the hinge bracket screw into the shroud. Door Leaks: Dispenser Does Not Dispense: Usually this occurs when the door is not correct, suspect a bad wiring connection. Replace the ...
...: The noise could be from loose lower front weight mounting bolts or a loose bolt securing the driven pulley. Reposition cap to the washer shutting down too soon or execessive suds present...The wax motors are loose. 16008373-01 © 1998 Maytag Corporation SECTION 3. The technician should fully seat the door into the shroud and the technician fully tightens the top hinge...seconds prior to tightening the hinge bracket screw into the shroud. Door Leaks: Dispenser Does Not Dispense: Usually this occurs when the door is not correct, suspect a bad wiring connection. Replace the ...

Service Manual
Page 66
...leak upon replacement of the boot clamp spring. Pull the boot clamp spring hook toward the wire loop and disengage the spring from the lip of the spin basket. NOTE: Note the orientation ribs on the boot seal, which engage with a ¼" drive socket. OUTER TUB & SPINNER ASSEMBLY © 1998 Maytag... The three front baffles within the spin basket are removed by a wire loop stretched around the perimeter of the washer. Using one... brake the wire into the door boot. Remove the front panel, top cover and front shroud (See Front Panel, Top and Front Shroud Removal). 3. SECTION 7....
...leak upon replacement of the boot clamp spring. Pull the boot clamp spring hook toward the wire loop and disengage the spring from the lip of the spin basket. NOTE: Note the orientation ribs on the boot seal, which engage with a ¼" drive socket. OUTER TUB & SPINNER ASSEMBLY © 1998 Maytag... The three front baffles within the spin basket are removed by a wire loop stretched around the perimeter of the washer. Using one... brake the wire into the door boot. Remove the front panel, top cover and front shroud (See Front Panel, Top and Front Shroud Removal). 3. SECTION 7....
Service Manual
Page 67
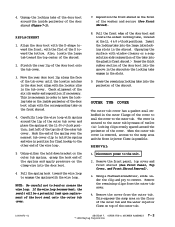
... the wire loop to the outer tub. OUTER TUB & SPINNER ASSEMBLY 7 - 2 © 1998 Maytag Corporation 6. Hook the end of the spring over the nearest tub cover clip to the other end of... if necessary. If the wire loop becomes bent, the result will be a potential leak upon replacement of the door shroud (Figure 7-1). OUTER TUB COVER The outer tub cover has a gasket seal embedded...and the water injector flume on the front of the outer tub. 16008373-01 SECTION 7. This is possible. Reposition the front shroud on top of the washer and secure (See Front Shroud). 8. The cover is secured ...
... the wire loop to the outer tub. OUTER TUB & SPINNER ASSEMBLY 7 - 2 © 1998 Maytag Corporation 6. Hook the end of the spring over the nearest tub cover clip to the other end of... if necessary. If the wire loop becomes bent, the result will be a potential leak upon replacement of the door shroud (Figure 7-1). OUTER TUB COVER The outer tub cover has a gasket seal embedded...and the water injector flume on the front of the outer tub. 16008373-01 SECTION 7. This is possible. Reposition the front shroud on top of the washer and secure (See Front Shroud). 8. The cover is secured ...


