

Use and Care Guide
Page 2
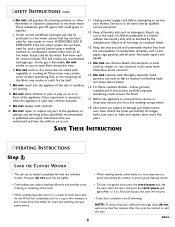
... proper operating and maintenance procedures. Never plug the appliance cord into a receptacle which is not grounded adequately and in a safe place for future reference. For service and warranty information, see page 15. Always contact your washer. RECOGNIZE SAFETY SYMBOLS, WORDS, LABELS WARNING WARNING - Install and level washer on the back door. Hand wash and line dry any equipment using electricity and having moving parts, there...
... proper operating and maintenance procedures. Never plug the appliance cord into a receptacle which is not grounded adequately and in a safe place for future reference. For service and warranty information, see page 15. Always contact your washer. RECOGNIZE SAFETY SYMBOLS, WORDS, LABELS WARNING WARNING - Install and level washer on the back door. Hand wash and line dry any equipment using electricity and having moving parts, there...
Use and Care Guide
Page 3
... to avoid overloading the washer to fabrics washed in following loads and cause skin irritation. 16. If the hot water system has not been used near children and pets. 9. Unplug power supply cord before using a washing machine or combination washer-dryer, turn on all hot water faucets and let the water flow from service or discarded, remove the lid to service your additional items get clean, do not fill the tub completely, such as...
... to avoid overloading the washer to fabrics washed in following loads and cause skin irritation. 16. If the hot water system has not been used near children and pets. 9. Unplug power supply cord before using a washing machine or combination washer-dryer, turn on all hot water faucets and let the water flow from service or discarded, remove the lid to service your additional items get clean, do not fill the tub completely, such as...
Use and Care Guide
Page 9
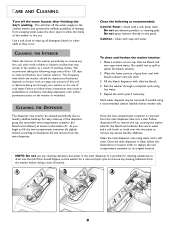
... usage, the amount of dirt, soil or bacteria being run through a complete cycle using water and a soft cloth. CLEANING THE INTERIOR Clean the interior of gray door seal with chlorine bleach. 4. Fill the bleach dispenser with bleach solution and soft cloth. 3. Follow illustration #3 to drain into the tub. Failure to follow the illustrations in illustration #1. NOTE: Do not use abrasive powders or cleaning pads. Cabinet - CLEANING THE DISPENSER To clean and freshen the washer...
... usage, the amount of dirt, soil or bacteria being run through a complete cycle using water and a soft cloth. CLEANING THE INTERIOR Clean the interior of gray door seal with chlorine bleach. 4. Fill the bleach dispenser with bleach solution and soft cloth. 3. Follow illustration #3 to drain into the tub. Failure to follow the illustrations in illustration #1. NOTE: Do not use abrasive powders or cleaning pads. Cabinet - CLEANING THE DISPENSER To clean and freshen the washer...
Use and Care Guide
Page 11
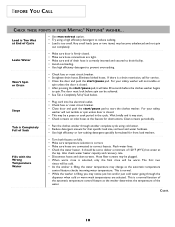
..., only the final rinse will not tumble or spin unless door is a normal function of the automatic temperature control feature as the automatic temperature control feature checks incoming water temperature. Leaks Water • Make sure door is Completely Full of Cycle • Use max extract option. • Try using cold water. • Reduce detergent amount for that specific load size, soil level and water hardness. • Use high efficiency or low sudsing detergent specially formulated for front load washers. For your safety...
..., only the final rinse will not tumble or spin unless door is a normal function of the automatic temperature control feature as the automatic temperature control feature checks incoming water temperature. Leaks Water • Make sure door is Completely Full of Cycle • Use max extract option. • Try using cold water. • Reduce detergent amount for that specific load size, soil level and water hardness. • Use high efficiency or low sudsing detergent specially formulated for front load washers. For your safety...
Use and Care Guide
Page 12
...; Be sure rubber feet are installed on leveling legs. • Weak floors can cause vibration and walking. • For information on fully. • Straighten inlet hoses. • Disconnect hoses and clean screens. Won't Tumble • Check fuse or reset circuit breaker. • Close the door and press the start /pause pad. • Turn both faucets on normal operating sounds, see page 13. Door Locked Shut; customers using TTY for the door lock mechanism to...
...; Be sure rubber feet are installed on leveling legs. • Weak floors can cause vibration and walking. • For information on fully. • Straighten inlet hoses. • Disconnect hoses and clean screens. Won't Tumble • Check fuse or reset circuit breaker. • Close the door and press the start /pause pad. • Turn both faucets on normal operating sounds, see page 13. Door Locked Shut; customers using TTY for the door lock mechanism to...
Use and Care Guide
Page 13
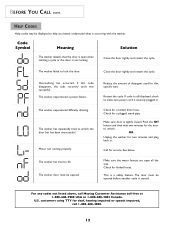
... sure door is a safety feature. For any codes not listed above, call 1-800-688-2080. 12 Motor not running properly. Check for a kinked drain hose. This is tightly closed. Close the door tightly and restart the cycle. The washer has repeatedly tried to lock the door. Call for kinked hoses. Check for service. customers using TTY for the door to make sure power cord is still displayed, check to unlock. If code is securely plugged in...
... sure door is a safety feature. For any codes not listed above, call 1-800-688-2080. 12 Motor not running properly. Check for a kinked drain hose. This is tightly closed. Close the door tightly and restart the cycle. The washer has repeatedly tried to lock the door. Call for kinked hoses. Check for service. customers using TTY for the door to make sure power cord is still displayed, check to unlock. If code is securely plugged in...
Use and Care Guide
Page 14
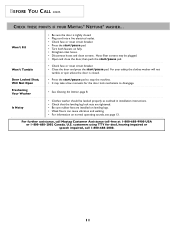
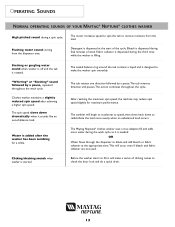
... bleach and fabric softener are not used. Flushing water sound coming from the load. Clothes washer maintains a slightly reduced spin speed after the washer has been tumbling for maximum performance. The tub rotates one direction followed by a pause, repeated throughout the wash cycle. OR Water flows through the dispenser to remove moisture from the dispenser area. OPERATING SOUNDS NORMAL OPERATING SOUNDS OF YOUR MAYTAG® NEPTUNE® CLOTHES WASHER High pitched sound during final minutes of wash. The motor increases speed to spin the tub...
... bleach and fabric softener are not used. Flushing water sound coming from the load. Clothes washer maintains a slightly reduced spin speed after the washer has been tumbling for maximum performance. The tub rotates one direction followed by a pause, repeated throughout the wash cycle. OR Water flows through the dispenser to remove moisture from the dispenser area. OPERATING SOUNDS NORMAL OPERATING SOUNDS OF YOUR MAYTAG® NEPTUNE® CLOTHES WASHER High pitched sound during final minutes of wash. The motor increases speed to spin the tub...

Use and Care Guide
Page 15
... and spin the washer may have stains on the wrinkle free cycle, and a cold rinse is used , causing oversudsing. What can I 'd like. My whites are washed on my laundry? The tub can occur with small loads, heavy items or a load in my Maytag® Neptune® washer? Q. DO NOT USE MAXEXTRACT. My laundry items seem to correct the problem? Pretreat the stains with dry, unfolded clothes. Select the hot wash/cold rinse temperature setting and...
... and spin the washer may have stains on the wrinkle free cycle, and a cold rinse is used , causing oversudsing. What can I 'd like. My whites are washed on my laundry? The tub can occur with small loads, heavy items or a load in my Maytag® Neptune® washer? Q. DO NOT USE MAXEXTRACT. My laundry items seem to correct the problem? Pretreat the stains with dry, unfolded clothes. Select the hot wash/cold rinse temperature setting and...
Use and Care Guide
Page 16
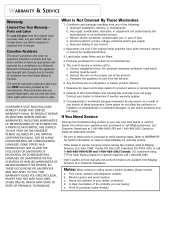
... DAMAGES. The cost of service or service call Maytag Services, LLC, Customer Assistance at 1-800-688-9900 USA and 1-800-688-2002 Canada to locate an authorized servicer. • Be sure to retain proof of charge. Instruct the user on owner's responsibilities for commercial or industrial use will be repaired or replaced free of purchase to state. THIS WARRANTY GIVES YOU SPECIFIC LEGAL RIGHTS AND YOU...
... DAMAGES. The cost of service or service call Maytag Services, LLC, Customer Assistance at 1-800-688-9900 USA and 1-800-688-2002 Canada to locate an authorized servicer. • Be sure to retain proof of charge. Instruct the user on owner's responsibilities for commercial or industrial use will be repaired or replaced free of purchase to state. THIS WARRANTY GIVES YOU SPECIFIC LEGAL RIGHTS AND YOU...
Service Manual
Page 7
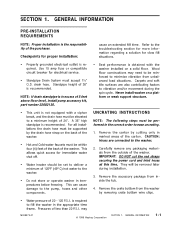
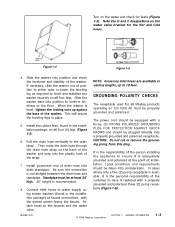
... (4) feet of the back of the washer. Never install washer on the back of the washer. • Hot and Cold water faucets must be supported by cutting only in marked areas of 20 - 120 P.S.I . IMPORTANT: DO NOT cut the red straps securing the power cord and inlet hoses at this time. may need to the pump, hoses and other components. GENERAL INFORMATION 1-1 drain hose. cause an extended fill time. Carefully remove any...
... (4) feet of the back of the washer. Never install washer on the back of the washer. • Hot and Cold water faucets must be supported by cutting only in marked areas of 20 - 120 P.S.I . IMPORTANT: DO NOT cut the red straps securing the power cord and inlet hoses at this time. may need to the pump, hoses and other components. GENERAL INFORMATION 1-1 drain hose. cause an extended fill time. Carefully remove any...
Service Manual
Page 9
... is level, tighten the locking nuts up to water supply using screen washers (found in place. 5. Then route the drain hose through the drain hose strap on the water valve bracket for leaks (Figure 1-5). Install gooseneck end of the washer. Connect inlet hoses to 10 feet. NOTE: Accessory inlet hoses are available in the installation package) at least 24" high. 36" height is not airtight between the drain hose and standpipe. The power cord should...
... is level, tighten the locking nuts up to water supply using screen washers (found in place. 5. Then route the drain hose through the drain hose strap on the water valve bracket for leaks (Figure 1-5). Install gooseneck end of the washer. Connect inlet hoses to 10 feet. NOTE: Accessory inlet hoses are available in the installation package) at least 24" high. 36" height is not airtight between the drain hose and standpipe. The power cord should...
Service Manual
Page 11
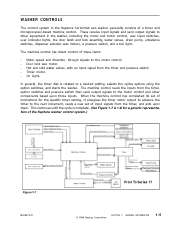
... receive input signals and send output signals to a desired setting, selects the cycles options using the option switches, and starts the washer. The machine control reads the inputs from the timer, option switches and pressure switch then send output signals to the motor control. - WASHER CONTROLS The control system in the washer, including the motor and motor control, user input switches, user indicator lights, the door latch and lock assembly, water valves, drain pump, unbalance switches, dispenser actuator wax motors, a pressure switch, and a tub light.
... receive input signals and send output signals to a desired setting, selects the cycles options using the option switches, and starts the washer. The machine control reads the inputs from the timer, option switches and pressure switch then send output signals to the motor control. - WASHER CONTROLS The control system in the washer, including the motor and motor control, user input switches, user indicator lights, the door latch and lock assembly, water valves, drain pump, unbalance switches, dispenser actuator wax motors, a pressure switch, and a tub light.
Service Manual
Page 12
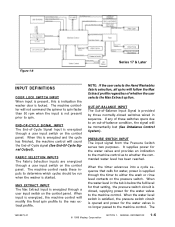
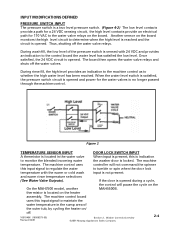
... of -balance condition, the signal will be run when the washer is provided by three normally-closed , supplying power for the water valves to either the wash or rinse level contacts on the control panel. It supplies power for water, power is energized through the timer to the machine control. When the timer advances into a cycle sequence that setting, the pressure switch circuit is locked. Figure 1-8 Series 17 & Later INPUT DEFINITIONS DOOR LOCK SWITCH INPUT...
... of -balance condition, the signal will be run when the washer is provided by three normally-closed , supplying power for the water valves to either the wash or rinse level contacts on the control panel. It supplies power for water, power is energized through the timer to the machine control. When the timer advances into a cycle sequence that setting, the pressure switch circuit is locked. Figure 1-8 Series 17 & Later INPUT DEFINITIONS DOOR LOCK SWITCH INPUT...
Service Manual
Page 13
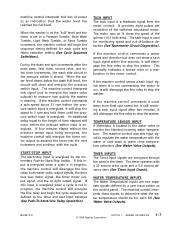
... water temperature should be for each cycle and fabric selection setting (See Cycle Sequence Definitions). The machine control uses this input signal to advance the timer into the next increment and continue with a 30 second drive cycle and a 5.8 second advance time (See Timer Input Charts). machine control interprets this loss of -balance detection (See Tachometer Circuit Diagnostics). START/STOP INPUT The start/stop the washer. The timer operates with the cycle. WATER TEMPERATURE INPUTS The Water Temperature...
... water temperature should be for each cycle and fabric selection setting (See Cycle Sequence Definitions). The machine control uses this input signal to advance the timer into the next increment and continue with a 30 second drive cycle and a 5.8 second advance time (See Timer Input Charts). machine control interprets this loss of -balance detection (See Tachometer Circuit Diagnostics). START/STOP INPUT The start/stop the washer. The timer operates with the cycle. WATER TEMPERATURE INPUTS The Water Temperature...
Service Manual
Page 36
... temperature (See Section 1:Water Temperature Inputs). Continuity should be cold regardless of temperature selection. If a switch is bad or a wire off, the machine control will not see "a change in state" whenever one or more of the upper and lower weights on the door lock enable switch in the wash cycle. Machine Operation Does Not Match Cycle Description: The machine control board monitors where the timer is in the cycle and then uses...
... temperature (See Section 1:Water Temperature Inputs). Continuity should be cold regardless of temperature selection. If a switch is bad or a wire off, the machine control will not see "a change in state" whenever one or more of the upper and lower weights on the door lock enable switch in the wash cycle. Machine Operation Does Not Match Cycle Description: The machine control board monitors where the timer is in the cycle and then uses...
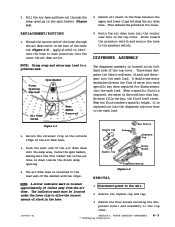
Service Manual
Page 61
..., it is down inside the drain sump opening in the hose. 1. Remove the four screws securing the dispenser bezel and assembly to the wash load. 5. REPLACEMENT/ROUTING 1. As water fills the bay, the fluid level rises. DISPENSER ASSEMBLY NOTE: Using soap and water may lead to the unit. 2. Disconnect power to a potential leak. Route toward the pressure switch and secure the hose to ease insertion into that bay...
..., it is down inside the drain sump opening in the hose. 1. Remove the four screws securing the dispenser bezel and assembly to the wash load. 5. REPLACEMENT/ROUTING 1. As water fills the bay, the fluid level rises. DISPENSER ASSEMBLY NOTE: Using soap and water may lead to the unit. 2. Disconnect power to a potential leak. Route toward the pressure switch and secure the hose to ease insertion into that bay...
Service Manual
Page 114
... (heavy, normal, light, quick, rinse, or spin), the LED shall be pressed to changing the feature. The user shall press the delay button for each with an Note: If a regular cycle has been running for hours) shall be able to select the minus (-) to set mode. The user will be shown in minutes in the main wash cycle, additional criteria may be pressed. Each Fabrics key...
... (heavy, normal, light, quick, rinse, or spin), the LED shall be pressed to changing the feature. The user shall press the delay button for each with an Note: If a regular cycle has been running for hours) shall be able to select the minus (-) to set mode. The user will be shown in minutes in the main wash cycle, additional criteria may be pressed. Each Fabrics key...
Service Manual
Page 116
... outer tub, by cycling the heater on the board. and warm rinse temperature selections (See Water Valve Outputs). Washer Controls Overview ©2001 Maytag Appliances Sales Company 2-4 When the water level switch is satisfied, the pressure switch circuit is opened . Figure 2 TEMPERATURE SENSOR INPUT DOOR LOCK SWITCH INPUT A thermistor is located in the sump area of the pressure switch is sensed with the warm or cold wash input is not present. The machine control board uses...
... outer tub, by cycling the heater on the board. and warm rinse temperature selections (See Water Valve Outputs). Washer Controls Overview ©2001 Maytag Appliances Sales Company 2-4 When the water level switch is satisfied, the pressure switch circuit is opened . Figure 2 TEMPERATURE SENSOR INPUT DOOR LOCK SWITCH INPUT A thermistor is located in the sump area of the pressure switch is sensed with the warm or cold wash input is not present. The machine control board uses...
Service Manual
Page 122
... used to monitor several screens. The service mode provides service personnel the ability to the Interactive State. The service mode can start special service tests such as a service cycle, user interface check, quick spin, and control system diagnose mode or advance the washer to navigate through several functions of the washing machine. The Diagnostic codes are turned on the keyboard. Washer Controls Overview ©2001 Maytag Appliances Sales Company 2-10 If the touch screen or any time...
... used to monitor several screens. The service mode provides service personnel the ability to the Interactive State. The service mode can start special service tests such as a service cycle, user interface check, quick spin, and control system diagnose mode or advance the washer to navigate through several functions of the washing machine. The Diagnostic codes are turned on the keyboard. Washer Controls Overview ©2001 Maytag Appliances Sales Company 2-10 If the touch screen or any time...
Service Manual
Page 143
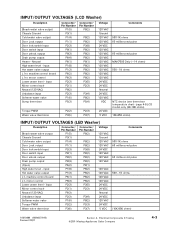
...input P8(1) P8(2) 120 VAC Door unlock output P8(2) P8(2) 120 VAC Drain pump output P8(4) P8(2) 120 VAC (Open) P6(2) P8(1) High water level - motor control P8(3) P8(2) 120 VAC Lower water level - Electrical Components & Testing ©2001 Maytag Appliances Sales Company 4-3 machine control board P6(1) P8(2) 120 VAC L1- INPUT/OUTPUT VOLTAGES (LCD Washer) Description Bleach water valve output Chassis Ground Cold water valve output Door Lock output Door lock switch input Door switch input Door unlock output Drain pump output Heater - Neutral High water level -
...input P8(1) P8(2) 120 VAC Door unlock output P8(2) P8(2) 120 VAC Drain pump output P8(4) P8(2) 120 VAC (Open) P6(2) P8(1) High water level - motor control P8(3) P8(2) 120 VAC Lower water level - Electrical Components & Testing ©2001 Maytag Appliances Sales Company 4-3 machine control board P6(1) P8(2) 120 VAC L1- INPUT/OUTPUT VOLTAGES (LCD Washer) Description Bleach water valve output Chassis Ground Cold water valve output Door Lock output Door lock switch input Door switch input Door unlock output Drain pump output Heater - Neutral High water level -


