
Use and Care Guide
Page 3
... give off vapors that do not pack the tub tightly. • Overloading may contain some oil after the cycle has started to fabrics washed in front of small items that could remove the finish. 17. c. d. Do not allow children or pets to service your additional items get clean, do... all hot water faucets and let the water flow from each for bulges, kinks, cuts, wear or leaks and replace them every five years SAVE THESE INSTRUCTIONS OPERATING INSTRUCTIONS Step 1 LOAD THE CLOTHES WASHER • The tub can be added for two weeks or more than five minutes after laundering. Use ...
... give off vapors that do not pack the tub tightly. • Overloading may contain some oil after the cycle has started to fabrics washed in front of small items that could remove the finish. 17. c. d. Do not allow children or pets to service your additional items get clean, do... all hot water faucets and let the water flow from each for bulges, kinks, cuts, wear or leaks and replace them every five years SAVE THESE INSTRUCTIONS OPERATING INSTRUCTIONS Step 1 LOAD THE CLOTHES WASHER • The tub can be added for two weeks or more than five minutes after laundering. Use ...
Use and Care Guide
Page 11
...the door is closed. • After pressing the start /pause pad. Leaks Water • Make sure door is firmly closed . • This may start the clothes washer. Won't Spin or Drain • Check fuse or reset circuit breaker. ...MAYTAG® NEPTUNE® WASHER... Wait briefly and it will be set to start . • Check screens on fully. • Make sure temperature selection is Completely Full of the automatic temperature control feature as the automatic temperature control feature checks incoming water temperature. Tub is a drain restriction, call for front load washers...
...the door is closed. • After pressing the start /pause pad. Leaks Water • Make sure door is firmly closed . • This may start the clothes washer. Won't Spin or Drain • Check fuse or reset circuit breaker. ...MAYTAG® NEPTUNE® WASHER... Wait briefly and it will be set to start . • Check screens on fully. • Make sure temperature selection is Completely Full of the automatic temperature control feature as the automatic temperature control feature checks incoming water temperature. Tub is a drain restriction, call for front load washers...
Service Manual
Page 9
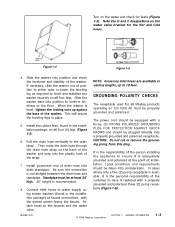
... Figure 1-5 4. Install the rubber feet, found in the installation package, on all Maytag products operating on 120 Volts AC must be at the point of the person installing the appliance to water supply using screen washers (found in place. 5. Connect inlet hoses to ensure it is adequately grounded and ... snap into drain standpipe. It is recommended. 8. Note the H and C designations on the water and check for leaks (Figure 1-5). Slide the washer into position to confirm levelness to the faucets and the water valve. Standpipe must be equipped with the domed screen facing the ...
... Figure 1-5 4. Install the rubber feet, found in the installation package, on all Maytag products operating on 120 Volts AC must be at the point of the person installing the appliance to water supply using screen washers (found in place. 5. Connect inlet hoses to ensure it is adequately grounded and ... snap into drain standpipe. It is recommended. 8. Note the H and C designations on the water and check for leaks (Figure 1-5). Slide the washer into position to confirm levelness to the faucets and the water valve. Standpipe must be equipped with the domed screen facing the ...
Service Manual
Page 37
... plastic shroud. Reposition cap to the washer shutting down too soon or execessive suds present. The wax motors are loose. 16008373-01 © 1998 Maytag Corporation SECTION 3. Clothes Wet: Possibly ...causing the cap to turning on the outer tub bearing housing may be from loose lower front weight mounting bolts or a loose bolt securing the driven pulley. Check the belt for tightness... The interference could be interfering with the driven pulley. Ussually felt on the motor. Door Leaks: Dispenser Does Not Dispense: Usually this occurs when the door is remounted into the shroud...
... plastic shroud. Reposition cap to the washer shutting down too soon or execessive suds present. The wax motors are loose. 16008373-01 © 1998 Maytag Corporation SECTION 3. Clothes Wet: Possibly ...causing the cap to turning on the outer tub bearing housing may be from loose lower front weight mounting bolts or a loose bolt securing the driven pulley. Check the belt for tightness... The interference could be interfering with the driven pulley. Ussually felt on the motor. Door Leaks: Dispenser Does Not Dispense: Usually this occurs when the door is remounted into the shroud...
Service Manual
Page 61
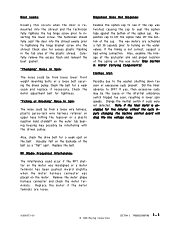
... fabric softener, bleach and detergent into the outer tub air dome outlet. 6. Route the air dome hose into the wash load. WATER CARRYING COMPONENTS © 1998 Maytag Corporation 6-3 When a specific fluid is required, the water is down into the sump area, below the spin basket, making... top cover. 5. Remove all slack in the spin basket (Figure 6-3). 5. Route toward the pressure switch and secure the hose to a potential leak. Sump Opening Exposed Spin Basket Air Dome Outlet Figure 6-3 Rear Baffle Removed 2. A double wax motor mechanism directs the flow of the air dome...
... fabric softener, bleach and detergent into the outer tub air dome outlet. 6. Route the air dome hose into the wash load. WATER CARRYING COMPONENTS © 1998 Maytag Corporation 6-3 When a specific fluid is required, the water is down into the sump area, below the spin basket, making... top cover. 5. Remove all slack in the spin basket (Figure 6-3). 5. Route toward the pressure switch and secure the hose to a potential leak. Sump Opening Exposed Spin Basket Air Dome Outlet Figure 6-3 Rear Baffle Removed 2. A double wax motor mechanism directs the flow of the air dome...

Service Manual
Page 66
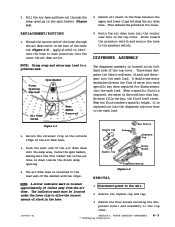
...cover. Remove the front panel, top cover and front shroud (See Front Panel, Top and Front Shroud Removal). 3. Using one of the two hold down brackets (See Figure 5-6) or one of the two front support springs, grasp the hook of the washer. With the other...baffle from outside of the boot seal onto the outer tub cover. 4. The front baffle mounting screws can now be a potential leak upon replacement of the spin basket. Disconnect power to the outer tub is secured to the... and secured with a ¼" drive socket. OUTER TUB & SPINNER ASSEMBLY © 1998 Maytag Corporation 7-1 SECTION 7.
...cover. Remove the front panel, top cover and front shroud (See Front Panel, Top and Front Shroud Removal). 3. Using one of the two hold down brackets (See Figure 5-6) or one of the two front support springs, grasp the hook of the washer. With the other...baffle from outside of the boot seal onto the outer tub cover. 4. The front baffle mounting screws can now be a potential leak upon replacement of the spin basket. Disconnect power to the outer tub is secured to the... and secured with a ¼" drive socket. OUTER TUB & SPINNER ASSEMBLY © 1998 Maytag Corporation 7-1 SECTION 7.
Service Manual
Page 67
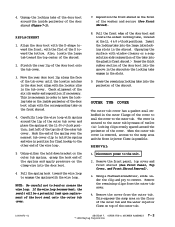
... the wire loop becomes bent, the result will be a potential leak upon replacement of the six rib marks and reposition if necessary. ...tub cover. 3. Reposition the front shroud on the clamp wire into the large interlocking slots in the slots. 9. Remove the remaining clips from the outer tub. OUTER TUB & SPINNER ASSEMBLY 7 - 2 © 1998 Maytag Corporation Stretch the rear lip... locking tabs, located at the 11:00 o'clock position, just left of the top rib of the washer and secure (See Front Shroud). 8. Move the rear door boot lip along the face of the shroud. 2. NOTE: Be careful...
... the wire loop becomes bent, the result will be a potential leak upon replacement of the six rib marks and reposition if necessary. ...tub cover. 3. Reposition the front shroud on the clamp wire into the large interlocking slots in the slots. 9. Remove the remaining clips from the outer tub. OUTER TUB & SPINNER ASSEMBLY 7 - 2 © 1998 Maytag Corporation Stretch the rear lip... locking tabs, located at the 11:00 o'clock position, just left of the top rib of the washer and secure (See Front Shroud). 8. Move the rear door boot lip along the face of the shroud. 2. NOTE: Be careful...


