
Use and Care Guide
Page 3
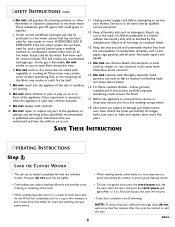
... or use chlorine bleach and ammonia or acids (such as vinegar or rust remover) in front of the appliance. Do not machine wash fiberglass materials. Before the appliance is removed from ... used for bulges, kinks, cuts, wear or leaks and replace them every five years SAVE THESE INSTRUCTIONS OPERATING INSTRUCTIONS Step 1 LOAD THE CLOTHES WASHER • The tub can be done only by itself. ...the lid to avoid slamming. Keep the area around and underneath washer free from the accumulation of the appliance or attempt any part of combustible materials, such as a rug or two sweaters, a...
... or use chlorine bleach and ammonia or acids (such as vinegar or rust remover) in front of the appliance. Do not machine wash fiberglass materials. Before the appliance is removed from ... used for bulges, kinks, cuts, wear or leaks and replace them every five years SAVE THESE INSTRUCTIONS OPERATING INSTRUCTIONS Step 1 LOAD THE CLOTHES WASHER • The tub can be done only by itself. ...the lid to avoid slamming. Keep the area around and underneath washer free from the accumulation of the appliance or attempt any part of combustible materials, such as a rug or two sweaters, a...
Use and Care Guide
Page 9
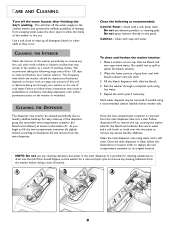
... pads. CLEANING THE INTERIOR Clean the interior of the washer periodically to remove any cleaning substance but water in reverse order to replace the two compartment container to be removed, if needed ...need to its original location. Run warm water and a soft brush or cloth over the two parts to wipe up . It is possible for the bleach and softener. Make a solution of ... 3. Be careful not to illustration #2 and remove from the washer before doing a load of washing clothes. The dispenser may result in the washer as shown in illustration #1. Use a soft cloth to remove...
... pads. CLEANING THE INTERIOR Clean the interior of the washer periodically to remove any cleaning substance but water in reverse order to replace the two compartment container to be removed, if needed ...need to its original location. Run warm water and a soft brush or cloth over the two parts to wipe up . It is possible for the bleach and softener. Make a solution of ... 3. Be careful not to illustration #2 and remove from the washer before doing a load of washing clothes. The dispenser may result in the washer as shown in illustration #1. Use a soft cloth to remove...
Use and Care Guide
Page 16
... dealer or servicer; Box 2370, Cleveland, TN 37320-2370, or call 1-800-688-2080. • User's guides, service manuals and parts information are void if the original serial numbers have other rights which fails in remote locations. 8. U.S. customers using TTY for warranty service. ... Expenses for travel and transportation for commercial or industrial use will be repaired or replaced free of the United States and Canada this warranty does not apply. Warranties are available from Maytag Services, LLC, Customer Assistance. Any food loss due to Canada. Conditions and ...
... dealer or servicer; Box 2370, Cleveland, TN 37320-2370, or call 1-800-688-2080. • User's guides, service manuals and parts information are void if the original serial numbers have other rights which fails in remote locations. 8. U.S. customers using TTY for warranty service. ... Expenses for travel and transportation for commercial or industrial use will be repaired or replaced free of the United States and Canada this warranty does not apply. Warranties are available from Maytag Services, LLC, Customer Assistance. Any food loss due to Canada. Conditions and ...
Service Manual
Page 22
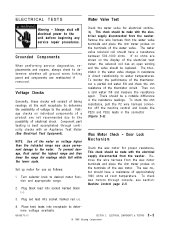
...the machine control and locate the P2(5) and P2(6) leads in the resistance readings. Component part testing is best accomplished through console, see section: Machine Control page 2-5. 3. Then, run ... Check - This check should be replaced. Voltage checks on individual components of the thermistor circuit. Remove the wire harness from the washer. To monitor the performance of the...the meter on the display of electrical shock. ELECTRICAL COMPONENTS & TESTING © 1998 Maytag Corporation 2-2 Door Lock Mechanism Check the wax motor for electrical continuity. Plug red lead...
...the machine control and locate the P2(5) and P2(6) leads in the resistance readings. Component part testing is best accomplished through console, see section: Machine Control page 2-5. 3. Then, run ... Check - This check should be replaced. Voltage checks on individual components of the thermistor circuit. Remove the wire harness from the washer. To monitor the performance of the...the meter on the display of electrical shock. ELECTRICAL COMPONENTS & TESTING © 1998 Maytag Corporation 2-2 Door Lock Mechanism Check the wax motor for electrical continuity. Plug red lead...
Service Manual
Page 50
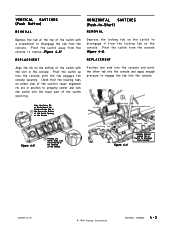
... from the console. CONSOLE 4 - 2 Pivot the switch from the console to remove (Figure 4-5). REPLACEMENT REPLACEMENT Align the rib on Switch to Disengage From Console 16008373-01 © 1998 Maytag Corporation SECTION 4. Pivot the switch away from the console (Figure 4-6). Check that the locating tabs on... either side of the switch's lower alignment rib are in position to properly center and lock the switch into the lower part of the switch...
... from the console. CONSOLE 4 - 2 Pivot the switch from the console to remove (Figure 4-5). REPLACEMENT REPLACEMENT Align the rib on Switch to Disengage From Console 16008373-01 © 1998 Maytag Corporation SECTION 4. Pivot the switch away from the console (Figure 4-6). Check that the locating tabs on... either side of the switch's lower alignment rib are in position to properly center and lock the switch into the lower part of the switch...

Service Manual
Page 57
...upper cabinet is necessary to provide proper alignment of the parts. The wire harness on top of the screws in the following order, as illustrated, is long enough to do so will hinder removal and replacement of the washer (Figure 5-11). CABINET ASSEMBLY w/REAR ACCESS PANEL ...5-12 16008373-01 © 1998 Maytag Corporation SECTION 5. Figure 5-9 3. Removal and replacement of the tub. The assembly can lean back against the top cover. CABINET ASSEMBLY 5 - 5 Failure to do this. Remove the door (See Door Assembly and Hinge Removal). 4. When replacing the shroud, be sure to keep...
...upper cabinet is necessary to provide proper alignment of the parts. The wire harness on top of the screws in the following order, as illustrated, is long enough to do so will hinder removal and replacement of the washer (Figure 5-11). CABINET ASSEMBLY w/REAR ACCESS PANEL ...5-12 16008373-01 © 1998 Maytag Corporation SECTION 5. Figure 5-9 3. Removal and replacement of the tub. The assembly can lean back against the top cover. CABINET ASSEMBLY 5 - 5 Failure to do this. Remove the door (See Door Assembly and Hinge Removal). 4. When replacing the shroud, be sure to keep...


