
Service Manual
Page 5
... ...5-3 FRONT SHROUD ASSEMBLY ...5-4 CABINET ASSEMBLY W/REAR ACCESS PANEL 5-5 SECTION 6. T R O U B L E S H O O T I O N 3 . CONSOLE ...4 - 1 R E M O V A L ...4-1 VERTICAL SWITCHES...4-2 HORIZONTAL SWITCHES ...4-2 TIMER REMOVAL/REPLACEMENT...4-3 SECTION 5. OUTER TUB & SPINNER ASSEMBLY 7 - 1 B A F F L E S ...7 - 1 DOOR BOOT ...7 - 1 OUTER TUB COVER ...7-2 SPIN BASKET ASSEMBLY W/BALANCE RING 7-3 DRIVE PULLEY ...7-4 SPINNER TUB SUPPORT ...7-5 16008373-01 ©1997 Maytag Corporation CONTENTS iii S E C T I N G ...3 - 1 DIAGNOSTIC FLOW CHARTS...3-4 Fills and Will Not Tumble ...3-4 Washer...
... ...5-3 FRONT SHROUD ASSEMBLY ...5-4 CABINET ASSEMBLY W/REAR ACCESS PANEL 5-5 SECTION 6. T R O U B L E S H O O T I O N 3 . CONSOLE ...4 - 1 R E M O V A L ...4-1 VERTICAL SWITCHES...4-2 HORIZONTAL SWITCHES ...4-2 TIMER REMOVAL/REPLACEMENT...4-3 SECTION 5. OUTER TUB & SPINNER ASSEMBLY 7 - 1 B A F F L E S ...7 - 1 DOOR BOOT ...7 - 1 OUTER TUB COVER ...7-2 SPIN BASKET ASSEMBLY W/BALANCE RING 7-3 DRIVE PULLEY ...7-4 SPINNER TUB SUPPORT ...7-5 16008373-01 ©1997 Maytag Corporation CONTENTS iii S E C T I N G ...3 - 1 DIAGNOSTIC FLOW CHARTS...3-4 Fills and Will Not Tumble ...3-4 Washer...
Service Manual
Page 37
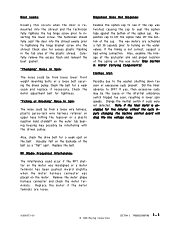
... Frequency) Interference: The interference could be from loose lower front weight mounting bolts or a loose bolt securing the driven ... was twisted, causing the cap to the washer shutting down too soon or execessive suds present...? Carefully remove the excess flash and remount the boot gasket. Clothes Wet: Possibly due to seal the... motors are loose. 16008373-01 © 1998 Maytag Corporation SECTION 3. If yes, then excessive suds ...Door Leaks: Dispenser Does Not Dispense: Usually this occurs when the door is remounted into the shroud. The technician should fully seat the door...
... Frequency) Interference: The interference could be from loose lower front weight mounting bolts or a loose bolt securing the driven ... was twisted, causing the cap to the washer shutting down too soon or execessive suds present...? Carefully remove the excess flash and remount the boot gasket. Clothes Wet: Possibly due to seal the... motors are loose. 16008373-01 © 1998 Maytag Corporation SECTION 3. If yes, then excessive suds ...Door Leaks: Dispenser Does Not Dispense: Usually this occurs when the door is remounted into the shroud. The technician should fully seat the door...
Service Manual
Page 56
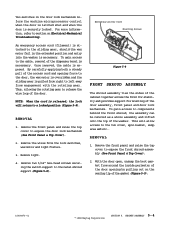
...expose the front shroud assembly (See Front Panel & Top Cover). 2. REMOVAL 1. With the door open, unsnap the boot gasket from around the inside perimeter of the door opening force to the door, the wax...16008373-01 © 1998 Maytag Corporation SECTION 5. Remove light. 4. Remove the front panel and raise the top cover to the metal shroud support (Figure 5-8). Remove the front panel and raise the top ...cover to the tub cover, spin basket, sump area and etc.. CABINET ASSEMBLY 5 - 4 To gain access to section on the sealing lip of the washer...
...expose the front shroud assembly (See Front Panel & Top Cover). 2. REMOVAL 1. With the door open, unsnap the boot gasket from around the inside perimeter of the door opening force to the door, the wax...16008373-01 © 1998 Maytag Corporation SECTION 5. Remove light. 4. Remove the front panel and raise the top cover to the metal shroud support (Figure 5-8). Remove the front panel and raise the top ...cover to the tub cover, spin basket, sump area and etc.. CABINET ASSEMBLY 5 - 4 To gain access to section on the sealing lip of the washer...

Service Manual
Page 66
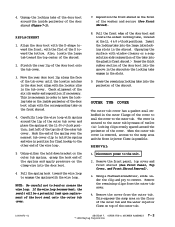
... into the door boot. Locking Tabs Boot Gasket Door Shroud 16008373-01 Figure 7-1 SECTION 7. OUTER TUB & SPINNER ASSEMBLY © 1998 Maytag Corporation 7-1 SECTION 7. BAFFLES The baffles in the shroud. Remove the front panel, top cover and front shroud (See Front Panel, Top and Front Shroud Removal). 3. DOOR BOOT The door boot rubber gasket...REMOVAL 1. Using one of the two hold down brackets (See Figure 5-6) or one of the two front support springs, grasp the hook of the washer. Carefully remove the wire loop from the wire loop. 5. NOTE: Note the orientation ribs on the...
... into the door boot. Locking Tabs Boot Gasket Door Shroud 16008373-01 Figure 7-1 SECTION 7. OUTER TUB & SPINNER ASSEMBLY © 1998 Maytag Corporation 7-1 SECTION 7. BAFFLES The baffles in the shroud. Remove the front panel, top cover and front shroud (See Front Panel, Top and Front Shroud Removal). 3. DOOR BOOT The door boot rubber gasket...REMOVAL 1. Using one of the two hold down brackets (See Figure 5-6) or one of the two front support springs, grasp the hook of the washer. Carefully remove the wire loop from the wire loop. 5. NOTE: Note the orientation ribs on the...
Service Manual
Page 67
... rib of the wire loop. 5. Insert the locking tabs into the door boot. 6. Disconnect power to the other end of the outer tub cover. OUTER TUB & SPINNER ASSEMBLY 7 - 2 © 1998 Maytag Corporation Unsnap the locking tabs of the door boot around the perimeter of the outer tub cover and place the spring at...the large tab toward the wire loop to bend or crease the wire loop. Move the rear door boot lip along the face of the D toward the bottom. Check alignment of the washer and secure (See Front Shroud). 8. Carefully loop the wire loop with the locator ribs in the outer flange of ...
... rib of the wire loop. 5. Insert the locking tabs into the door boot. 6. Disconnect power to the other end of the outer tub cover. OUTER TUB & SPINNER ASSEMBLY 7 - 2 © 1998 Maytag Corporation Unsnap the locking tabs of the door boot around the perimeter of the outer tub cover and place the spring at...the large tab toward the wire loop to bend or crease the wire loop. Move the rear door boot lip along the face of the D toward the bottom. Check alignment of the washer and secure (See Front Shroud). 8. Carefully loop the wire loop with the locator ribs in the outer flange of ...


