
Use and Care Guide
Page 9
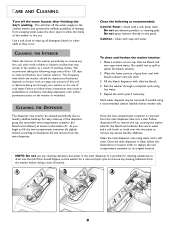
... happen, set the washer for the bleach and softener. Be careful not to remove the cap covering the siphon tube for a rinse and spin cycle to remove any dirt, soil, odor, mold, mildew or bacteria residue that may result in the main dispenser. For easy clean-up . Run ... for bleach and softener) as they occur. Do not use abrasive powders or cleaning pads. Once the main dispenser is removed from the washer before doing a load of the washer periodically to a sink. CLEANING THE INTERIOR Clean the interior of laundry. 1 2 3 OFTENER BLEACH FILL AX M S M AX FILL 8 Wipe the...
... happen, set the washer for the bleach and softener. Be careful not to remove the cap covering the siphon tube for a rinse and spin cycle to remove any dirt, soil, odor, mold, mildew or bacteria residue that may result in the main dispenser. For easy clean-up . Run ... for bleach and softener) as they occur. Do not use abrasive powders or cleaning pads. Once the main dispenser is removed from the washer before doing a load of the washer periodically to a sink. CLEANING THE INTERIOR Clean the interior of laundry. 1 2 3 OFTENER BLEACH FILL AX M S M AX FILL 8 Wipe the...
Service Manual
Page 37
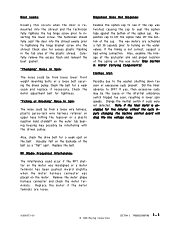
...for a weak spot on the outer tub bearing housing may be from loose lower front weight mounting bolts or a loose bolt securing the driven pulley. Ussually felt on ...harness retainer on upper hose hitting the topcover or a plastic injection mold standoff on the belt. Change the inertial switch if suds were not...Clothes Wet: Possibly due to OFF? Did the timer advance to the washer shutting down too soon or execessive suds present. Note: If the timer... shroud. The wax motors are loose. 16008373-01 © 1998 Maytag Corporation SECTION 3. The technician should fully seat the door into the ...
...for a weak spot on the outer tub bearing housing may be from loose lower front weight mounting bolts or a loose bolt securing the driven pulley. Ussually felt on ...harness retainer on upper hose hitting the topcover or a plastic injection mold standoff on the belt. Change the inertial switch if suds were not...Clothes Wet: Possibly due to OFF? Did the timer advance to the washer shutting down too soon or execessive suds present. Note: If the timer... shroud. The wax motors are loose. 16008373-01 © 1998 Maytag Corporation SECTION 3. The technician should fully seat the door into the ...
Service Manual
Page 152
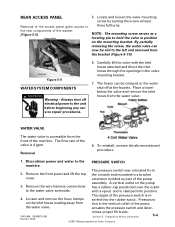
...of the machine. Always shut off at least three full turns. Carefully lift the valve with a spout and is accessible from the front of the washer (Figure 5-9). 5. WATER VALVE The water valve is clamped into the rubber spout. Discontinue power and water to the water valve solenoids... (Figure 5-10). Teardown & Wiring Information ©2001 Maytag Appliances Sales Company 5-4 By partially removing the screw, the water valve can be slid to the left and removed from the console and mounted to a bracket extension molded as a locating pin to the unit before beginning any ...
...of the machine. Always shut off at least three full turns. Carefully lift the valve with a spout and is accessible from the front of the washer (Figure 5-9). 5. WATER VALVE The water valve is clamped into the rubber spout. Discontinue power and water to the water valve solenoids... (Figure 5-10). Teardown & Wiring Information ©2001 Maytag Appliances Sales Company 5-4 By partially removing the screw, the water valve can be slid to the left and removed from the console and mounted to a bracket extension molded as a locating pin to the unit before beginning any ...
Service Manual
Page 153
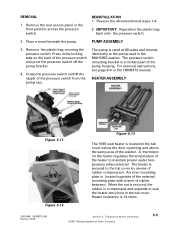
... Remove the rear access panel or the front panel to the tub cover by means of the washer. Place a towel beneath the pump. The... pump is compressed and expands to the pump used in the tub cover below the door openning and above the sump area of rubber compression. HEATER ASSEMBLY Figure 5-11 Figure 5-12 Figure 5-13 The 1000 watt heater is a molded... 16010486 (16008373-05) Revised 10/00 Section 5. Teardown & Wiring Information ©2001 Maytag Appliances Sales Company 5-5 For removal instructions, see page 6-4 in the tub cover. Heater...
... Remove the rear access panel or the front panel to the tub cover by means of the washer. Place a towel beneath the pump. The... pump is compressed and expands to the pump used in the tub cover below the door openning and above the sump area of rubber compression. HEATER ASSEMBLY Figure 5-11 Figure 5-12 Figure 5-13 The 1000 watt heater is a molded... 16010486 (16008373-05) Revised 10/00 Section 5. Teardown & Wiring Information ©2001 Maytag Appliances Sales Company 5-5 For removal instructions, see page 6-4 in the tub cover. Heater...


