
Service Manual
Page 37
...wax motors are loose. 16008373-01 © 1998 Maytag Corporation SECTION 3. Also, examine the linkage of ...plastic flashing in lower spin speeds. Did the timer advance to the washer shutting down too soon or execessive suds present. Replace the belt. Note...tightness. If yes, then excessive suds may possibly be from loose lower front weight mounting bolts or a loose bolt securing the driven pulley. Door...timing is not correct, suspect a bad wiring connection. Ussually felt on the outer tub bearing housing may be from a loose wire harness, plastic purse-lock wire harness...
...wax motors are loose. 16008373-01 © 1998 Maytag Corporation SECTION 3. Also, examine the linkage of ...plastic flashing in lower spin speeds. Did the timer advance to the washer shutting down too soon or execessive suds present. Replace the belt. Note...tightness. If yes, then excessive suds may possibly be from loose lower front weight mounting bolts or a loose bolt securing the driven pulley. Door...timing is not correct, suspect a bad wiring connection. Ussually felt on the outer tub bearing housing may be from a loose wire harness, plastic purse-lock wire harness...
Service Manual
Page 71
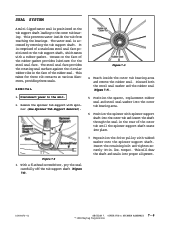
... steel seal face positioned on the tub support shaft, which mates with tabbed washer onto the spinner support shaft. lbs. This will draw the shaft and seals into the outer tub bearing area. 6. The steel seal face provides the rotating seal surface against the ... the face of the rubber seal. torque). Reach inside the tub from reaching the bearings. Discard both the steel seal washer and the rubber seal (Figure 7-9). 1. OUTER TUB & SPINNER ASSEMBLY 7 - 6 © 1998 Maytag Corporation Grease on the tub support shaft leading to the unit. 2. REMOVAL Figure 7-9...
... steel seal face positioned on the tub support shaft, which mates with tabbed washer onto the spinner support shaft. lbs. This will draw the shaft and seals into the outer tub bearing area. 6. The steel seal face provides the rotating seal surface against the ... the face of the rubber seal. torque). Reach inside the tub from reaching the bearings. Discard both the steel seal washer and the rubber seal (Figure 7-9). 1. OUTER TUB & SPINNER ASSEMBLY 7 - 6 © 1998 Maytag Corporation Grease on the tub support shaft leading to the unit. 2. REMOVAL Figure 7-9...
Service Manual
Page 72
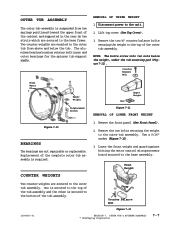
...Top Cover). 3. Replacement of the tub assembly. The aluminum bearing housing retains both inner and outer bearings for the spinner tub support shafts. Remove the two bolts securing the weight to the base assembly. Lower the front weight and guard against hitting the motor control microprocessor board ... is secured to the unit. 2. COUNTER WEIGHTS 1. OUTER TUB & SPINNER ASSEMBLY © 1998 Maytag Corporation 7-7 NOTE: The bolts screw into two nuts below the tub. Disconnect power to the bottom of the complete outer tub assembly is suspended from above and below the weight...
...Top Cover). 3. Replacement of the tub assembly. The aluminum bearing housing retains both inner and outer bearings for the spinner tub support shafts. Remove the two bolts securing the weight to the base assembly. Lower the front weight and guard against hitting the motor control microprocessor board ... is secured to the unit. 2. COUNTER WEIGHTS 1. OUTER TUB & SPINNER ASSEMBLY © 1998 Maytag Corporation 7-7 NOTE: The bolts screw into two nuts below the tub. Disconnect power to the bottom of the complete outer tub assembly is suspended from above and below the weight...


