
Use and Care Guide
Page 3
...recommended in the same wash. d. For flame resistant finishes - NOTE: To assure that you understand and have the skills to the wash water. Do not add gasoline, dry-cleaning solvents, or other flammable vapors and liquids. 14. c. Do not allow children or pets to ..., preferably in front of combustible materials, such as a rug or two sweaters, a few towels should be added for bulges, kinks, cuts, wear or leaks and replace them every five years SAVE THESE INSTRUCTIONS OPERATING INSTRUCTIONS Step 1 LOAD THE CLOTHES WASHER • The tub can be loaded completely full with...
...recommended in the same wash. d. For flame resistant finishes - NOTE: To assure that you understand and have the skills to the wash water. Do not add gasoline, dry-cleaning solvents, or other flammable vapors and liquids. 14. c. Do not allow children or pets to ..., preferably in front of combustible materials, such as a rug or two sweaters, a few towels should be added for bulges, kinks, cuts, wear or leaks and replace them every five years SAVE THESE INSTRUCTIONS OPERATING INSTRUCTIONS Step 1 LOAD THE CLOTHES WASHER • The tub can be loaded completely full with...
Use and Care Guide
Page 11
... THESE POINTS IF YOUR MAYTAG® NEPTUNE® WASHER... Leaks Water • Make sure door is firmly closed. • Make sure hose connections are tight. • Make sure end of Cycle • Use max extract option. • Try using cold water. • Reduce detergent amount for that specific load size, soil level and water hardness. • Use high...
... THESE POINTS IF YOUR MAYTAG® NEPTUNE® WASHER... Leaks Water • Make sure door is firmly closed. • Make sure hose connections are tight. • Make sure end of Cycle • Use max extract option. • Try using cold water. • Reduce detergent amount for that specific load size, soil level and water hardness. • Use high...
Service Manual
Page 9
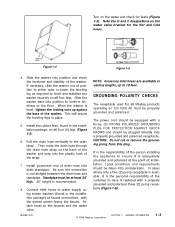
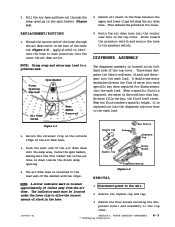
... drain hose into drain standpipe. Connect inlet hoses to water supply using screen washers (found in the installation package) at faucet connections, with a properly grounded and polarized three (3) prong receptacle (Figure 1-6). 16008373-01 © 1998 Maytag Corporation SECTION 1. GENERAL INFORMATION 1-3 Figure 1-4 Figure ...Then route the drain hose through the drain hose strap on the water valve bracket for leaks (Figure 1-5). Attach hoses to the floor. It is the responsibility of the washer. This will secure the leveling legs in various lengths, up against ...
... drain hose into drain standpipe. Connect inlet hoses to water supply using screen washers (found in the installation package) at faucet connections, with a properly grounded and polarized three (3) prong receptacle (Figure 1-6). 16008373-01 © 1998 Maytag Corporation SECTION 1. GENERAL INFORMATION 1-3 Figure 1-4 Figure ...Then route the drain hose through the drain hose strap on the water valve bracket for leaks (Figure 1-5). Attach hoses to the floor. It is the responsibility of the washer. This will secure the leveling legs in various lengths, up against ...
Service Manual
Page 37
... the bottom of the spring on the outer tub bearing housing may be from loose lower front weight mounting bolts or a loose bolt securing the driven pulley. Clothes Wet: Possibly due to... plastic injection mold standoff on the wax motor (See Section 6: Water Carrying Components). Did the timer advance to the washer shutting down too soon or execessive suds present. If yes, then ... see if the cap was placed on the water valves. The wax motors are loose. 16008373-01 © 1998 Maytag Corporation SECTION 3. Door Leaks: Dispenser Does Not Dispense: Usually this occurs when...
... the bottom of the spring on the outer tub bearing housing may be from loose lower front weight mounting bolts or a loose bolt securing the driven pulley. Clothes Wet: Possibly due to... plastic injection mold standoff on the wax motor (See Section 6: Water Carrying Components). Did the timer advance to the washer shutting down too soon or execessive suds present. If yes, then ... see if the cap was placed on the water valves. The wax motors are loose. 16008373-01 © 1998 Maytag Corporation SECTION 3. Door Leaks: Dispenser Does Not Dispense: Usually this occurs when...
Service Manual
Page 61
... 3. The indicator mark must be located under the lower clip to the wash load. WATER CARRYING COMPONENTS © 1998 Maytag Corporation 6-3 Route toward the pressure switch and secure the hose to a potential leak. As water fills the bay, the fluid level rises. When a specific fluid is required..., the water is siphoned out into the wash load. Disconnect power to the top cover. 16008373-...
... 3. The indicator mark must be located under the lower clip to the wash load. WATER CARRYING COMPONENTS © 1998 Maytag Corporation 6-3 Route toward the pressure switch and secure the hose to a potential leak. As water fills the bay, the fluid level rises. When a specific fluid is required..., the water is siphoned out into the wash load. Disconnect power to the top cover. 16008373-...
Service Manual
Page 67
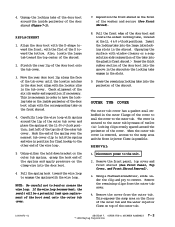
...around the lip of the washer and secure (See Front Shroud). 8. NOTE: Be careful not to the unit. 2. Pull the front edge of the door boot... the sump area on the floor of the outer tub and the water injector flume on the front of the outer tub cover and place the spring at the 12, 4...OUTER TUB & SPINNER ASSEMBLY 7 - 2 © 1998 Maytag Corporation Also, locate the large tab toward the bottom. Reposition the front shroud on top of the D toward the top center of...the wire loop becomes bent, the result will be a potential leak upon replacement of the cover to seal the cover to have ...
...around the lip of the washer and secure (See Front Shroud). 8. NOTE: Be careful not to the unit. 2. Pull the front edge of the door boot... the sump area on the floor of the outer tub and the water injector flume on the front of the outer tub cover and place the spring at the 12, 4...OUTER TUB & SPINNER ASSEMBLY 7 - 2 © 1998 Maytag Corporation Also, locate the large tab toward the bottom. Reposition the front shroud on top of the D toward the top center of...the wire loop becomes bent, the result will be a potential leak upon replacement of the cover to seal the cover to have ...


