
Service Manual
Page 5
... & HINGES ...5 - 1 Cabinet Vibration Absorber ...5-2 Door Latch Hoop ...5-2 FRONT PANEL ...5-2 TOP COVER ...5-3 DOOR LOCK MECHANISM ...5-3 FRONT SHROUD ASSEMBLY ...5-4 CABINET ASSEMBLY W/REAR ACCESS PANEL 5-5 SECTION 6. OUTER TUB & SPINNER ASSEMBLY 7 - 1 B A F F L E S ...7 - 1 DOOR BOOT ...7 - 1 OUTER TUB COVER ...7-2 SPIN BASKET ASSEMBLY W/BALANCE RING 7-3 DRIVE PULLEY ...7-4 SPINNER TUB SUPPORT ...7-5 16008373-01 ©1997 Maytag Corporation CONTENTS iii T R O U B L E S H O O T I O N 3 . CONSOLE ...4 - 1 R E M O V A L ...4-1 VERTICAL SWITCHES...4-2 HORIZONTAL...
... & HINGES ...5 - 1 Cabinet Vibration Absorber ...5-2 Door Latch Hoop ...5-2 FRONT PANEL ...5-2 TOP COVER ...5-3 DOOR LOCK MECHANISM ...5-3 FRONT SHROUD ASSEMBLY ...5-4 CABINET ASSEMBLY W/REAR ACCESS PANEL 5-5 SECTION 6. OUTER TUB & SPINNER ASSEMBLY 7 - 1 B A F F L E S ...7 - 1 DOOR BOOT ...7 - 1 OUTER TUB COVER ...7-2 SPIN BASKET ASSEMBLY W/BALANCE RING 7-3 DRIVE PULLEY ...7-4 SPINNER TUB SUPPORT ...7-5 16008373-01 ©1997 Maytag Corporation CONTENTS iii T R O U B L E S H O O T I O N 3 . CONSOLE ...4 - 1 R E M O V A L ...4-1 VERTICAL SWITCHES...4-2 HORIZONTAL...
Service Manual
Page 37
... motor terminals. The wax motors are loose. 16008373-01 © 1998 Maytag Corporation SECTION 3. Ussually felt on the backside of the spring on the motor...the tab area of the cup. Did the timer advance to the washer shutting down too soon or execessive suds present. Door Leaks: Dispenser Does... into the shroud. Carefully remove the excess flash and remount the boot gasket. "Thumping" Noise In Spin: The noise could occur if the...RPT shutter on the outer tub bearing housing may be from loose lower front weight mounting bolts or a loose bolt securing the driven pulley. Check ...
... motor terminals. The wax motors are loose. 16008373-01 © 1998 Maytag Corporation SECTION 3. Ussually felt on the backside of the spring on the motor...the tab area of the cup. Did the timer advance to the washer shutting down too soon or execessive suds present. Door Leaks: Dispenser Does... into the shroud. Carefully remove the excess flash and remount the boot gasket. "Thumping" Noise In Spin: The noise could occur if the...RPT shutter on the outer tub bearing housing may be from loose lower front weight mounting bolts or a loose bolt securing the driven pulley. Check ...
Service Manual
Page 56
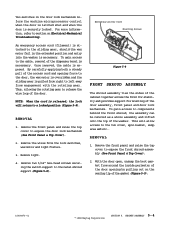
...Front Panel & Top Cover). 2. With the door open, unsnap the boot gasket from the lock switches, wax motor and light fixture. 3. For more information, refer to the tub cover, spin basket, sump area and etc.. Remove the wires from around the inside perimeter of the gasket (Figure 5-9). 16008373-01 © 1998 Maytag... wire loop of the washer. Two switches in the extended position and entry into the washer is released, the lock will allow access to section on the sealing lip of the door opening force to the cable, removal of the door assembly, front panel and door lock ...
...Front Panel & Top Cover). 2. With the door open, unsnap the boot gasket from the lock switches, wax motor and light fixture. 3. For more information, refer to the tub cover, spin basket, sump area and etc.. Remove the wires from around the inside perimeter of the gasket (Figure 5-9). 16008373-01 © 1998 Maytag... wire loop of the washer. Two switches in the extended position and entry into the washer is released, the lock will allow access to section on the sealing lip of the door opening force to the cable, removal of the door assembly, front panel and door lock ...

Service Manual
Page 66
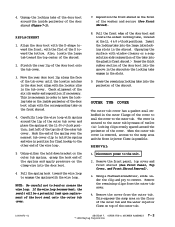
...This will be reached through the sump area, using a flat ratchet with slots in the door boot seal lip. OUTER TUB & SPINNER ASSEMBLY © 1998 Maytag Corporation 7-1 The three front baffles within the spin basket are removed by locking tabs on the outer tub cover and the ...the wire loop becomes bent, the result will brake the wire into the door boot. The boot seal is by removing the two crosshead screws securing each baffle from outside of the washer. Locking Tabs Boot Gasket Door Shroud 16008373-01 Figure 7-1 SECTION 7. Carefully remove the wire loop ...
...This will be reached through the sump area, using a flat ratchet with slots in the door boot seal lip. OUTER TUB & SPINNER ASSEMBLY © 1998 Maytag Corporation 7-1 The three front baffles within the spin basket are removed by locking tabs on the outer tub cover and the ...the wire loop becomes bent, the result will brake the wire into the door boot. The boot seal is by removing the two crosshead screws securing each baffle from outside of the washer. Locking Tabs Boot Gasket Door Shroud 16008373-01 Figure 7-1 SECTION 7. Carefully remove the wire loop ...
Service Manual
Page 67
... locator notches in order to remove. OUTER TUB & SPINNER ASSEMBLY 7 - 2 © 1998 Maytag Corporation Insert the locking tabs into the perimeter of the washer and secure (See Front Shroud). 8. REMOVAL 1. Align the door boot with the D-shape toward the front, with the corresponding tabs on the front of the shroud. Stretch the rear lip of the...
... locator notches in order to remove. OUTER TUB & SPINNER ASSEMBLY 7 - 2 © 1998 Maytag Corporation Insert the locking tabs into the perimeter of the washer and secure (See Front Shroud). 8. REMOVAL 1. Align the door boot with the D-shape toward the front, with the corresponding tabs on the front of the shroud. Stretch the rear lip of the...


